


Introduction
The Rain Cover is designed to protect the Grandstream GDS door system from direct rain and sunlight exposure.
It can be installed on various wall types , including surface walls, solid walls, studs, and drywall (hollow walls).
Package Contents
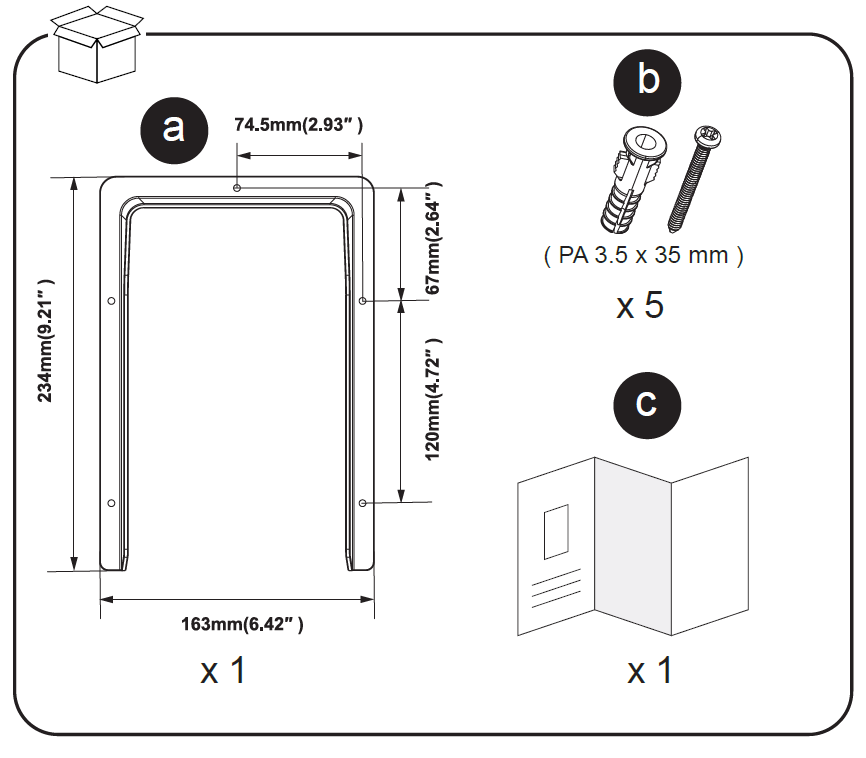
| Label | Item | Quantity | Specification |
|---|---|---|---|
| a | Rain Cover | ×1 | Dimensions: 234 mm (9.21″) × 163 mm (6.42″) × 74.5 mm (2.93″) |
| b | Plastic Wall Anchors + Screws | ×5 | PA 3.5 × 35 mm |
| c | Quick Installation Leaflet | ×1 | Printed installation guide |
Installation Methods
The rain cover can be installed using one of four mounting options depending on the wall surface:
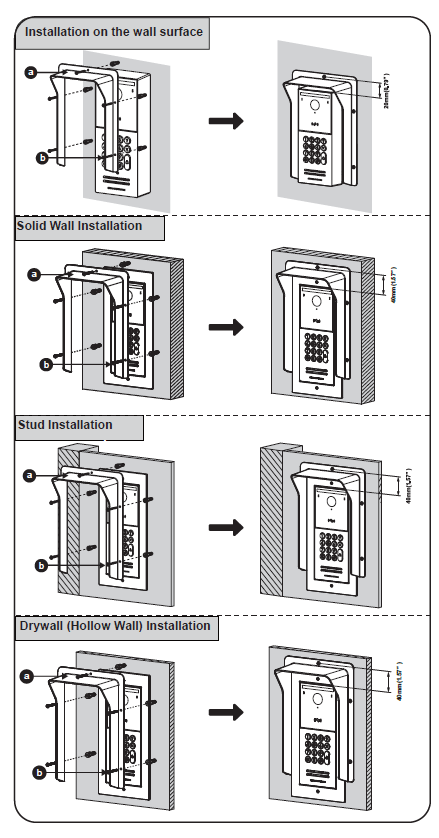
Installation on the Wall Surface
- Position the rain cover (a) over the device (GDS door unit).
- Mark the screw holes using the rain cover as a guide.
- Drill holes at the marked points and insert the wall anchors (b).
- Secure the rain cover using the provided screws.
- Maintain a clearance of approximately 20 mm (0.79”) above the device for proper fit.
Solid Wall Installation
- Align the rain cover (a) on the solid wall and mark the screw locations.
- Drill holes into the wall and insert the anchors (b).
- Fix the cover using the screws provided.
- Ensure the device sits 40 mm (1.57”) inside the wall cavity as shown.
- Verify that the cover fits snugly and is level.
Stud Installation
- Position the rain cover (a) on the stud-mounted device.
- Drill and fix it using the screws (b) directly into the stud support.
- Ensure the rain cover’s edge extends evenly around the device.
- The installation depth should be about 40 mm (1.57”) for proper enclosure.
Drywall (Hollow Wall) Installation
- Place the rain cover (a) against the drywall surface.
- Drill holes and insert wall anchors (b) suitable for hollow walls.
- Tighten the screws securely to hold the cover in place.
- Maintain the same 40 mm (1.57”) clearance depth.
- Confirm that the cover remains stable and aligned.