
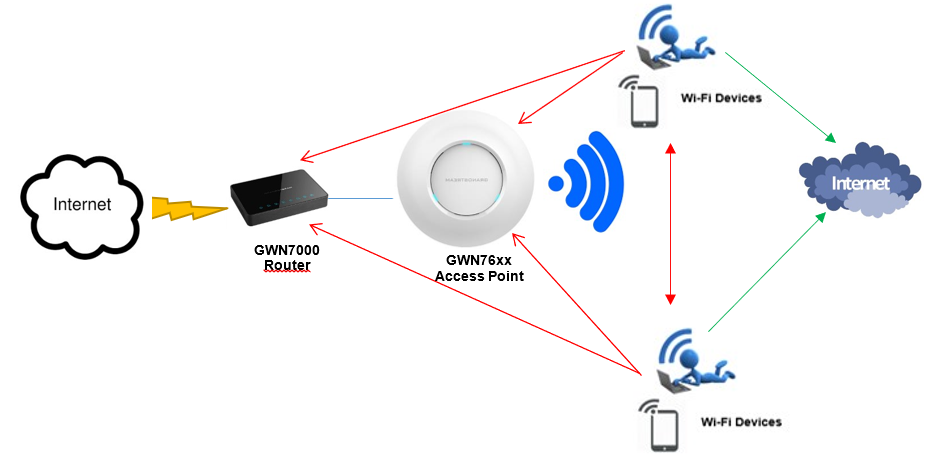
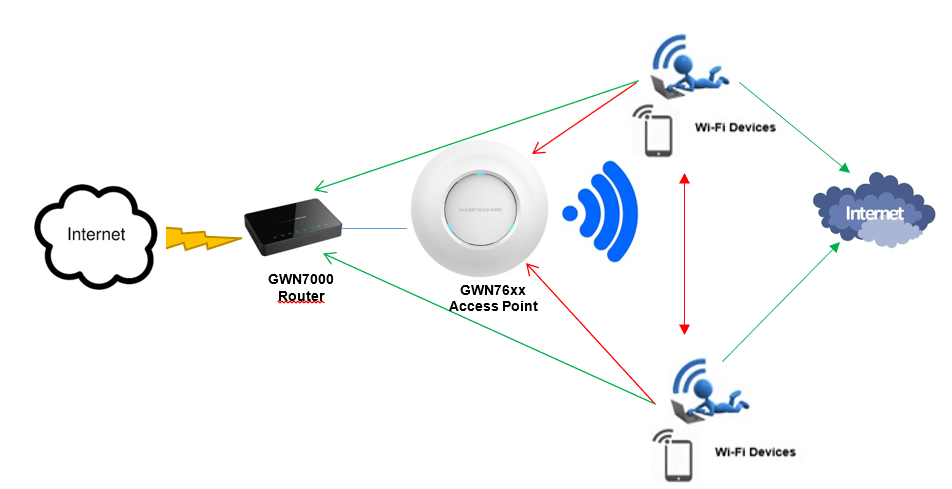
GWN76xx Access Points support client isolation feature with different types allowing users to better manage access to their WiFi networks.
In environments where WiFi access needs to be provided to clients but with some restrictions/control, such as allowing them to access Internet without accessing other Wireless devices, providing Internet access but restricting access to management devices (GWN76xx access points and GWN7000 routers), the GWN76xx Client Isolation is the best solution to meet such requirements.
Without client isolation, anyone on a wireless internet connection in a Wi-Fi hotspot will have full access to the various wireless devices connected to Wi-Fi network at that time.
GWN76xx Client Isolation feature can be used for each WiFi network SSID created allowing to define for instance a WiFi network for production without restriction and another WiFi network for guests restricting access to network resources but allowing Internet access only.
This guide covers supported mode for GWN76xx Client Isolation and needed steps to configure them.
CLIENT ISOLATION MODES
GWN76xx Client Isolation feature supports 3 modes:
- Internet Mode: Wireless clients will be allowed to access only the internet services and they cannot access any of the management services, either on the router nor the GWN76xx access points.
- Gateway MAC Mode: Wireless clients can only communicate with the gateway, the communication between Wireless clients is blocked and they cannot access any of the management services on the GWN76xx access points.
- Radio Mode: Wireless clients can access to the internet services, GWN7000 router and the access points GWN76xx but they cannot communicate with other Wireless clients.
CLIENT ISOLATION CONFIGURATION
In this chapter, we assume the following:
- We will add SSID GWN_Guest.
- Client Isolation will be applied on GWN_Guest SSID.
Client Isolation – Internet Mode
Using Internet Mode, Wireless clients will be allowed to access only the internet services and they cannot access any of the management services, either on the router GWN7000 nor the access points GWN76xx.
To configure your WiFi network with the isolation mode set to “Internet mode”, refer to following steps:
- Access the Master GWN76xx using the administrator username and password. (Default admin/Default WiFi password).
- Access to SSIDs.
- Click
 to create a new SSID.

- Navigate to Wi-Fi tab and configure your SSID with its security mode and set client isolation to “Internet” as displayed on the following screenshot.
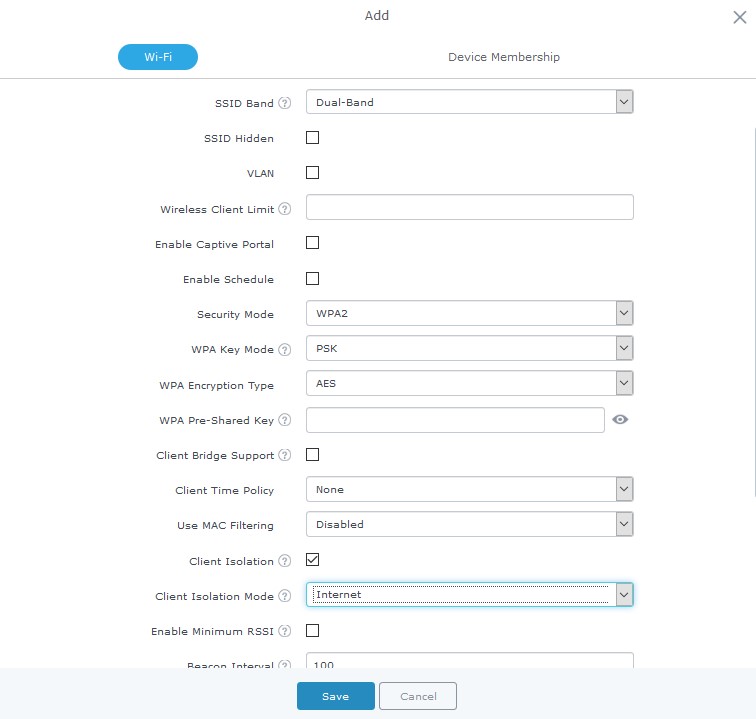
- Press Save button to save and apply the new settings.
Client Isolation – Radio Mode
Using Radio Mode, Wireless clients will be able to access to the internet services, GWN7xxx router and the access points GWN76xx but they cannot communicate with each other.

To configure your WiFi network with the isolation mode set to “Radio Mode”, please refer to following steps:
- Access the Master GWN76xx using the administrator username and password. (Default admin/Default WiFi password).
- Access to SSIDs.
- Click to create a new SSID.
- Navigate to Wi-Fi tab and configure your SSID with its security mode and set client isolation to “Radio Mode” as displayed on the following screenshot.
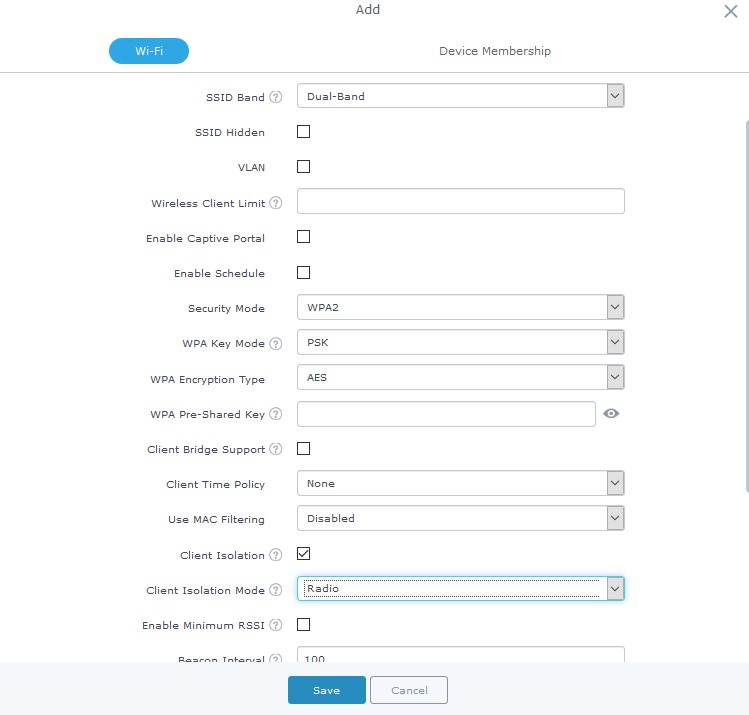
- Press Save button to save and apply the new settings.
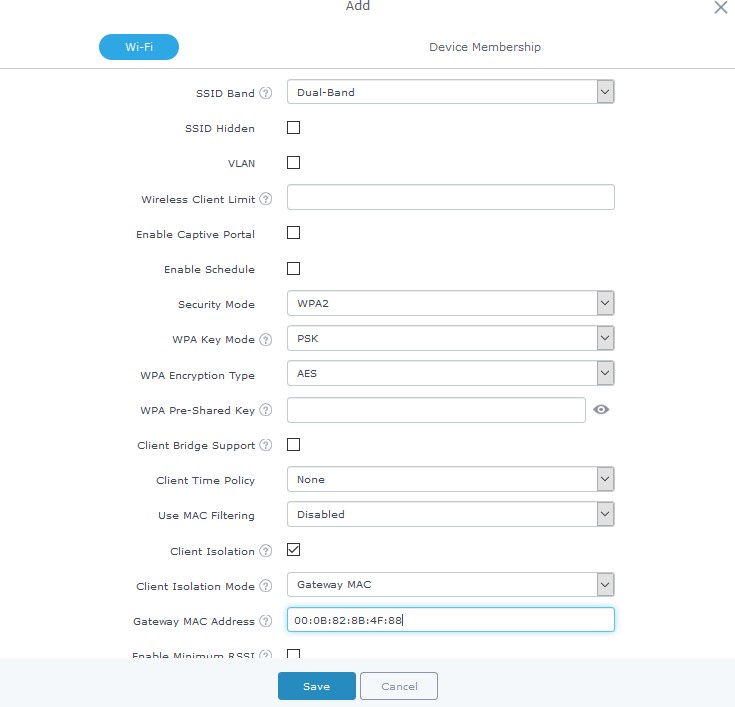
Client Isolation – Gateway MAC Mode
Using Gateway Mode, Wireless clients can only communicate with the gateway and access to network services, the communication between clients is blocked and they cannot access any of the management services on the GWN76xx access points.
To configure your WiFi network with the isolation mode set to “Gateway MAC mode”, please refer to following steps:
- Access the Master GWN76xx using the administrator username and password. (Default admin/Default WiFi password).
- Access to SSIDs.
- Click to create a new SSID.

- Navigate to Wi-Fi tab and configure your SSID with its security mode and set client isolation to “Gateway MAC” as displayed on the following screenshot.
- Specify the default LAN Gateway Mac address. In this scenario, GWN7000 router MAC address to allow access to the router and Internet.
- Press Save button to save and apply the new settings.