Overview
Live Chat feature is an online customer service solution that allows website visitors to directly create instant messaging sessions or make calls to customer service staff. This will help visitors contact you to solve their problems or learn more about your services, easily connecting all of your customers.
The integration method of the Live Chat feature is very simple. You can simply integrate the link of the Live Chat feature to your website.
Applicable Scenarios:
- Website Customer Service: Integrate customer service entry to your official website, e-commerce platform, products website, etc.
- Hotel Room Customer Service: Provide a live chat QR code in the room, allow customers to scan the QR code, and contact the customer service staff.
- Social Media Customer Service: Provide a customer service link or QR code in your email, Facebook, Twitter, Ins, and other messages.
- Product After-sales: Provide customer service QR code in your hardware products or software products, and customers can scan it for free to contact after-sales service staff.
Learn more about his service: https://ucmrc.gdms.cloud/customer
Configure Live Chat on UCM
You need to create a Live Chat on your UCM and configure it.
Prerequisites: You have purchased a UCMRC plan for your UCM device.
- The administrator can log in to the Web UI of the UCM, and find the “Live Chat” configuration page under the “Message” tab:
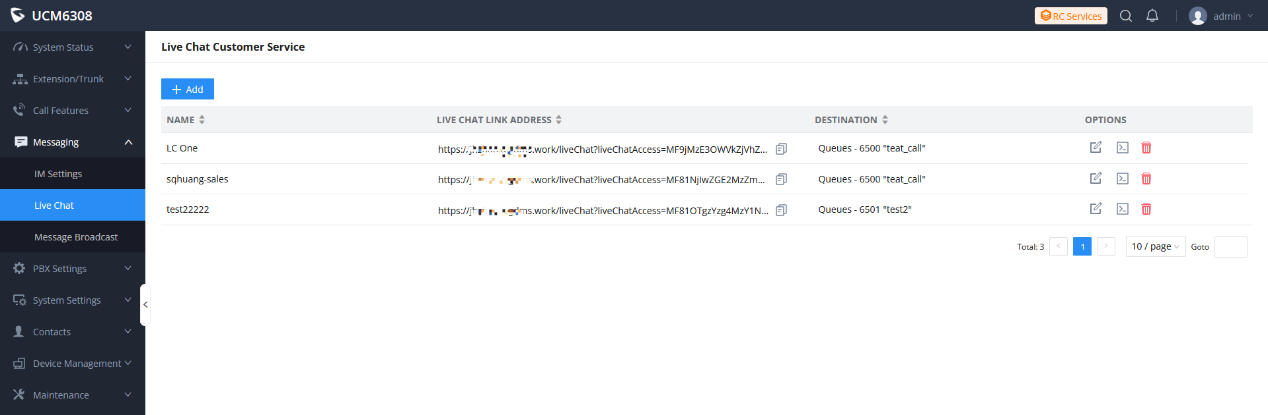
2. Click the “Add” button to create a “Live Chat”:
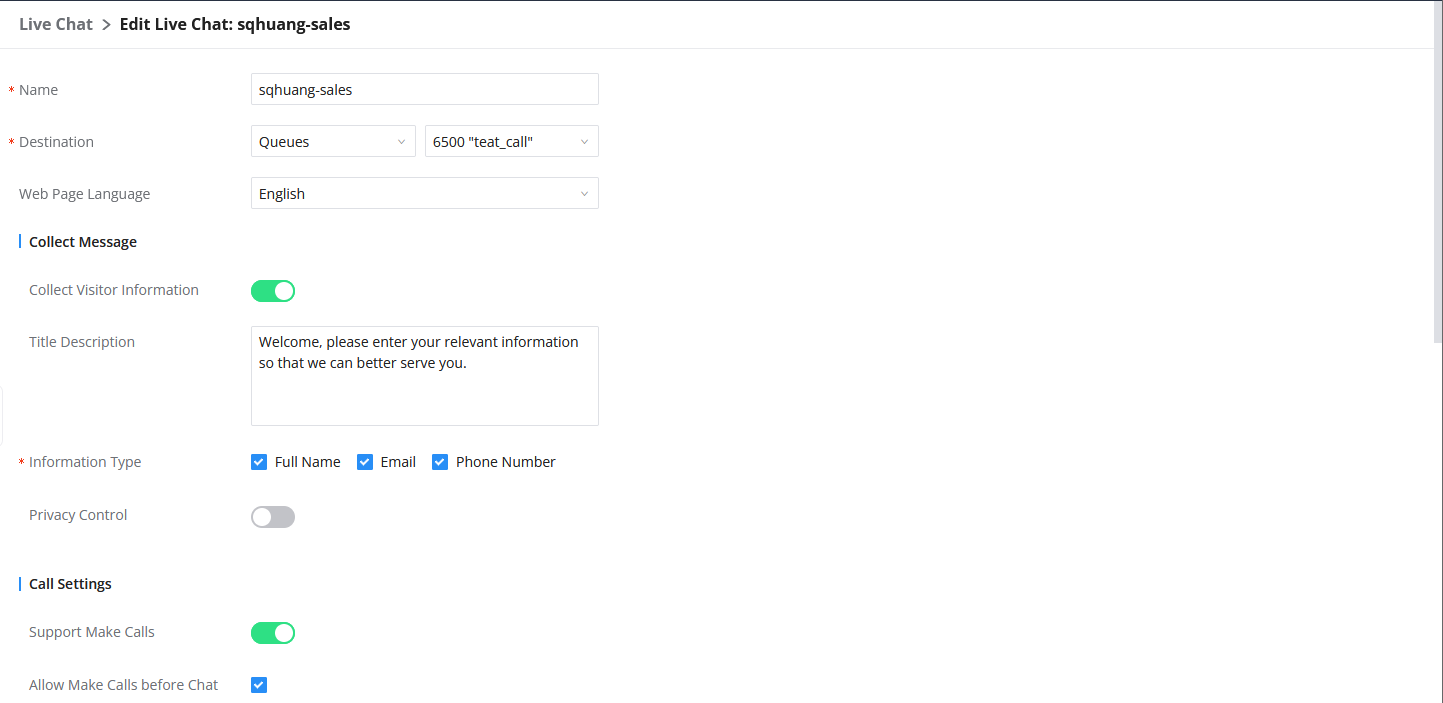
Name | Fill in the name of the Live Chat. It will be displayed on the chat session page of the agent (customer service), and the agent will know which Live Chat the visitor is accessing through. |
Destination | Select the destination number, which is the extension or queue number of this Live Chat (receiving message). |
Web Page Language | Select the display language on the visitor’s Live Chat interface. |
Collect Message | |
Collect Visitor Information | Select whether to collect visitors’ information. |
Title Description | If you want to collect visitors’ information, you will need to fill in the descriptions. This information is displayed on visitor’s interface. |
Information Type | You can select the following information to collect. If selected, visitors must fill in the selected information before chatting or making calls:
|
Privacy Control | Select this option if your customers are privacy conscious. After selecting this option, visitors must agree to this agreement before chatting and making calls. |
Privacy Control Notice Description | Fill in the privacy policy you want to declare. |
Call Settings | |
Support Make Calls | Select whether to allow visitors to make calls. |
Allow Make Calls before Chat | Select whether to allow visitors to make phone calls before an agent (customer service) receive the session. |
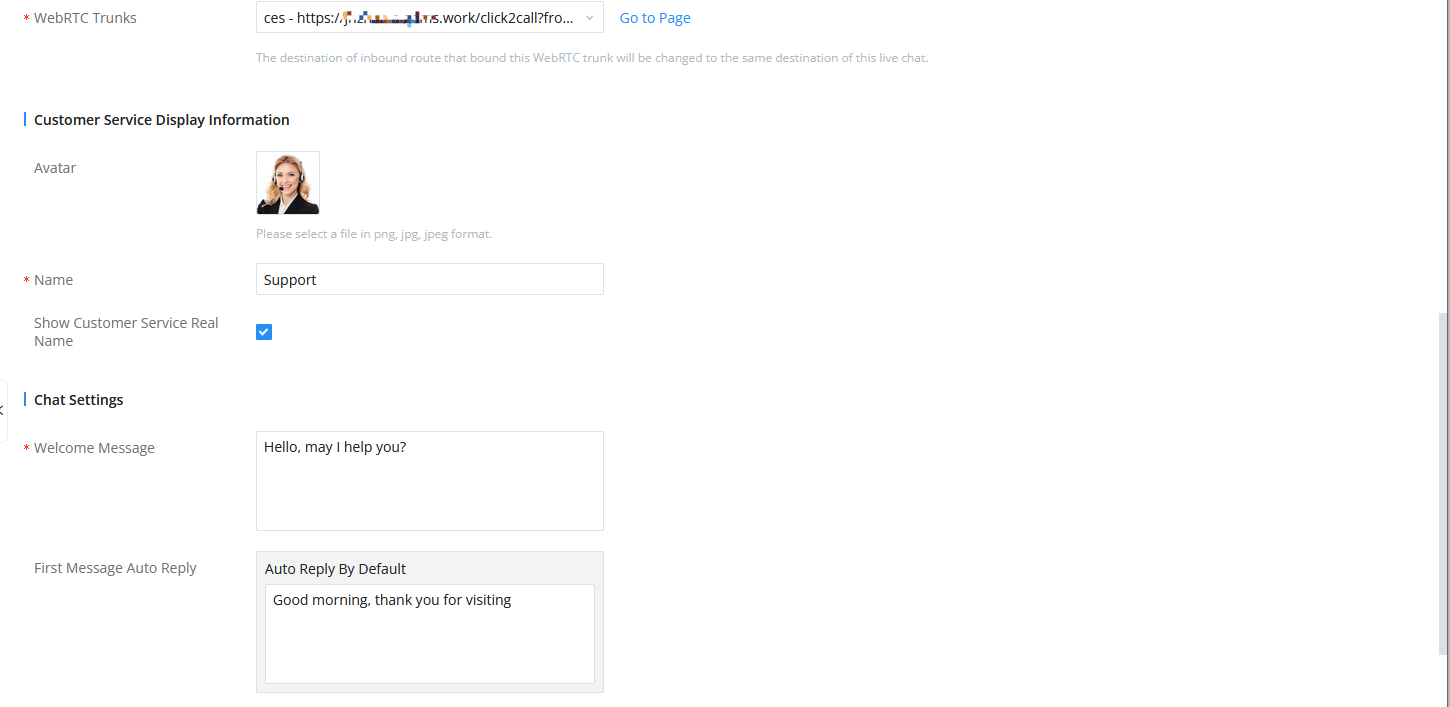
WebRTC Trunks | Select the WebRTC trunk of the phone customer service which is applicable. You can create it in Extension/Trunk -> WebRTC Trunk in advance. It is recommended that the destination number of the WebRTC Trunk be the same as the destination number of the live chat, so that after transferring the chat to a call the receiver will be the same agent. |
Customer Service Display Information | |
Avatar | Select the profile picture that visitors will see. You can upload a picture or use the default picture. |
Name | Fill in the name of the agent that visitors will see. |
Show Customer Service Real Name | Select whether to display the extension name of the agent |
Chat Settings | |
Welcome Message | Fill in the display welcome message when visitors start chatting. |
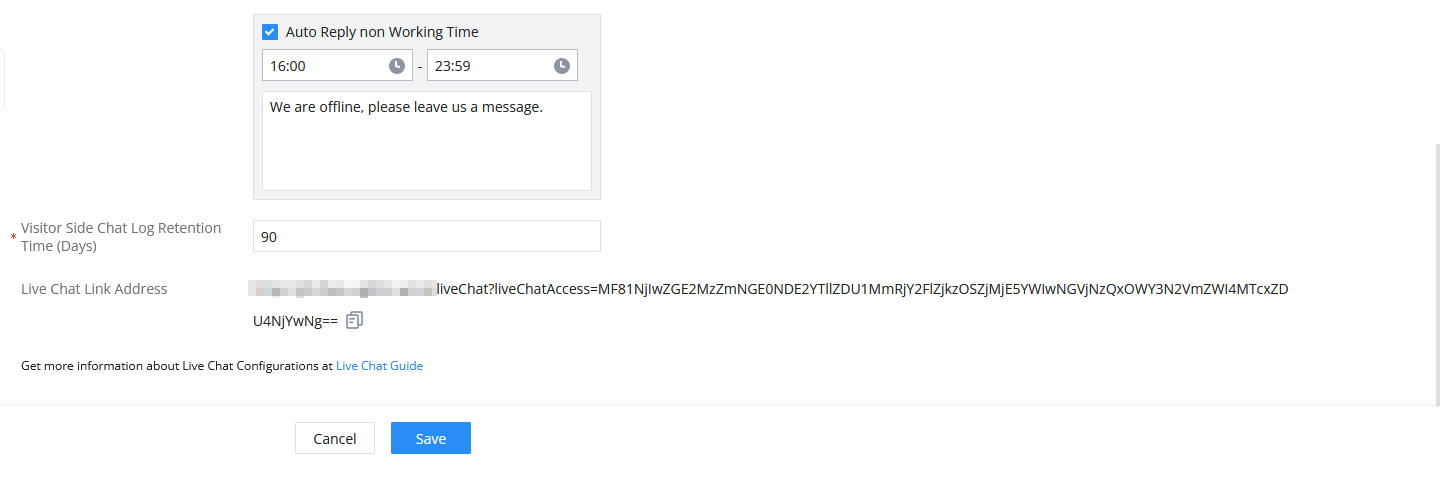
First Message Auto Reply | You can set the auto reply message contents after the visitor sends the 1st message. You can set the default reply contents or customize the reply contents for a certain period of time. For example, you can set to auto reply to the 1st message with the default contents for working hours, and the custom contents for off-work hours. |
Visitor Side Chat Log Retention Time (Days) | When the session ends, the visitor can view the chat history during this configured period. After this time, the chat history cannot be viewed. Note: If the session never ends, the visitor will always see the chat history. |
3. After creating the Live Chat successfully, you can get a link to the Live Chat, or click to copy the code of the Live Chat, and embed it into your own website.
Example:
https://xxxx.a.gdms.work/liveChat/?liveChatAccess=xxxxxx&name=xxx&email=xxxx&phoneNumber=xxxx
Security Settings: If you need to control the access security of the Live Chat feature, you can set “Live Chat Message Attack Defense” in “Security Settings” -> “Fail2Ban”:

Max Retries | Set the times for the same IP address to access the Live Chat web page during the configured time. |
Max Retry Duration | Set the duration that limits the number of times to access the Live Chat web page from the same IP address. |
Integrate Live Chat On Website
The chat feature and call feature in the Live Chat feature are compatible with browsers on PCs and mobile devices. It can be integrated anywhere.
There are 2 integration methods:
- Method 1:
You can copy this link to your website, email, or any messages. Your customers will be able to create instant chats for messaging or make calls through this link:

After integration:

- Method 2:
You can click the Live Chat icon ![]() to copy the code or download the Javascript code file:
to copy the code or download the Javascript code file:

After embedding into your website, an online chat entrance will be generated in the lower right corner of the website. Visitors can click to see the Live Chat interface. Please refer to the screenshot below:
Create Sessions or Make Calls (by Visitors)
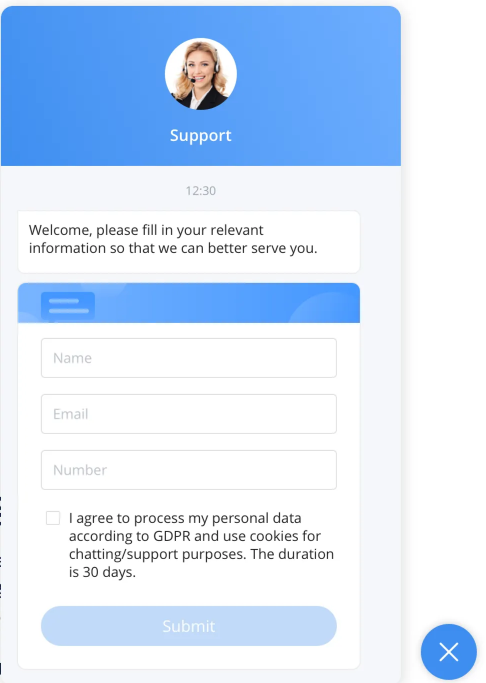
Visitors can tap to view the interface below through your integrated Live Chat entrance on PCs and mobile devices.
If you have configured the option “Collect Visitor Information” for your Live Chat, visitors must enter the corresponding information before sending messages and making calls.

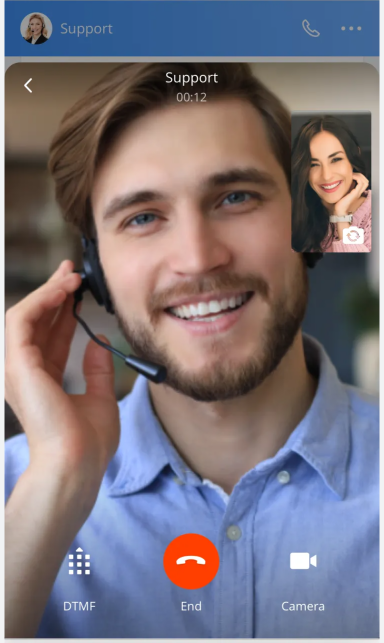
If you have configured it to allow making calls in live chat, your customers will see a call button ![]() at the top of the live chat interface. After clicking this button, the customer can make a call to the live chat’s configured destination number, and it will call the customer service number of the session receiver first.
at the top of the live chat interface. After clicking this button, the customer can make a call to the live chat’s configured destination number, and it will call the customer service number of the session receiver first.
Note: If the WebRTC Trunk has been configured to allow video calls, customers will see the button![]() , and customers can tap to turn on the camera for video calls.
, and customers can tap to turn on the camera for video calls.

Reply to Live Chat on Wave (by Customer Service)
Agents can receive Live Chat messages from visitors after logging in to the Wave Desktop application or Wave Web client, and agents can reply to messages directly through Wave.
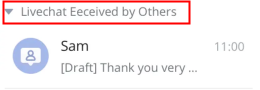
- After receiving messages, agents can click the “Reception” button or send a message to receive a visitor for this live chat and a visitor’s session can only be processed by one Wave agent.

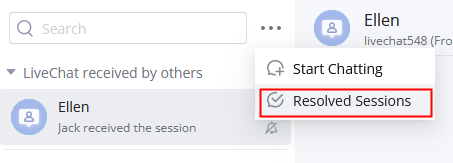
Note: In the reception queue, other service staff can also view the session and reply to the message. You can also expand this list to see sessions processed by other agents:
2. After customer service receives the session, the action button will appear in the upper right corner of the chat:

Options on the right upper corner of the chat window.
![]() : The user can click this option to view the CRM contact corresponding to this phone number. This entrance can be seen only if the user has installed and logged into the CRM.
: The user can click this option to view the CRM contact corresponding to this phone number. This entrance can be seen only if the user has installed and logged into the CRM.
![]() : The user can click this option to forward the session to another Wave client user. After forwarding the session, the user will exit this session, and the other Wave client user will continue chatting with this visitor.
: The user can click this option to forward the session to another Wave client user. After forwarding the session, the user will exit this session, and the other Wave client user will continue chatting with this visitor.
![]() : The user can click this option to mark this session as processed, which means the visitor’s problem has been resolved, and the session will be deleted from the session list.
: The user can click this option to mark this session as processed, which means the visitor’s problem has been resolved, and the session will be deleted from the session list.
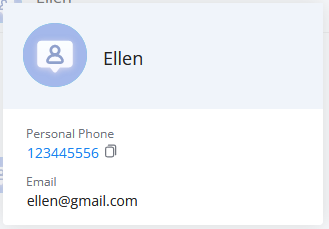
![]() : You can click the profile picture of a visitor to view the information about the visitor. You cannot view the details if you have not configured the feature “Collect Visitor Information” for live chat.
: You can click the profile picture of a visitor to view the information about the visitor. You cannot view the details if you have not configured the feature “Collect Visitor Information” for live chat.
View Resolved Live Chat Sessions
You can view all live chat sessions in your queue, including those hosted by yourself and others.
- You can click the button
 in the upper right corner of the session list to view resolved live chat sessions:
2. The following screenshot shows a list of resolved sessions. The search feature has been supported.

Answer Calls (by Customer Service)
Customer service staff can log into the Wave Desktop application or web client, and receive calls from visitors, as well as video calls (The WebRTC trunk of the live chat allows making video calls).


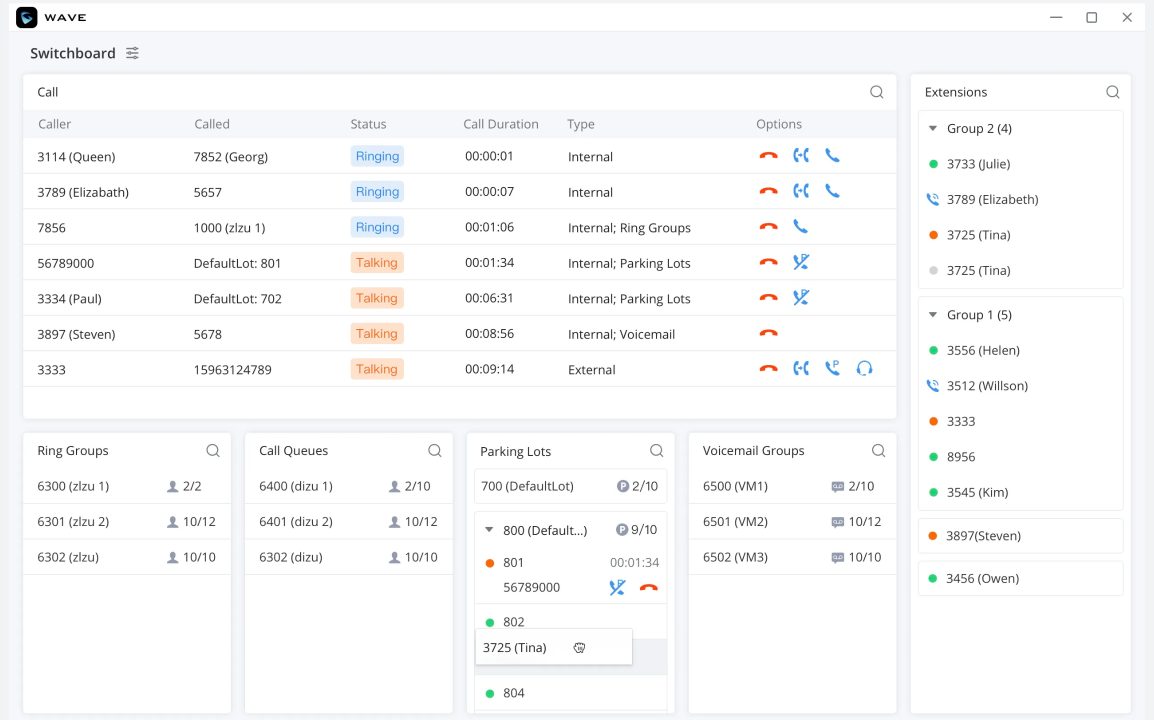
If you have more than one customer service staff and more calls, you can use the “Switchboard” feature:
Learn more about Live Chat: