


Overview
This guide explains how to configure a Grandstream captive portal to authenticate visitors using their Microsoft work or school accounts. It covers the complete setup, from creating and configuring the required Microsoft application to configuring the captive portal and completing the visitor sign-in process.
The guide is divided into two parts. Part 1 covers the one-time configuration of the Microsoft application. Part 2 covers the captive portal configuration, providing two deployment options: configuring the portal through the primary AP’s local web interface, or through a management platform, using GDMS Networking as an example. The management-platform method includes an additional splash-page configuration, but both methods provide visitors with the same Microsoft sign-in experience.
How It Works
The visitor selects Connect With Microsoft on the portal. Microsoft handles the account sign-in, then returns the visitor to the portal using the application’s registered redirect URI. After successful authentication, the access point allows the visitor to access the network.
Before You Begin
Prepare a Grandstream access point with working internet connectivity, access to its management interface, and a Microsoft organizational account that can register an application. An administrator must be available to approve the requested permissions when required. Keep the application credentials available for the captive portal configuration.
Part 1: Prepare the Microsoft Application
Register the Application
- Sign in to the Microsoft Entra admin center using an account permitted to register applications in your organization.
- Open Entra ID > App registrations > New registration.
- Enter a recognizable name, such as Guest Wi-Fi. This identifies the application to visitors during permission approval.
- For visitors from different organizations, select Accounts in any organizational directory (Multi-tenant). In the newer Authentication interface, this is shown as Multiple Entra ID tenants with Allow all tenants.
- Set the redirect platform to Web and enter the return address shown below, then select Register. If the application already exists, add the Web redirect URI under Authentication.
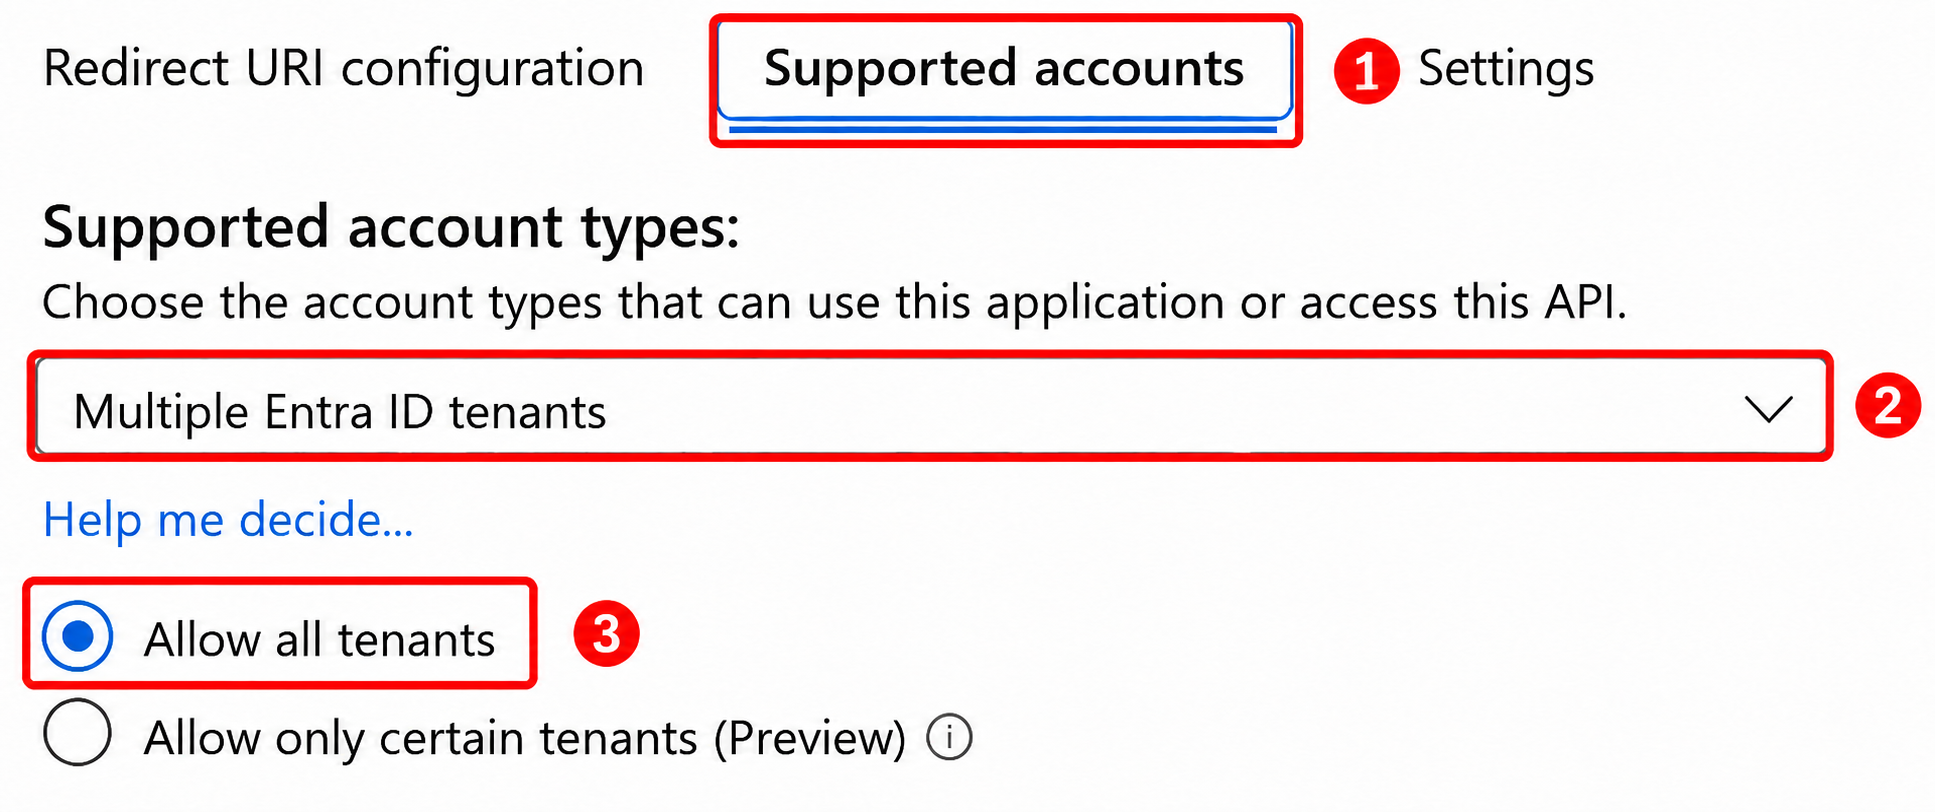
This configuration accepts Microsoft work or school accounts. Each visitor organization can still require administrator approval. Personal Microsoft accounts are not supported by this query-based redirect configuration; do not select a personal-account audience.
Configure the Return Address
For the local access point used in this guide, register the following exact Web redirect URI:
https://cwp.gwnportal.cloud:8443/GsUserAuth.cgi?GsUserAuthMethod=6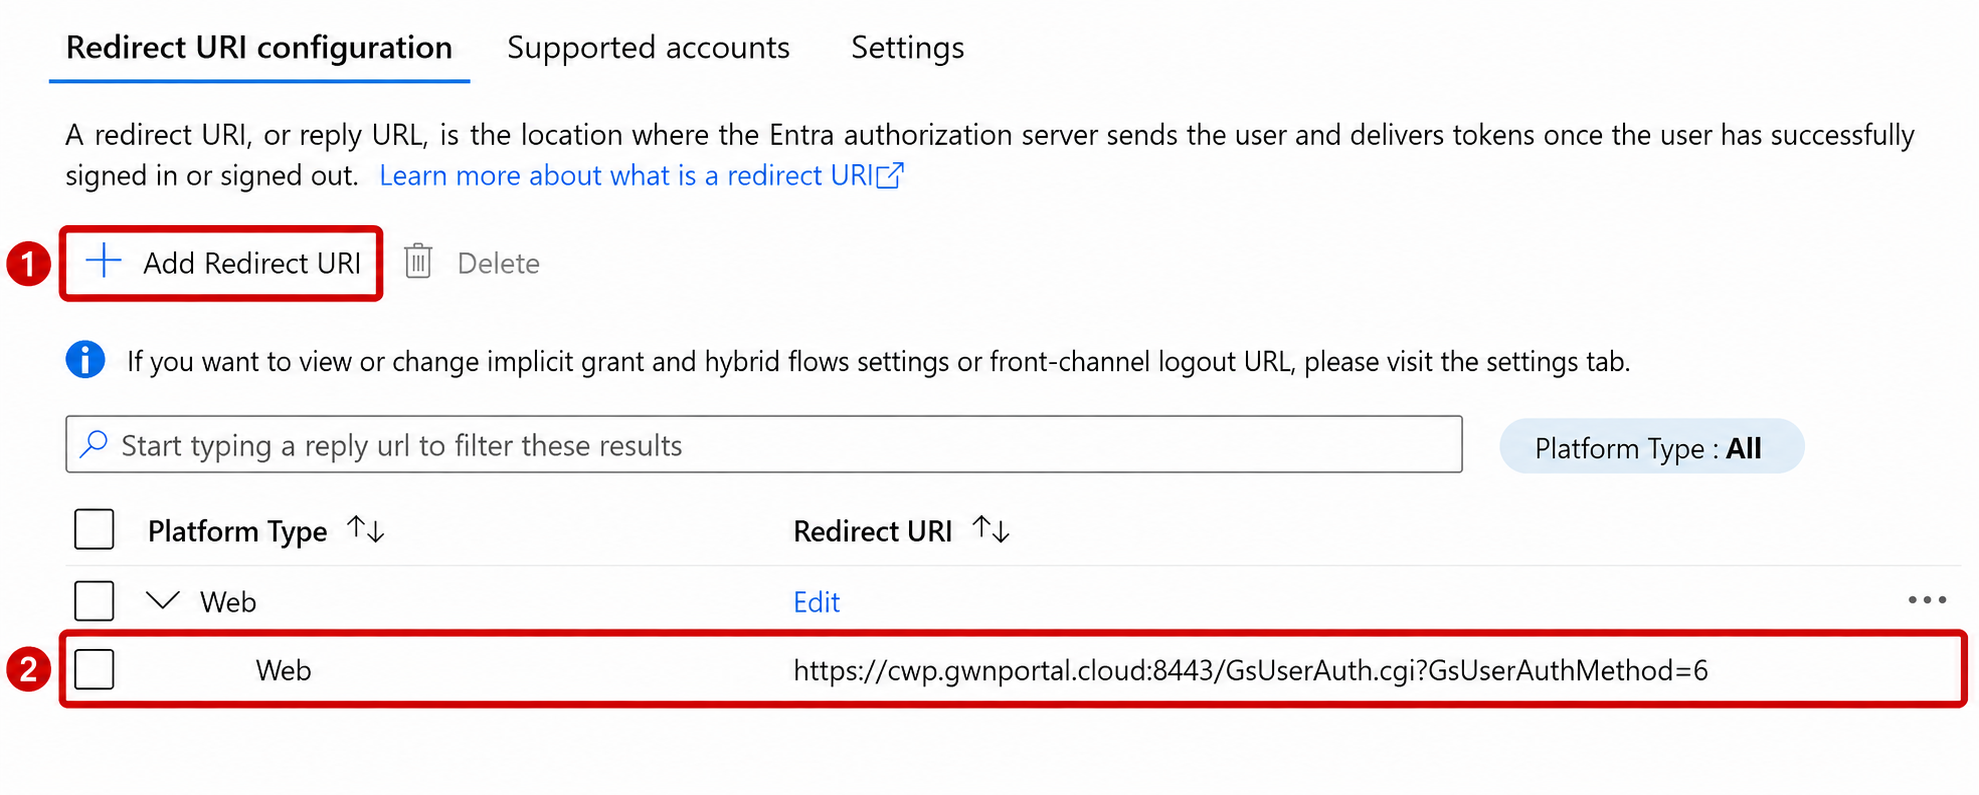
Keep implicit access-token and ID-token grants unchecked and public client flows disabled, as in the tested Web application. No front-channel logout URL is required for this guide.
Enter the redirect URI above exactly as shown, including https://, cwp.gwnportal.cloud, port 8443, and /GsUserAuth.cgi?GsUserAuthMethod=6. This is the return address used by the captive portal in this guide.
Obtain the Client ID and Client Key
- On the application Overview page, copy Application (client) ID. This is the value entered as Microsoft 365 Client ID on the access point.
- Open Certificates & secrets > Client secrets > New client secret. Enter a description and choose an expiration, then select Add.
- Copy the new secret Value immediately and keep it securely. Enter this value as Microsoft 365 Client Key on the access point. The Secret ID is not the client key.
- Record the expiration date. Replace the secret and update the portal configuration before it expires. Do not put the secret in screenshots or share it with visitors.
Approve the Requested Permissions
The tested portal requests delegated access to read directory data. An administrator must approve that request for the organization whose accounts will sign in. Merely creating the application or selecting a multi-tenant audience does not grant this permission.
- After the portal and SSID are configured in Part 2, perform an initial sign-in using an authorized administrator account for the visitor organization.
- On Permissions requested, verify the application name and review the requested access. The tested flow requested Read directory data, permission to maintain access, the user email address, and sign-in.
- If granting access for the organization is intended, select Consent on behalf of your organization, then Accept. Complete the portal login.
- In the application API permissions view, verify that the delegated Directory.Read.All permission is granted. It may appear under Other permissions granted, as shown below.
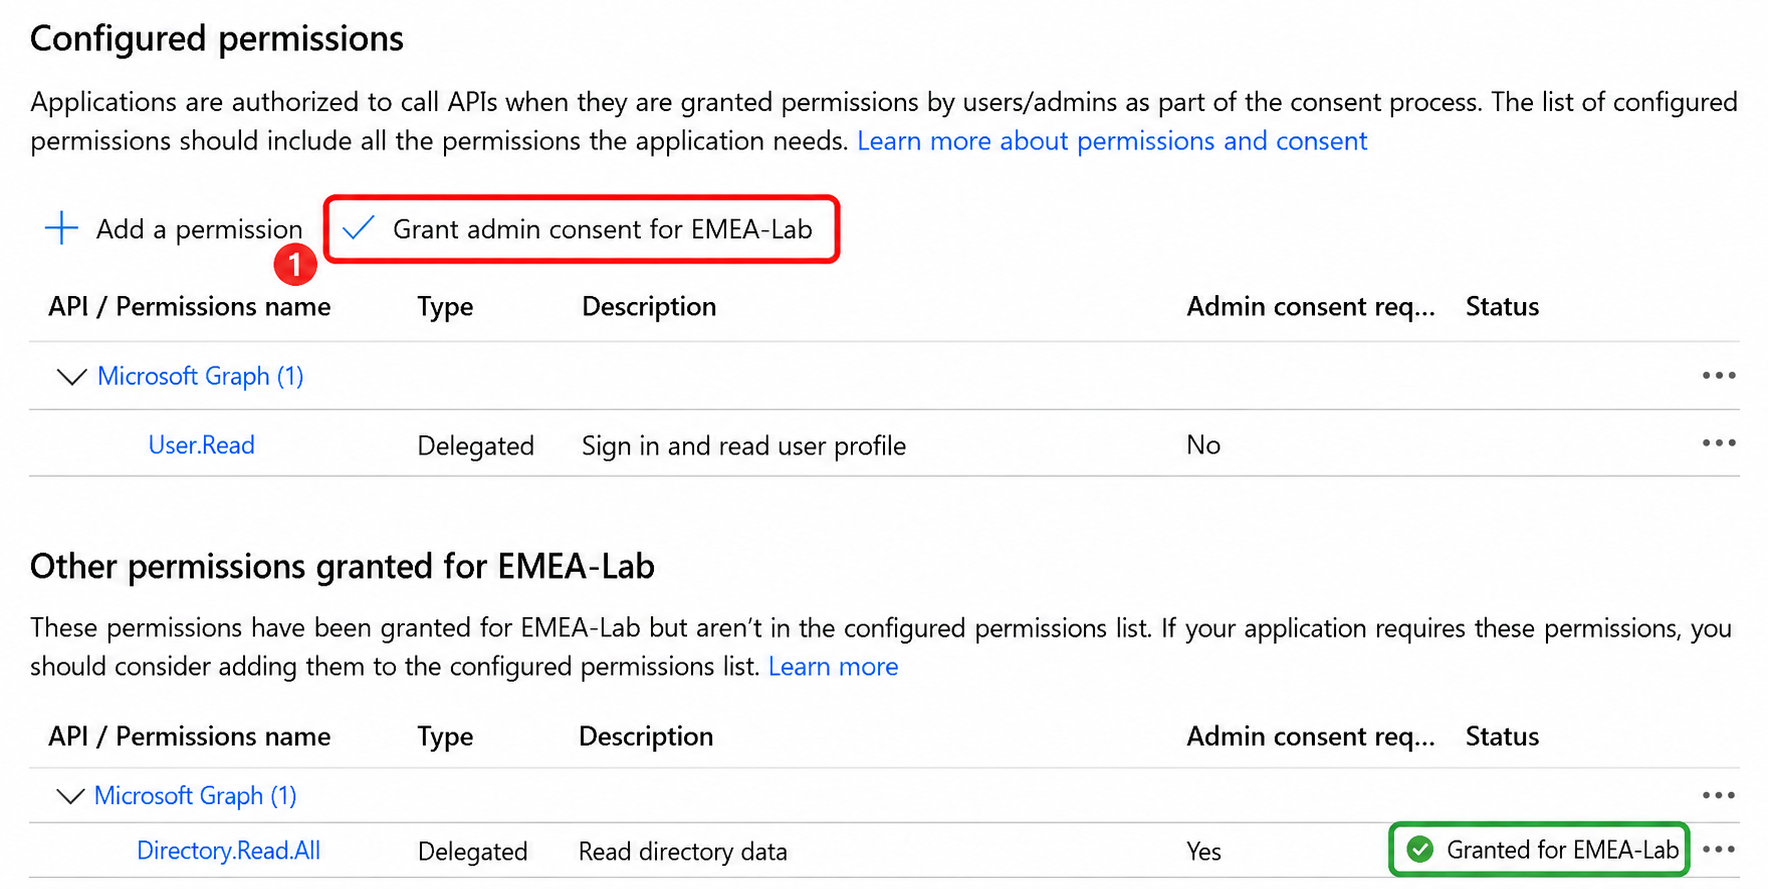
Read directory data is broader than basic profile sign-in. Have the administrator review it before approval. An approval in one organization does not approve the application for every other organization. If a visitor sees Need admin approval, their organization must approve the application before that account can proceed.
Part 2: Configure the Grandstream Captive Portal
Choose the path that matches how your access points are managed: A for a primary AP, or B for a management platform. Complete only the applicable path, then continue to Test the Visitor Experience. The Microsoft application prepared in Part 1 is used in either case.
A. Using the Primary Access Point
Use this path when you configure the guest network through the primary AP’s local web interface. You can configure the Microsoft 365 login directly in the portal policy; creating a separate splash page first is not required.
Create the Captive Portal Policy
- Open Captive Portal > Policy List and select Add.
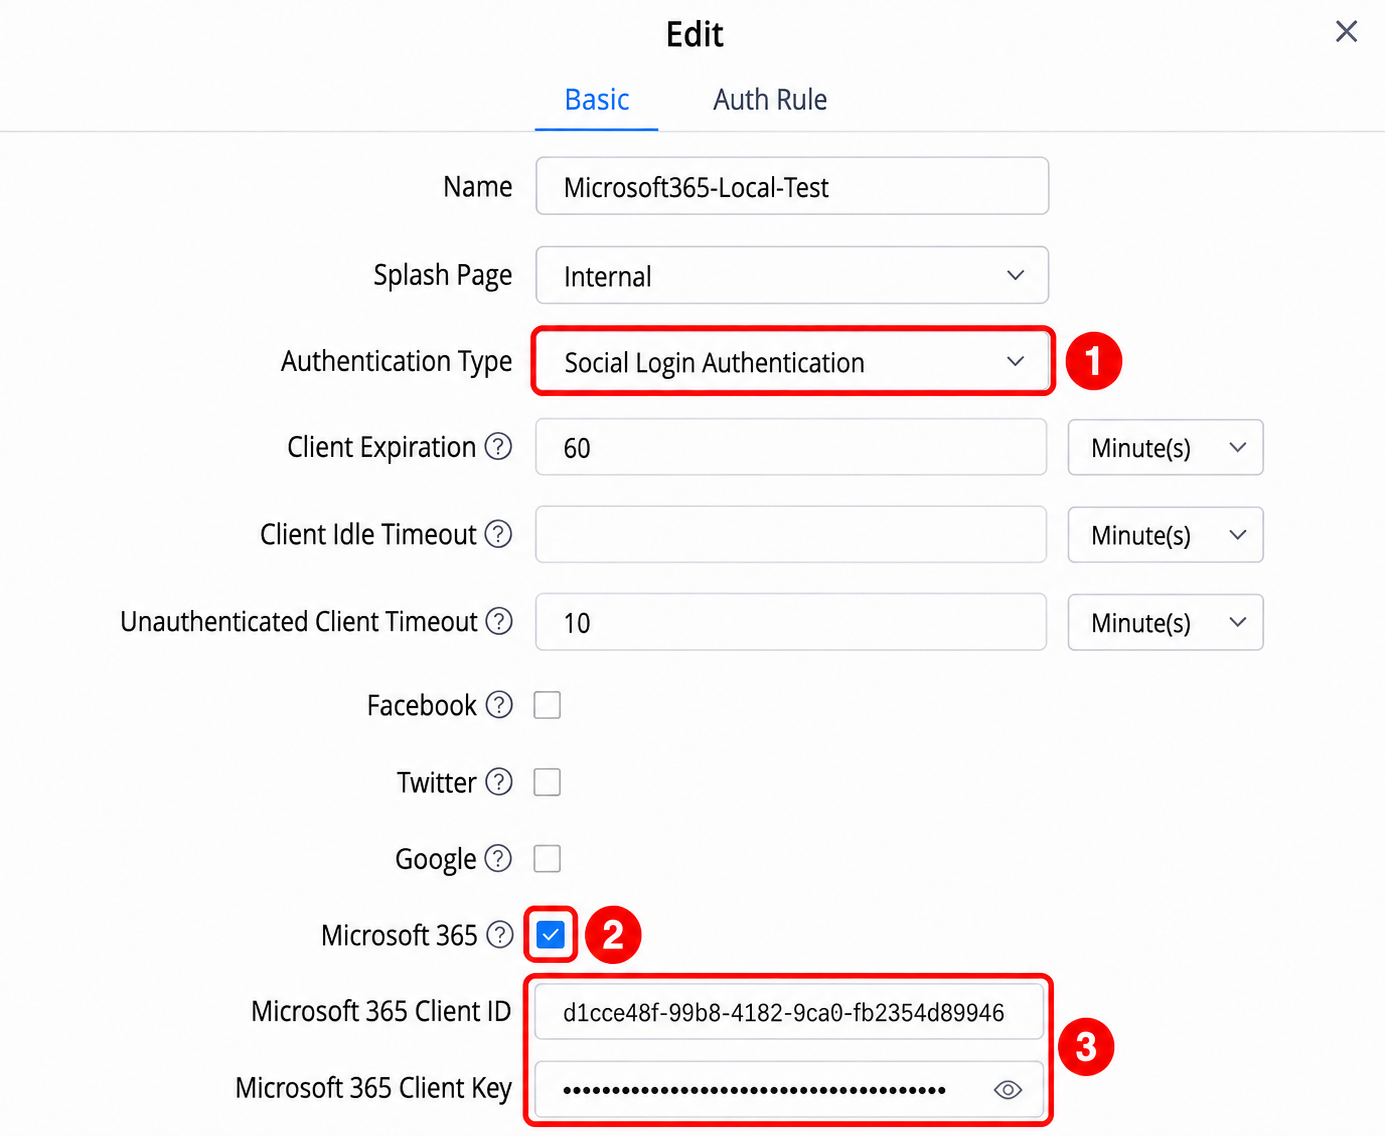
- On the Basic tab, enter a policy name, such as Microsoft365-Guest. Set Splash Page to Internal and Authentication Type to Social Login Authentication.
- Enable Microsoft 365. Leave the other social providers unchecked for a Microsoft-only portal.
- Paste the application client ID into Microsoft 365 Client ID and the secret value into Microsoft 365 Client Key.
- Configure the portal page and session options shown below.
| Setting | Configuration |
|---|---|
| Microsoft 365 Client ID | Application (client) ID from Microsoft Entra. |
| Microsoft 365 Client Key | Client secret Value from the same application. |
| Client Expiration | Set the allowed session duration. This example uses 60 minutes. |
| Unauthenticated Client Timeout | Allow enough time to complete sign-in and any additional verification. This example uses 10 minutes. |
| Use Default Portal Page | Enable for the built-in Microsoft sign-in page. The selected social-login template is /social_auth.html. |
| Landing Page | Select Redirect to the Original URL, or configure your chosen post-login destination. This is separate from the Microsoft redirect URI. |
| Enable Secure Portal | Keep enabled so the captive portal uses HTTPS. It is enabled in the tested Microsoft 365 configuration. |
| Enable Daily Limit | The example leaves this disabled so repeat testing is possible. Set session limits according to the deployment. |
Microsoft 365 portal policy settings
Check Pre-Authentication Access
Visitors must reach Microsoft before the portal grants normal internet access. Open the Auth Rule tab and check the pre-authentication entries. In the tested firmware, enabling Microsoft 365 supplies these entries automatically; they appear as read-only fields.
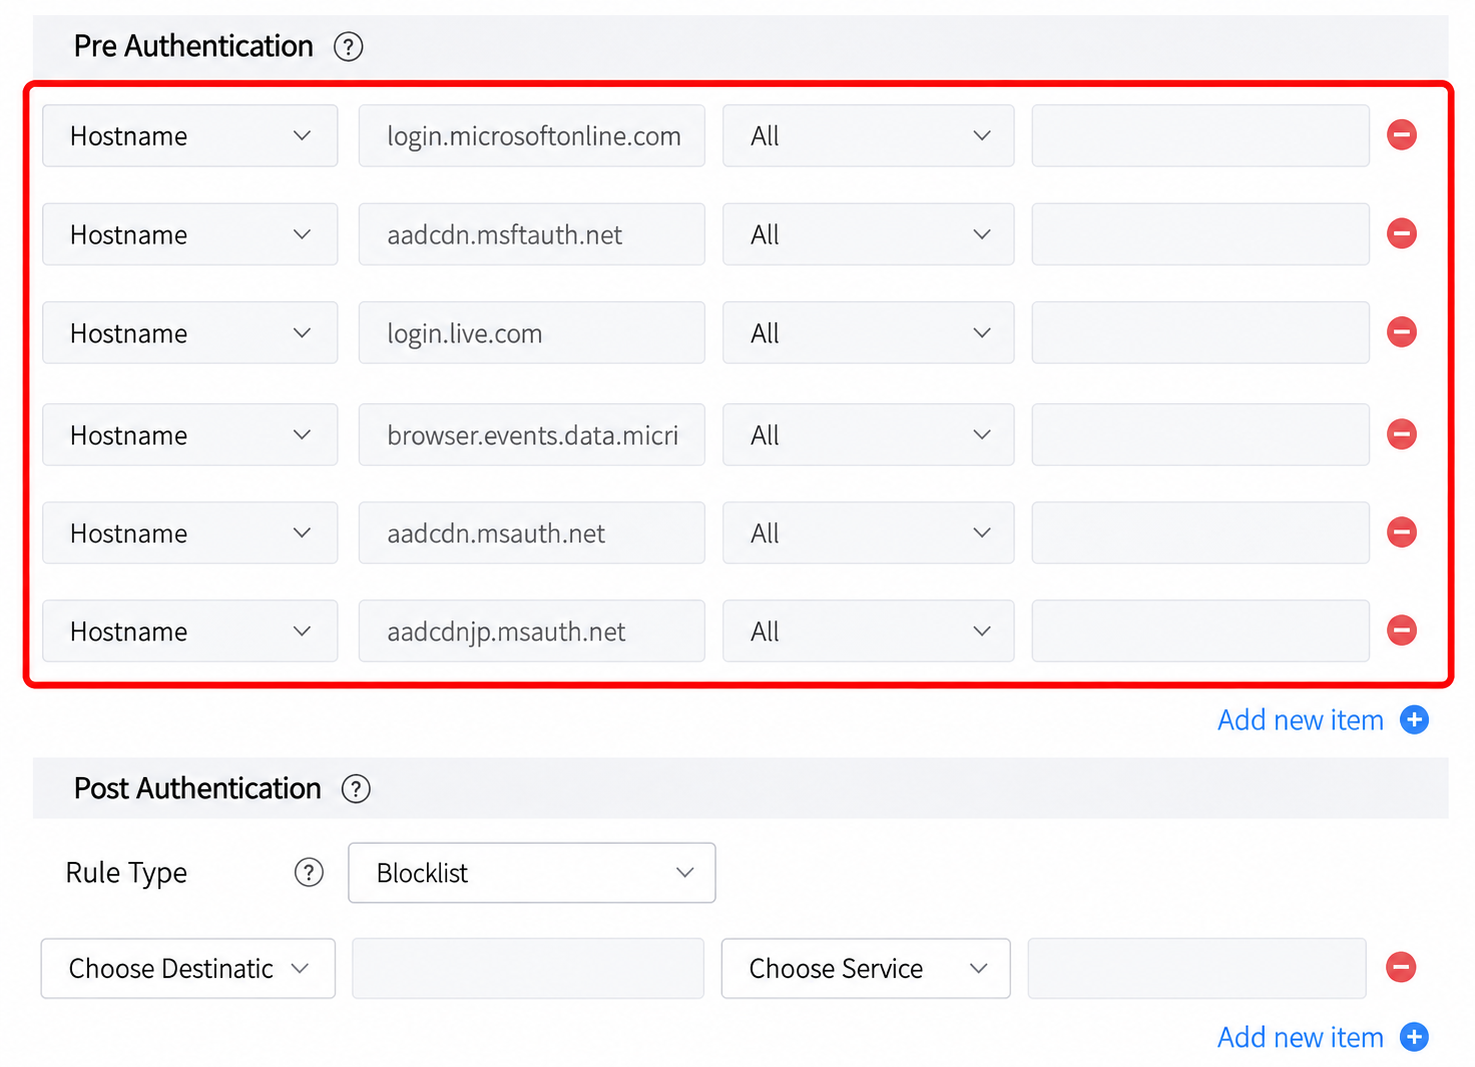
The full pre-authentication entries are listed below for easy copying. Use the hostname only, without https://.
| Destination Type | Hostname | Service |
|---|---|---|
| Hostname | login.microsoftonline.com | All |
| Hostname | aadcdn.msftauth.net | All |
| Hostname | login.live.com | All |
| Hostname | browser.events.data.microsoft.com | All |
| Hostname | aadcdn.msauth.net | All |
| Hostname | aadcdnjp.msauth.net | All |
Keep these entries available and ensure the upstream network allows DNS resolution and access to the required sign-in services. An organization using an additional identity or verification service may require additional access.
Select Save to create the policy.
Apply the Policy to the Guest SSID
- Open Wi-Fi > SSID. Add a dedicated guest SSID or edit the intended guest network.
- Enter the SSID name and enable Enable SSID. Select the appropriate bands and IP assignment for your network. The example uses Bridge and 2.4 GHz / 5 GHz, with DHCP and internet access supplied by the upstream network.
- Under Access Security, select Open for this example. Enable Enable Captive Portal and select the policy created above in Captive Portal Policy.
- Open Device Membership and ensure the access points that should broadcast the guest SSID are in Member Devices.
- Select Save and allow the configuration to take effect before connecting a test device.
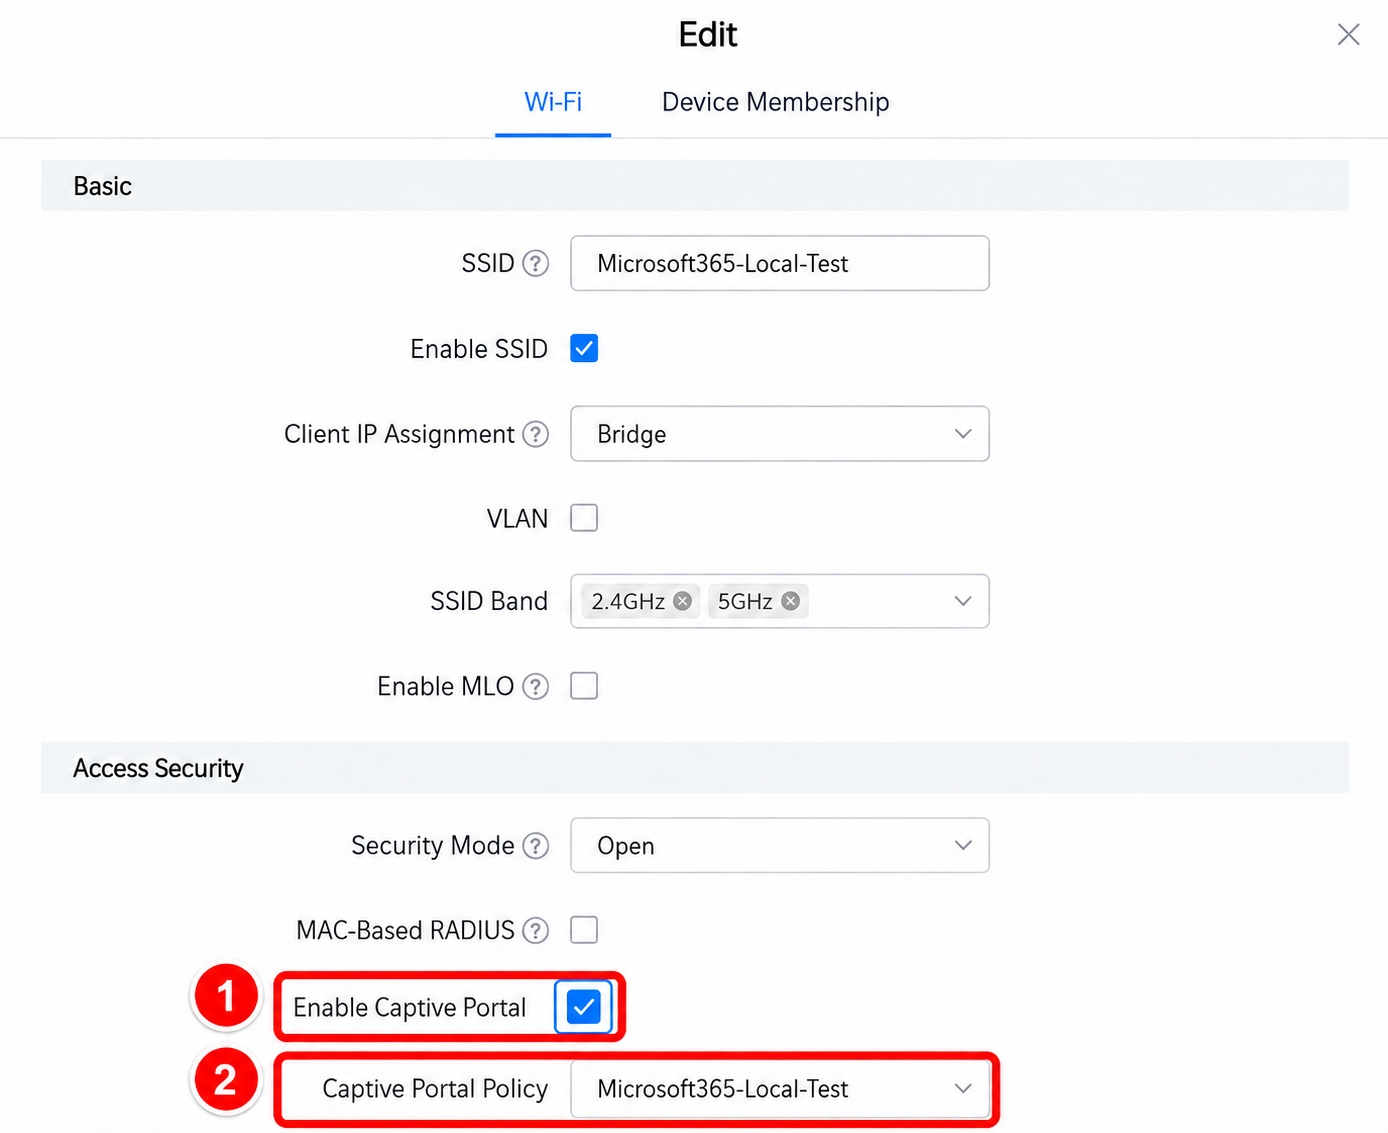
A captive portal controls admission to the network; it does not encrypt an Open SSID or isolate guests from internal resources. Apply guest VLAN, firewall, and isolation settings appropriate to your deployment.
B. Using a Management Platform
Use this path when the APs are managed through GDMS Networking or GWN Manager. The following example uses GDMS Networking. Here, create the splash page and configure its Microsoft 365 login component first, select that splash page in a portal policy, and assign the policy to the wireless network. Menu labels and available options can vary with the managing platform and software version.
Create the Splash Page and Configure Microsoft 365
- In GDMS Networking, select the network containing your access points. Open Settings > Wi-Fi > Splash Page and select Add.
- Enter a recognizable splash-page name, such as Microsoft 365 Only Lab. On the Page tab, select Microsoft 365 under Logging Components. For a Microsoft-only portal, leave For Free and the other login components unselected.
- Select the Microsoft 365 component in the page preview to open its Logging Configuration settings.
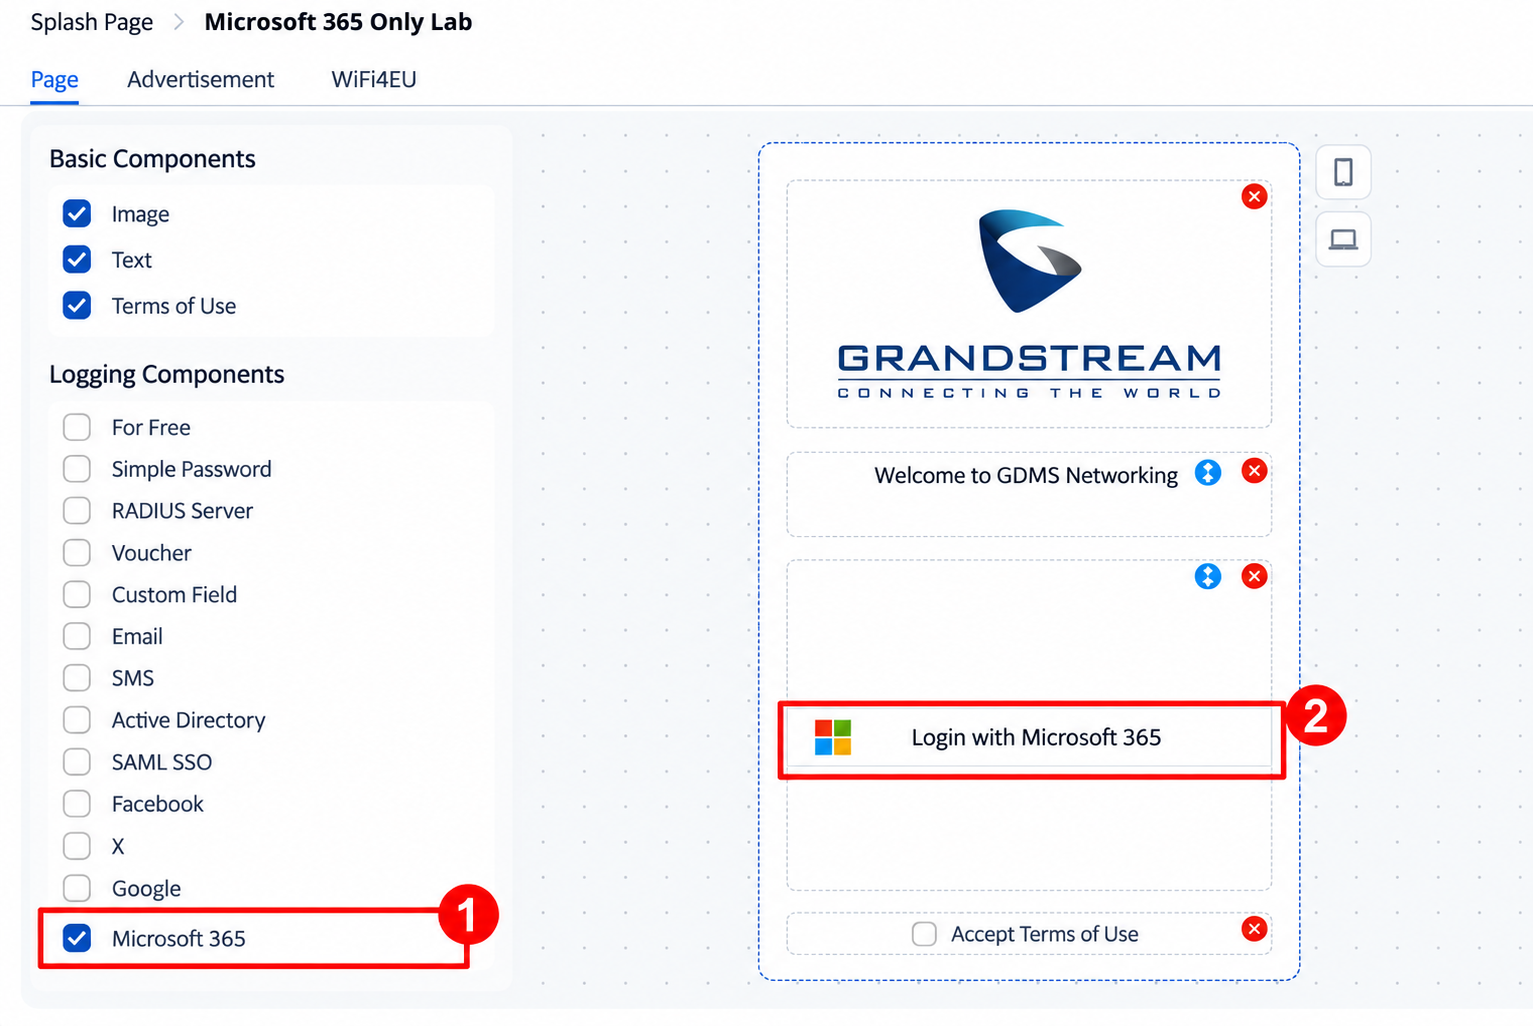
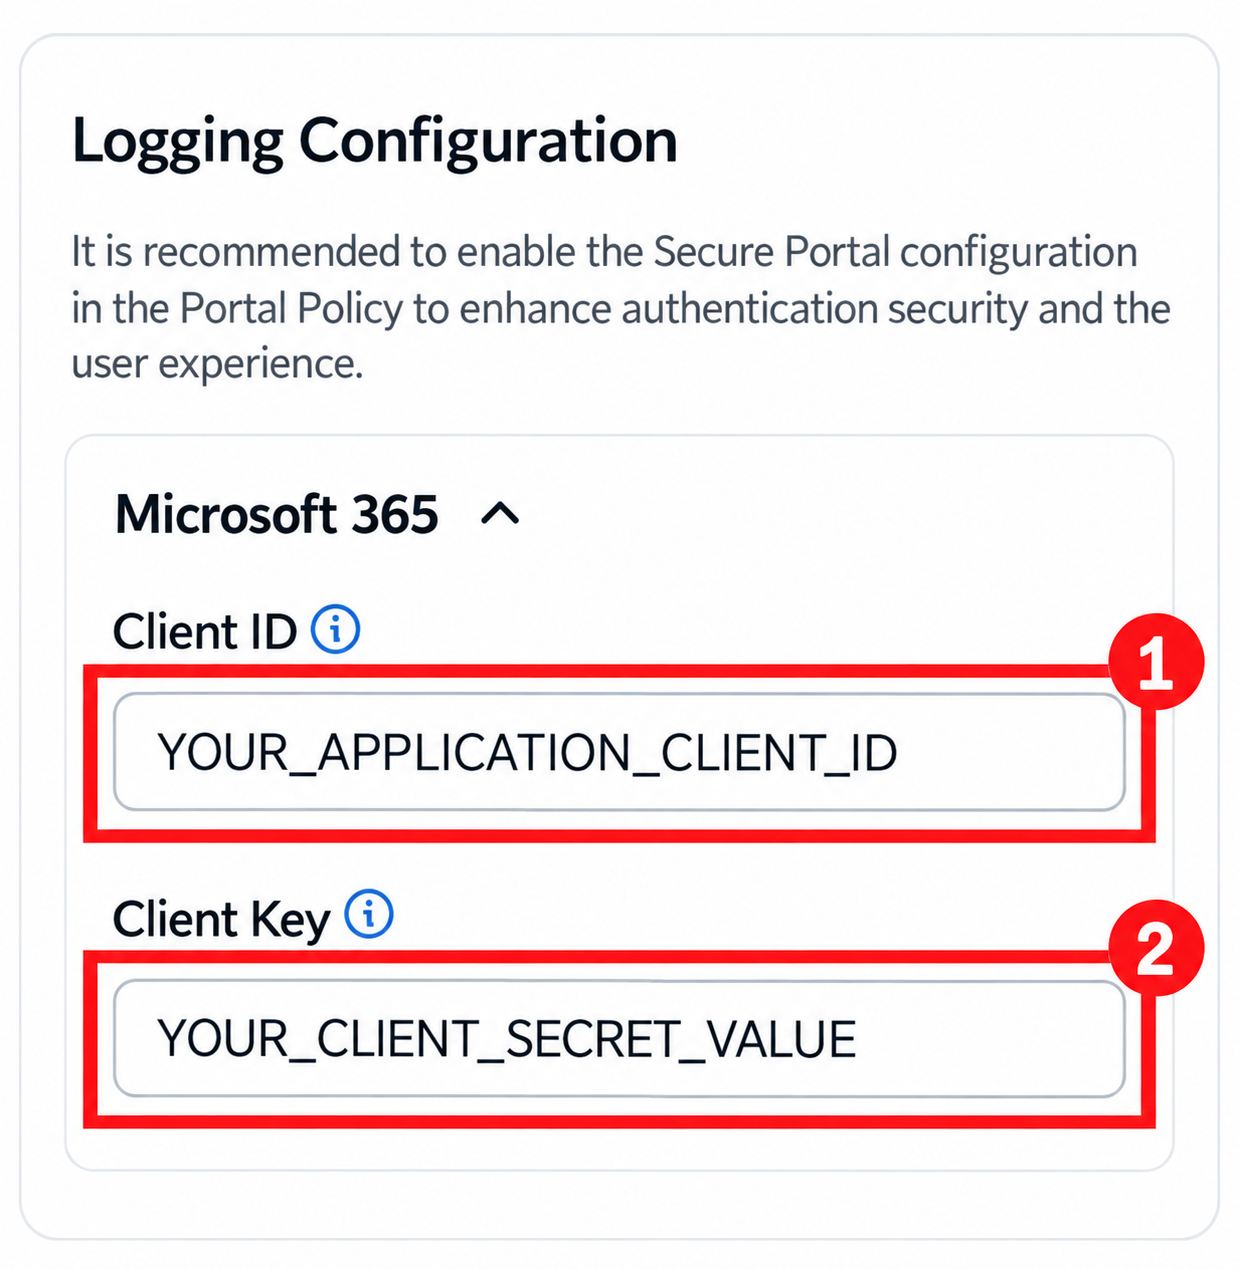
In the Microsoft 365 settings, enter the Client ID and Client Key obtained in Part 1. Client ID is the application’s Application (client) ID; Client Key is the client secret Value, not its Secret ID. The placeholders below show where to enter your own values.
Customize the logo, welcome text, and terms of use as needed, then select Save. The saved splash page will be available when you create the portal policy.
Create the Portal Policy and Select the Splash Page
- Open Settings > Wi-Fi > Portal Policy and select Add. Enter a policy name, such as Microsoft 365 Only Lab.
- Set Splash page to Internal. Under Splash Page Customization, select the splash page you just saved.
- Set the session limits for your deployment. This example uses a Client Expiration of 1 hour and a Timeout Duration of Unauthenticated Clients of 10 minutes.
- Enable Secure Portal. For the example shown, leave Landing Page set to Redirect to the original URL.
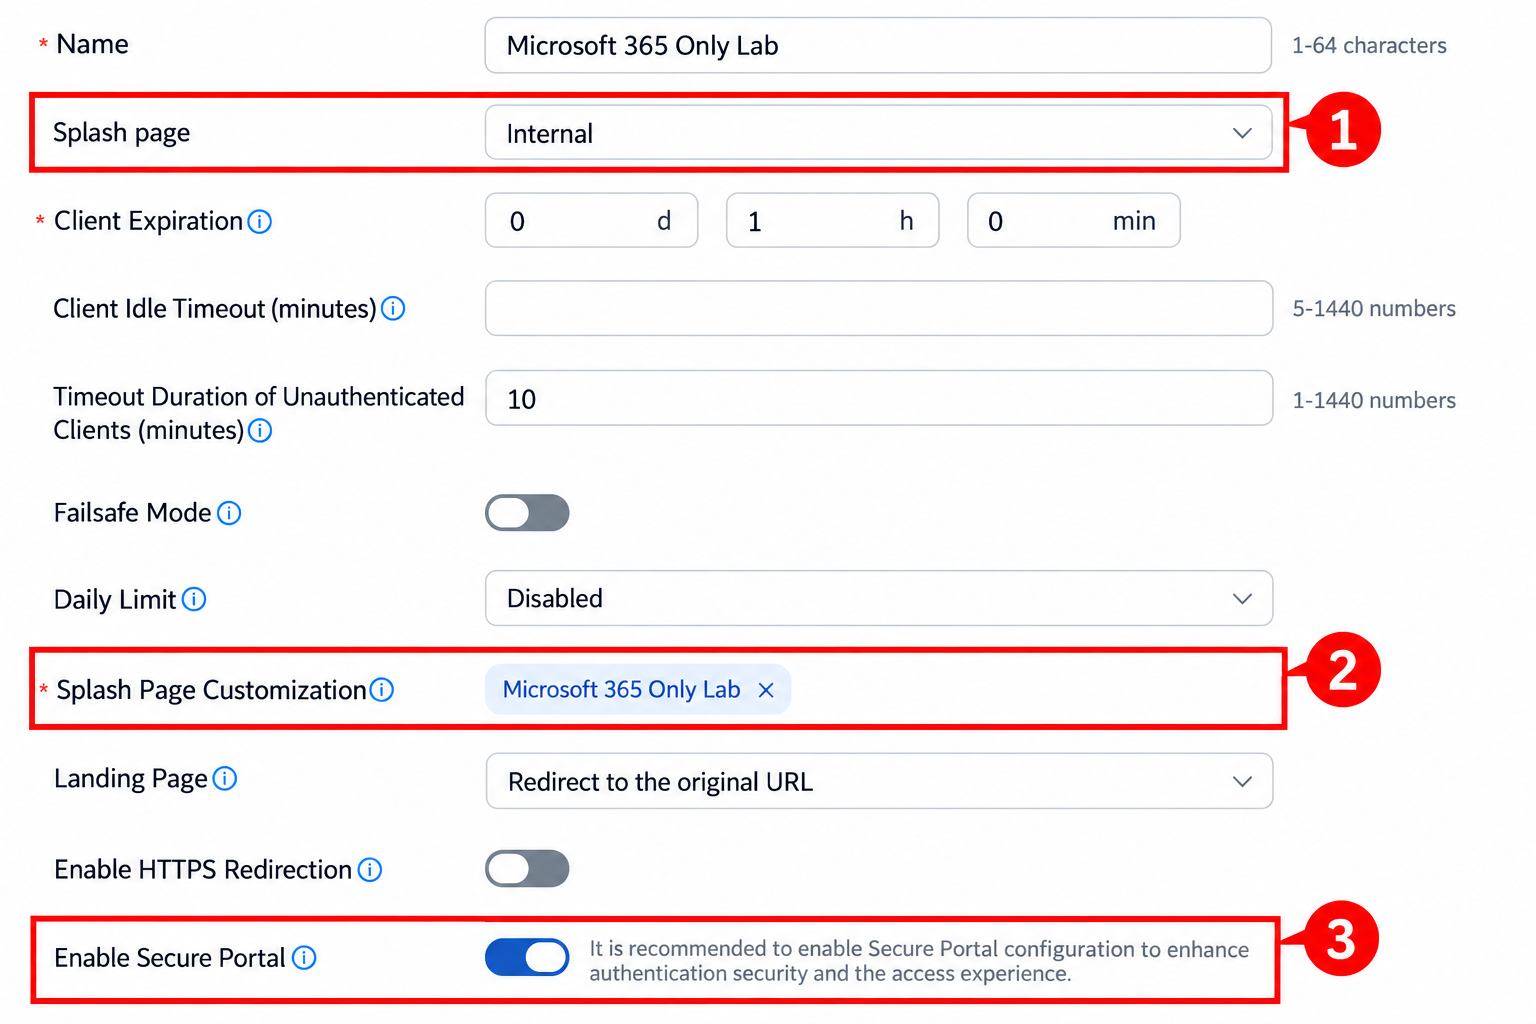
Under Pre Authentication Rule(s), check that the Microsoft sign-in hostnames are allowed before authentication. Use the full, copyable hostnames in the pre-authentication table above, with destination type Hostname and service All. Add or correct entries as needed, then select Save.
Apply the Policy to the Wireless Network
- Open Settings > Wi-Fi > Wireless LAN and add or edit the guest wireless network.
- In Basic, enable Captive Portal. Select the policy you just created in Captive Portal Policy.
- Configure the SSID, bands, access security, and network settings for your deployment. Under Device Assignment, select the access points that will broadcast the network.
- Select Save. Allow the configuration to reach the assigned APs before testing the visitor login.
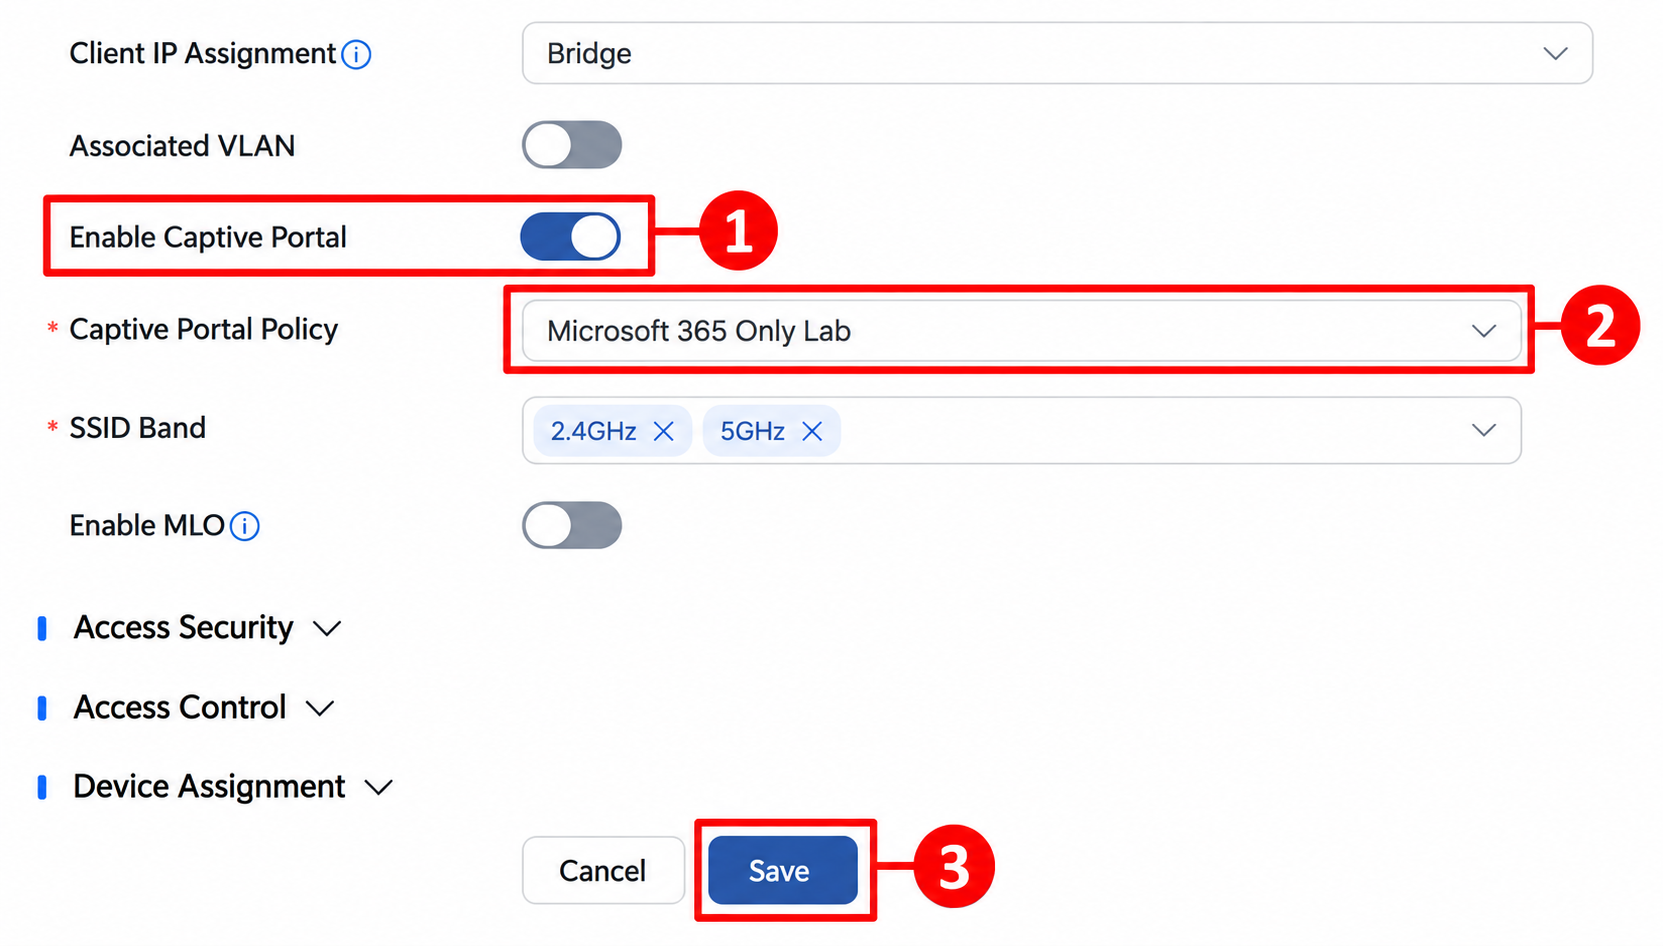
The splash page, policy, and wireless network are now linked. Continue with the visitor test below; the Microsoft sign-in steps are shared by both configuration paths.
Test the Visitor Experience
1. Open the Portal and Start Microsoft Sign-In
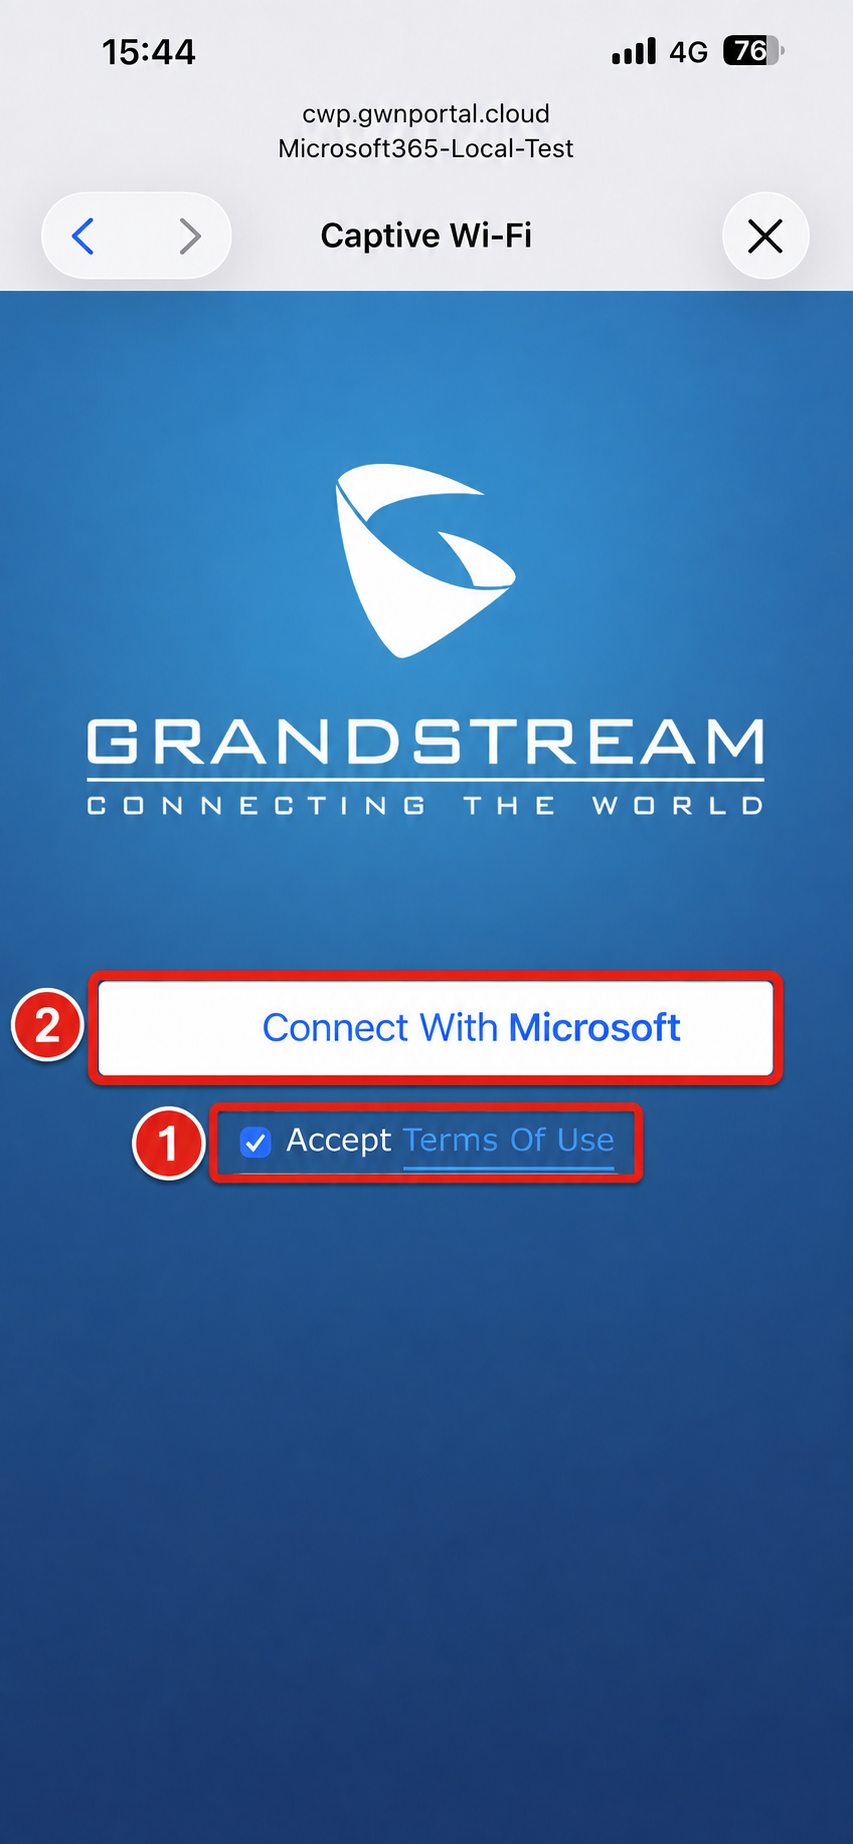
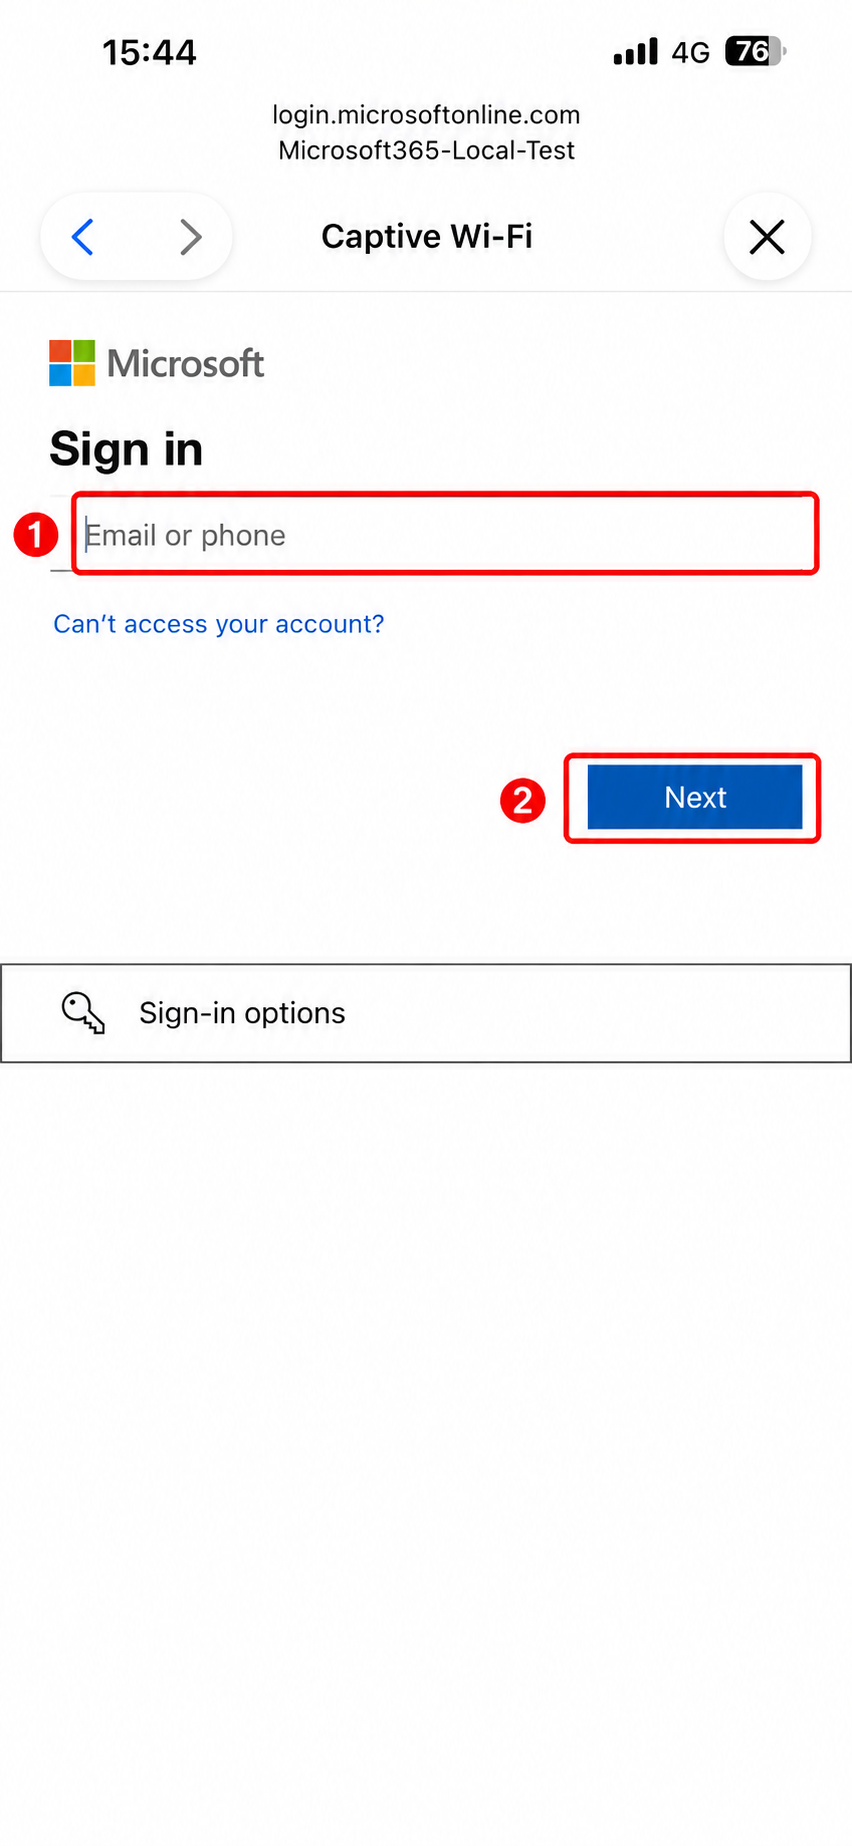
Connect the test device to the guest SSID and open its captive portal prompt. If the prompt does not appear, open an HTTP website to trigger it. Accept the terms of use and select Connect With Microsoft. On the Microsoft sign-in page, enter your work or school account and select Next.
2. Complete Microsoft Sign-In
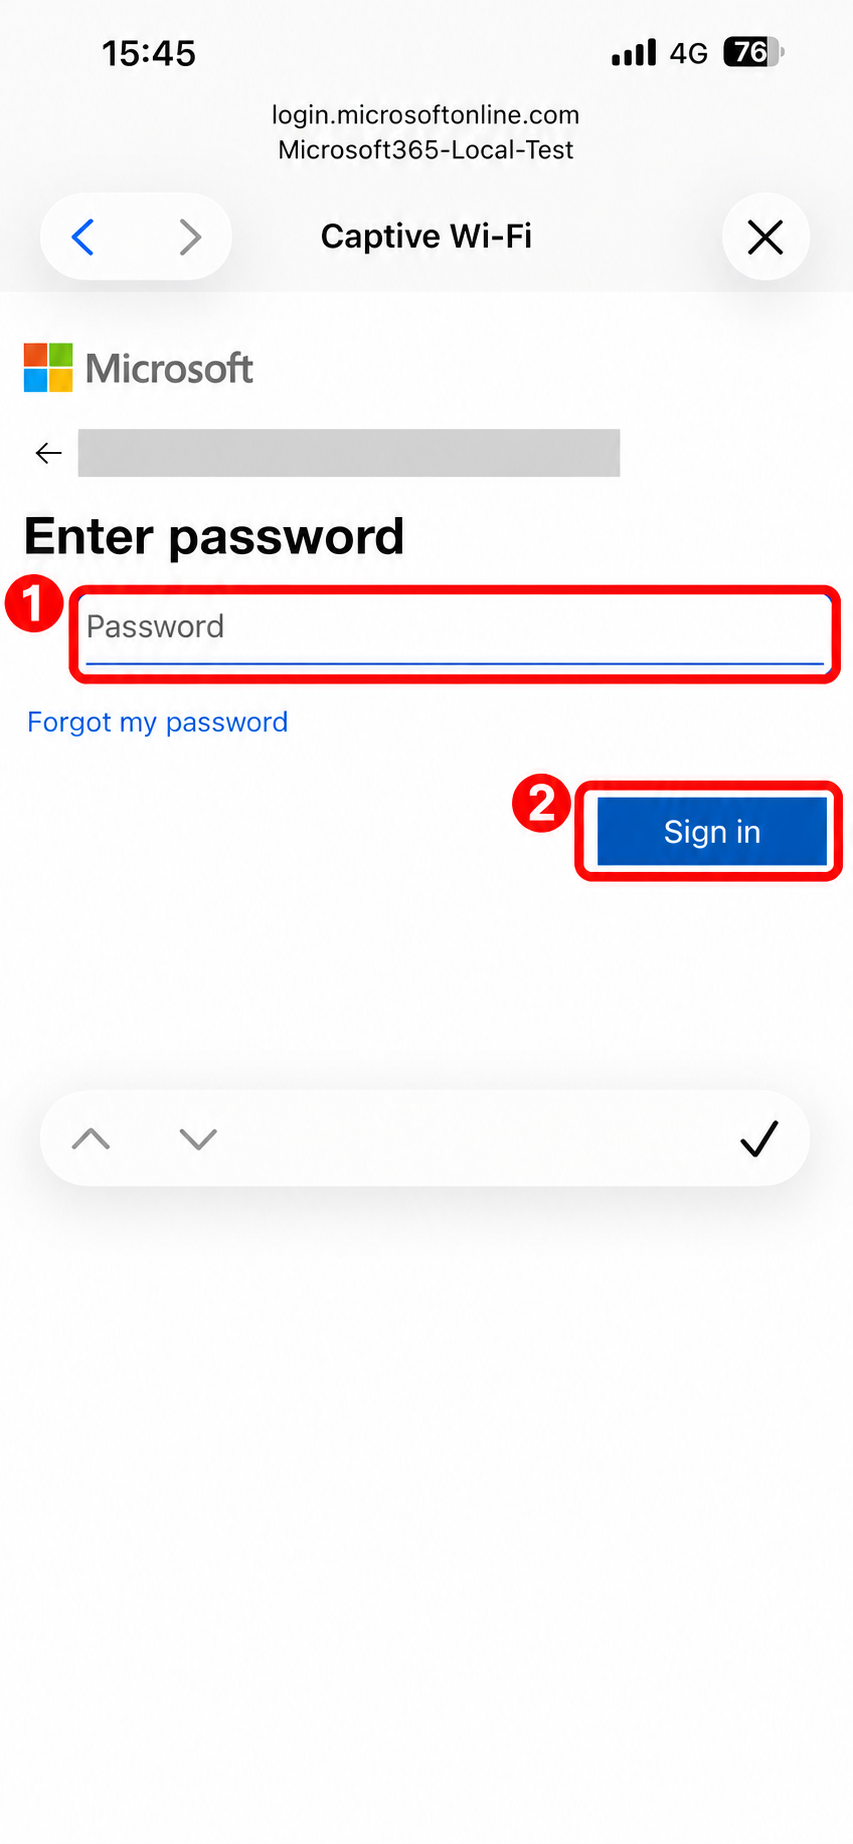
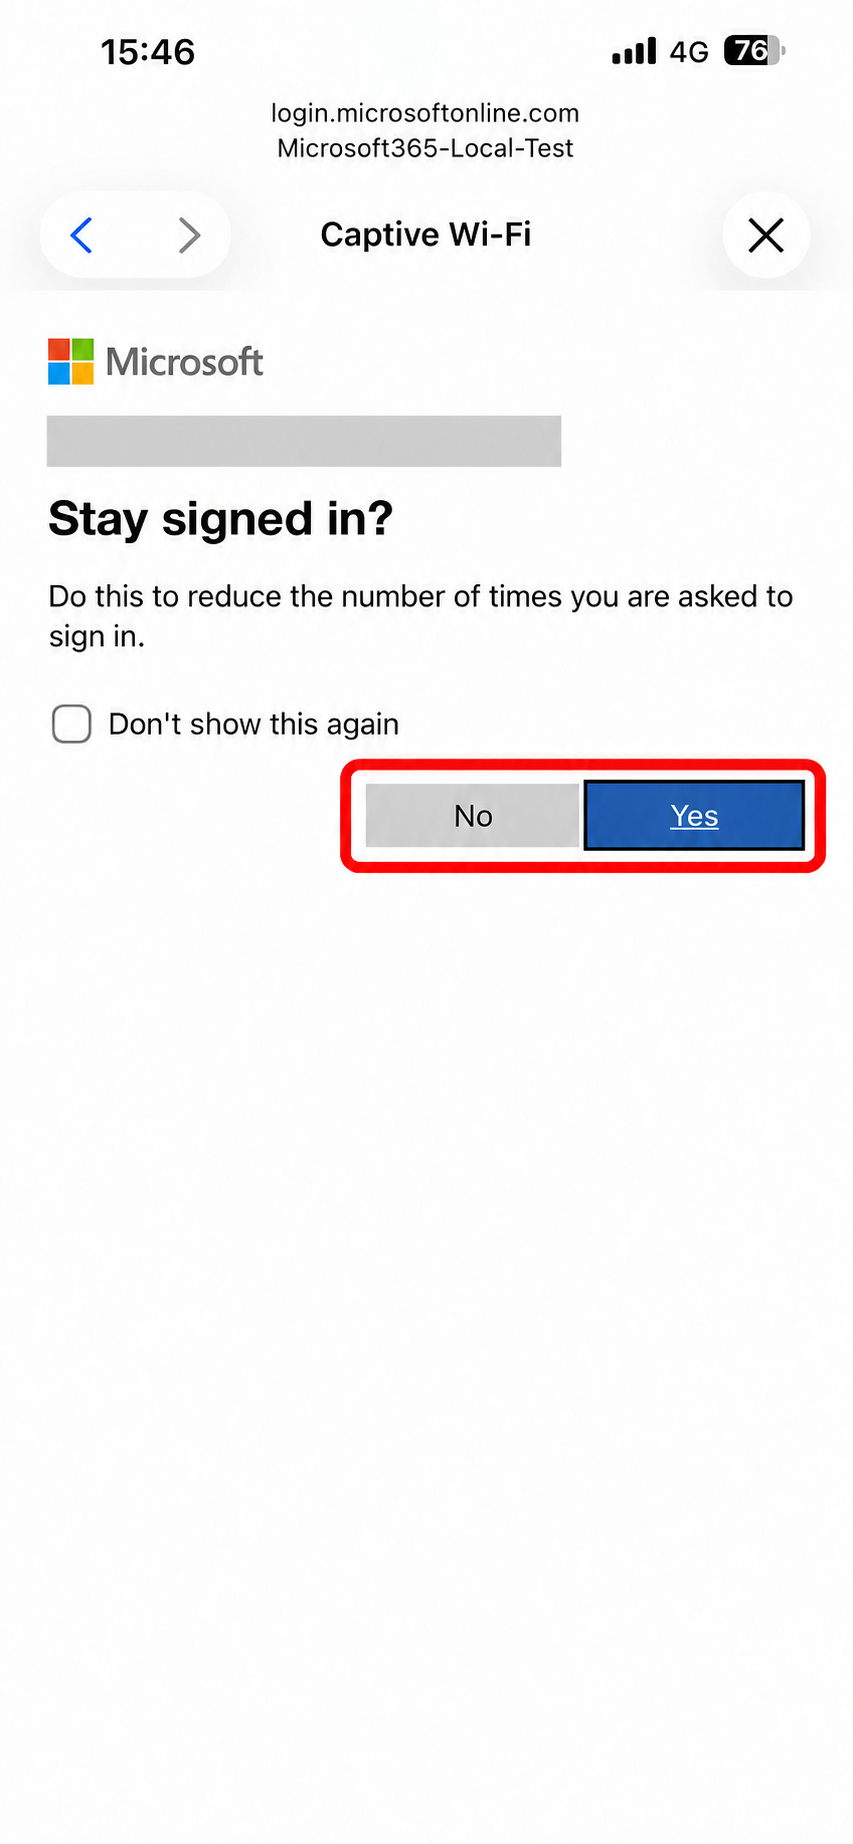
Enter the account password and select Sign in. Complete any additional verification requested by your organization. If the Stay signed in? prompt appears, choose whether to keep the Microsoft session signed in; select No on a shared device. If administrator approval is requested, complete the approval described in Part 1 before continuing.
3. Confirm Authentication and Internet Access
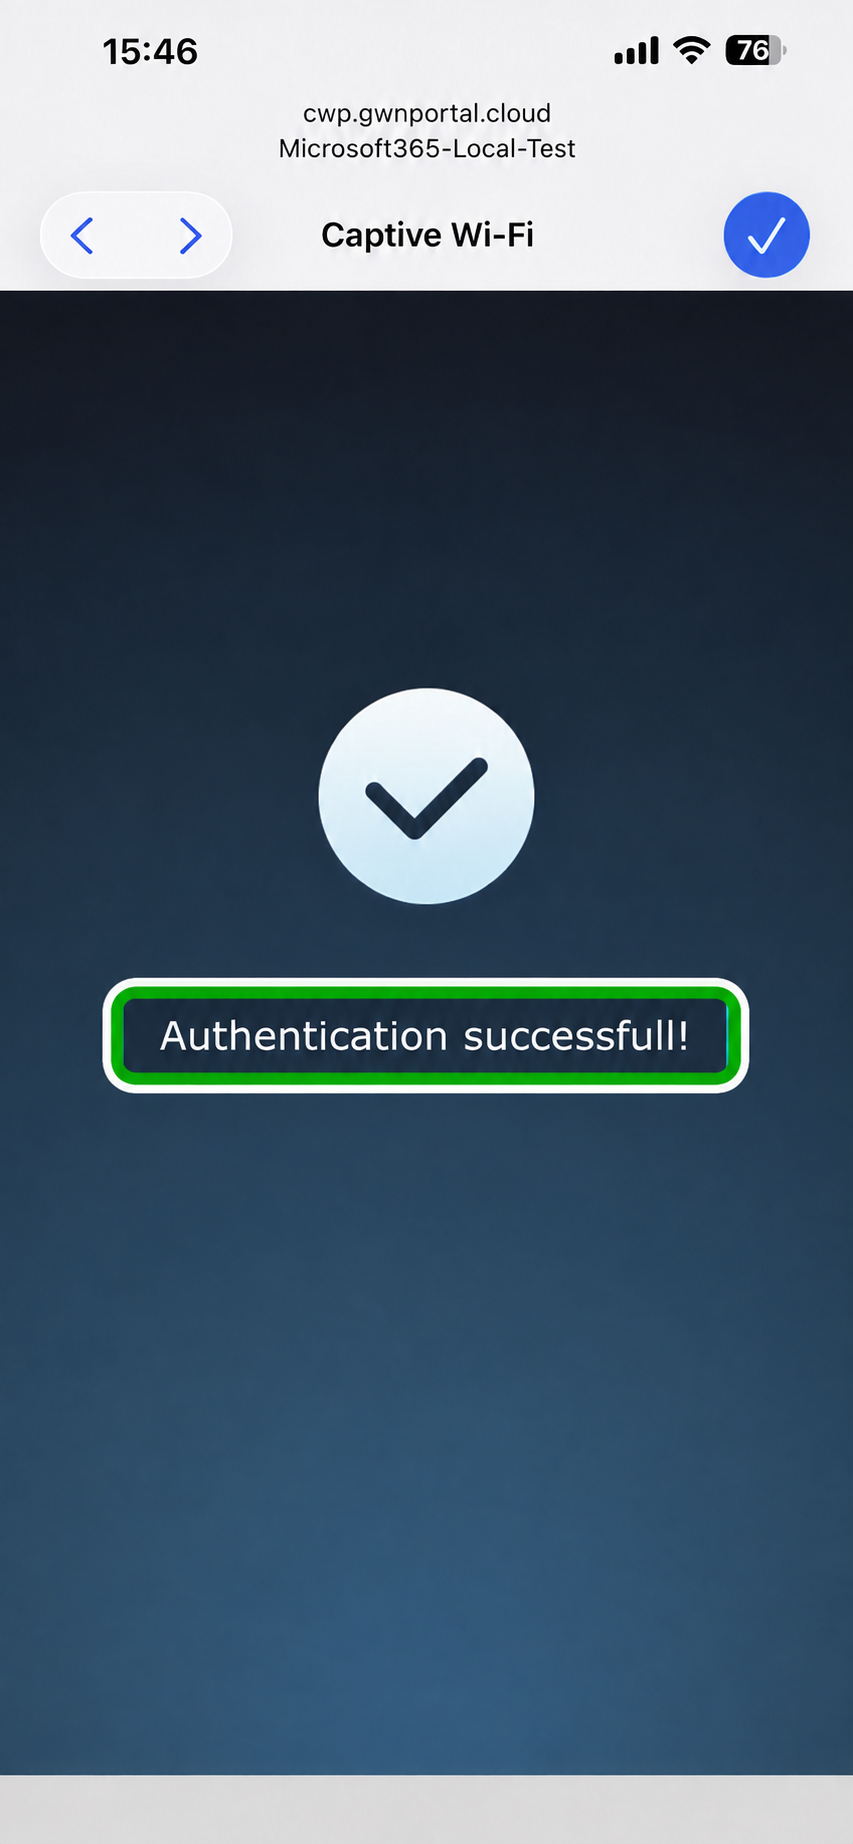
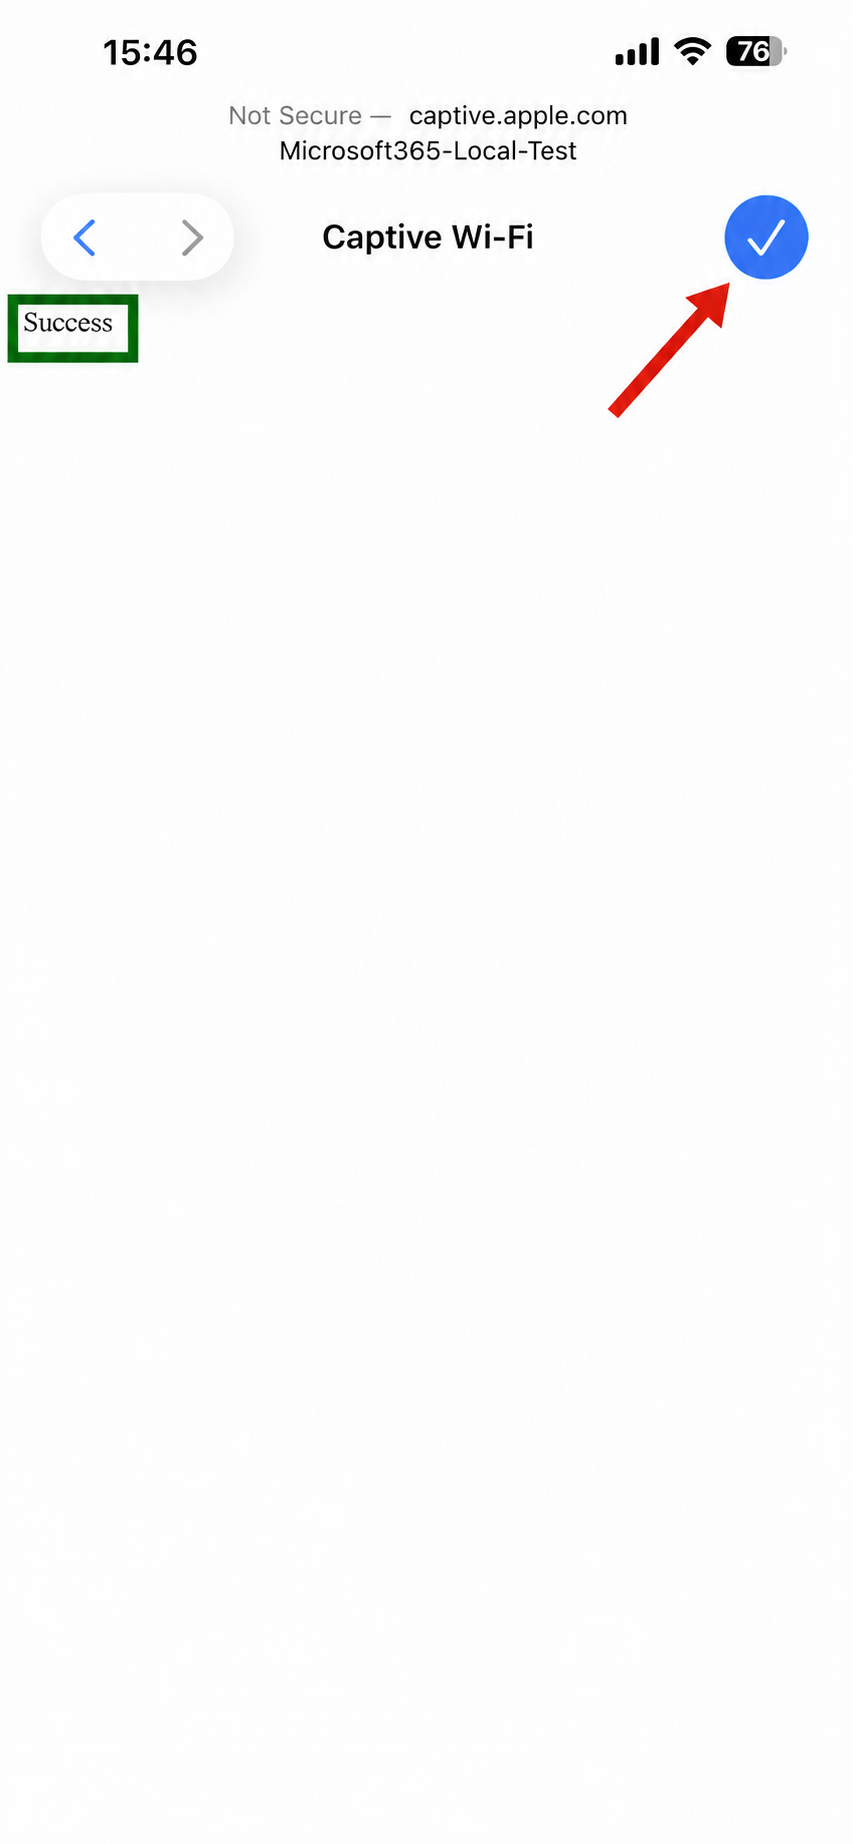
After sign-in, the browser returns to the captive portal and displays Authentication successful!. In this iPhone example, the subsequent connectivity check displays Success and a blue checkmark. Close the portal window and open a website. Temporarily disable mobile data during this check to confirm that internet access is using the guest Wi-Fi rather than cellular data.
On the primary AP, open Captive Portal > Guest to check the visitor session. Confirm that the test client is authenticated. A returning visitor may not be asked to enter credentials again while a portal or Microsoft session is still valid.
Supported Devices and Management Options
This guide covers Grandstream GWN76xx indoor and outdoor access points, except GWN7610 and GWN7602, which are end-of-life (EOL) models and are not covered by this Microsoft 365 configuration.
Configure the Microsoft 365 captive portal through the interface that manages your access points:
- Primary access point: Use the local web interface of the access point acting as the primary controller for itself and any other access points it manages.
- GDMS Networking (cloud-based management): Configure the captive portal in the cloud platform managing your access points.
- GWN Manager (on-premises management): Configure the captive portal in the locally hosted management platform.
This walkthrough uses the local web interface of a primary access point and GDMS Networking. The same Microsoft 365 configuration principles apply to the other management option; menu locations and screen layouts may differ.