


Overview
Allow visitors to authenticate with their organization’s identity provider before accessing a Grandstream wireless network. This guide explains how to connect a captive portal to a SAML identity provider, apply the portal to a Wi-Fi network, and verify the visitor login experience.
SAML (Security Assertion Markup Language) is a standard for exchanging authentication information. The identity provider verifies the visitor’s account and returns a signed response. The Grandstream captive portal checks that response and grants network access according to the portal policy. Visitors enter their identity-provider credentials on its sign-in page, not into a Grandstream password form.
The example uses Microsoft Entra ID as the identity provider and GDMS Networking as the AP management platform. Microsoft Entra ID was previously named Azure Active Directory (Azure AD). It is not an additional service to configure alongside Entra ID. SAML can also be provided by other compatible identity providers. Active Directory Federation Services (AD FS) is an alternative SAML identity provider that can be deployed on Windows Server; it is not required for this cloud-based example using Microsoft Entra ID.
The same integration concepts apply across SAML providers: identify the portal, specify its response address, configure the identity-provider sign-in endpoint and signing certificate, and authorize users. The exact values, terminology, and menus depend on the provider. This procedure concerns wireless captive-portal authentication, not administrator SSO into GDMS Networking and not the separate Microsoft 365 captive-portal component.
Prerequisites
- A Grandstream GWN76xx indoor or outdoor access point with SAML SSO captive-portal support in its firmware and managing platform. The AP must be online and have working network, DNS, and Internet connectivity.
- Administrator access to the device or platform that manages the AP. This walkthrough uses GDMS Networking cloud.
- A SAML identity provider and permission to create/configure an application and assign test users. For this example, use a Microsoft Entra tenant and an authorized account at Microsoft Entra admin center.
- A test user authorized for the SAML application and a phone or laptop to verify the full captive-portal flow.
- Network access to the identity provider before authentication. Configure the pre-authentication rules in Part 2 and allow the required traffic through the upstream network.
Part 1: Configure the Identity Provider
Create a SAML Application
- Sign in to Microsoft Entra admin center and select the tenant containing the users who will authenticate.
- Open Entra ID → Enterprise apps → New application → Create your own application.
- Enter a recognizable name, such as Guest Wi-Fi SAML. Select Integrate any other application you don’t find in the gallery (Non-gallery), then select Create.
- Open the new enterprise application, select Single sign-on, and choose SAML.
Set the Portal Identifier and Response Address
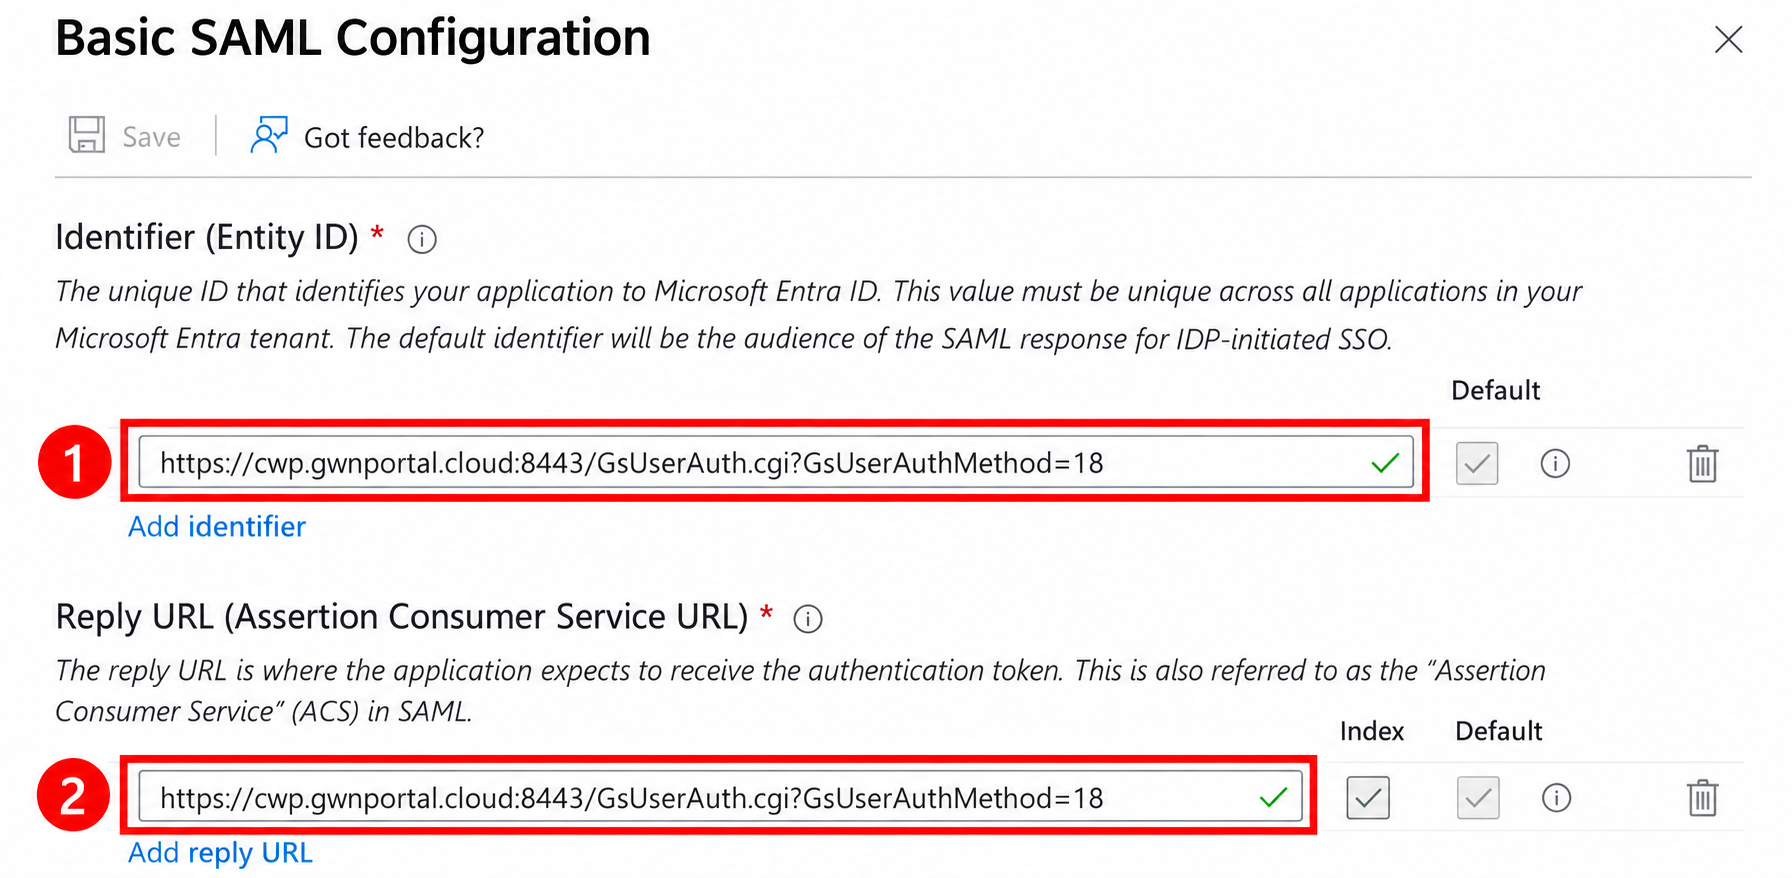
Under Basic SAML Configuration, select Edit. For the GDMS Networking captive portal used in this example, enter the following complete address in both fields, then save.
| Microsoft field | Value for this example |
|---|---|
| Identifier(Entity ID) | https://cwp.gwnportal.cloud:8443/GsUserAuth.cgi?GsUserAuthMethod=18 |
| Reply URL(Assertion Consumer Service URL) | https://cwp.gwnportal.cloud:8443/GsUserAuth.cgi?GsUserAuthMethod=18 |
| Sign on URL, Relay State, Logout URL | Leave blank for this example. |
The Entity ID identifies the portal to the identity provider. The Reply URL is where the signed response is delivered. Although they have different purposes, both use the same full address in this tested GDMS Networking configuration. Include HTTPS, port 8443, the full path, and GsUserAuthMethod=18. Do not shorten the Entity ID to the hostname or substitute the Microsoft 365 callback. For another managing platform, use the SAML portal addresses required by that deployment.
Assign Users
- In the enterprise application, open Users and groups → Add user/group.
- Select the users who should be allowed to authenticate, then select Select.
- Keep the application’s default User role for this example and select Assign. Verify that the users appear in the assignment list.
User assignment gives the selected accounts access to this application; it does not make them Microsoft administrators. The tested captive-portal flow used the default application role. Leave the default Attributes & Claims configuration in place, including Unique User Identifier: user.userprincipalname.
Collect the Sign-in URL and Certificate Fingerprint
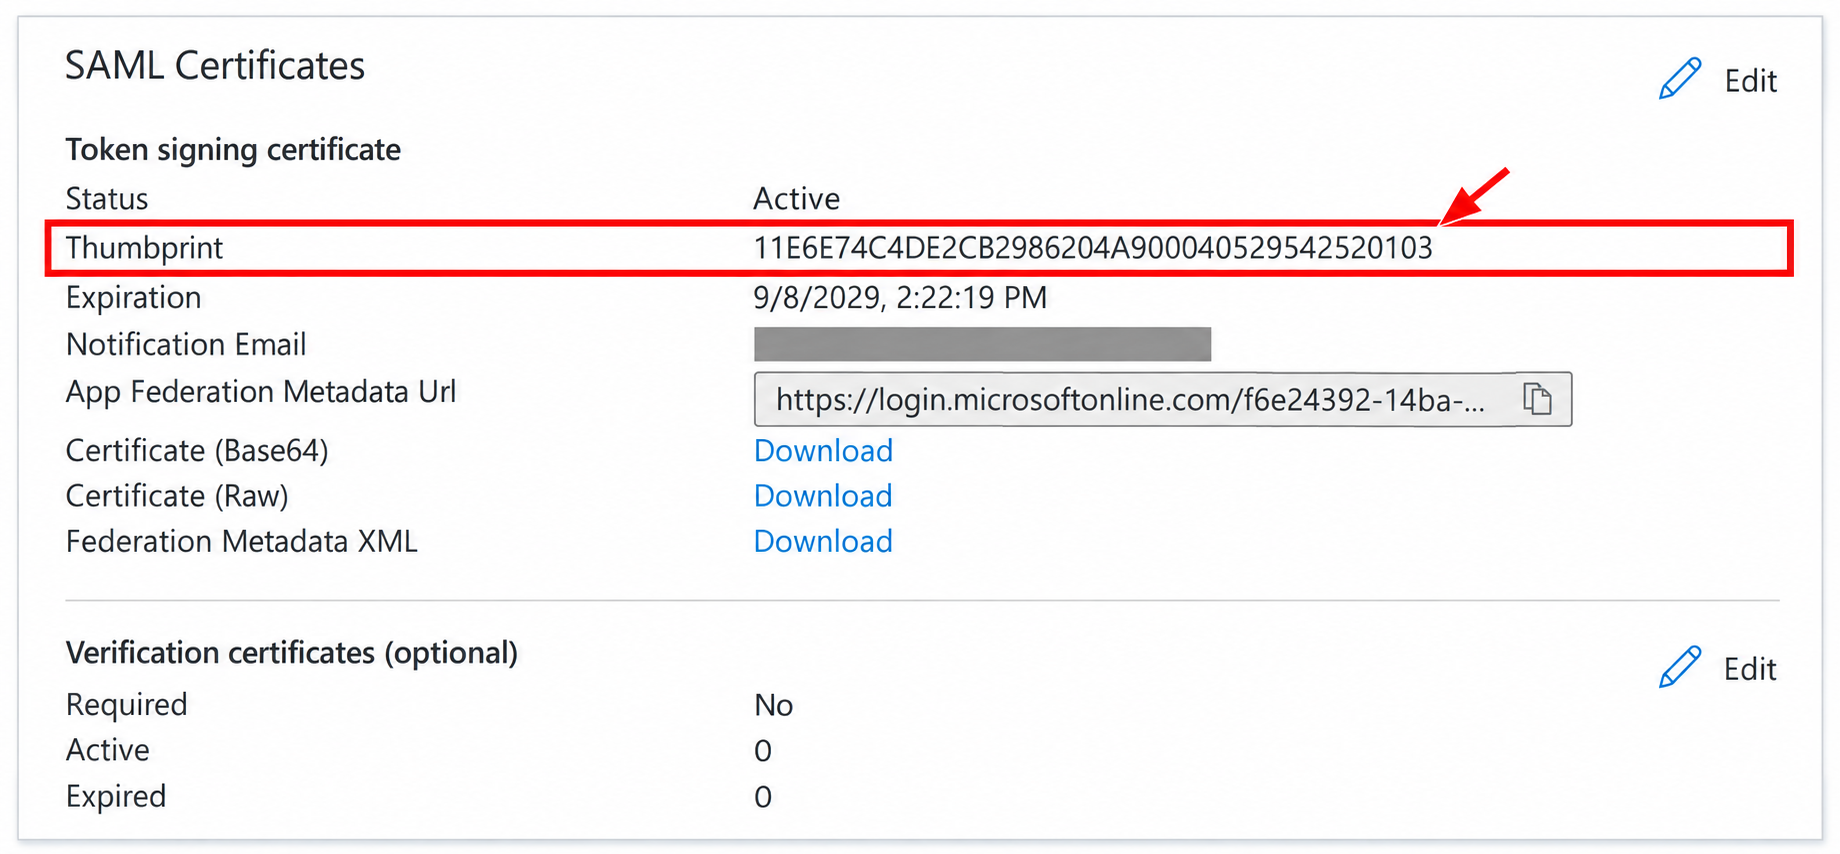
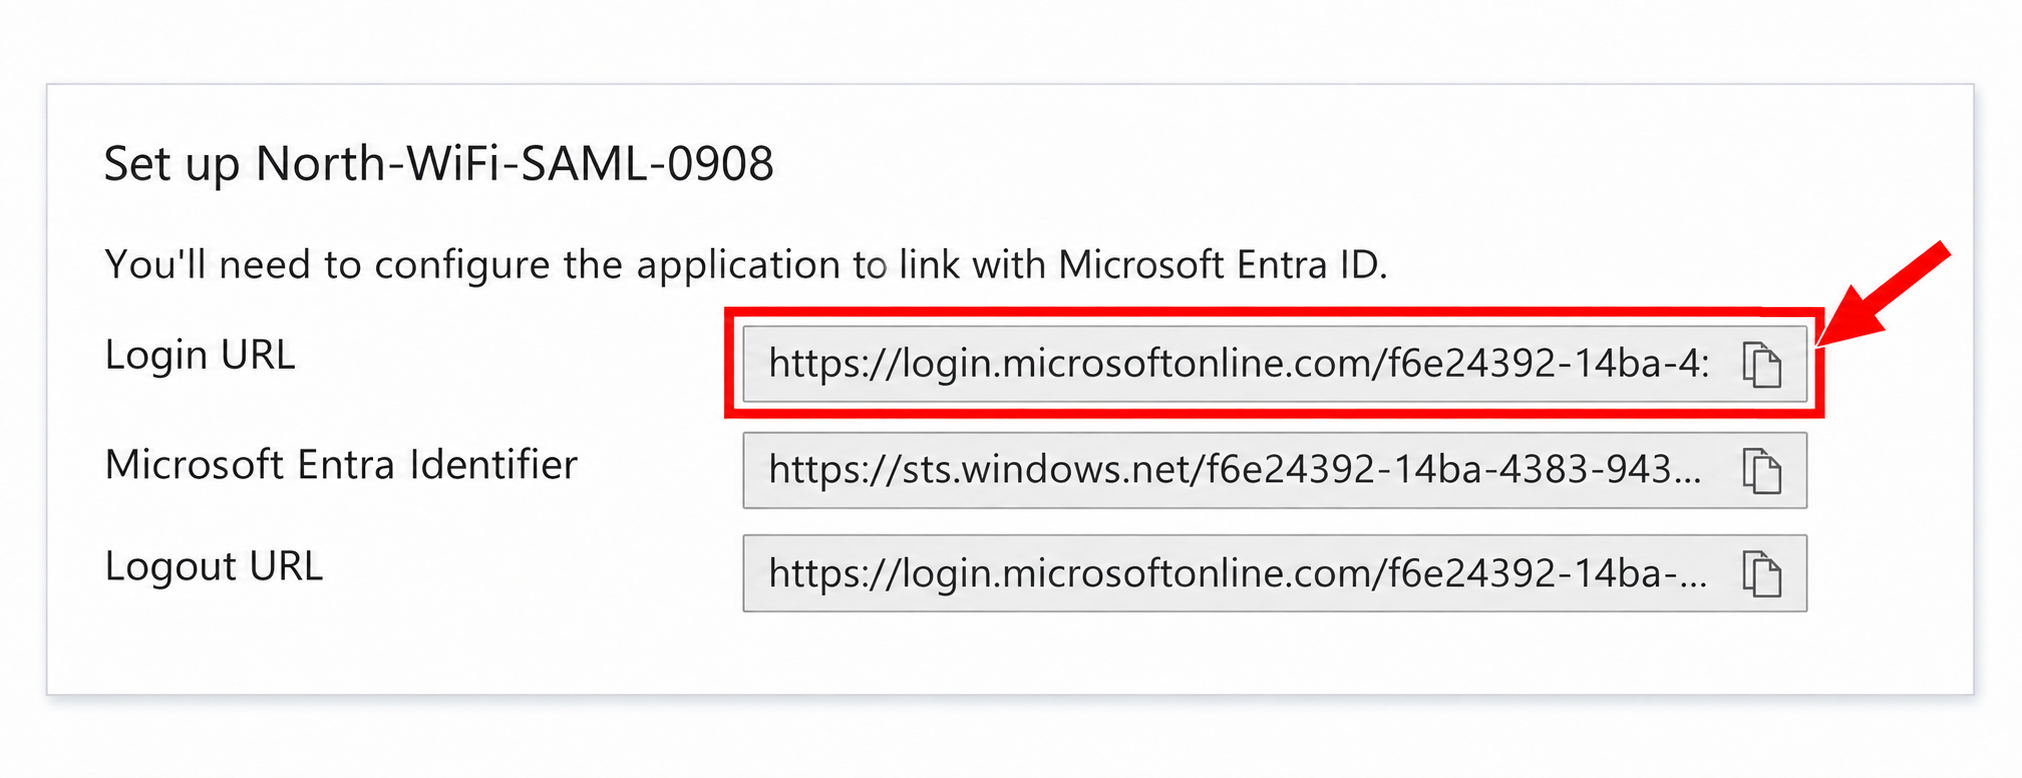
Return to Single sign-on. Under SAML Certificates, verify that the token signing certificate is Active and copy its Thumbprint. Under Set up [application name], copy the Login URL. These values connect the Grandstream portal to this application’s identity provider.
| Value from Microsoft | Where it will be used in Grandstream |
|---|---|
| Login URL | Enter the same Login URL in SSO Server URL and Redirect URL in the SAML SSO splash-page component. |
| Active signing-certificate Thumbprint | Enter it in X.509 Certificate SHA1 Fingerprint, separated into colon-delimited hexadecimal pairs. |
The Entra Login URL has the format https://login.microsoftonline.com/<tenant-id>/saml2. Copy it from your application rather than copying the tenant ID shown in an example screenshot. For the fingerprint format, A1B2C3… becomes A1:B2:C3:…. Use the complete thumbprint from your own active certificate, not this abbreviated illustration. Track the certificate’s expiration and update the portal fingerprint when the signing certificate changes.
Part 2: Configure the Grandstream Captive Portal
Sign in to GDMS Networking, select the organization and network containing the AP, and complete the following steps. If the AP is managed by a primary AP, a supported Grandstream router or GCC device, or GWN Manager, configure the portal on that managing device or platform. Navigation, field names, and available options may differ; the relationship remains splash page → portal policy → Wi-Fi network → assigned AP.
Create the SAML Splash Page
- Open Settings → Wi-Fi → Splash Page and select Add.
- Name the page, for example Guest Wi-Fi SAML. Keep the desired image, welcome text, and Terms of Use components.
- Enable SAML SSO under Logging Components. Disable unused login components so visitors see the intended SAML sign-in option.
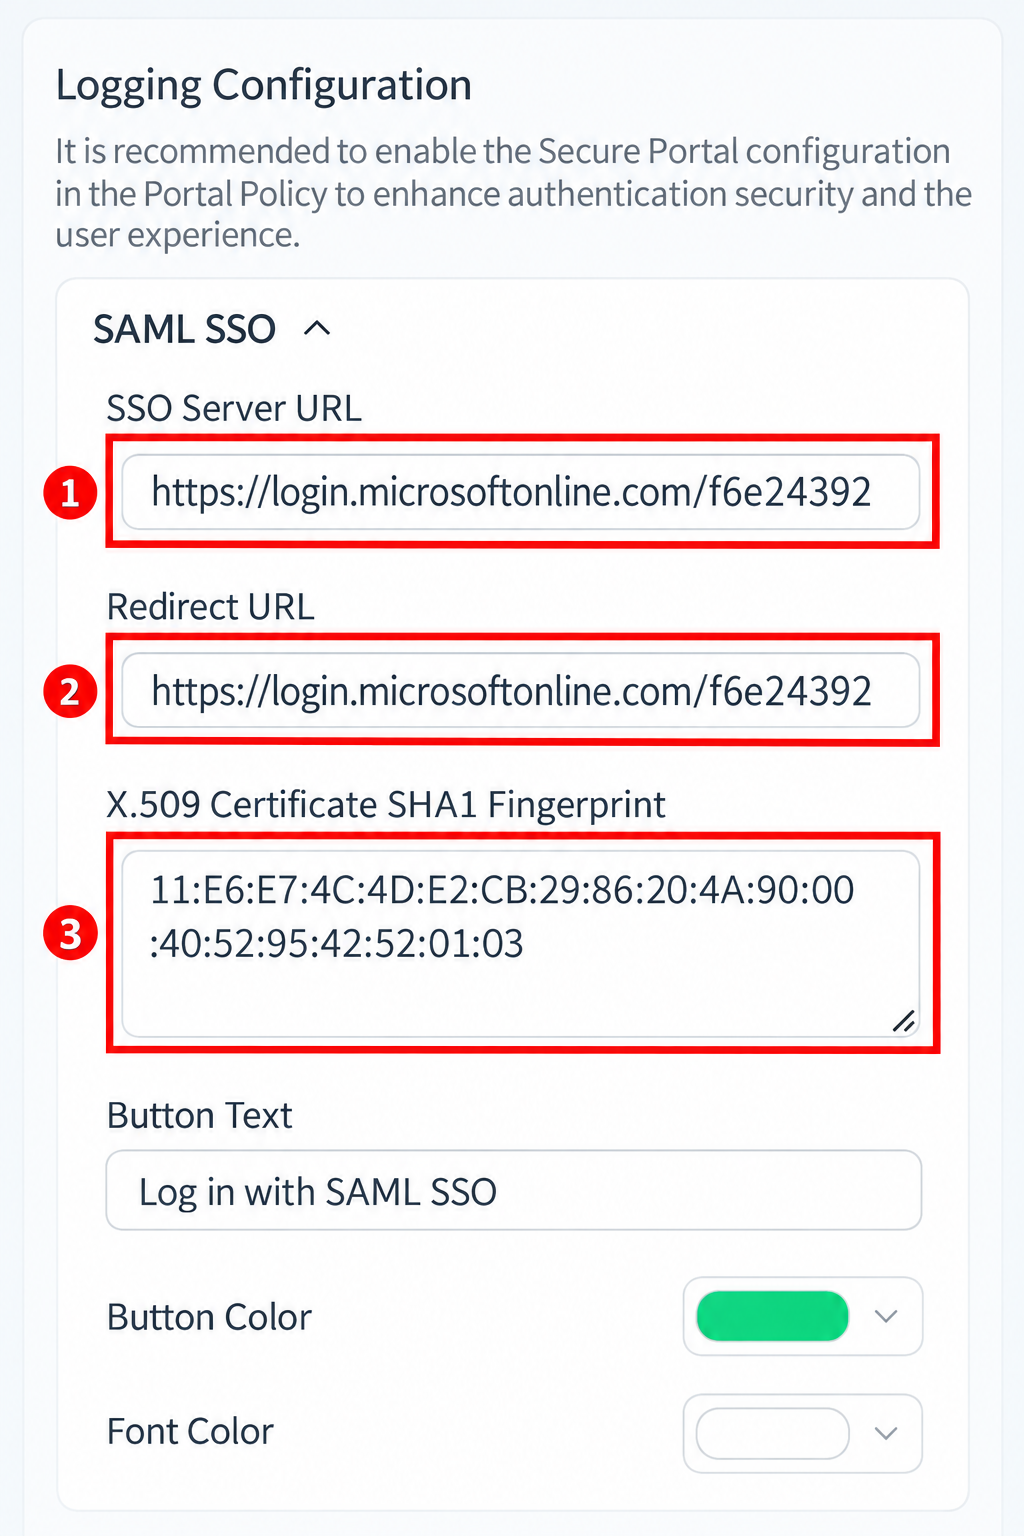
- Enter the values from Part 1 in the SAML SSO configuration, then save the splash page.
| SAML SSO field | Configuration |
|---|---|
| SSO Server URL | Paste the identity provider’s sign-in endpoint. For this Entra example, use the application’s Login URL. |
| Redirect URL | Paste the same Entra Login URL. This Grandstream field is not the Microsoft Reply URL / ACS address. |
| X.509 Certificate SHA1 Fingerprint | Paste the active token signing certificate’s complete SHA-1 thumbprint in colon-separated pairs. |
| Button Text | Use a clear label, such as Log in with SAML SSO. |
Create the Portal Policy
- Open Settings → Wi-Fi → Portal Policy and select Add.
- Enter a policy name and select Internal for Splash page. Under Splash Page Customization, select the SAML page created above.
- Set the session timing, enable Secure Portal, and configure the pre-authentication rules below.
- Save the policy after completing the required fields.
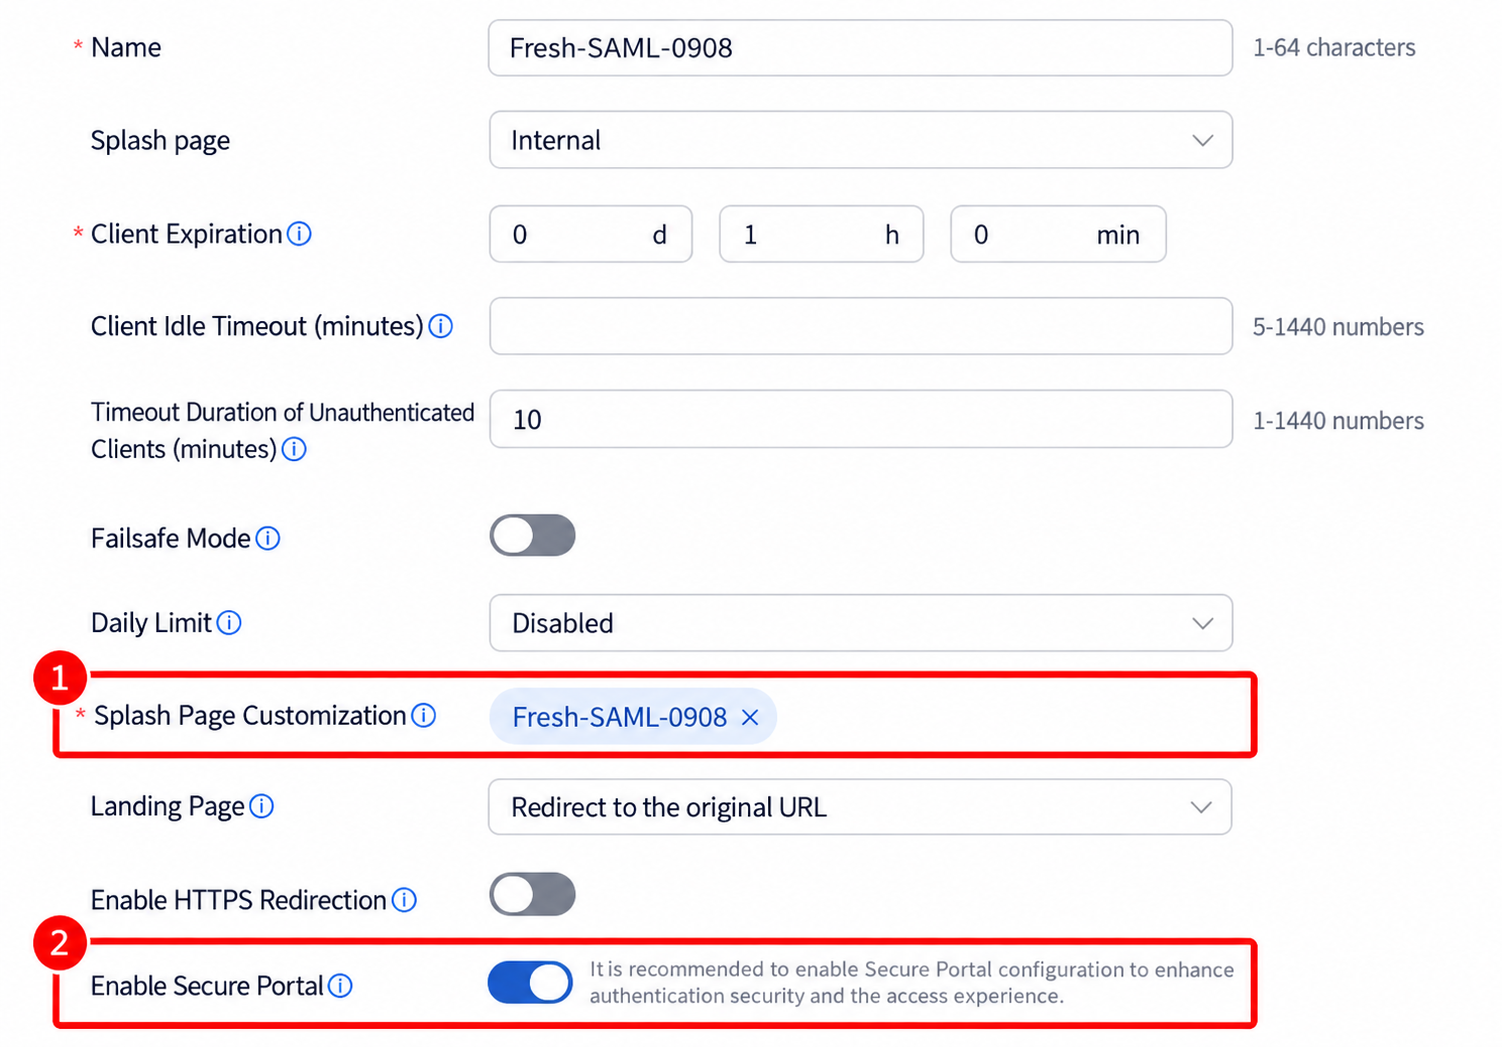
| Policy setting | Example configuration |
|---|---|
| Client Expiration | 1 hour. Choose the access duration appropriate for the deployment. |
| Timeout Duration of Unauthenticated Clients | 10 minutes in this example, allowing time to complete sign-in. |
| Failsafe Mode | Disabled in this example. |
| Daily Limit | Disabled in this example. |
| Landing Page | Redirect to the original URL. |
| Enable HTTPS Redirection | Disabled in this example. |
| Enable Secure Portal | Enabled. |
| MAC Bypass | No bypass entries in this example. |
| Post Authentication Rule Type | Blocklist, with no destination rules in this example. |
Allow Identity-provider Access Before Authentication
Visitors must reach the Microsoft sign-in page and its resources before the portal grants normal Internet access. Under Pre Authentication Rule(s), use Add New Authentication Rule to configure the following hostname entries. Keep any automatically supplied matching entry; do not duplicate it.
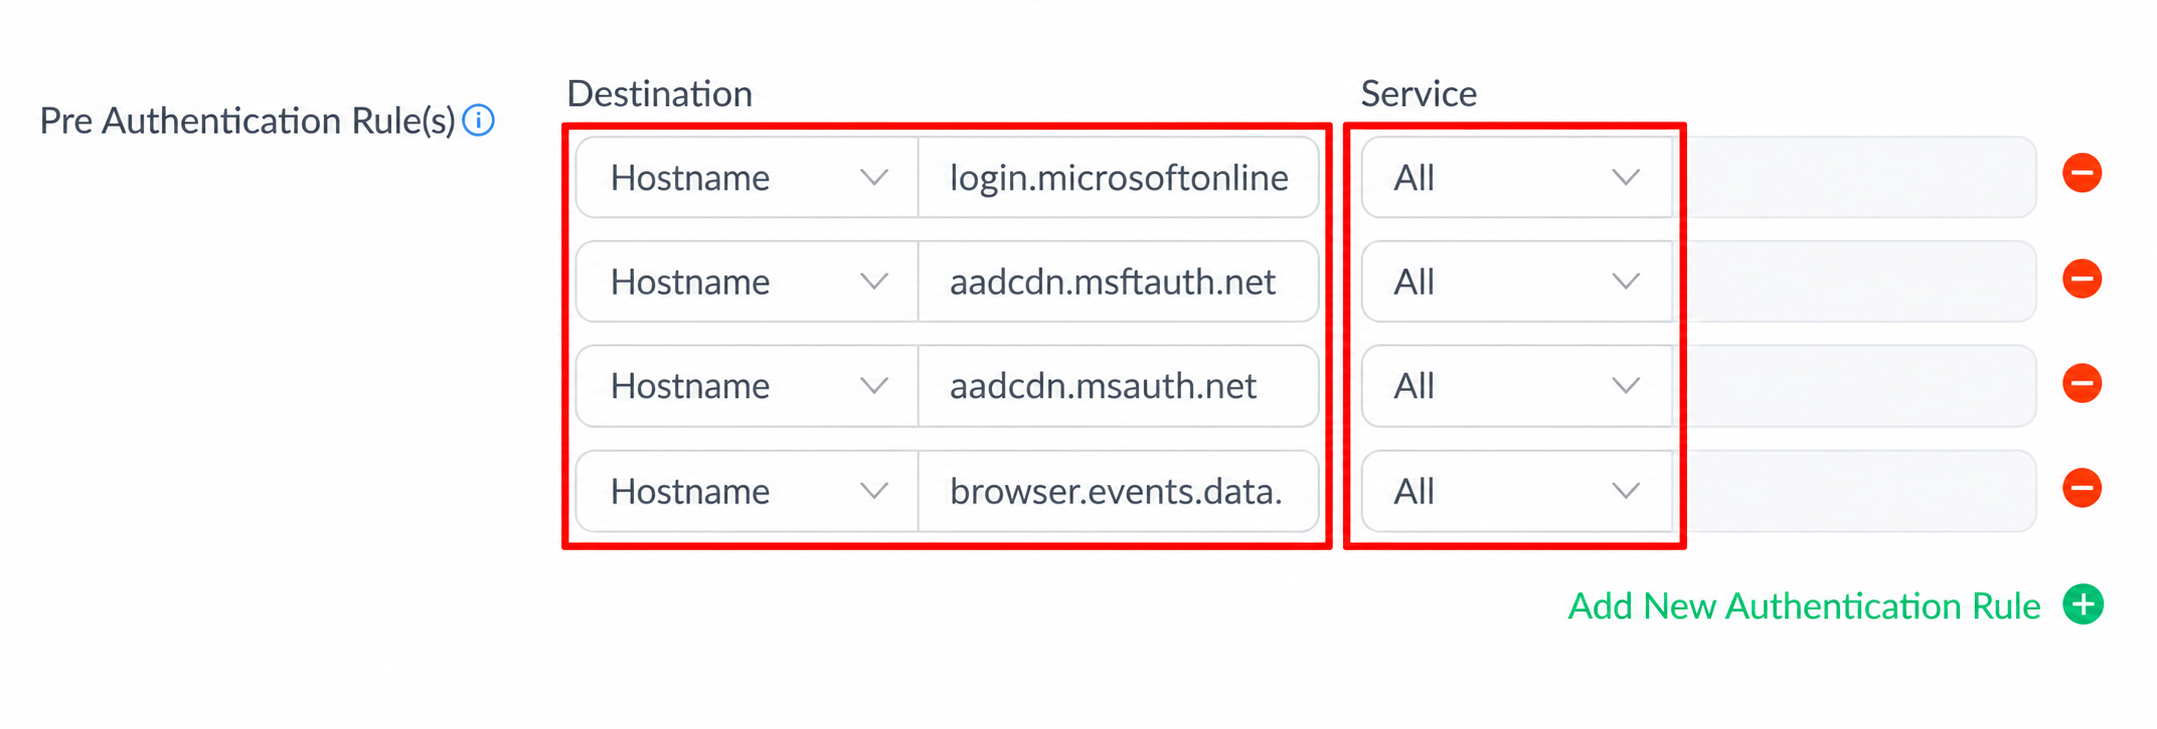
| Destination type | Hostname | Service |
|---|---|---|
| Hostname | login.microsoftonline.com | All |
| Hostname | aadcdn.msftauth.net | All |
| Hostname | aadcdn.msauth.net | All |
| Hostname | browser.events.data.microsoft.com | All |
These are the entries used in the successful Entra test. Enter hostnames only, without https:// or URL paths. The upstream network must also permit DNS resolution and access to these services. A different identity provider, federated sign-in service, or additional authentication step may require its own endpoints; use the requirements for that deployment.
Apply the Policy to the Wi-Fi Network
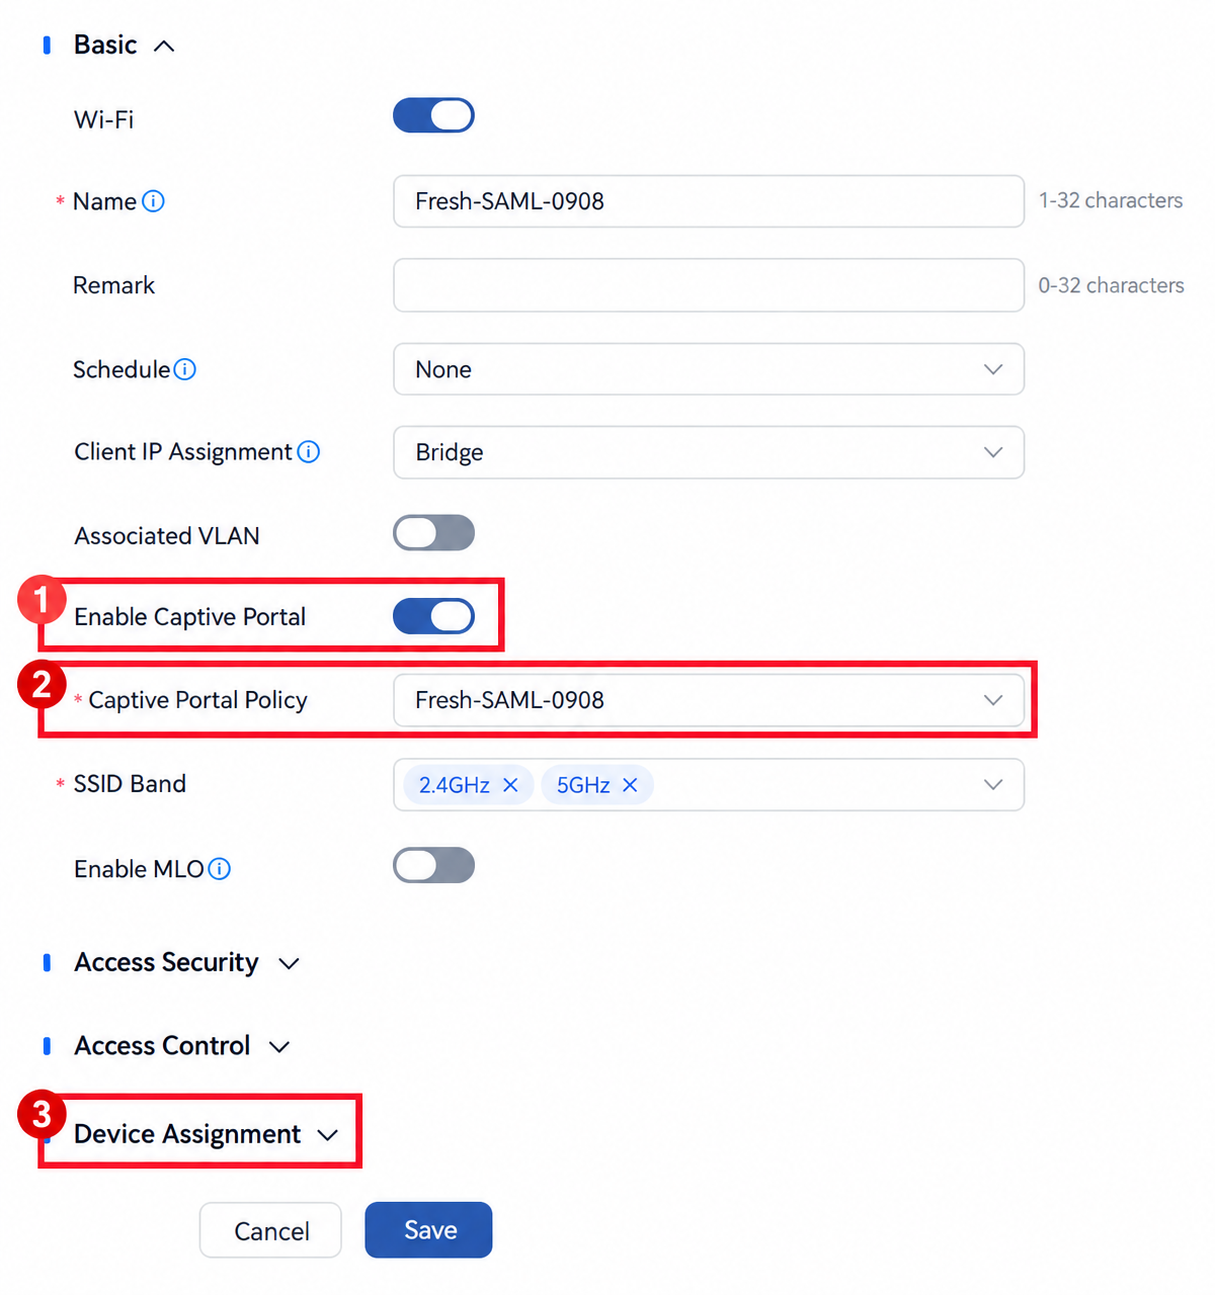
- Open Settings → Wi-Fi → Wireless LAN. Add a Wi-Fi network or edit the intended guest network.
- Under Basic, enable Wi-Fi, enter the SSID, enable Captive Portal, and select the new Captive Portal Policy. Select the required bands.
- For this example, keep Client IP Assignment: Bridge and no associated VLAN. In a deployment using a guest VLAN, ensure that its addressing, DNS, and upstream connectivity are configured.
- Under Access Security, choose Open for this portal-only example. SAML controls network access after association; an open SSID does not provide Wi-Fi link encryption. Apply your organization’s wireless-security requirements for production.
- Under Device Assignment, select the APs that should broadcast this network, then select Save.
- Verify that the Wireless LAN list shows the new SSID enabled, Portal enabled, and the expected online APs assigned.
Part 3: Verify the Visitor Experience
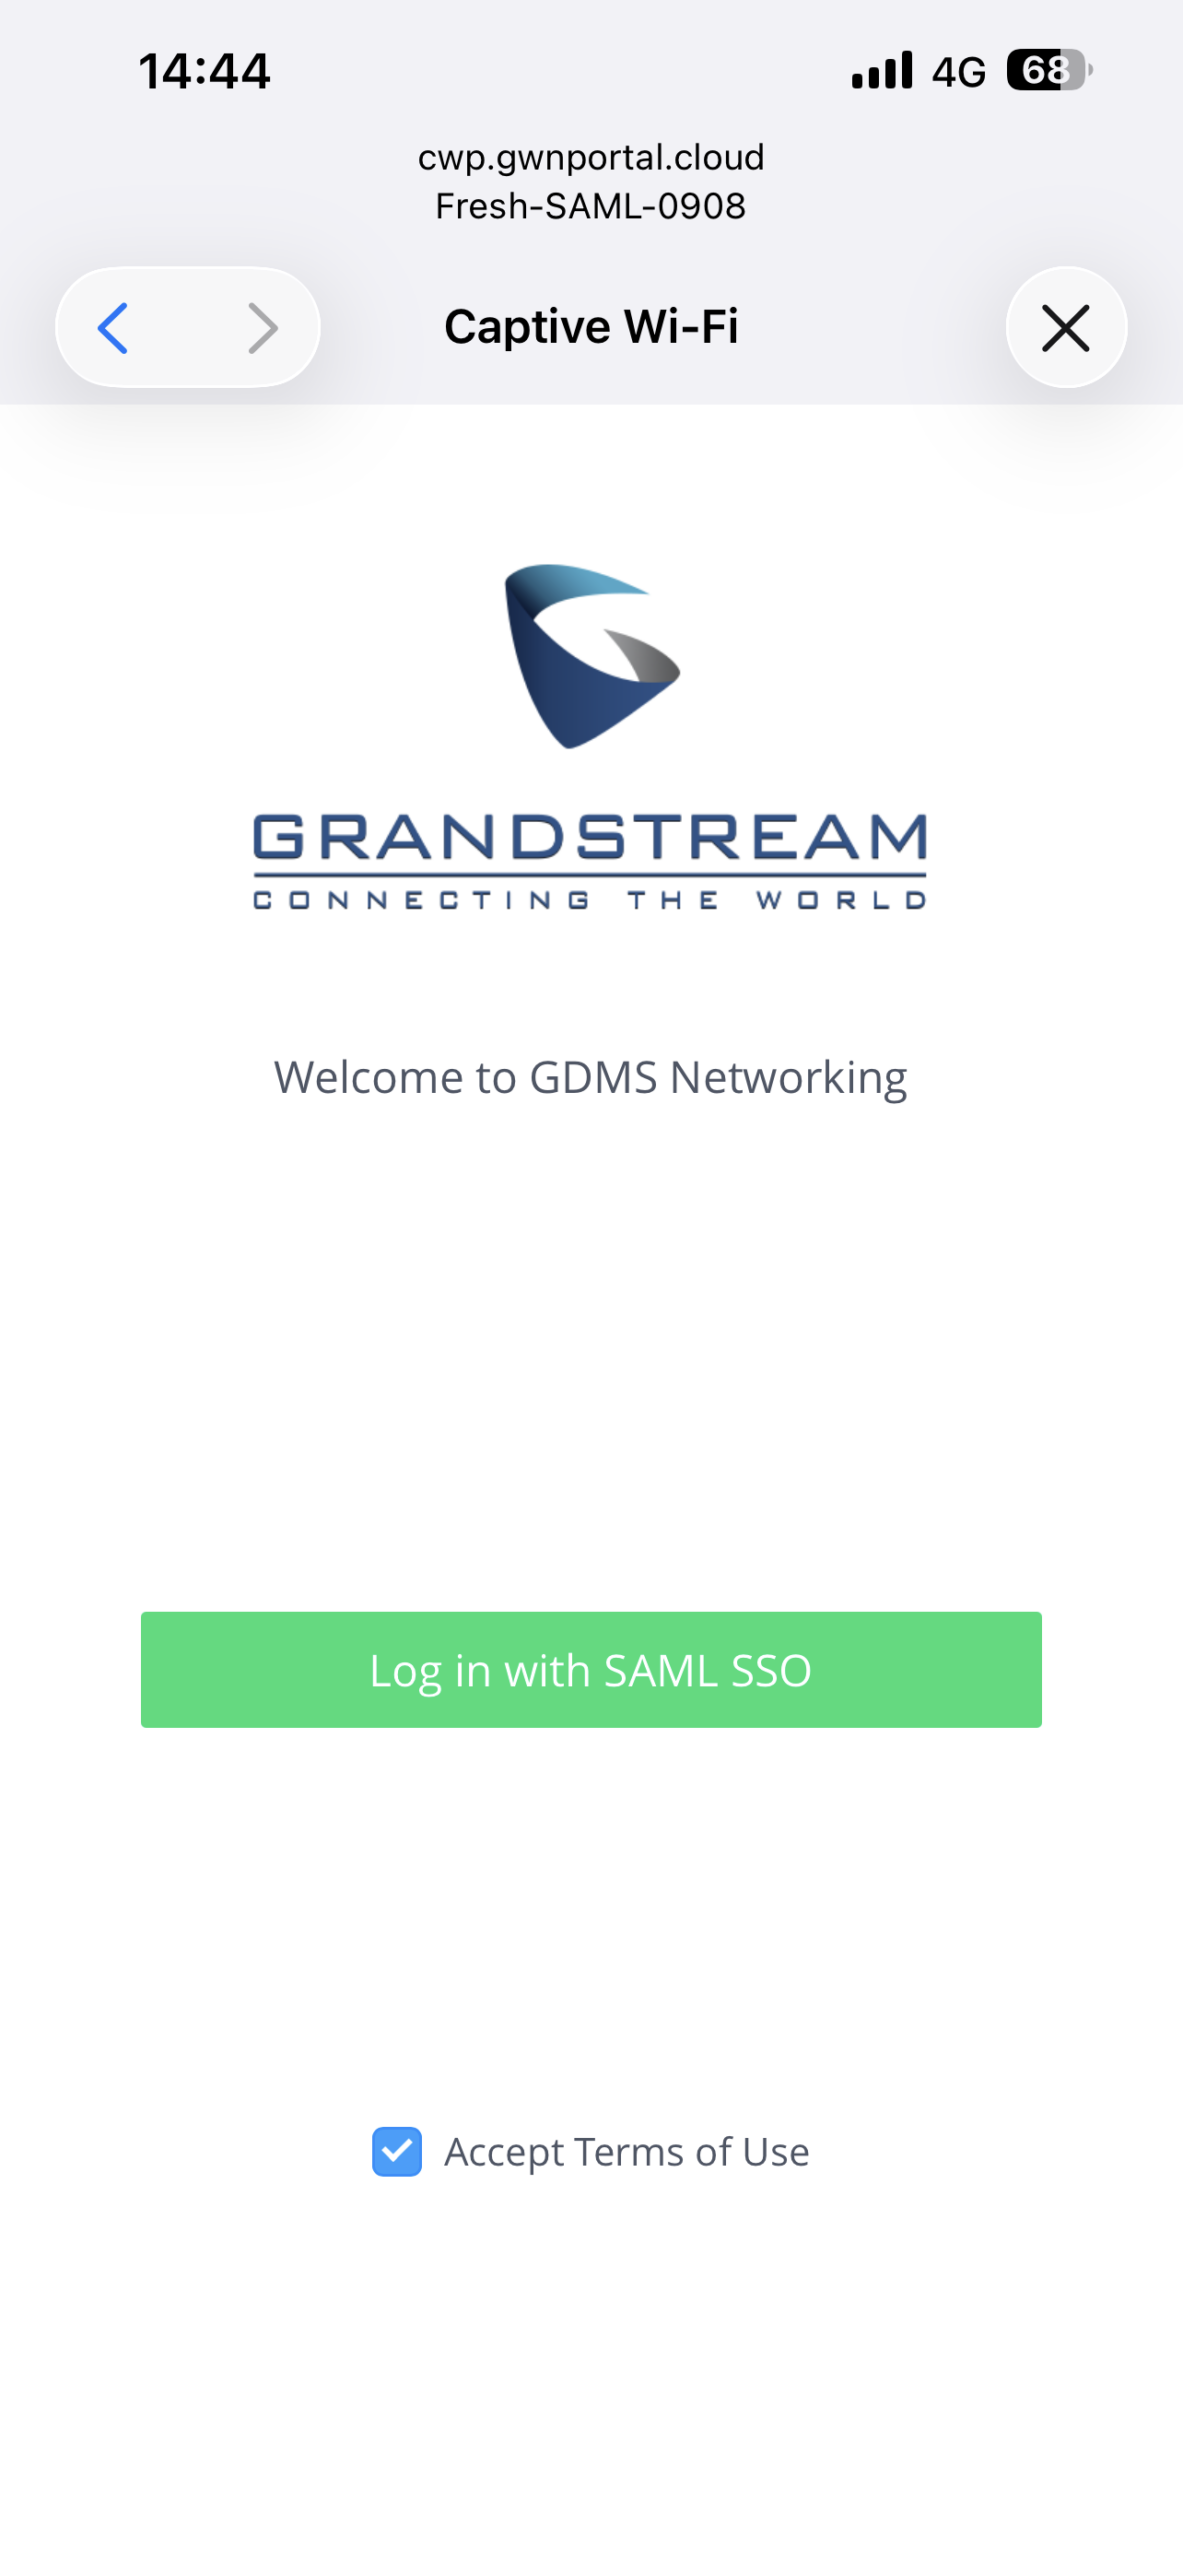
Connect a phone to the configured SSID. For an Internet-access test, disable mobile data so traffic cannot bypass the Wi-Fi connection. The screenshots below show the test SSID Fresh-SAML-0908; your deployment displays its own network name.
Open the Portal and Enter the Account
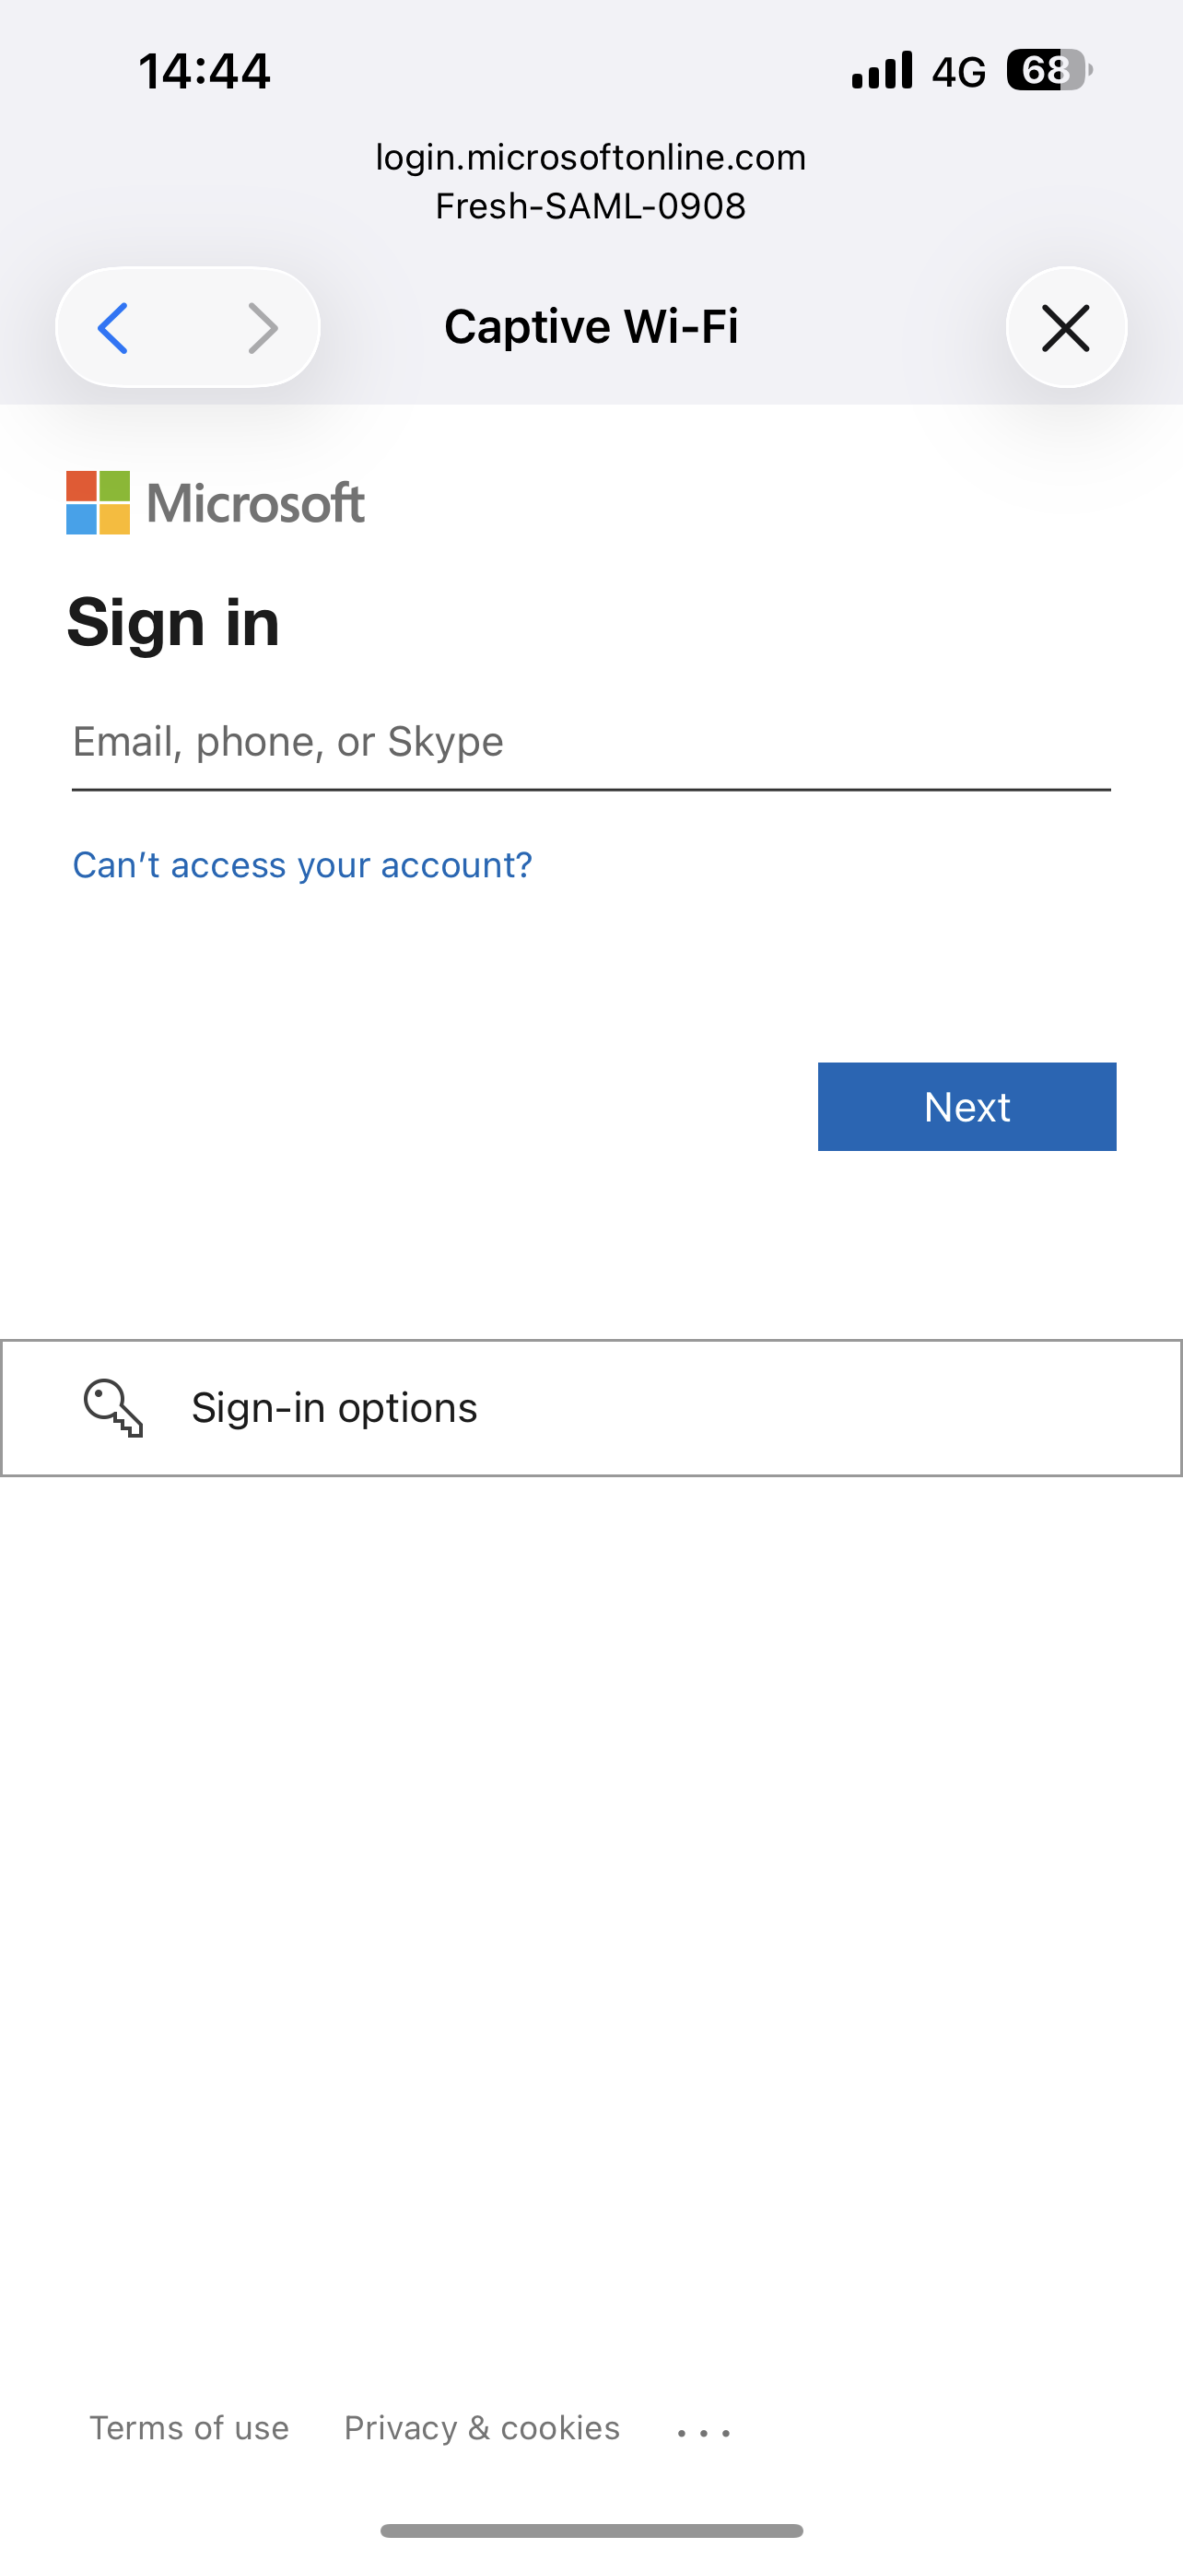
Accept the Terms of Use and select Log in with SAML SSO. The browser opens the identity provider’s sign-in page. Enter an account assigned to the SAML application and select Next.
Complete Identity-provider Authentication
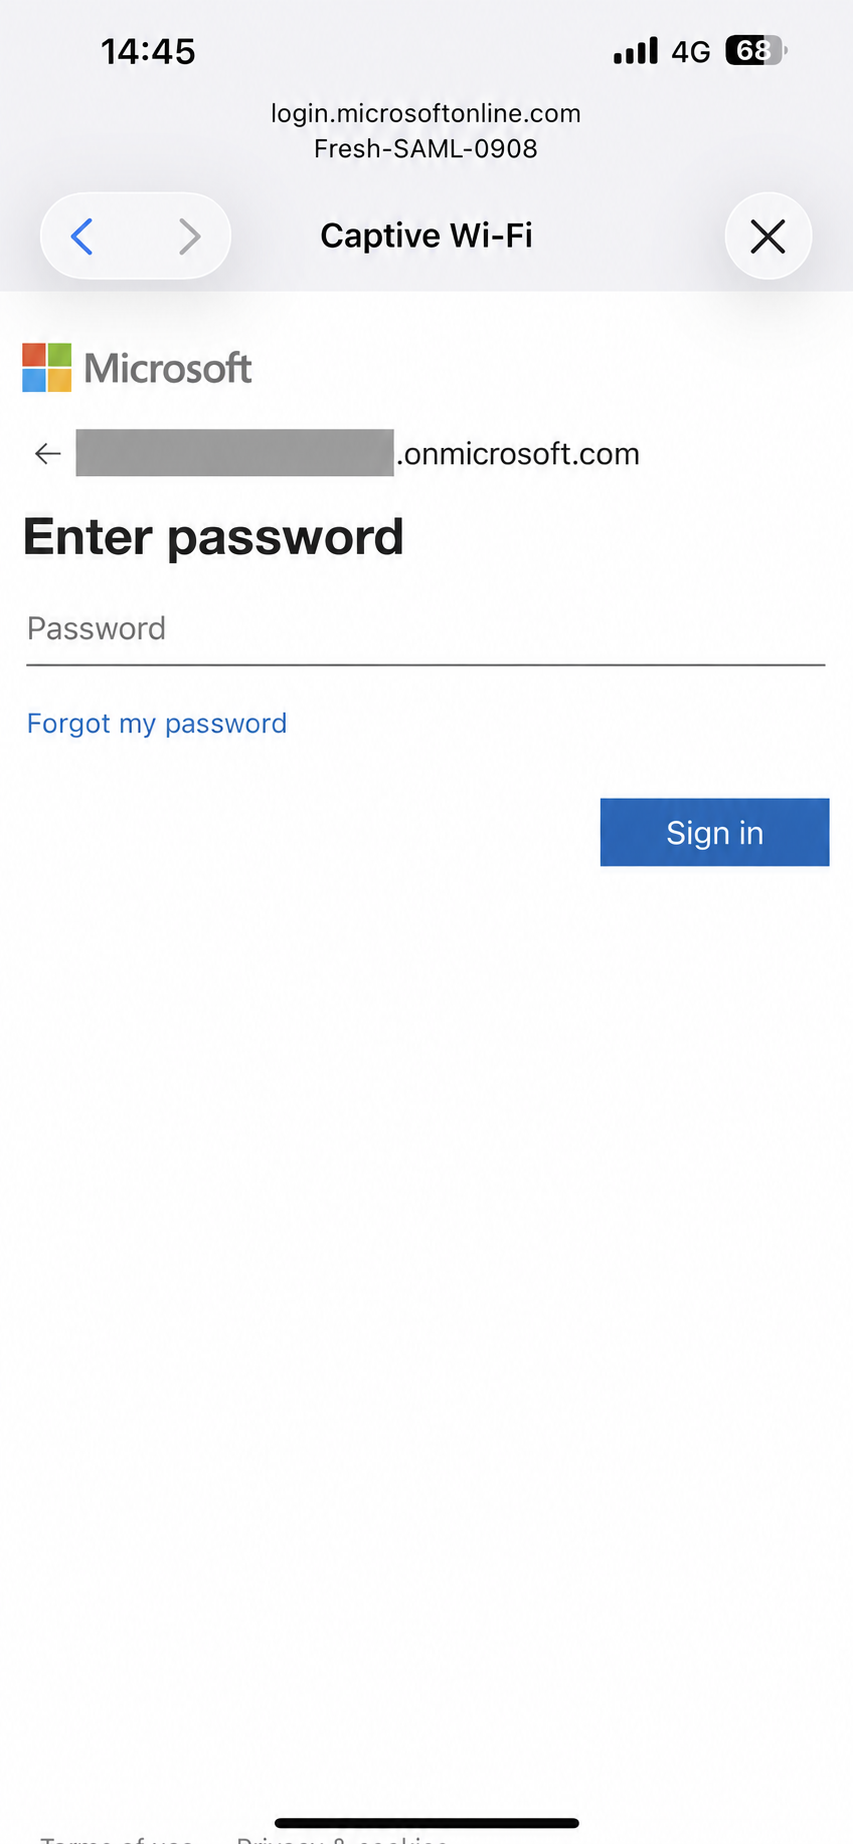
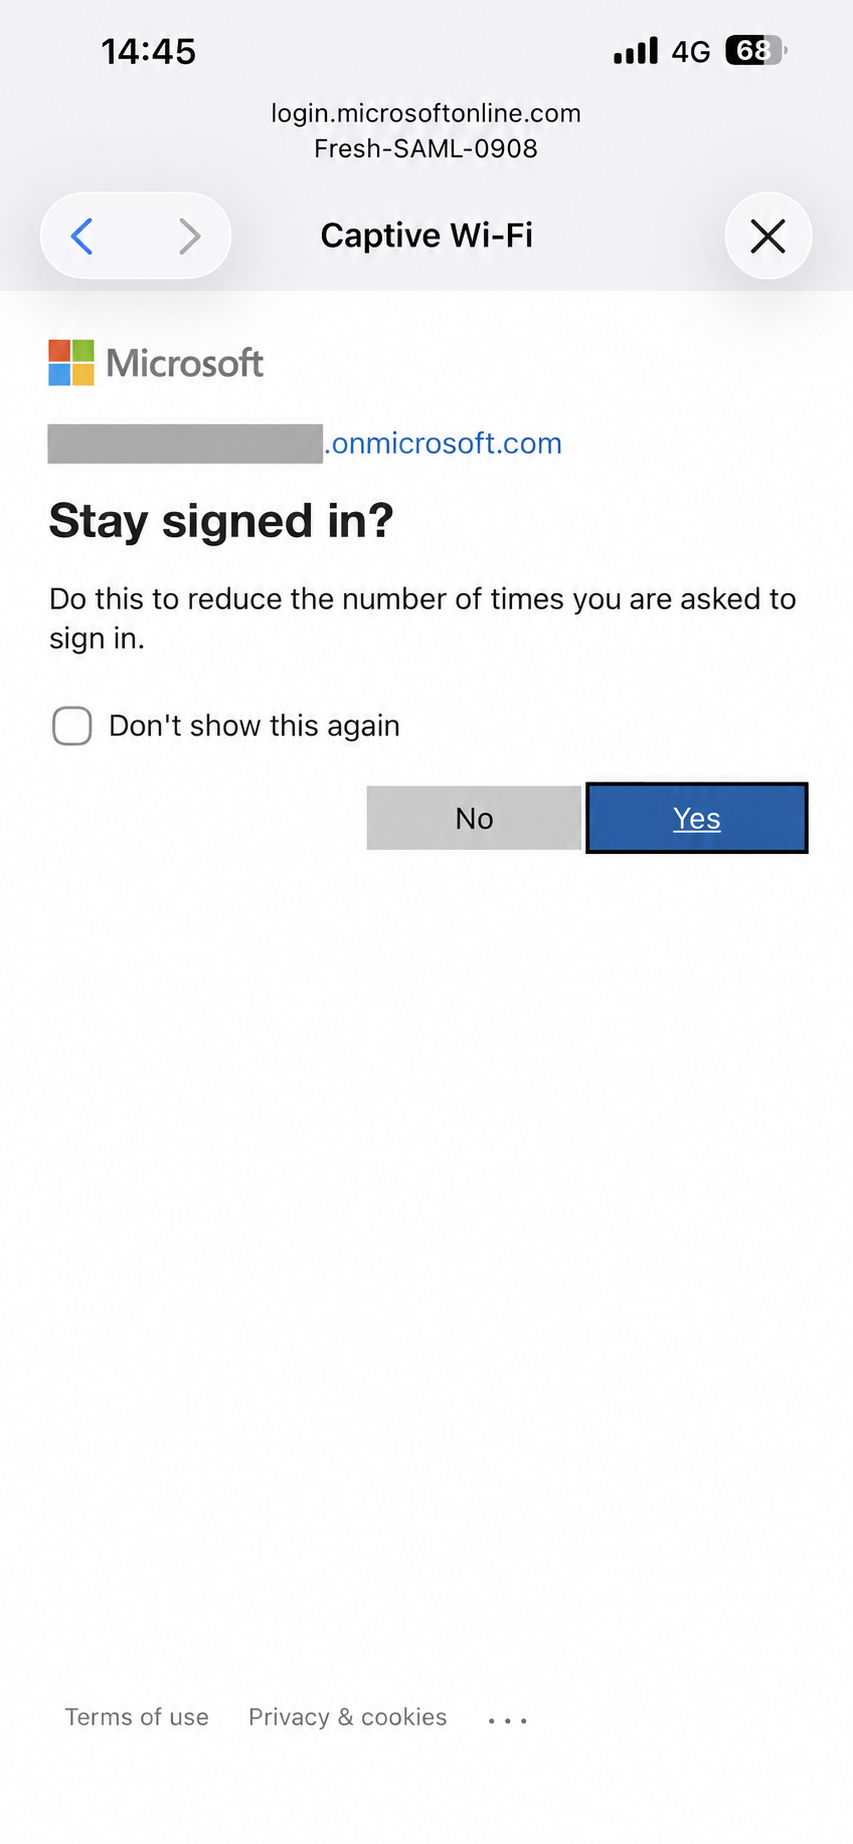
Enter the account password and select Sign in. Complete any additional verification required by the organization. If Microsoft asks whether to stay signed in, choose the appropriate option for the device. Existing sessions and organization policies can change which prompts appear.
Confirm Network Access
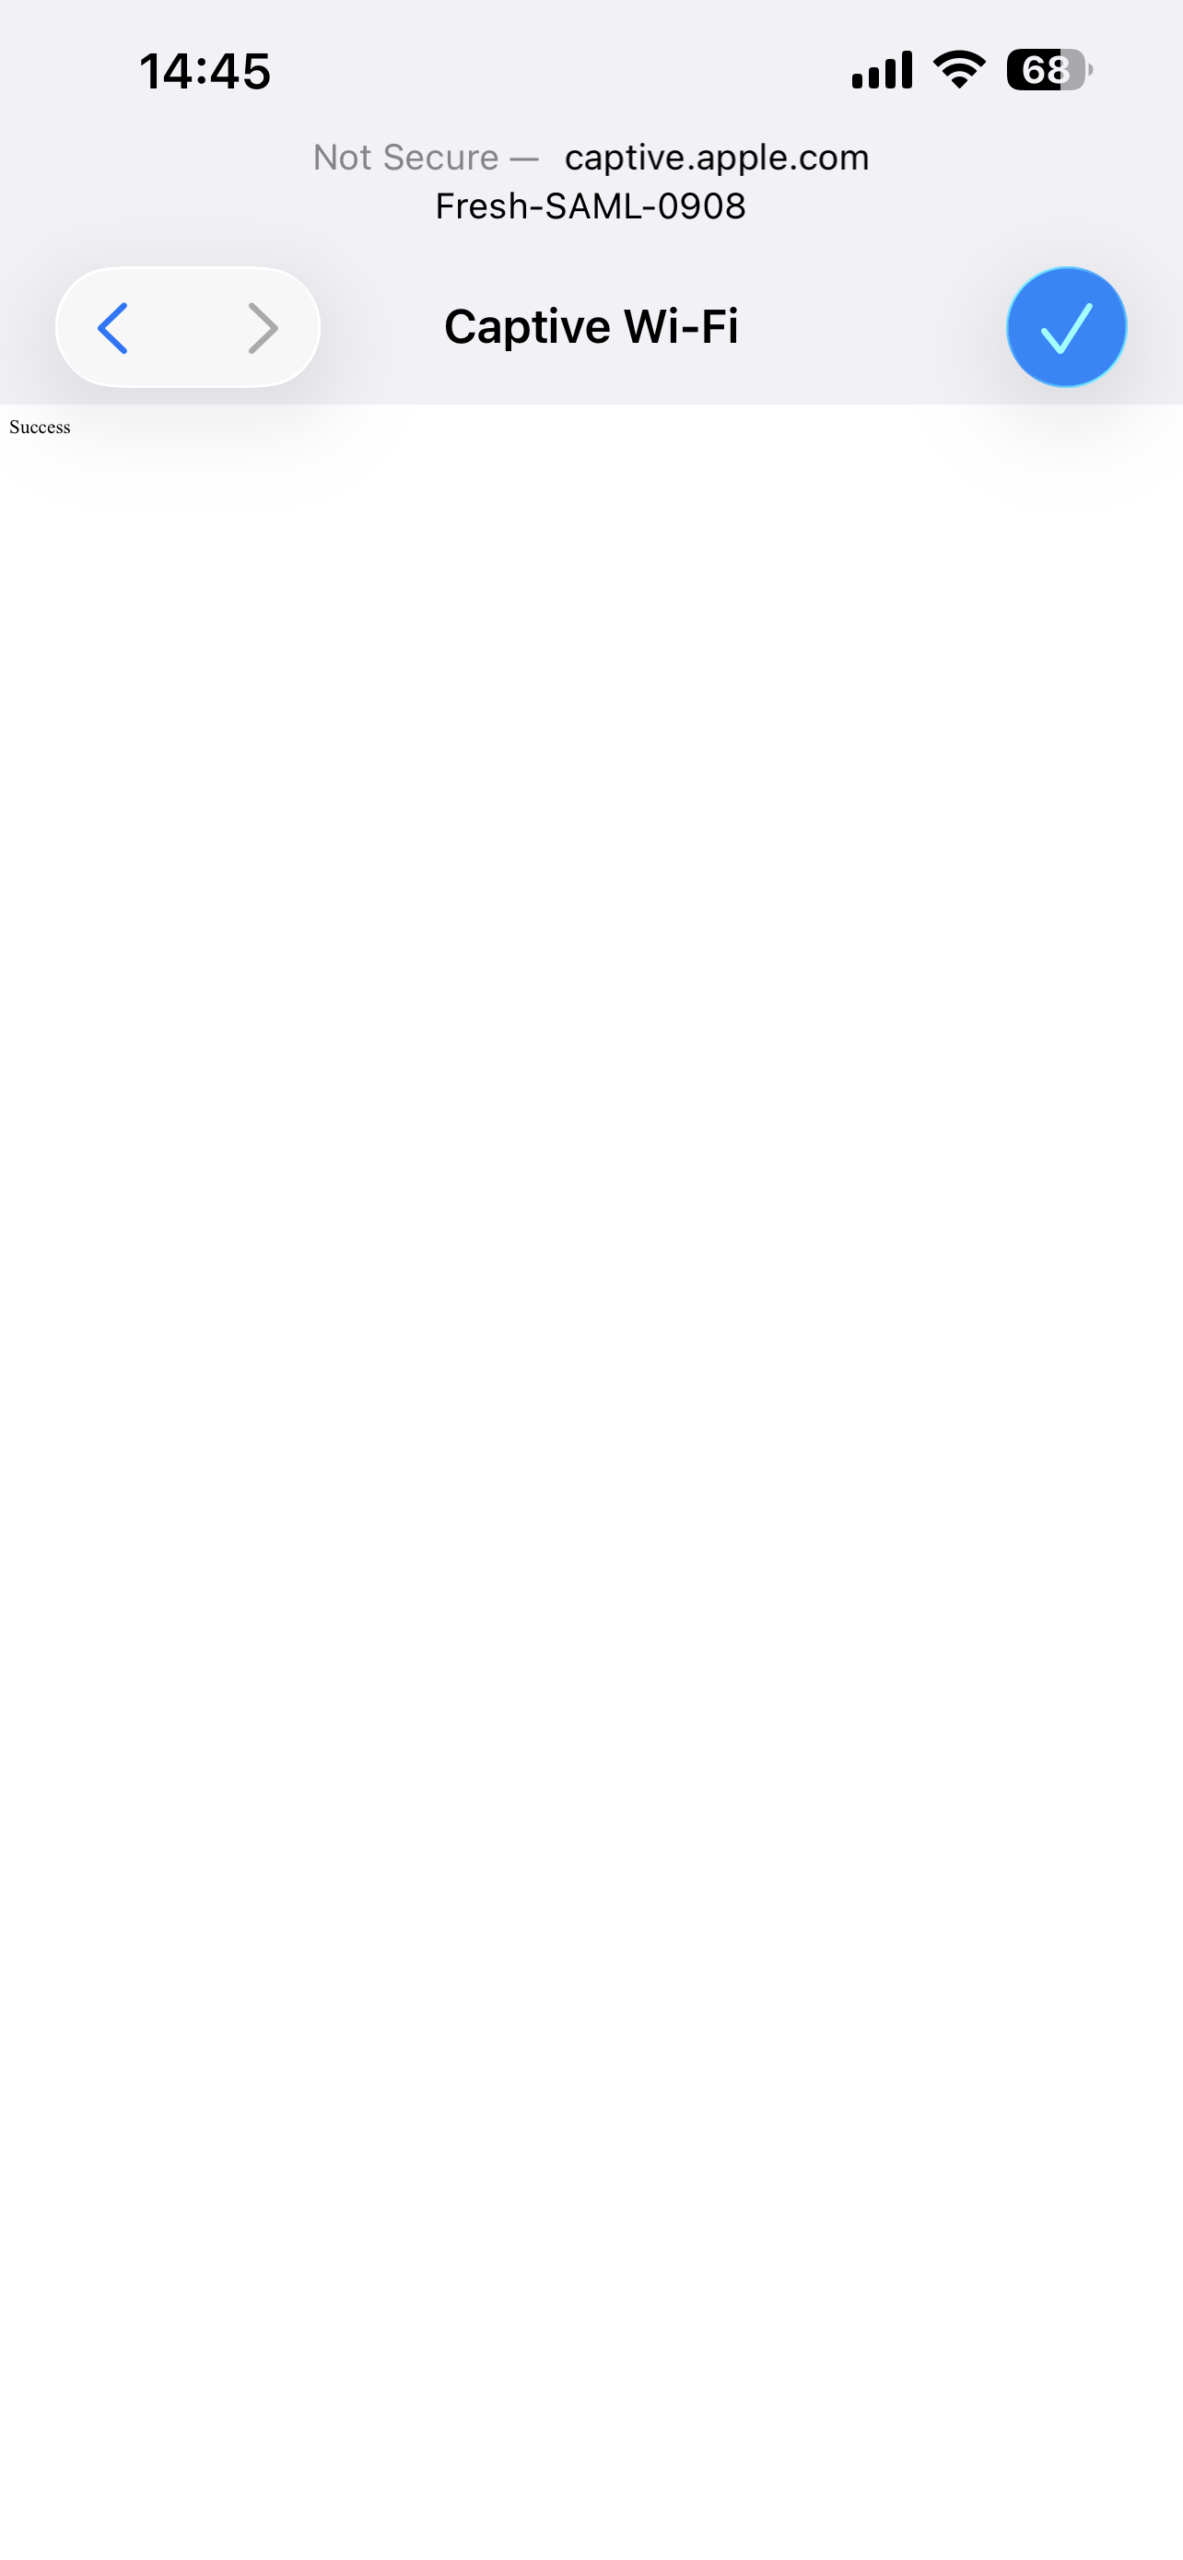
After authentication, the identity provider returns a signed SAML response to the captive portal. When validation succeeds, the portal authorizes the client. In this iPhone example, the captive-network check displays Success and a completion checkmark. Close the portal and open a website with mobile data still disabled to confirm Internet access.
Supported Devices and Management Options
This guide covers Grandstream GWN76xx indoor and outdoor access points, except GWN7610 and GWN7602, which are end-of-life (EOL) models and are not covered by this SAML SSO configuration.
Configure the SAML SSO captive portal through the interface that manages your access points:
- Primary access point: Use the local web interface of the access point acting as the primary controller for itself and any other access points it manages.
- GDMS Networking (cloud-based management): Configure the captive portal in the cloud platform managing your access points.
- GWN Manager (on-premises management): Configure the captive portal in the locally hosted management platform.
This walkthrough uses GDMS Networking. The same SAML SSO configuration principles apply to the other management options; menu locations and screen layouts may differ.