


Overview
The GWN7660ELR is an enterprise-grade long-range Wi-Fi 6 access point that allows businesses to build next-generation Wi-Fi networks for high-density environments. It supports weatherproof casing and heat resistant technology, dual-band 2×2:2 MIMO with OFDMA technology and a sophisticated antenna design for maximum network throughput that supports 256 clients and an expanded 300-meter coverage range. It also provides IP68 weatherproof and dust-proof ability, as well as -30 to 60°C operating temperature, this ensures that the Wi-Fi 6 access point can operate properly in difficult weather conditions. To ensure easy installation and management, the GWN7660ELR includes a built-in controller embedded within the product’s web user interface. It is also supported by GWN.Cloud and GWN Manager, Grandstream’s free cloud and on-premise Wi-Fi management platform. The GWN7660ELR is the ideal Wi-Fi AP for voice over Wi-Fi deployment and offers a seamless connection with Grandstream’s Wi-Fi voice and video IP phones. With support for advanced QoS, low-latency real-time applications, mesh networks, captive portals, a Gigabit Ethernet port with PoE/PoE+ and a 2.5 Gigabit SFP port, the GWN7660ELR is an ideal outdoor Wi-Fi access point for enterprises, multiple floor offices, warehouses, hospitals, schools, and more.
Package Contents
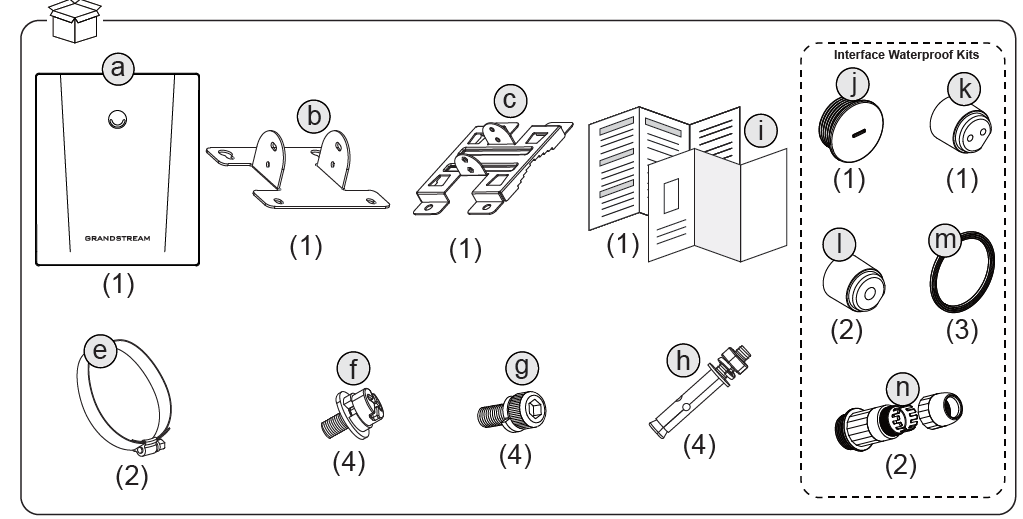
| Letter | Package Content | Quantity |
|---|---|---|
| a | GWN7660ELR Access Point | 1x |
| b | Base Bracket | 1x |
| c | Mounting Bracket | 1x |
| e | Metal Straps | 2x |
| f | Expansion Screws | 4x |
| g | Screws (HM 5.0 × 12) | 6x |
| h | Screw (HM 5.0 × 65) | 1x |
| i | Quick Installation Guide & Regulator Paper | 1x |
| j | Nut Plugs | 2x |
| k | SFP Sealing Plug | 1x |
| l | RJ45 Sealing Plugs | 2x |
| m | O-Rings | 4x |
| n | Clamp Nuts | 2x |
GWN7660ELR Ports

Port | Description |
SFP Port | 2.5G SFP Port (support 2.5Gbps aggregate wired throughput). |
NET/POE 1G | Ethernet RJ45 port 1Gbps to your router or another GWN76xx, support PoE/PoE+. |
RESET | Factory reset button. |
GWN7660ELR Ports
Powering and Connecting the GWN7660ELR
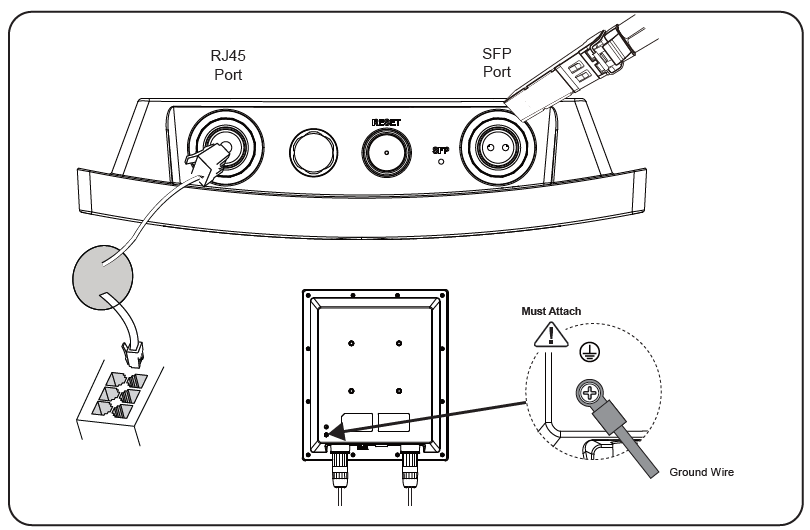
The GWN7660ELR can be powered using a PoE/PoE+ switch or PoE injector. Follow the steps below to power on and connect the device:
Step 1: Connect the ground wire to the grounding point on the GWN7660ELR and secure it properly.
Step 2: Plug an RJ45 Ethernet cable into the RJ45 port of the GWN7660ELR.
Step 3: Connect the other end of the RJ45 Ethernet cable to the uplink port of a PoE/PoE+ switch to power the device and establish the network connection.
Step 4: If the GWN7660ELR is connected to the network through its SFP port, connect the SFP cable to the SFP port. In this configuration, connect the RJ45 Ethernet port to a PoE/PoE+ switch or PoE injector without using the uplink connection. The RJ45 connection is used to provide power to the device.
Hardware Installation
GWN7660ELR can be mounted on the wall or on a metal bar, Please refer to the following steps for the appropriate installation.
Preventing Water Ingress
- Create a drip loop: Before connecting the cable to the AP, form a downward loop below the connection point. This allows water to drain away instead of traveling along the cable into the AP connection.
- Seal cable-entry points: Properly seal any opening where the cable passes through a wall or enters a building or enclosure to prevent water ingress.
Waterproof Kits Installation
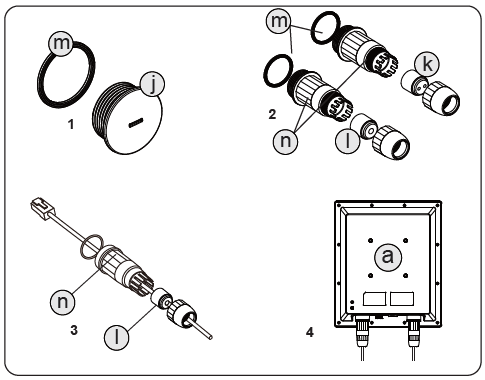
- If the Ethernet (RJ45) or SFP port is not used, please use the O-ring and the nut plug to seal the port to ensure waterproofing, and to use the port remove it with a flat screwdriver.
- Place the O-ring between the port and the front clamp nut, and place the Ethernet/Fiber joint between the front and the back of the clamp nut.
- Insert the Ethernet/Fiber cable through the O-ring, front clamp nut, Ethernet/Fiber joint and the back clamp nut, if the RJ45/Fiber connector is attached, please remove it first then attach it back.
- Connect the Ethernet (RJ45) or Fiber (SFP module) to the appropriate port, then screw the front clamp nut with the GWN7660ELR port and screw the back clamp nut with the front clamp nut.
Wall Mount
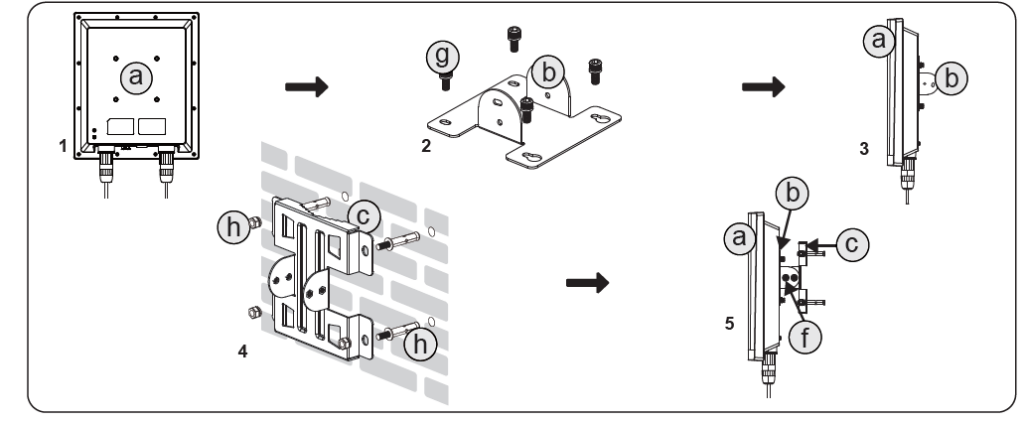
- Please refer to the waterproof kits installation.
- Connect the Ethernet (RJ45) or Fiber (SFP module) cable to the correct GWN7660ELR port and tighten the waterproof joints.
- Attach the Base Bracket with screws (HM 5.0 x 12) on the back of GWN7660ELR access point.
- Drill four holes on the wall based on the positions of the ones on the mounting bracket (use the mounting bracket as a drill template). Then, fix an expansion screw in each hole.
- Assemble the base bracket and mounting bracket together with the screw (HM 5.0 x 65) and screws (HM 5.0 x12).
- Attach the GWN7660ELR access point by securing the mounting bracket with the expansion screws on the wall.
Pole Mount
- Please refer to the waterproof kits installation.
- Connect the Ethernet (RJ45) or Fiber (SFP module) to the correct GWN7660ELR port and tighten the waterproof joints.
- Attach the Base Bracket with screws (HM 5.0 x 12) on the back of GWN7660ELR access point.
- Assemble the Base Bracket and Mounting Bracket together with the screw (HM5.0 x 65) and screws (HM 5.0 x 12).
- Assemble the Base Bracket and Mounting Bracket together with the screw (HM5.0 x 65) and screws (HM 5.0 x 12).
- Straighten out the end of the metal straps and slide it through the back of the base bracket.
- Wrap the metal strap around the pole and use a flathead screwdriver to tighten the locking mechanism by turning it clockwise.

Connect to GWN7660ELR Default Wi-Fi Network
GWN7660ELR can be used as a standalone access point out of the box, or after a factory reset with Wi-Fi enabled by default.
After powering the GWN7660ELR and connecting it to the network, GWN7660ELR will broadcast a default SSID based on its MAC address GWN[MAC’s last 6 digits] and a random password.
Accessing the Configuration Interface
A computer connected to the GWN7660ELR’s SSID, or to the same network as the GWN7660ELR can discover and access its configuration interface using one of the below methods:
Method 1: Discover GWN7660ELR using its MAC Address
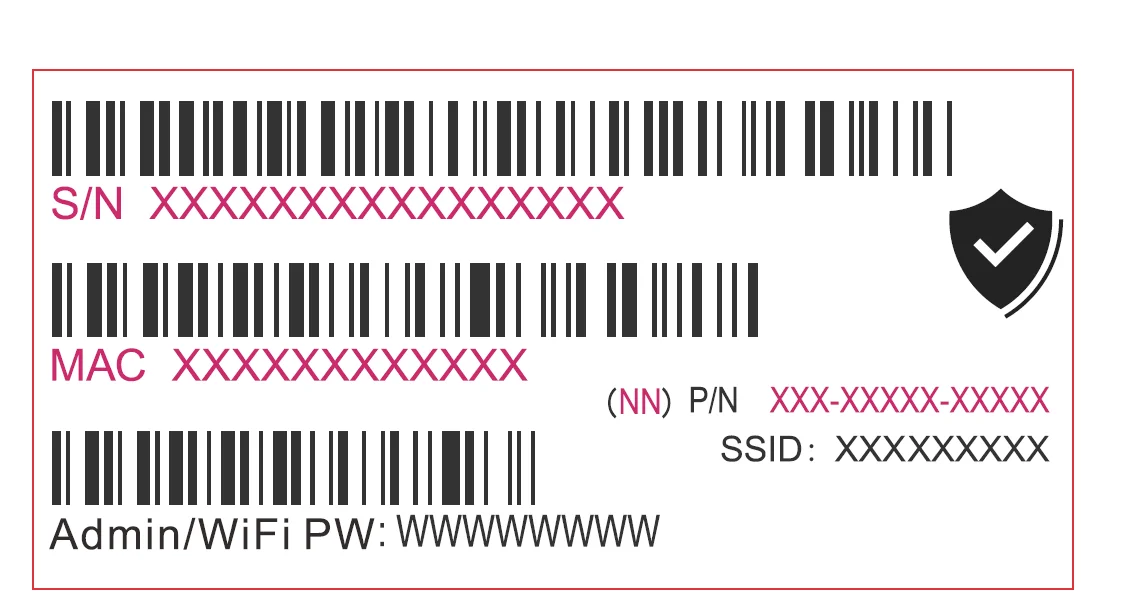
- Locate the MAC address on the MAC tag of the unit, which is on the underside of the device, or on the package.
- From a computer connected to the same network as the GWN7660ELR, type in the following address using GWN7660ELR’s MAC address on your browser https://gwn_<mac>.local
Method 2: Discover GWN7660ELR using GWN Discovery Tool
- Download and install GWN Discovery Tool from the following link: https://www.grandstream.com/tools/GWNDiscoveryTool.zip
- Open the GWNDiscoveryTool, and click on Scan.
- The tool will discover all GWN76xx Access Points connected to the network showing their MAC and IP addresses.
- Click on Manage Device to be redirected directly to the GWN7660ELR’s configuration interface, or type in manually the displayed IP address on your browser.
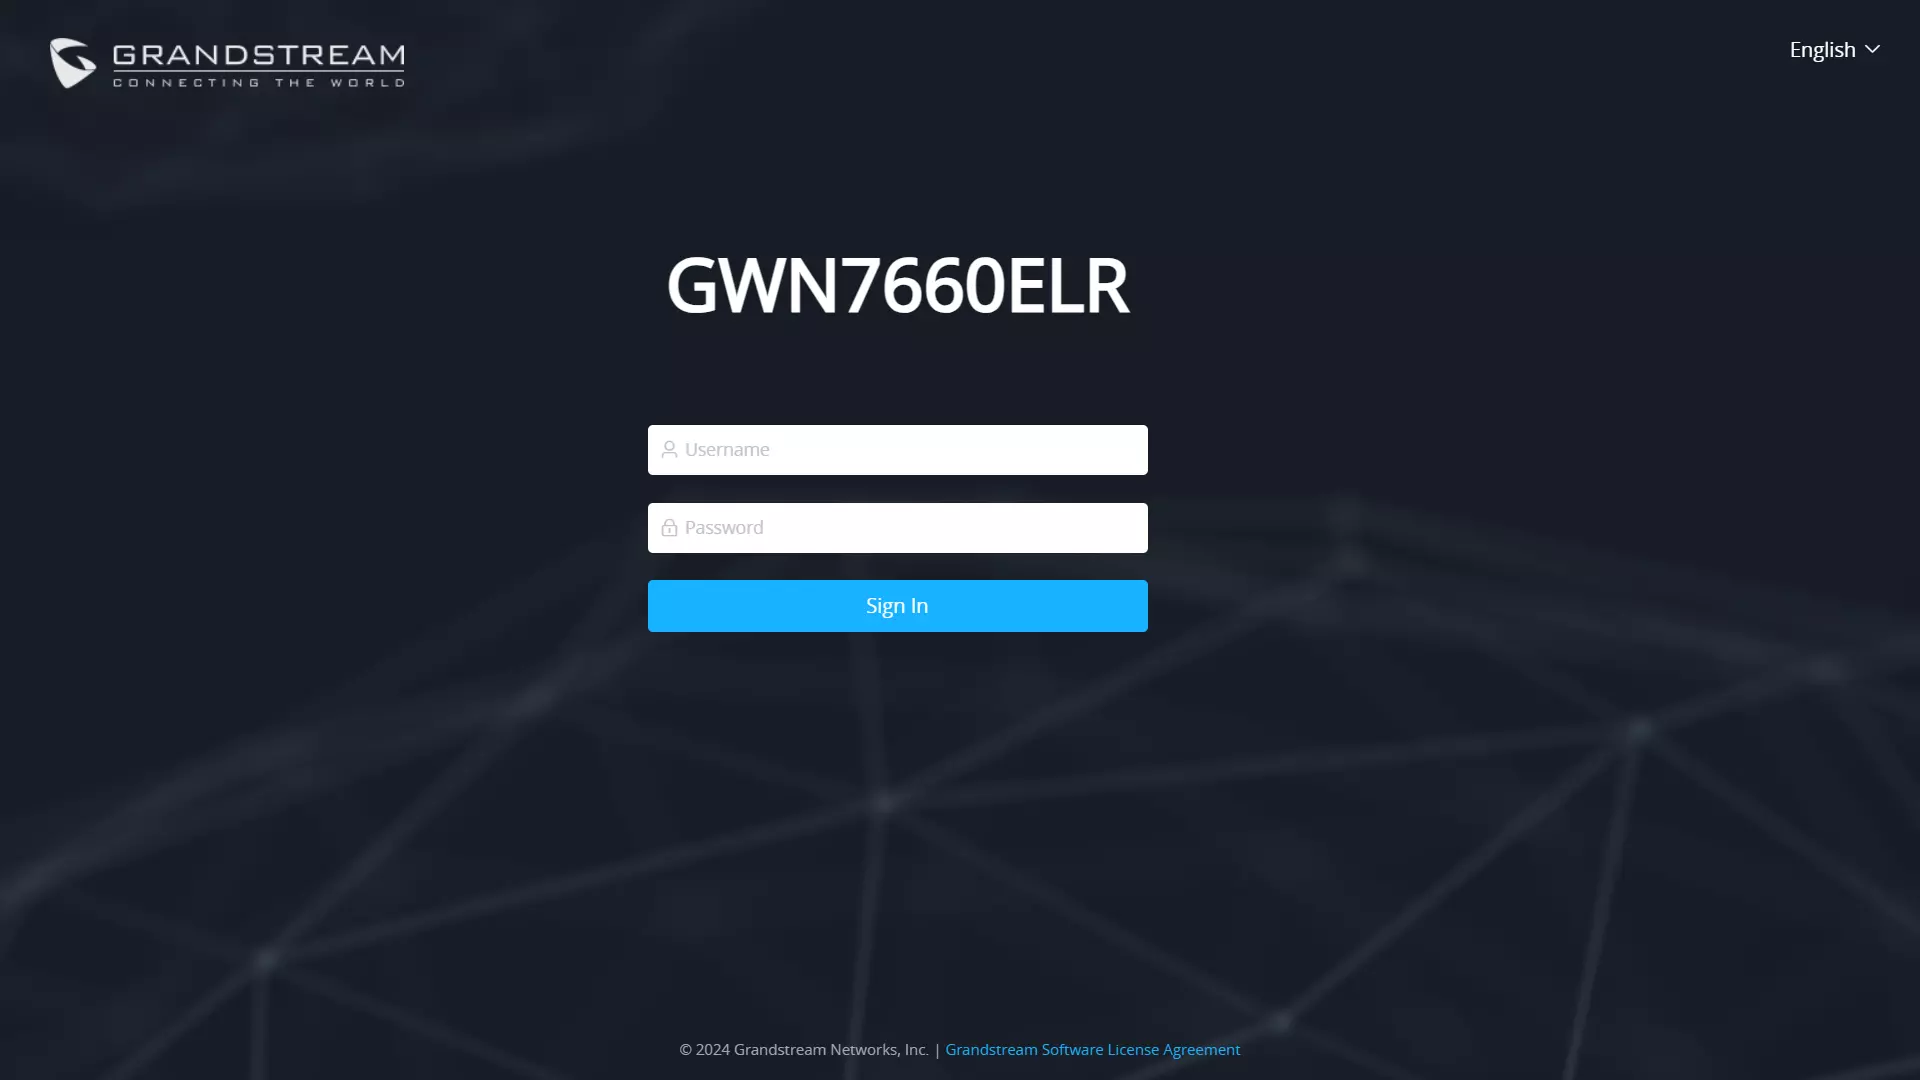
- Enter the username and password to log in. (The default administrator username is “admin” and the default random password can be found on the sticker on the GWN7660ELR).
Refer to online documents and FAQ for more detailed information:
https://www.grandstream.com/our-products

For Certification, Warranty, and RMA information,
please visit www.grandstream.com