


Introduction
The GWN7660EM is an AX3000 Wi-Fi 6 access point with a socket design, enabling simple deployment and superior performance. It can be used as a wireless extender, which works with the GWN7062E router to quickly build a home wireless mesh networking to expand network coverage. It offers 2×2:2 MU-MIMO technology on the 2.4G band and 3×3:2 MU-MIMO on the 5G band as well as a sophisticated antenna design and uses XTRA Range technology with beamforing for maximum network throughput and expanded Wi-Fi coverage range. To ensure easy installation and management, the GWN7660EM uses a controller-less distributed network management design in which the controller is embedded within the product’s Web user interface. The GWN7660EM is also supported by GDMS Networking and GWN Manager, Grandstream’s cloud and on-premise Wi-Fi management platform. It is the ideal Wi-Fi AP for voice-over-Wi-Fi deployments and offers a seamless connection with Grandstream’s Wi-Fi capable IP phones. With support for advanced QoS, low-latency real- time applications, mesh networks, captive portals, 128 concurrent clients per AP and 1 x 1 Gigabit network port, GWN7660EM is an ideal Wi-Fi access point for small and medium household users to achieve high-speed Wi-Fi coverage in the whole house.
Package Content
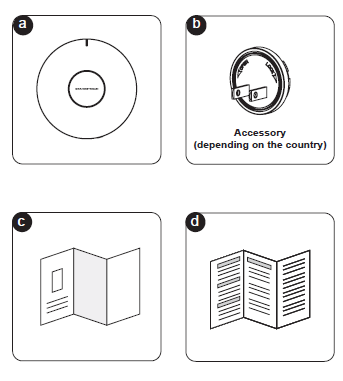
a | 1x GWN7660EM |
b | 1x wall plug (depending on the country) |
c | Quick Installation Guide |
d | Regulatory Paper |
Powering the Access Point
- Unpack the GWN7660EM and locate the socket adapter (plug base) compatible with your region.
- Align the plug base with the bottom of the access point.
- Connect the NET port of the AP to the uplink of a switch port.
- Insert the plug base into the AP’s slot and rotate clockwise until it locks into place.
- Access the web UI for additional settings via
https://gwn_<MAC>.local.

Plug Access point on the wall
- Choose a wall power outlet at a height and position that offers optimal signal coverage.
- Simply plug the powered GWN7660EM into the socket.
- Once powered, the AP will automatically start and connect to the existing mesh (if configured).

Mesh Configuration
The GWN7660EM supports mesh networking with GWN routers (GWN7062E(T)) and wireless access points (GWN76XX series).
Follow the corresponding procedure below depending on the device used for mesh connection.
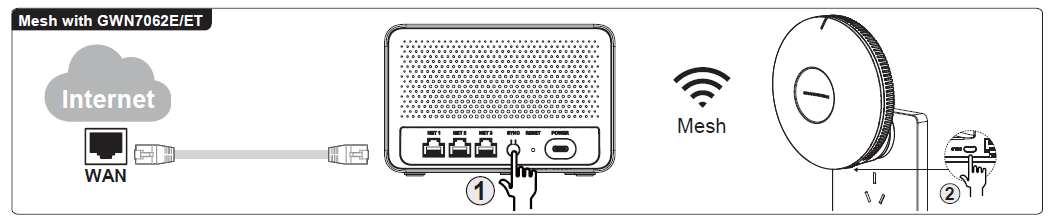
Mesh with Router GWN7062E(T)
Step 1: Factory Reset State
Ensure that the GWN7660EM is in a factory reset state. The SYS LED should display solid pink.
Step 2: Device Placement
Connect the GWN7660EM to the router using an Ethernet cable, or place it close to the router without connecting via cable.
Step 3: Trigger Mesh Scanning
On the router, either press and hold the SYNC button for 3 seconds or log in to the router’s Web GUI to start scanning for mesh sub-nodes.
If the GWN7660EM is detected, its SYS LED will begin blinking pink.
Step 4: Initiate Mesh Pairing
When the GWN7660EM is used wirelessly as a mesh access point (no Ethernet cable connected to the router), press and hold the SYNC button for 3 seconds to start mesh pairing. Once initiated, the SYS LED will blink pink, then turn solid pink while the mesh link is being established.
However, when the GWN7660EM is connected to the router using an Ethernet cable, it will operate as a wired access point and manual mesh setup is not required. In this case, do not press the SYNC button, as the device will connect through the wired uplink automatically.
Step 5: Confirm Mesh Status
- Solid Blue: Mesh pairing completed successfully. During the pairing process, it is normal for the LED to temporarily display pink, yellow, or blue. After approximately 2 minutes, the LED will stabilize to solid blue, indicating a successful mesh connection.
- Solid Red: Mesh pairing failed. After approximately 30 seconds, the router LED will revert to solid blue, and the GWN7660EM LED will revert to solid pink, indicating that the device has stopped the pairing attempt.
Mesh with Access Point (GWN76XX Series)
Step 1: Enable MESH on the Master AP or Primary AP
Log in to the Web UI of the Primary AP (Master AP), then enable Mesh.
Step 2: Restore the GWN7660EM to Factory Reset State
Use a pin to press and hold the reset pinhole on the GWN7660EM until the device resets.
After the reset is completed, the SYS LED should display solid pink.
Step 3: Start Mesh Scanning
Press the SYNC button on the GWN7660EM once.
The SYS LED will begin blinking cyan, indicating that the device is scanning for nearby APs.
Important: If there are multiple Access Points nearby, place the GWN7660EM close to the target Primary AP (Master AP) before starting the mesh process. The GWN7660EM will automatically pair with the AP that has the strongest signal.
Once the connection is established, the SYS LED will turn solid cyan.
Step 4: Discover and Bind the GWN7660EM
In the Web UI of the Primary AP (Master AP), use the Discover AP function to locate the GWN7660EM.
Once the GWN7660EM appears in the device list, bind it. During configuration synchronization, the SYS LED will blink blue.
Step 5: Confirm Mesh Status
When the mesh setup is successful, the SYS LED will turn solid blue.
Note: It is normal for the LED to temporarily turn yellow before the mesh process is completed.
Mesh with GDMS Networking Cloud
The GWN7660EM can be configured as a mesh child node directly through GDMS Networking. This method allows the mesh configuration to be completed remotely through the cloud without requiring physical access to the GWN7660EM to press the Sync button.
Step 1: Add Devices to GDMS Networking
Add both the primary GWN access point and the GWN7660EM to the same GDMS Networking site.
Ensure that both devices are online in GDMS Networking.
Step 2: Enable Mesh
In GDMS Networking, navigate to Settings → Wi-Fi and enable the Mesh option.
Make sure the configuration is provisioned to both devices.
Step 3: Confirm Device Provisioning
Wait until both devices have been successfully provisioned with the mesh configuration.
The GWN7660EM should remain connected to the network through its Ethernet cable during this step.
Step 4: Disconnect the GWN7660EM from the LAN
Once the devices have been provisioned, disconnect the Ethernet cable from the GWN7660EM.
Then, reboot the GWN7660EM and allow approximately 15–20 minutes for the device to establish the wireless mesh connection.
Note: Do not press the SYNC button on the GWN7660EM when using this GDMS Networking cloud-based procedure. The mesh configuration is provisioned remotely through GDMS Networking, making physical access to the device unnecessary.
Step 5: Confirm Mesh Status
After approximately 15–20 minutes, check the GWN7660EM in GDMS Networking.
- Mesh Child Node: The GWN7660EM should appear under the primary access point as a mesh child node.
- Online: The GWN7660EM should be shown as online in GDMS Networking, confirming that the wireless mesh connection has been established.
During the transition from the wired connection to the wireless mesh connection, the GWN7660EM LED may temporarily change between different colors. The LED may display green, blue, pink, or yellow during the process before eventually showing blue once the device is connected and online.
LED indication
The table below indicates all the possible SYS LED behaviors and their signification.
Set up | SYS LED | Description |
Mesh with router GWN7062E(T) | Solid pink (after factory rest) | Stand by |
Blinking pink | Scanned by other device(e.g. GWN7062E) | |
Blinking pink speeds up | Device is waiting for user action. Press and hold the SYNC button for 3 seconds to begin pairing. | |
Solid pink | Mesh in progress | |
Solid blue | Mesh successful | |
Solid red | Mesh failed | |
Blink blue | Configuration in progress | |
Solid yellow | Disconnected after mesh | |
Mesh with AP GWN76XX series | Solid pink (After factory rest) | Stand by |
blinking cyan | Press SYNC button on GWN7660EM once Scanning for nearby APs with mesh functionality enabled. | |
solid cyan | GWN7660EM discovered by Primary AP . | |
Blink blue | Configuration in progress | |
Solid blue | Mesh connected | |
Solid yellow | Disconnected after mesh |
LED and SYNC Button Behavior Summary
The table below summarizes the correct light sequence for a GWN7660EM from factory reset to being connected successfully to a mesh network, with both the GWN Router , and with a GWN76xx master access point.
Scene | SYNC Button Action | SYS LED Status Sequence |
Mesh with Router GWN7062E(T) | Press and hold for 3 seconds | Solid pink (factory reset) → Blinking pink → Solid pink → Solid blue |
Mesh with AP GWN76XX Series | Press once | Solid pink (factory reset) → Blinking cyan → Solid cyan → Solid blue |