

Introduction
This guide provides a detailed explanation of how to configure a Multi-VLAN network on a single SSID using Grandstream GWN series access points (APs). We cover two configurations: WPA2-PSK and WPA2-Enterprise (802.1X with RADIUS), along with step-by-step instructions for setting up seamless roaming across access points with VLAN management.
What is a VLAN?
A Virtual Local Area Network (VLAN) is a method of dividing a physical network into separate logical networks. VLANs allow you to isolate network traffic to improve security and manageability. Each VLAN functions as a distinct network while sharing the same physical infrastructure, which is especially useful in environments where different types of traffic (e.g., corporate data, guest access) need to be segregated.
Why Use Multiple VLANs on a Single SSID?
Using multiple VLANs on a single SSID enables traffic segmentation while maintaining a consistent Wi-Fi experience for users. For example, you can assign employees to one VLAN (corporate traffic), guests to another (guest access), and prioritize voice traffic to a third VLAN. This ensures efficient traffic management without the need for multiple visible Wi-Fi networks.
Prerequisites
- Grandstream GWN series APs (e.g., GWN7605, GWN7624, GWN7660LR)
- RADIUS server for 802.1X configuration (only for Configuration 2)
- Router & Switch capable of VLAN configuration
Lab Setup Overview
We will configure three access points (AP1, AP2, AP3) to share a single SSID, with different VLANs assigned to each AP. We’ll go through two key configurations:
- Configuration 1: WPA2-PSK for simple network security using a shared password and fixed VLANs.
- Configuration 2: WPA2-Enterprise (802.1X with RADIUS) for dynamic VLAN assignment, where the RADIUS server decides the VLAN based on user credentials.
General Network Diagram
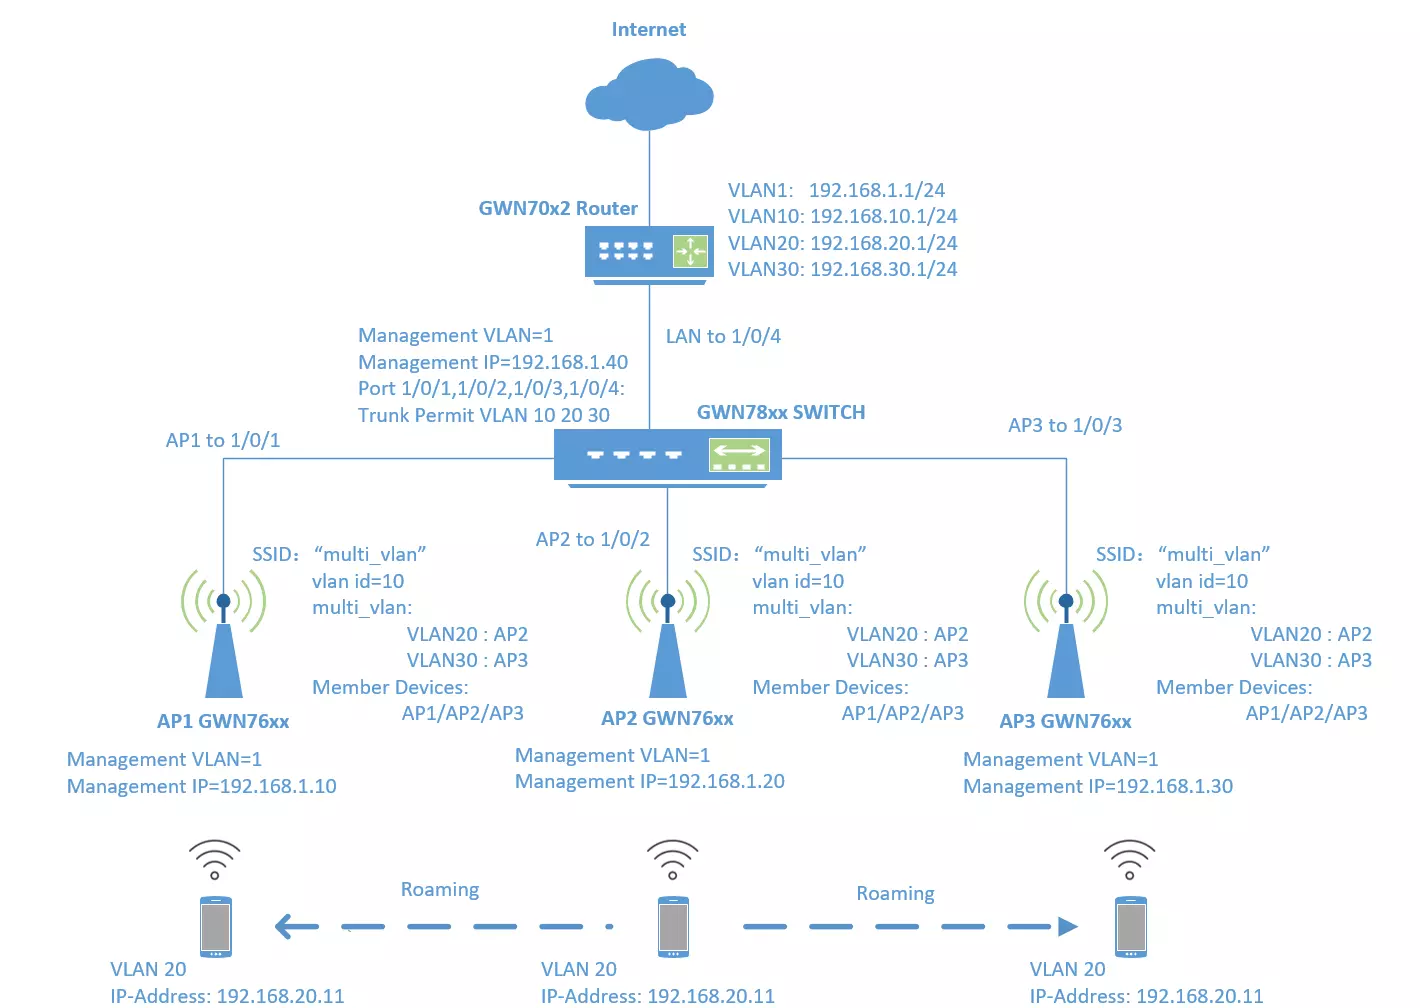
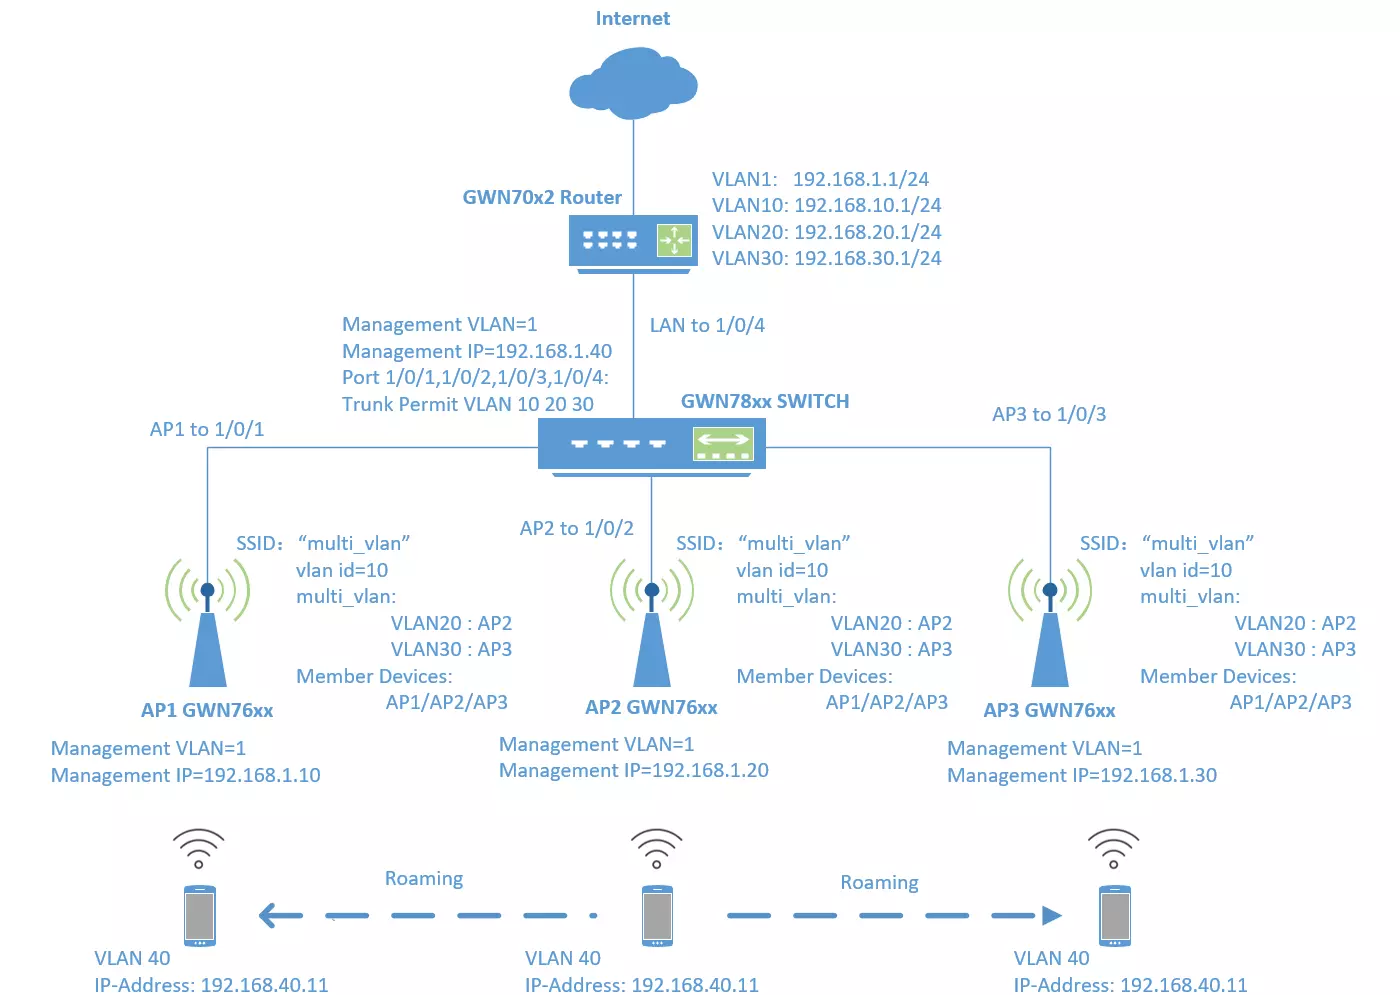
This diagram shows the general structure of how the Multi-VLAN setup works across multiple APs. In this example, we have three APs connected to a switch, each assigned to different VLANs:
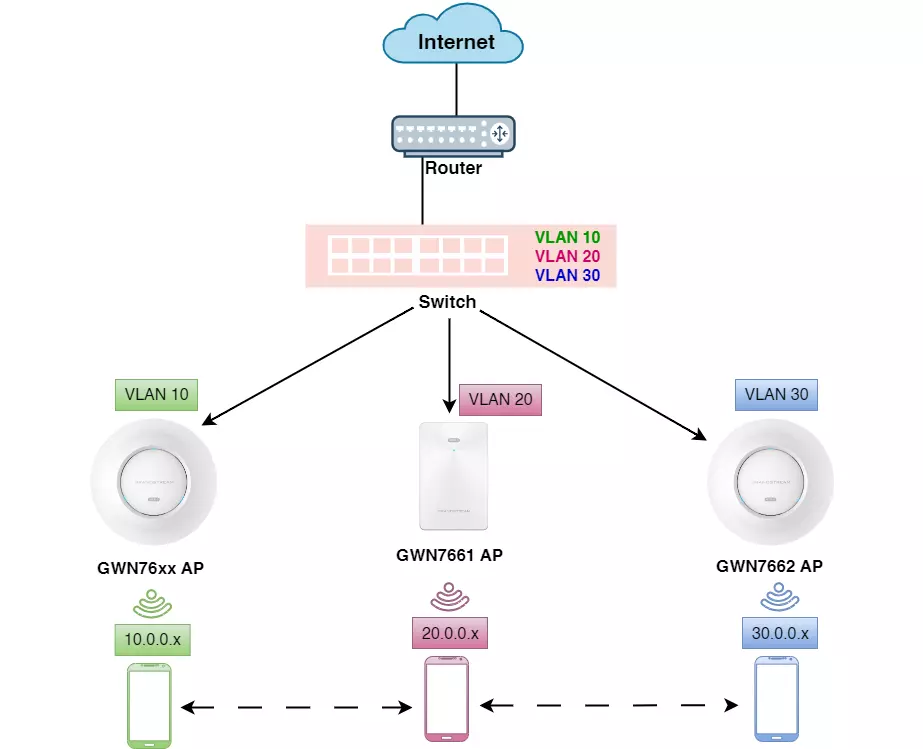
- AP1 is assigned VLAN 10, which may be used for general user traffic.
- AP2 is assigned VLAN 20, which could be for voice traffic or another specific group.
- AP3 is assigned VLAN 30, for another group of users or devices.
Each AP shares the same SSID, ensuring seamless roaming between access points for wireless clients. The switch is configured to pass multiple VLANs (trunk mode) between the router and the APs. The router manages the traffic for each VLAN and routes it accordingly, ensuring proper network segmentation.
- Router: Provides internet access and routes traffic between VLANs.
- Switch: Allows multiple VLANs to communicate with the APs.
- VLANs: VLAN 10, 20, and 30 are configured to separate network traffic.
As clients connect to the SSID on any AP, they are placed into their respective VLAN based on the AP they connect to or dynamically by a RADIUS server (for 802.1X configuration). Roaming between APs is seamless and VLAN-specific, depending on the configuration.
Pre-Configuration Setup
Before setting up the specific configurations (WPA2-PSK or 802.1X), ensure that your Router, Switch, and Access Points are properly configured to handle VLAN traffic. Follow these steps to ensure the necessary VLANs are created and the trunking is correctly applied.
1. Router Setup
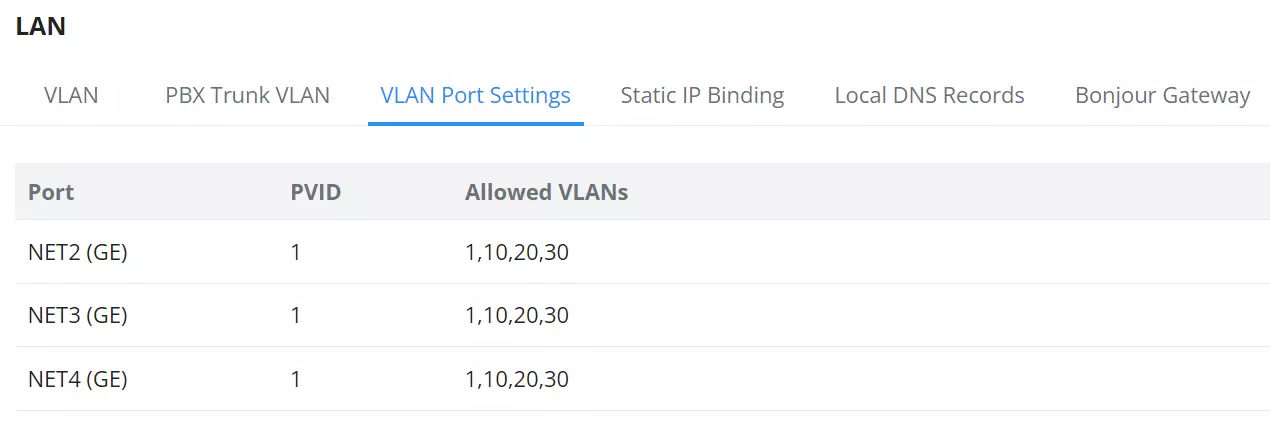
- VLAN Creation: On the router, create the VLANs 10, 20, and 30. VLAN 1 is used as the native/default VLAN (PVID).
- VLAN Port Configuration: Ensure that the ports leading to the switch and APs are configured as trunk ports and allow VLANs 10, 20, 30 to pass through.
For more details about VLANs or how to create/configure VLANs on GWN Routers, check the GWN700x.
2. Switch Setup
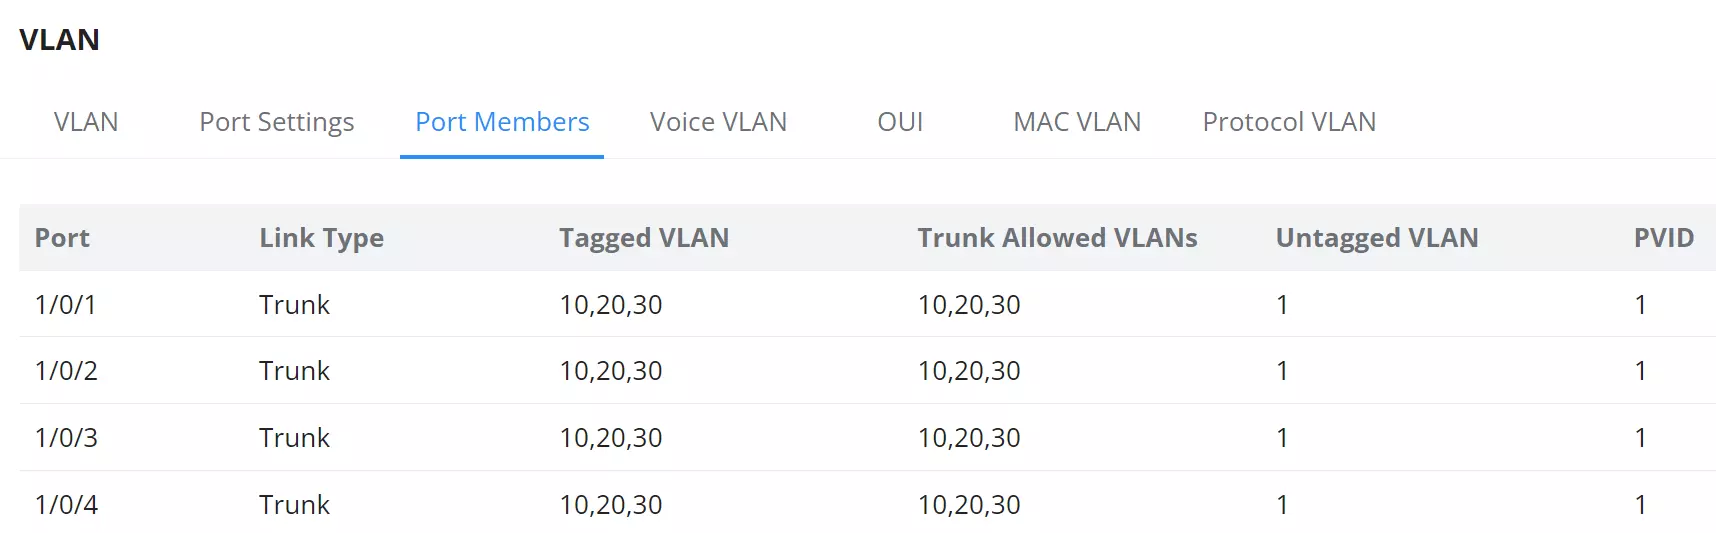
- VLAN Tagging: On the switch, configure each port connected to the router and APs to tag VLANs 10, 20, and 30. The ports should also be set to trunk mode.
- Management VLAN: Assign VLAN 1 as the PVID for the switch management interface.
For more details on how to create/configure VLANs on GWN Switches, check the GWN78xx.
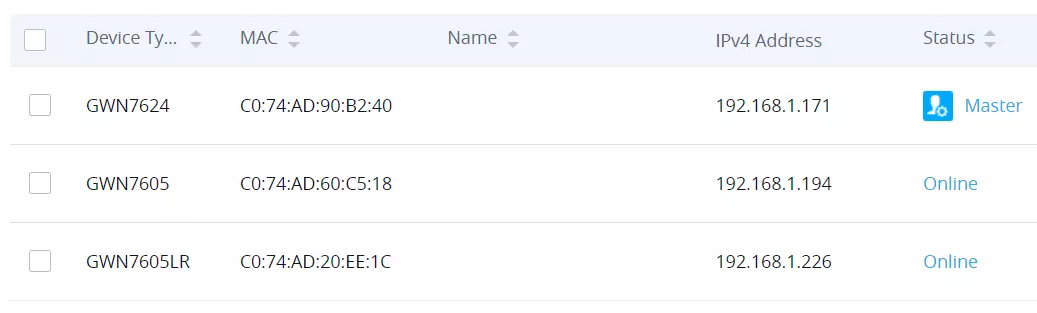
3. AP Configuration (Master & Slave)
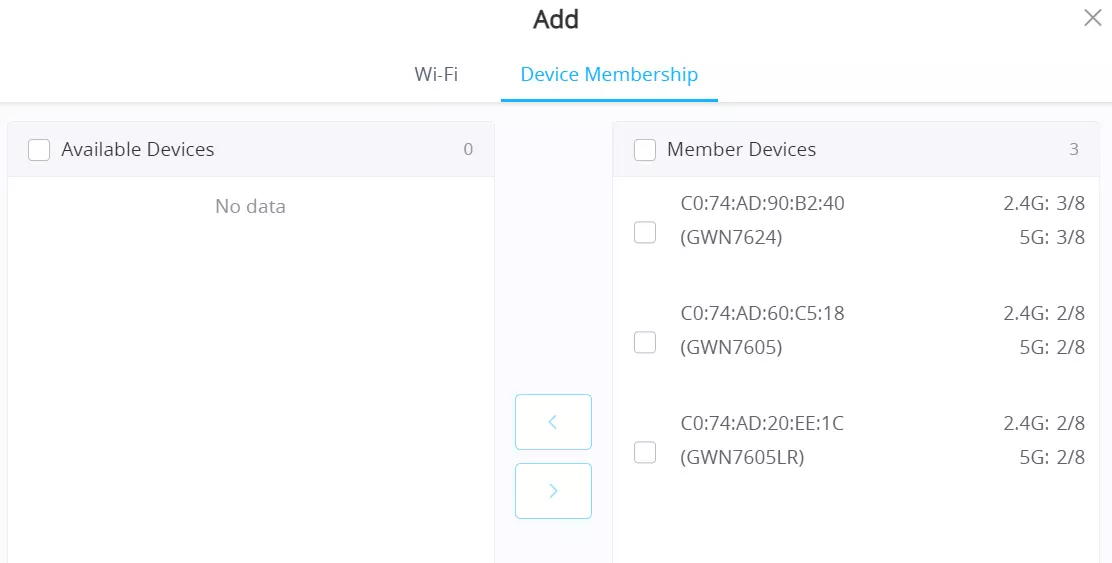
- Master AP Setup: Log in to the Master AP and configure the VLAN settings. Ensure that VLAN 10 is set as the default VLAN for the SSID and that trunking is enabled for VLANs 10, 20, 30.
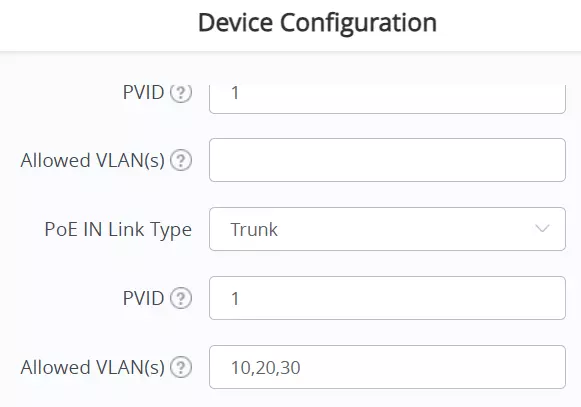
- AP Slave Configuration: Once the Master AP is configured, add the Slave APs to the same network and confirm they are part of the same SSID with trunking for VLANs enabled.
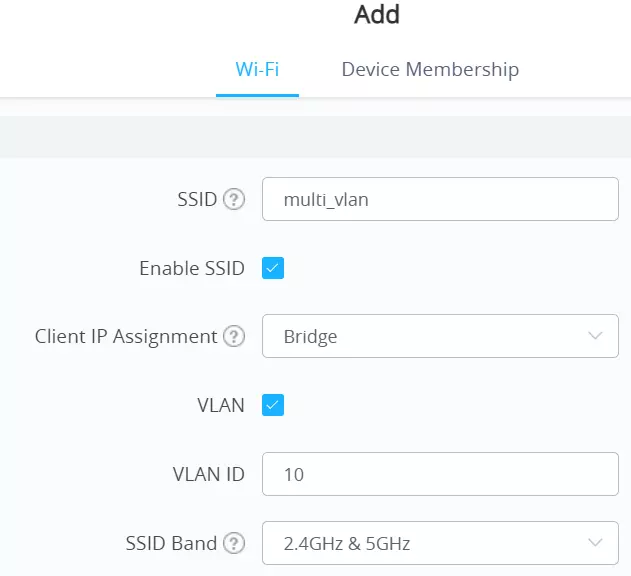
- Master AP SSID Assignment: Log in to the Master AP and configure the SSID “multi_vlan”. Make sure to set the VLAN ID to 10 and enable it across both the 2.4GHz and 5GHz bands.
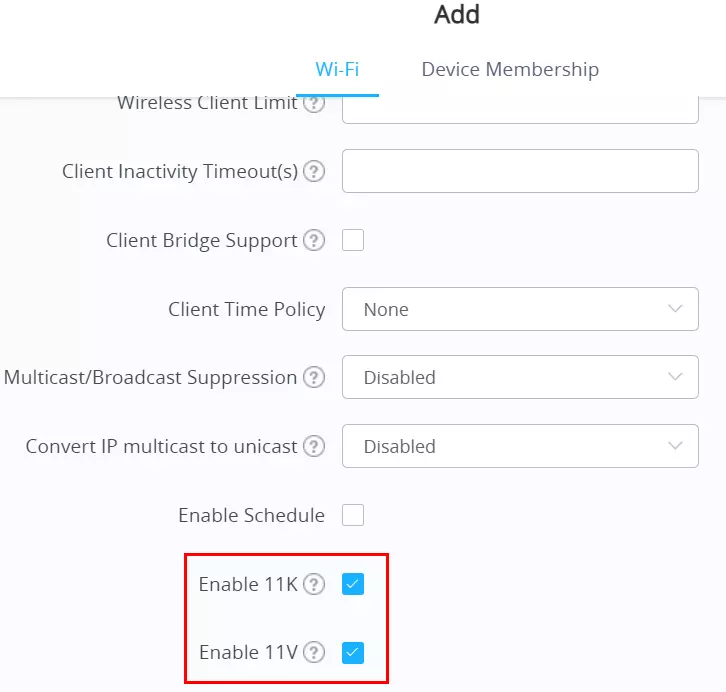
- Enable Fast Roaming: Enable 802.11k and 802.11v (Voice Enterprise) for optimized roaming.
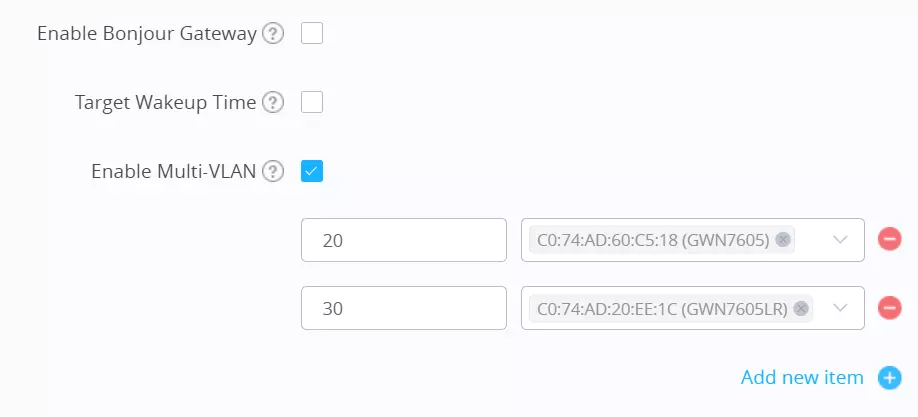
- Enabling Multi-VLAN for Multiple APs: to enable Multi-VLAN, simply check the Enable Multi-VLAN option, and add or remove the desired APs and VLAN combinations. For instance, you can assign VLAN 20 to AP2 and VLAN 30 to AP3 as shown in the configuration.
- Add APs to the Same SSID: Ensure that the slave APs are part of the same SSID network and configured for the same VLANs (10, 20, 30).
Configuration 1: WPA2-PSK (Pre-Shared Key)
WPA2-PSK is a common and straightforward Wi-Fi security setup where all users share a common password. In this configuration, we will assign different VLANs to each access point, all sharing the same SSID for a seamless user experience.
First, configure the SSID (Wi-Fi network) for all three APs:
- Log in to the Master AP (the AP managing all others).
- Set Security Mode to WPA2-PSK and enter the shared password for the network.
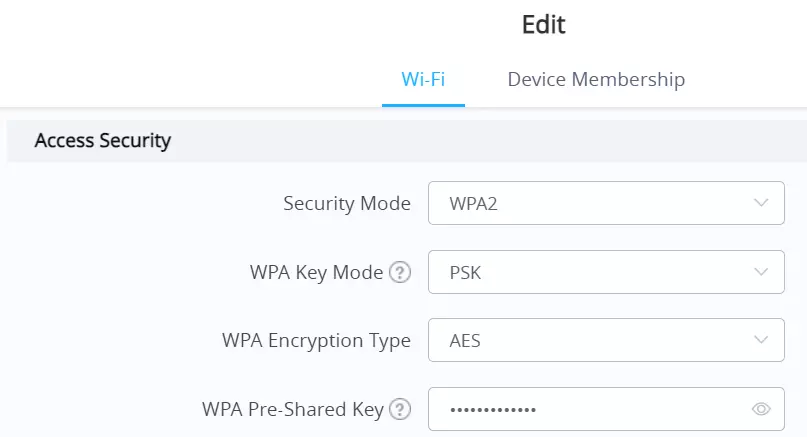
In Configuration 1, we will explore two roaming scenarios where clients move between APs, each using the same SSID but with different VLANs assigned to the APs.
Option 1: User connected through Associated VLAN (SSID VLAN)
Roaming Scenario 1: SSID VLAN Priority
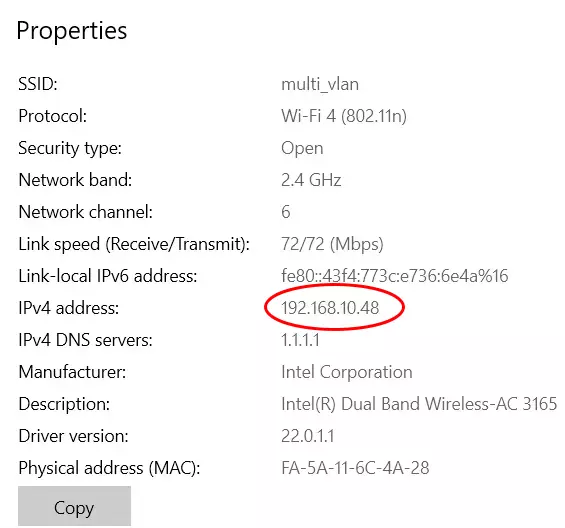
In this scenario, AP1 is not added to Multi-VLAN, meaning all clients connecting to AP1 will receive an IP from VLAN 10. When client1 connects to the SSID “multi_vlan” on AP1, it will obtain an IP address, such as 192.168.10.11 under the VLAN 10 subnet.
Reminder:
- AP1 => VLAN 10 (SSID VLAN)
- AP2 => VLAN 20 (Multi-VLAN)
- AP3 => VLAN 30 (Multi-VLAN)
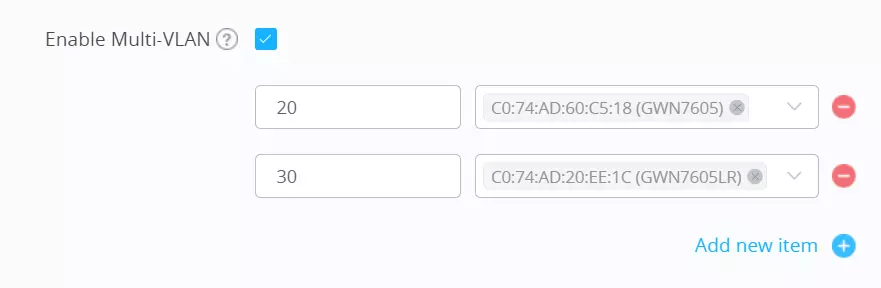
Multi-VLAN Configuration (On the Master AP): mapping or binding each VLAN to its corresponding AP based on its MAC address.
- Enable Multi-VLAN.
- Assign VLAN 20 to AP2.
- Assign VLAN 30 to AP3.
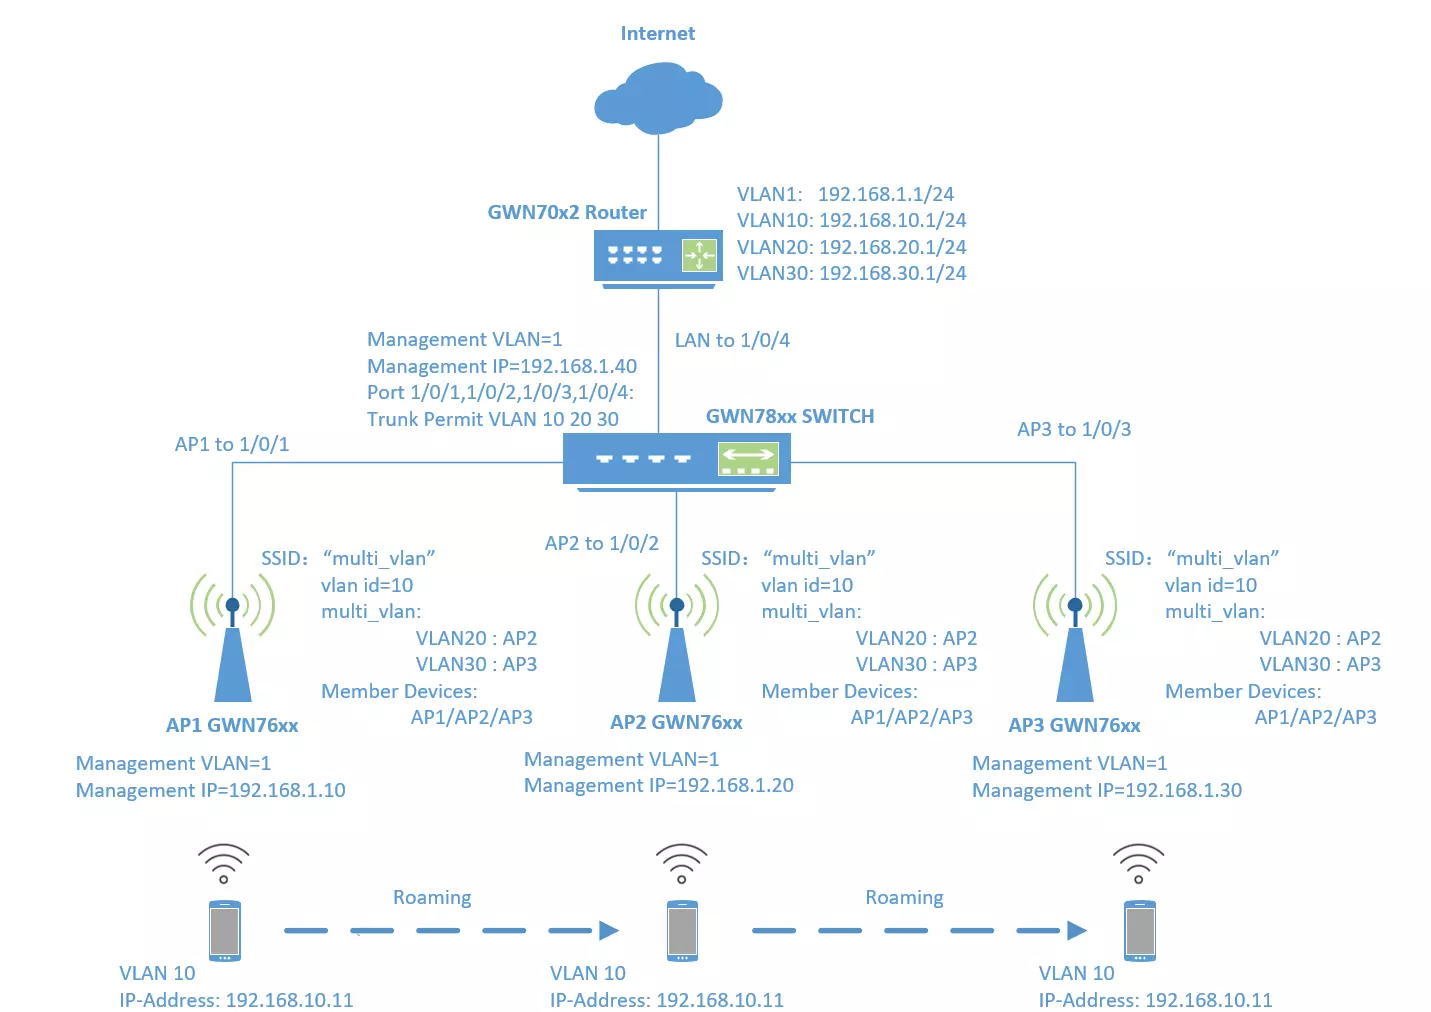
After fast roaming to AP2 or AP3, client1 retains its VLAN 10 IP address and can continue accessing the internet without interruption.
Key point: AP2 and AP3 are added to Multi-VLAN but still allow client1 to maintain the VLAN 10 IP after fast roaming.
Option 2: User connected through Multi-VLAN
Roaming Scenario 2: Multi-VLAN Priority
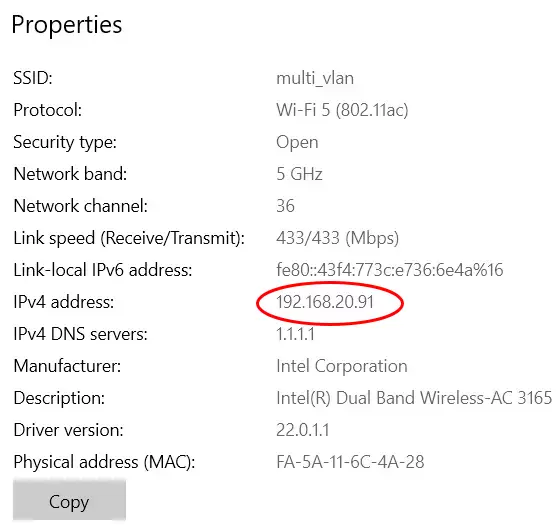
In this scenario, Multi-VLAN takes precedence over the default VLAN of the SSID. When client2 connects to the “multi_vlan” SSID through AP2 or AP3, it is dynamically assigned an IP address from VLAN 20 or VLAN 30 (e.g., 192.168.20.11). The Multi-VLAN feature allows the network to automatically assign the appropriate VLAN based on the access point (AP) the client connects to, ensuring network segmentation and control.
Reminder:
- AP1 => VLAN 10 (SSID VLAN)
- AP2 => VLAN 20 (Multi-VLAN)
- AP3 => VLAN 30 (Multi-VLAN)
After fast roaming between APs, client2 retains the same IP address, enabling uninterrupted internet access and a seamless roaming experience.
Configuration 2: WPA2-Enterprise (802.1X with RADIUS)
In this configuration, we will use WPA2-Enterprise with 802.1X authentication, a more secure method often used in business environments. Clients authenticate through a RADIUS server, which dynamically assigns VLANs based on user credentials. This allows for a more flexible and secure network.
Step 1: Configuring 802.1X Authentication
To configure 802.1X authentication:
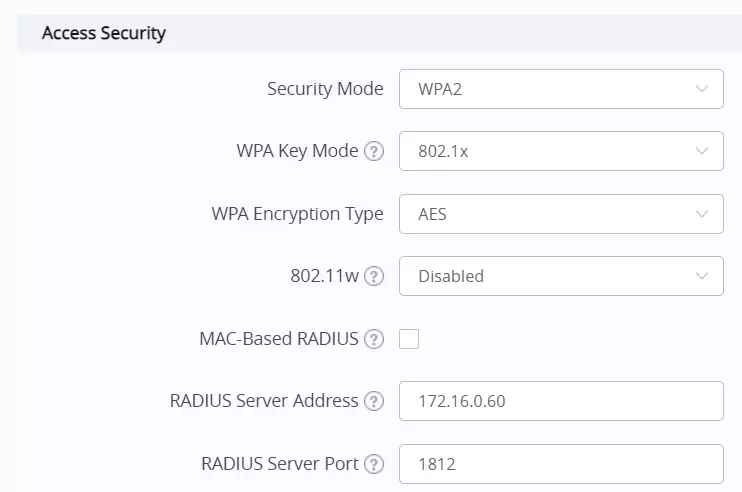
- In the SSID settings, set the Security Mode to WPA2.
- Set the WPA Key Mode to 802.1X and provide the RADIUS server address and port (default port is 1812).
Step 2: Enabling Dynamic VLAN
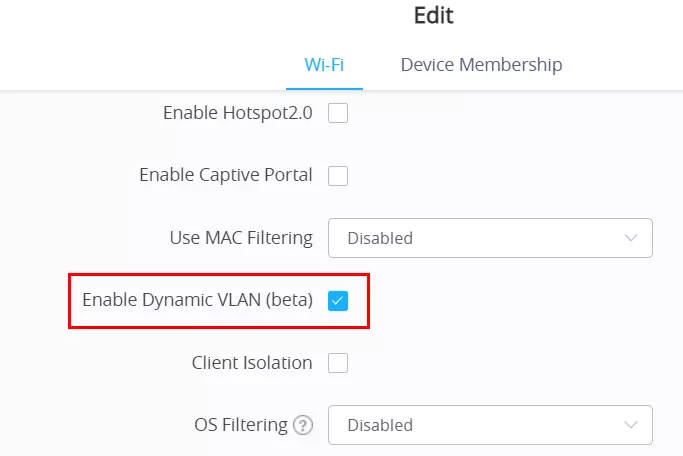
Enable Dynamic VLAN in the SSID settings. This feature allows the RADIUS server to assign VLANs to clients dynamically, based on their credentials. Dynamic VLANs ensure that users are placed in the correct VLAN for their role or group, which provides flexibility and security.
Option 3: User connected through RADIUS
Roaming Scenario for 802.1X with Dynamic VLAN
When a client connects to any access point, the RADIUS server dynamically assigns them to a VLAN (e.g., VLAN 40). As the client roams between APs, they will remain in the same VLAN with no disruption to network access.
- The RADIUS server controls the VLAN assignment, ensuring each user is placed in the correct VLAN based on their credentials.
- This setup improves security by preventing unauthorized access to the network.
- With Dynamic VLAN, you don’t need to configure VLANs for each individual client device; the RADIUS server handles this automatically.
Conclusion
This guide outlined the process of setting up a Multi-VLAN configuration using both WPA2-PSK and WPA2-Enterprise (802.1X with RADIUS), showing how different VLAN assignment methods affect network traffic and roaming behavior.
Key takeaways
- Roaming Scenario 1 (WPA2-PSK): AP1 is assigned VLAN 10 and is not part of the Multi-VLAN setup. When clients connect to AP1, they receive an IP from VLAN 10 as defined by the SSID’s configuration. Fast roaming allows Client 1 to keep its VLAN 10 IP when moving between AP1, AP2, and AP3. If fast roaming isn’t supported, switching between APs may result in VLAN and IP changes.
- Roaming Scenario 2 (WPA2-PSK): AP2 and AP3 are part of the Multi-VLAN setup and are linked to VLAN 20 and VLAN 30, respectively. When a client connects to AP2 or AP3, the Multi-VLAN setting overrides the SSID VLAN, and the client is dynamically assigned to VLAN 20 (AP2) or VLAN 30 (AP3). Fast roaming ensures that the client retains its VLAN-assigned IP while switching between APs, but without fast roaming, switching between VLANs/APs may cause interruptions.
- Roaming Scenario (802.1X with RADIUS): When using Dynamic VLANs with a RADIUS server, clients are assigned to specific VLANs based on their credentials. Regardless of the AP they connect to, the RADIUS-assigned VLAN remains consistent. This method ensures that clients retain the same VLAN and IP address across all APs, providing seamless, secure, and flexible network management.
Core VLAN Priority:
The hierarchy of VLAN priority is as follows:
- Dynamic VLAN (802.1X) – Has the highest priority, ensuring that RADIUS-assigned VLANs override all other settings.
- Multi-VLAN – Takes precedence over SSID VLAN configurations, dynamically assigning VLANs based on AP-specific settings.
- SSID VLAN – The default VLAN assigned to an SSID, applied only when Multi-VLAN or Dynamic VLAN configurations are not in use.
By understanding and applying this VLAN priority, network administrators can create a robust, scalable network that supports seamless roaming, traffic segmentation, and enhanced security.