INTRODUCTION
SoftwareUCM is an on-premises solution that provides businesses with complete control over their telephony systems and offers many advantages, such as scalability by expanding storage capacity, flexibility in integrating with third-party applications, and security within the internal network.
GDMS Unified Communication, on the other hand, is a cloud-based solution that provides a user-friendly interface to manage and monitor devices before, during, and after deployment. GDMS organizes systems into separate product lines, specifically Unified Communications and Networking Solutions, for simplified management.
This guide explains how to remotely manage SoftwareUCM using GDMS Unified Communications, enabling efficient monitoring and control from any location.
ADDING SOFTWAREUCM TO GDMS
UCMRC (UCM RemoteConnect) allows users to remotely access and configure SoftwareUCM through GDMS.
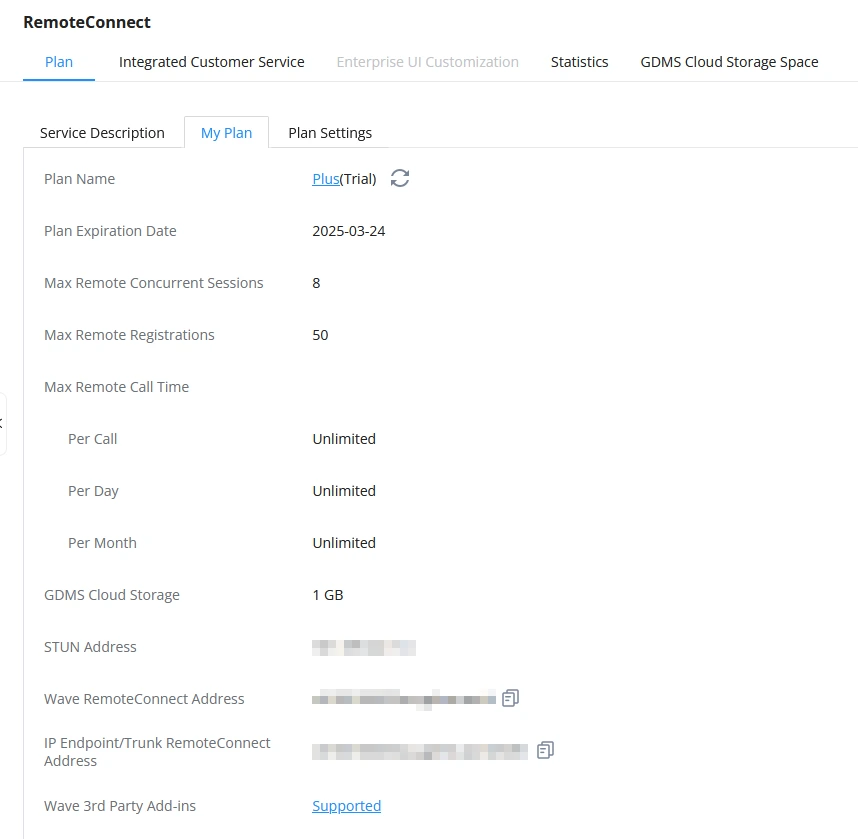
- Before connecting SoftwareUCM with GDMS, ensure that the RemoteConnect information is displayed on SoftwareUCM web GUI→RemoteConnect→Plan→My Plan page.
- In order to use the service, please log in to your GDMS account. (If you do not have a GDMS account, please sign up here and then log in: https://www.gdms.cloud/login)
Add a single SoftwareUCM
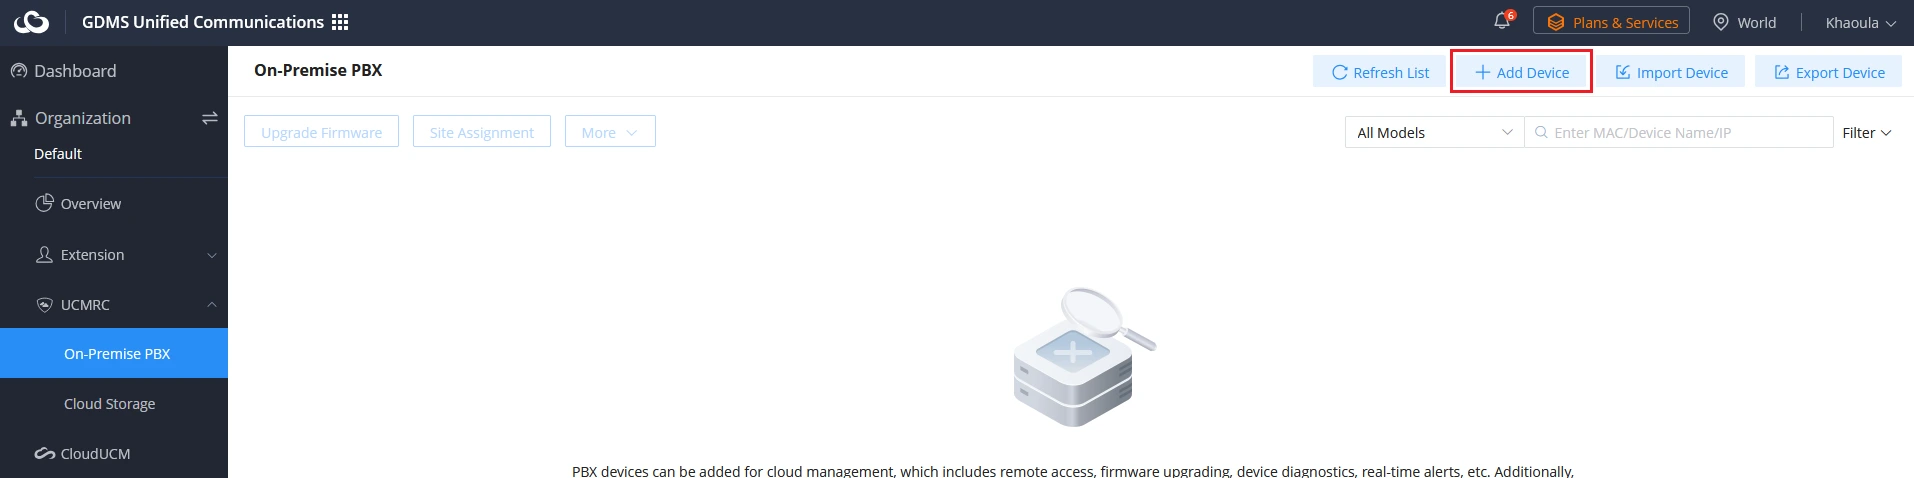
- On the GDMS platform, sign in and go to UCMRC→On-Premise PBX page, click on “Add Device“.
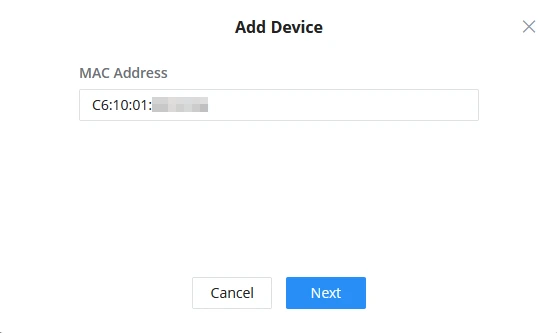
- Enter the MAC Address of the SoftwareUCM, which can be found on the Web UI→System Status→System Information.
- Choose a name for your SoftwareUCM, assign it to the desired site and enter the Serial Number (located under Web UI→System Status→System Information).
- If the “Activate UCMRC Free Trial Plan (Plus)” option is selected, the UCMRC Plus plan will be automatically activated after adding the SoftwareUCM. If it is not selected, the Basic plan will be applied instead.
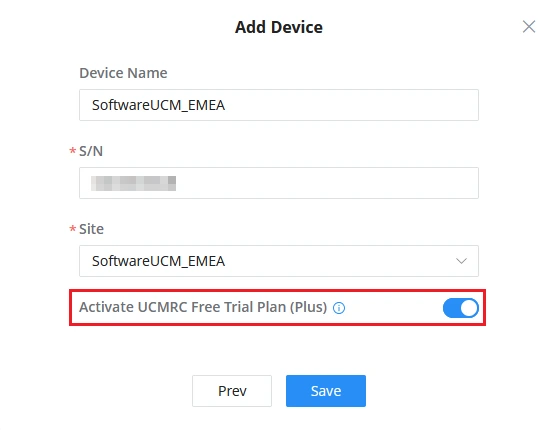
- Once all of the information is filled correctly, click the Save button to add SoftwareUCM to the corresponding site.
Batch SoftwareUCM Import
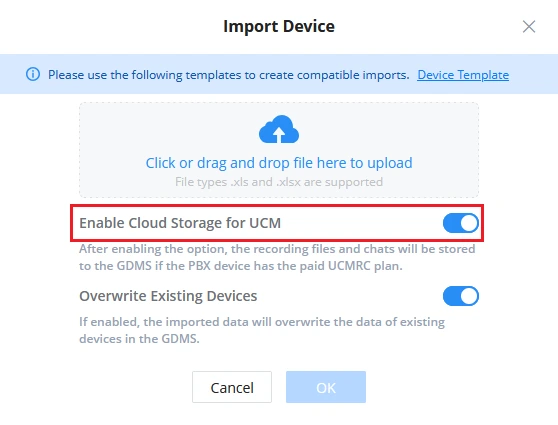
- On the GDMS platform, sign in and go to UCMRC→On-Premise PBX page, click on “Import Device“.
- On the import device window, choose whether or not to store recording files and chats on GDMS Cloud storage by enabling/disabling the “Enable Cloud Storage for UCM” option. (This only applies to paid UCMRC plans)
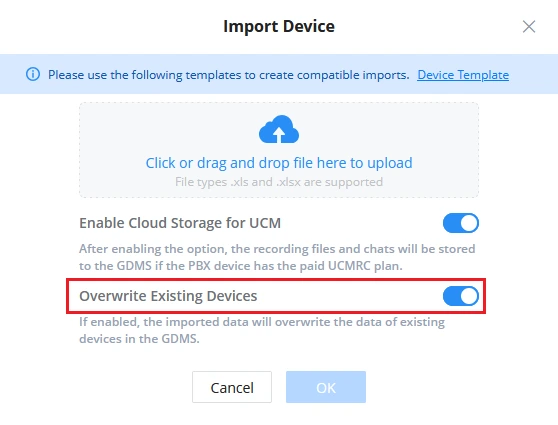
- Select “Overwrite Existing Devices“, if you wish to import a SoftwareUCM that is already added to your GDMS account.
- Click on “Device Template” to download the Excel import file template.
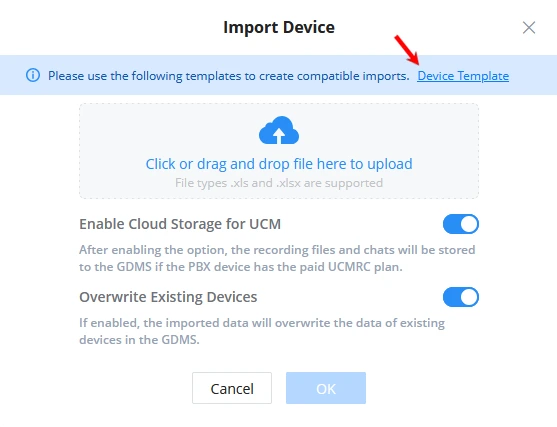
- Open the downloaded file and complete the fields listed in the table below.
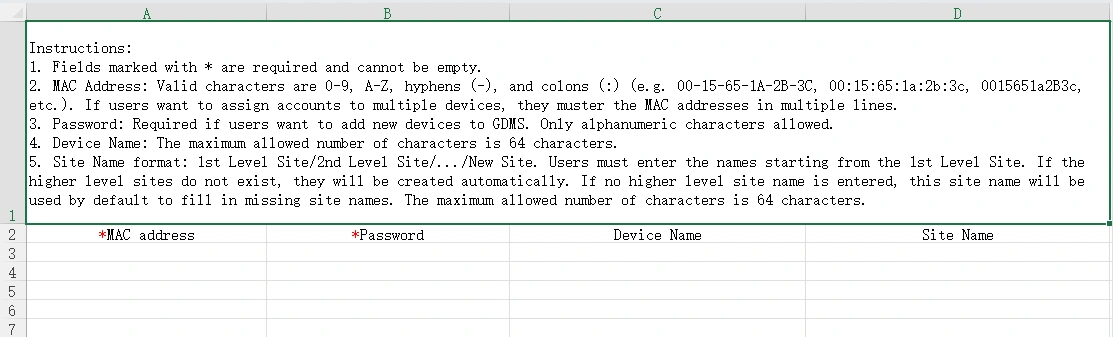
MAC Address | (Required) Enter the MAC address of SoftwareUCM. The valid characters (0-9, a-z, A-Z) can be entered either consecutively or separated by colons (:) or hyphens (-).
|
Password/SN | (Required) Input the serial number of SoftwareUCM in this field. |
Device Name | (Optional) Set the name of the SoftwareUCM. The maximum allowed number of characters is 64 characters. |
Site Name | (Optional) Select the site to which the SoftwareUCM will be assigned. The maximum allowed length is 64 characters.
|
- Save the template file, and upload it on the Import Device window.
- A confirmation prompt will appear once the SoftwareUCM has been imported successfully.
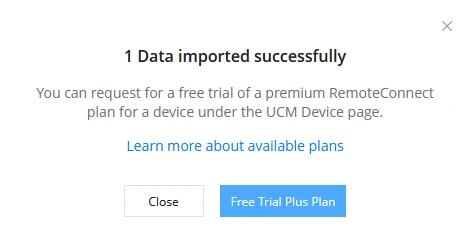
- Close the window or select the option to activate the Free Trial for the RemoteConnect Plus plan.
SOFTWAREUCM GDMS FUNCTIONS
Remote Access to PBX
To access SoftwareUCM remotely, please follow the steps below:
- Go to GDMS Unified Communications→UCMRC→On-Premise PBX and click on the icon shown in the image below.

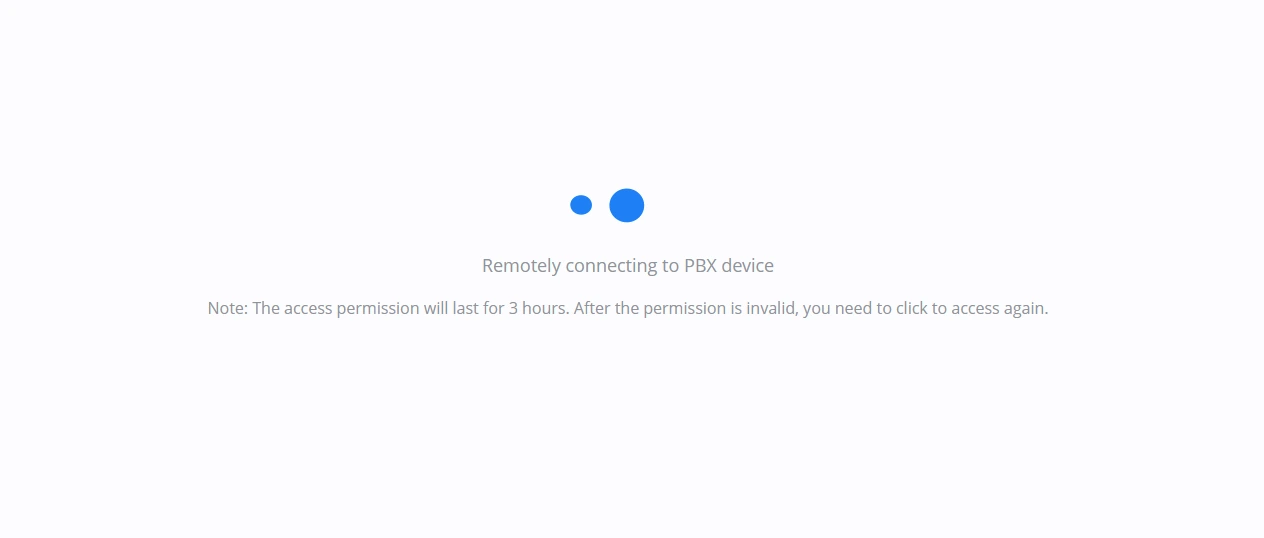
- After being redirected to this page, please wait for the connection time to complete. Access permissions are valid for only three hours, so once they expire, users will need to click the “Remote Access to PBX” button again to regain access.
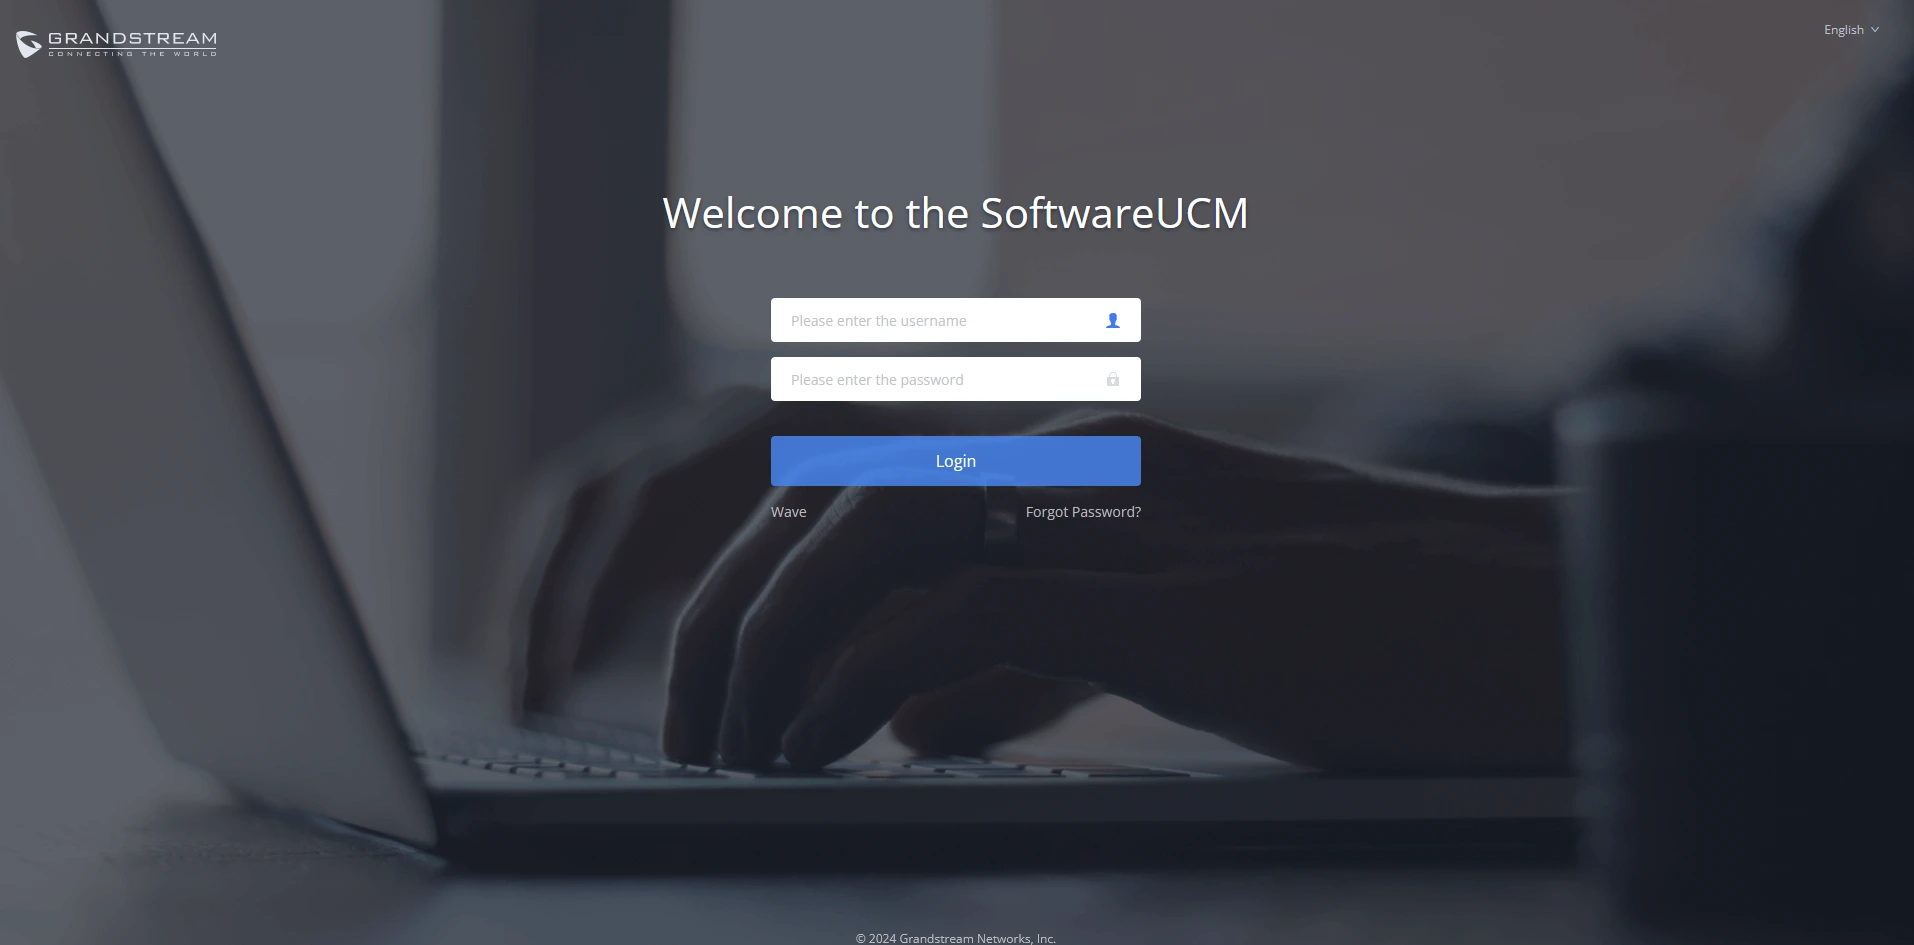
- Enter your username and password to remotely login to SoftwareUCM’s Web UI.
Device Details
The Device Details tabs offer users access to various SoftwareUCM information, including device details, plan information, and statistical reports. This section describes the function of each tab.
To access Device Details, first click on the icon highlighted in the image below:

Overview
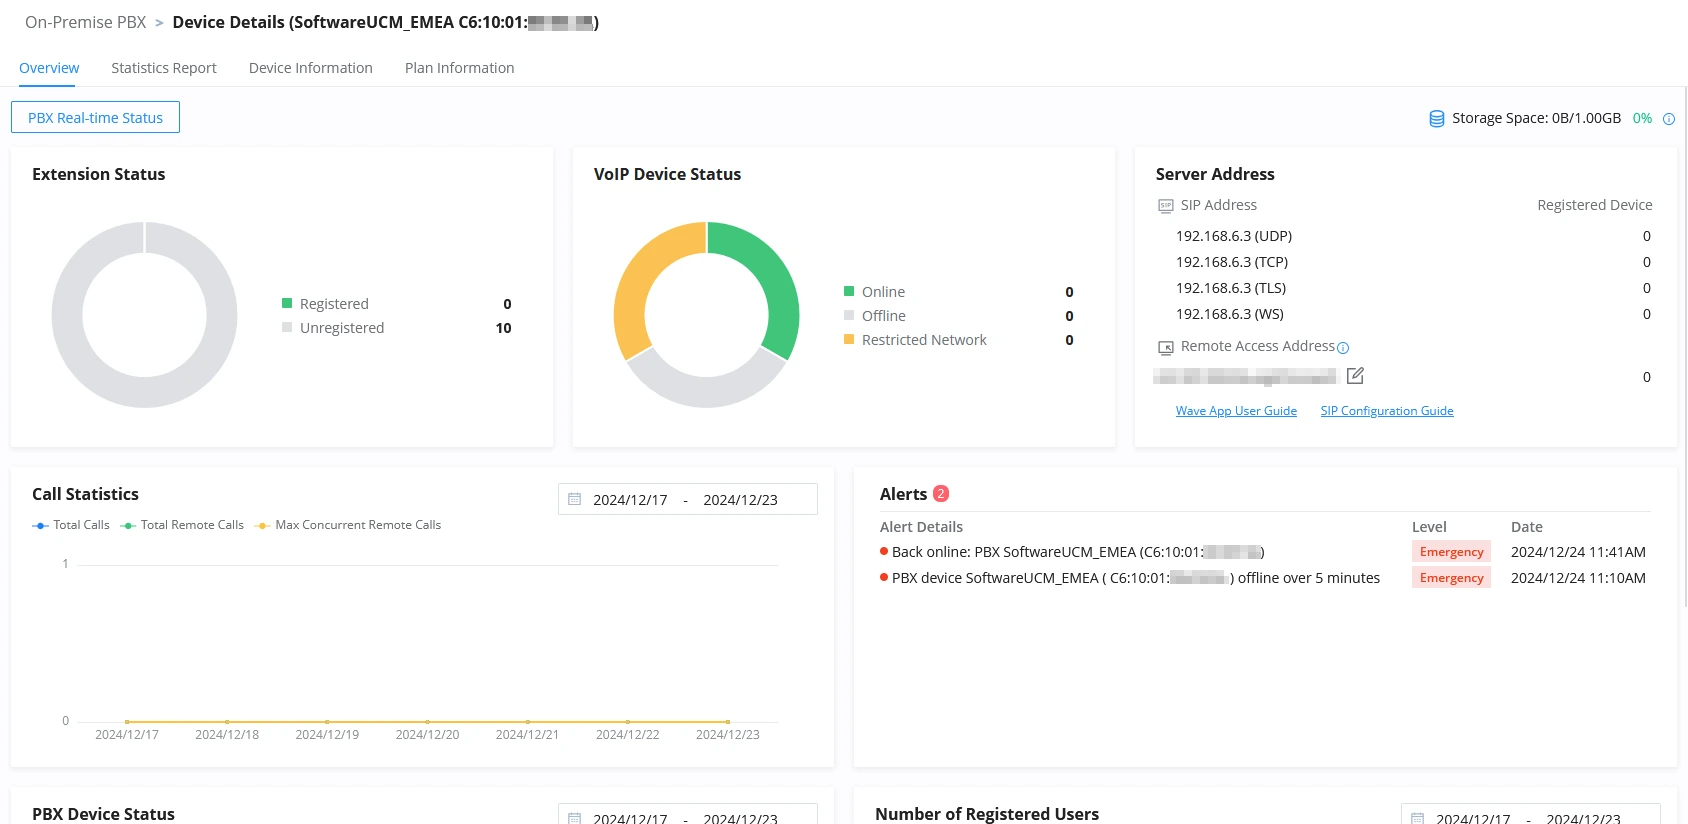
The Overview Page provides a comprehensive view of key system information, including the Extension Status, VoIP Device Status, and Server Address. It also displays Call Statistics, Alerts, PBX Device Status, and the number of registered users, offering users a quick and clear view of the system’s current performance and health.
Statistics Report
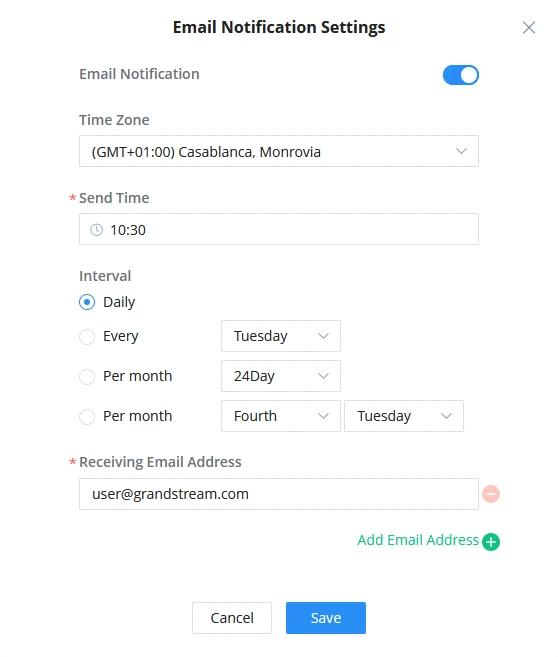
The Statistics Report page provides detailed reports related to the SoftwareUCM (e.g. Device Storage, Total Calls, etc…) and allows users to configure an email address for receiving these reports at specified intervals, ensuring timely and efficient access to important system data.

To receive these reports via email, click the “Email Notification Settings” button, then configure the desired sending interval and specify the recipient’s email address.
Device Information
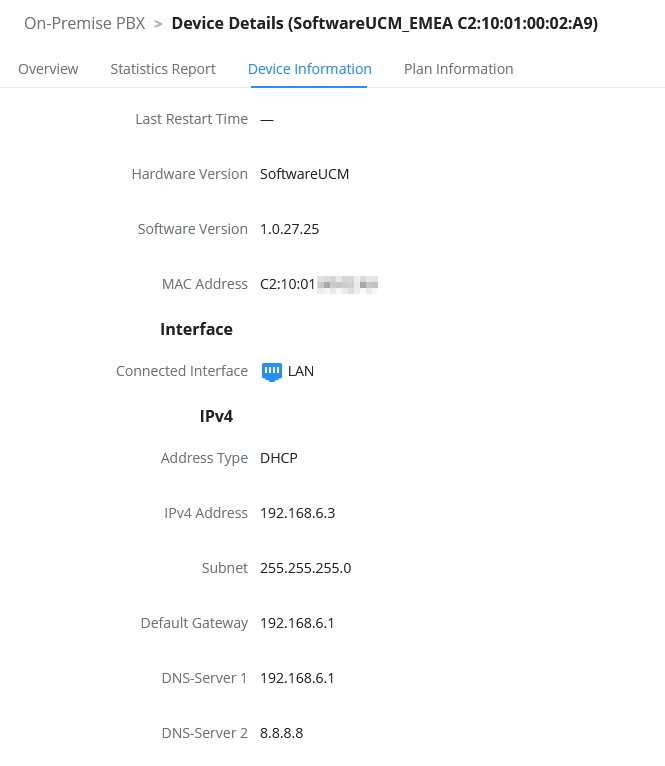
The Device Information page displays essential details about the device, including the Last Restart Time, Hardware Version, Software Version, and MAC Address.
It also provides network information such as the Connected Interface, Address Type, IPv4 Address, Default Gateway, and IPv6 details, offering a complete overview of the device’s configuration and connectivity.
Plan Information
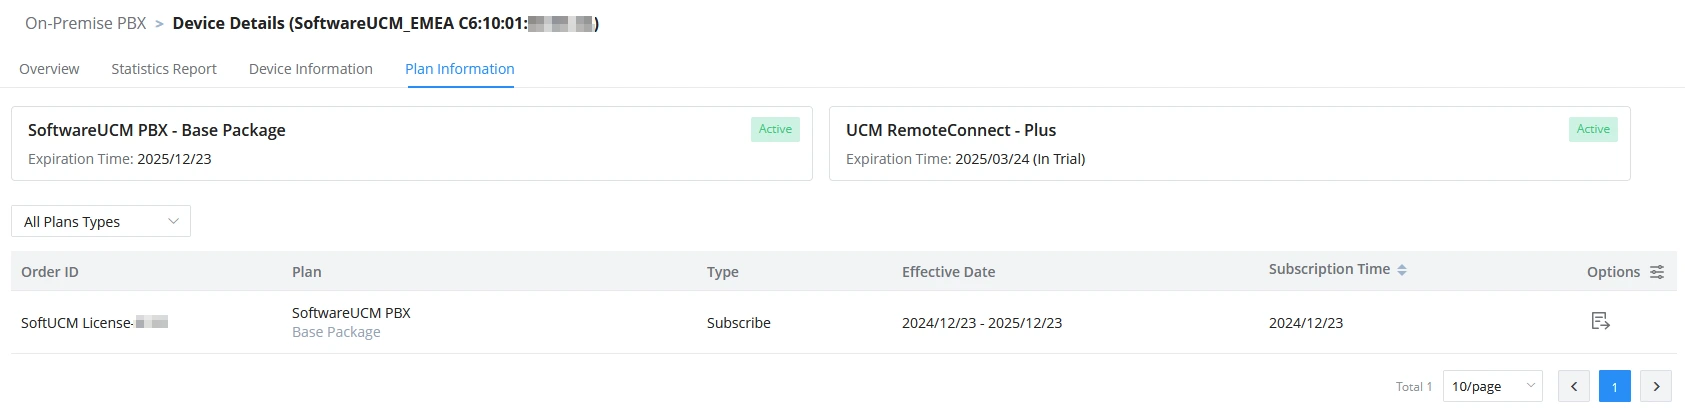
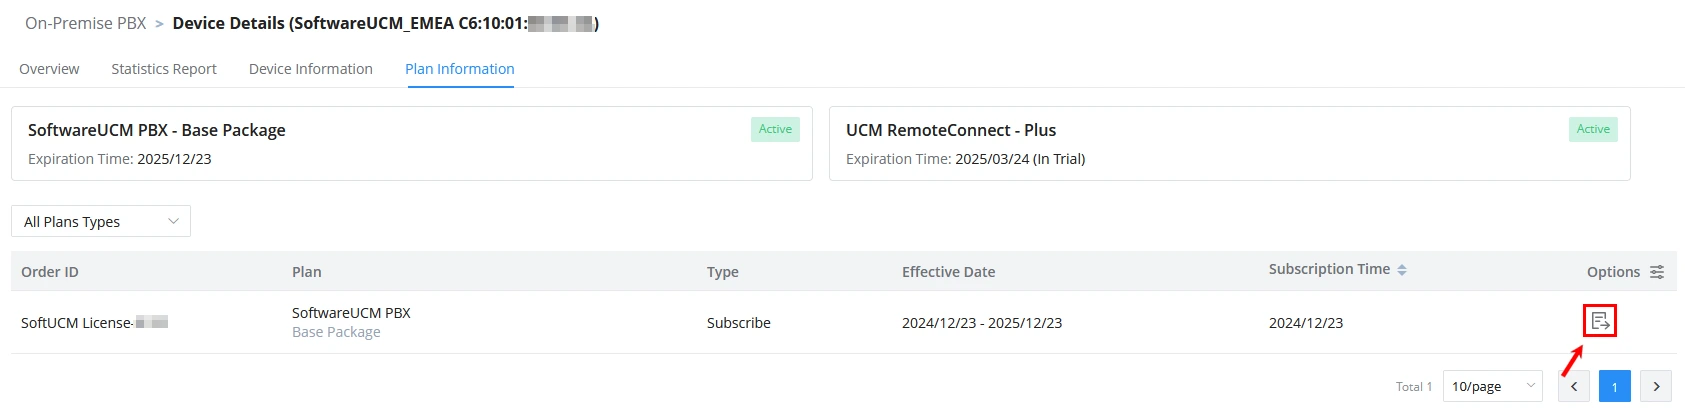
This tab provides comprehensive information about the activated plans for both UCMRC and SoftwareUCM, including details such as the plan type, and the expiration date of each.
Additionally, users can view the SoftwareUCM license receipt by clicking the icon shown in the image below:
UCMRC Diagnostics
This feature provides users with the ability to troubleshoot and resolve any issues that may occur with SoftwareUCM. It offers different tools to identify potential problems, helping users to quickly diagnose, fix any errors and minimize downtime.
To access the diagnostics page, please click on the the icon shown in the image below:

UCMRC Connection
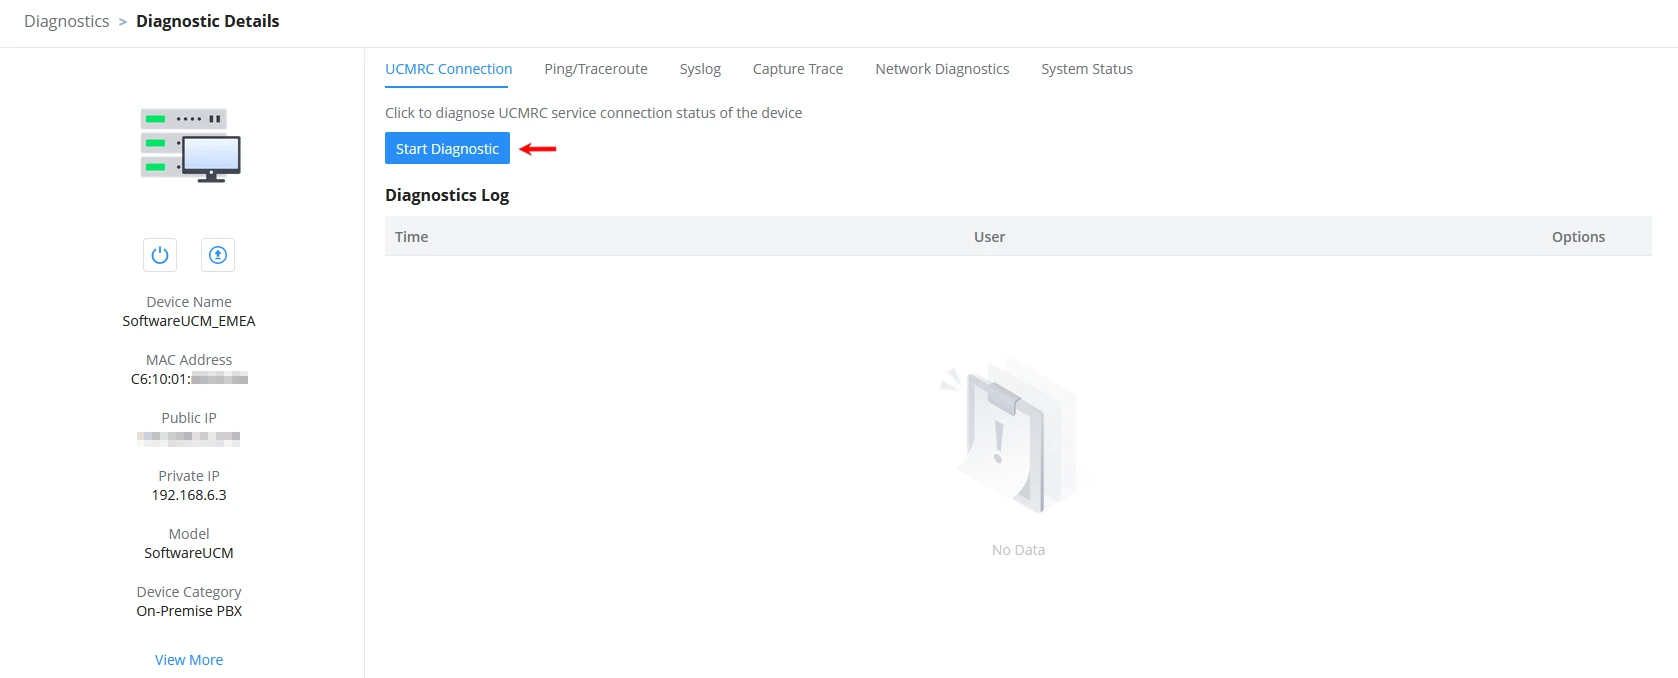
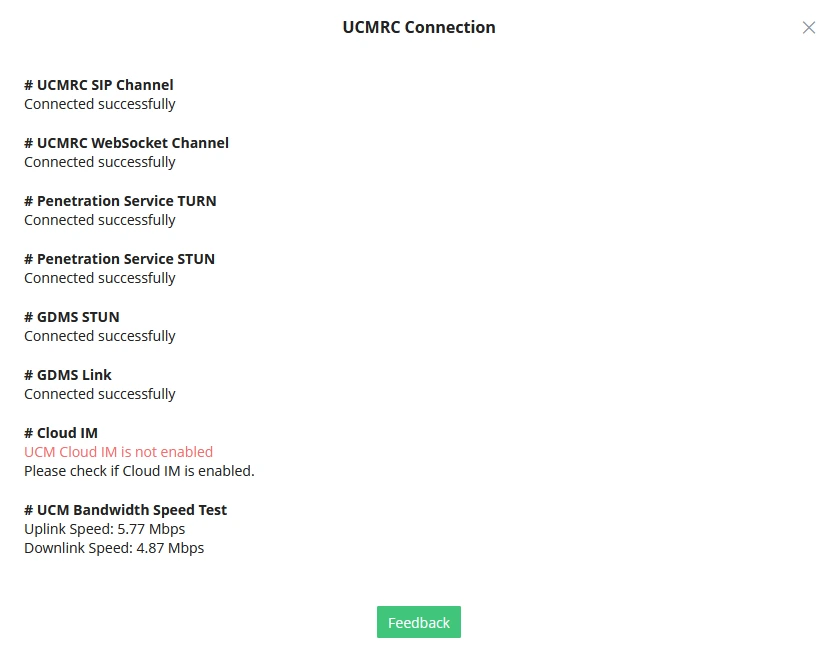
This feature allows users to check the current status of the device’s connection to the UCMRC service. By clicking on the “Start Diagnostic” button, users can initiate a diagnostic process that checks the health and status of the connection.
Ping/Traceroute
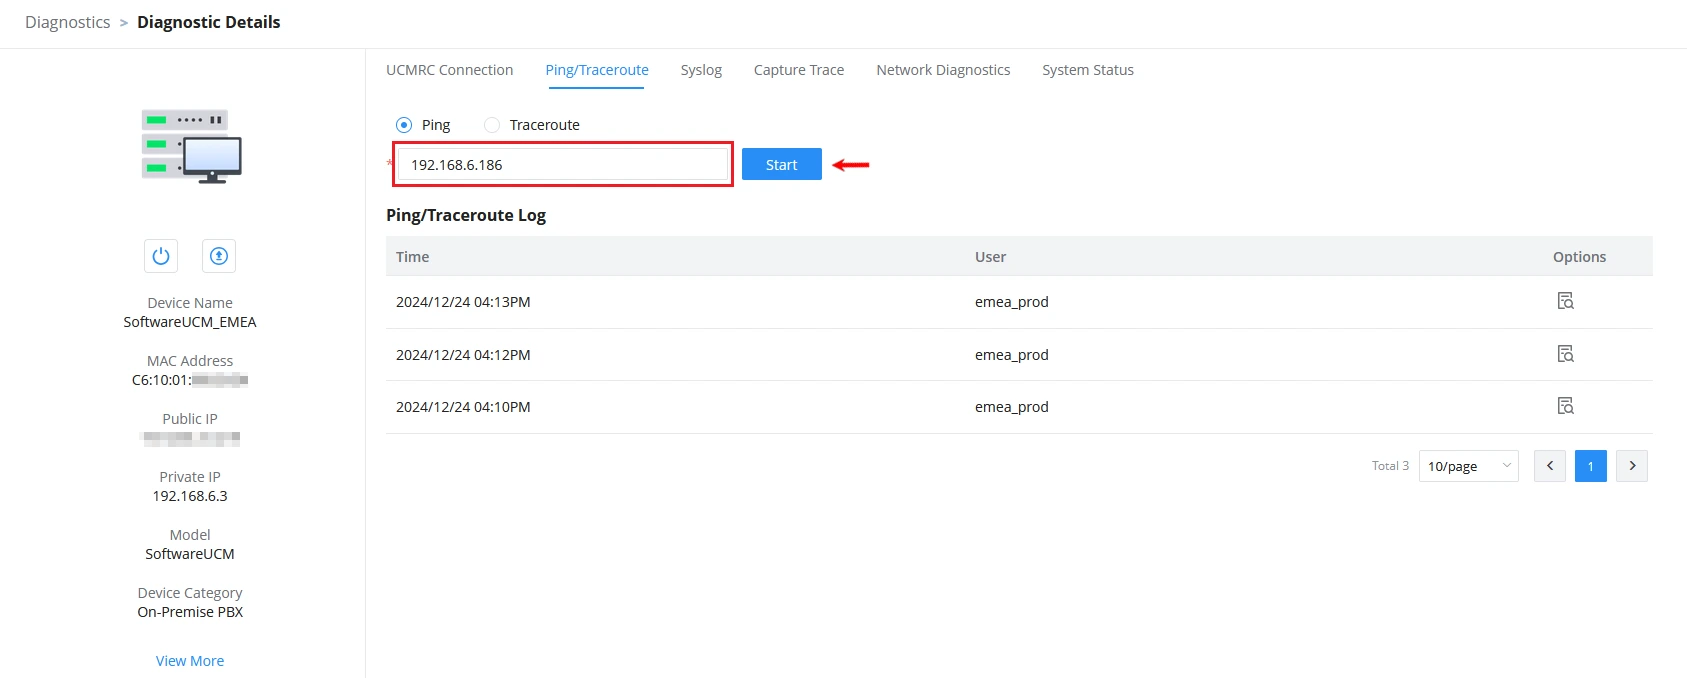
The Ping/Traceroute diagnostic is a tool that allows users to remotely test and diagnose network connectivity related to the SoftwareUCM system. This can be useful to identify the cause of call drops and voice quality issues.
In order to run a Ping/Traceroute command remotely, please enter the target IP address and click on the “Start” button.
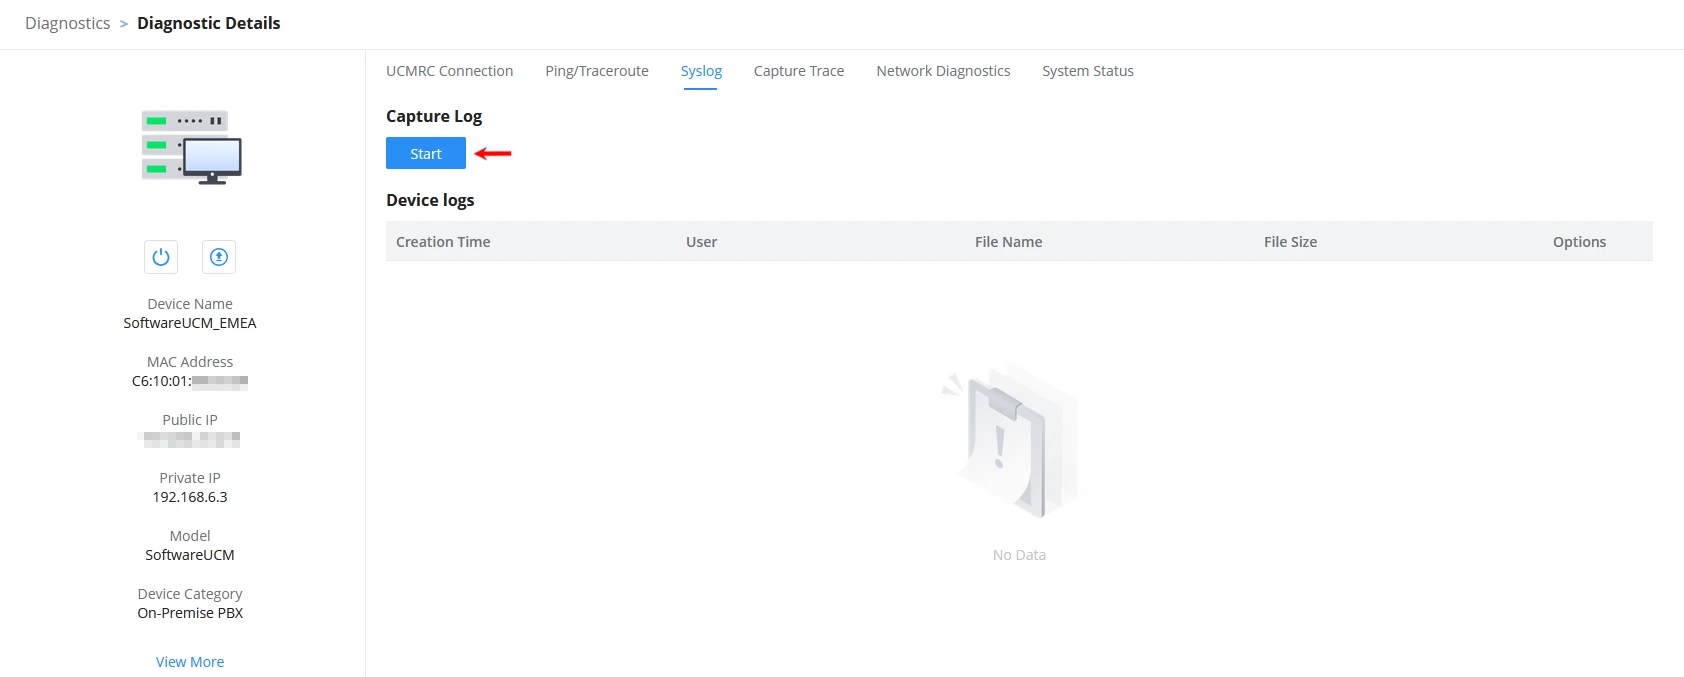
Syslog
The UCMRC Syslog diagnostic helps users retrieve and analyze logs generated by SoftwareUCM without the need for physical access. These logs can help to identify system failures, detect misconfigurations, and address call routing issues.
Click on the “Start” button to begin the syslog capturing process.
Capture Trace
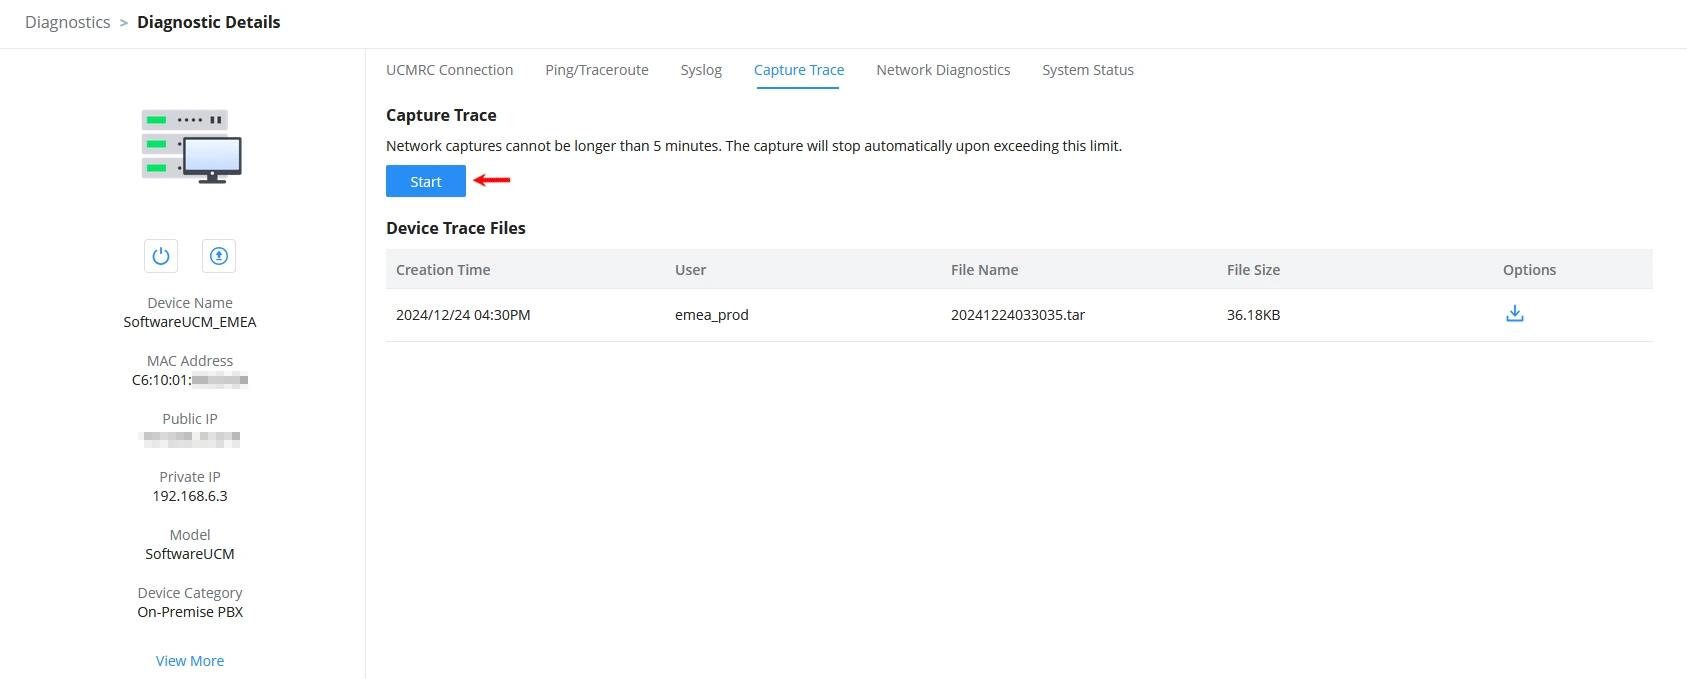
UCMRC Capture Trace for SoftwareUCM is a diagnostic feature that enables users to remotely monitor and capture network traffic between endpoints and the IPPBX. This feature is essential for troubleshooting communications issues and ensuring reliable operation of IP-based telephony services.
To start the packet capture, please select “Start“.
Network Diagnostics
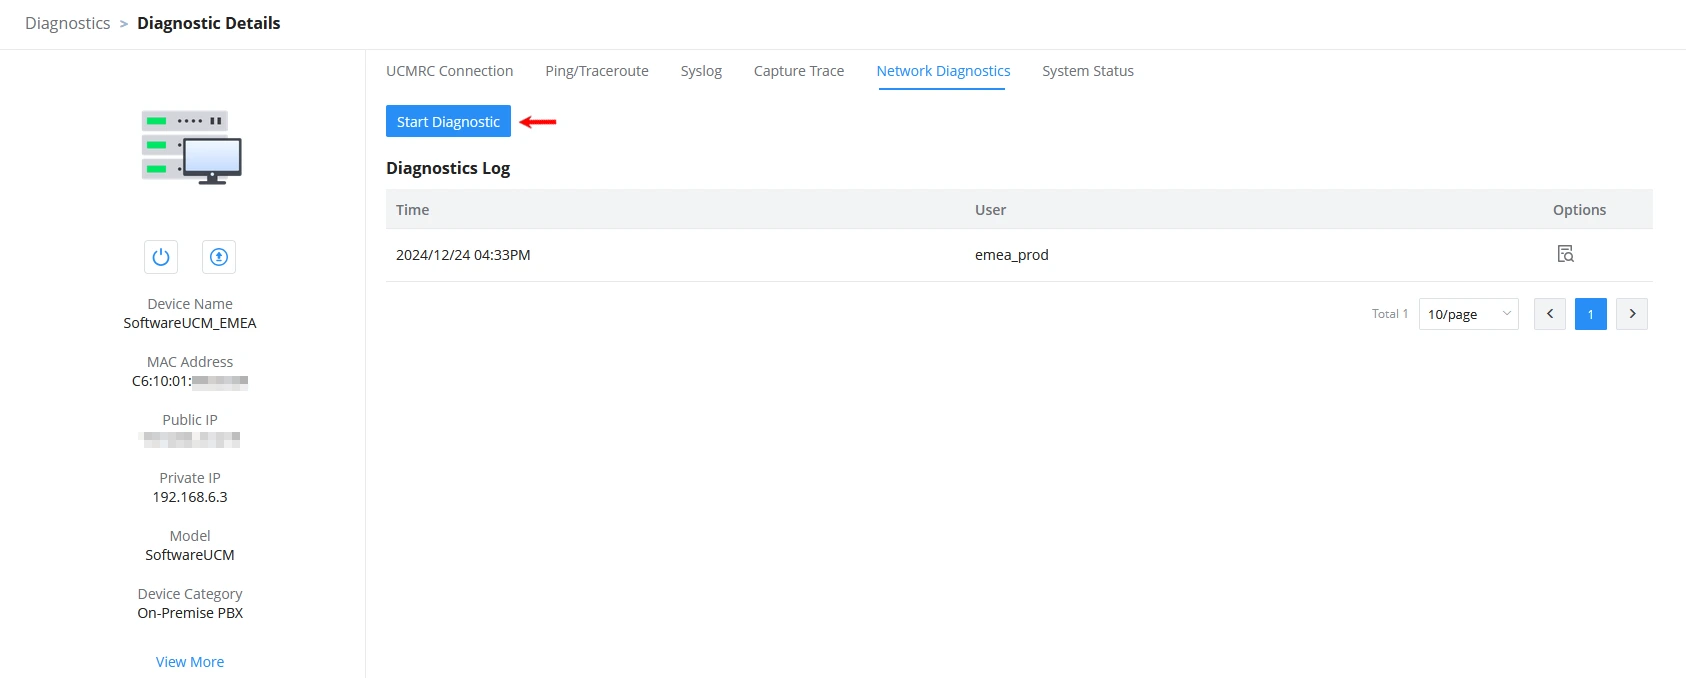
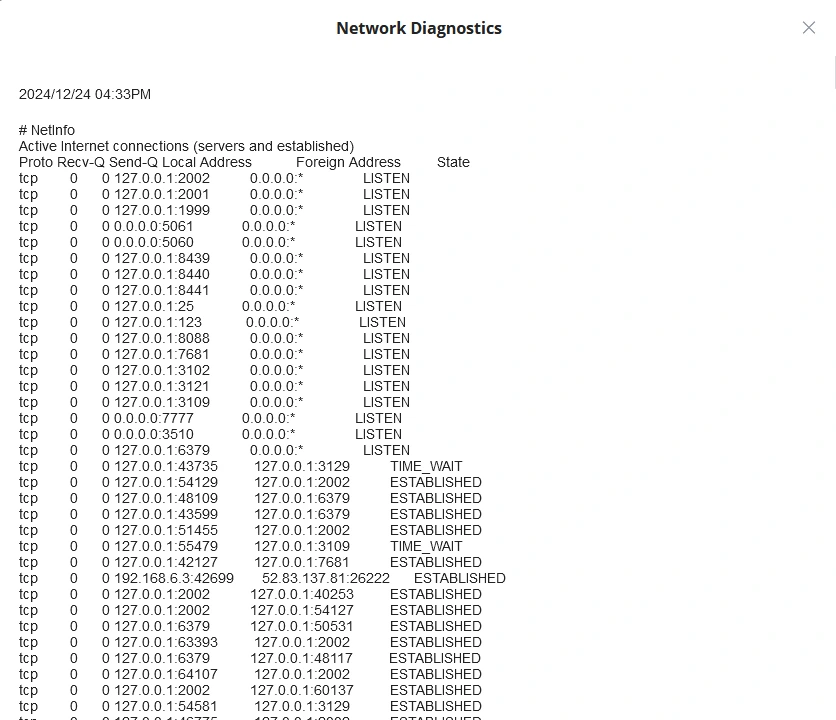
The output from the Network Diagnostics provides a detailed list of active internet connections, including listening services, established connections on SoftwareUCM as well as additional information about the system’s network interfaces and routing tables.
In order to use this feature, click on the “Start Diagnostic” button.
System Status
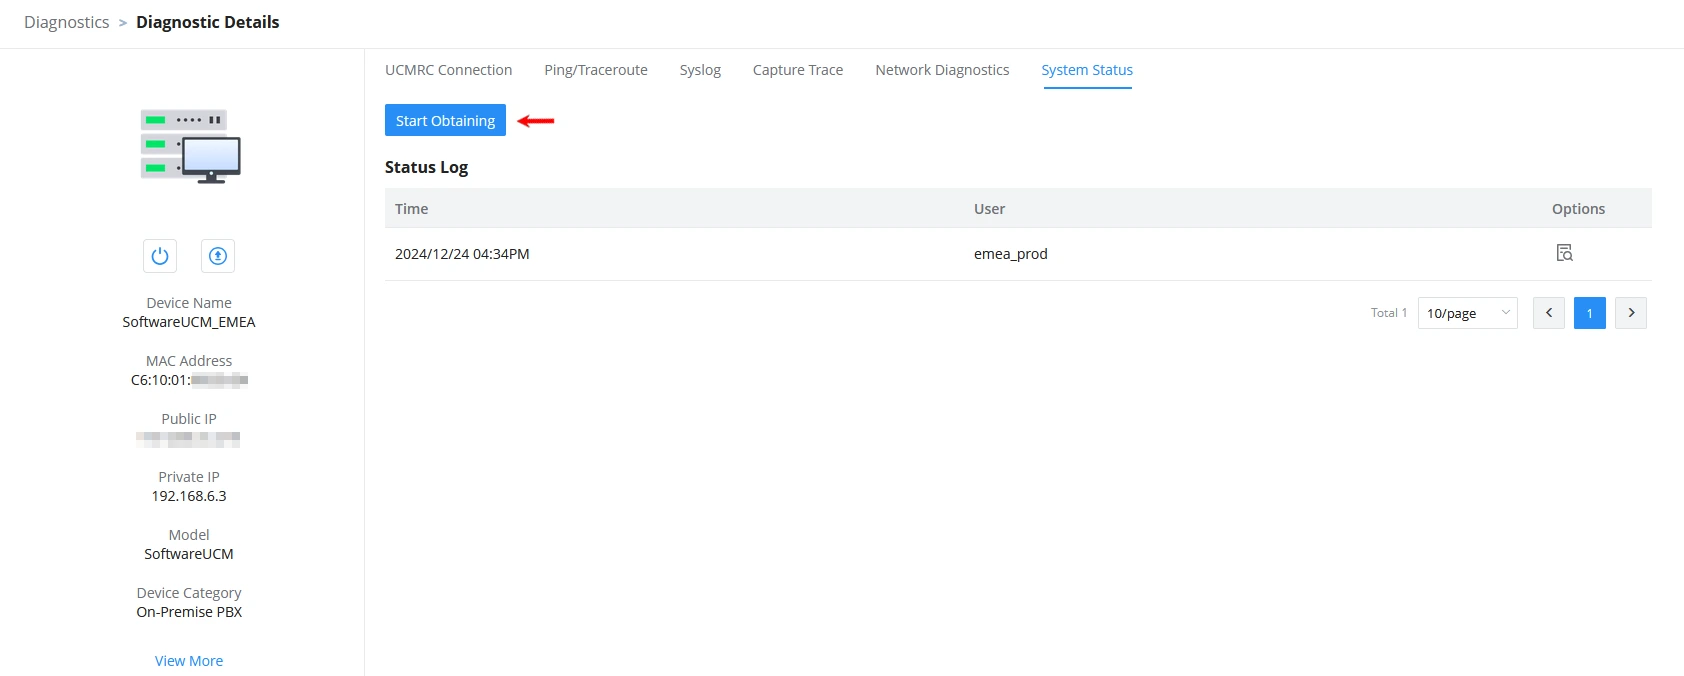
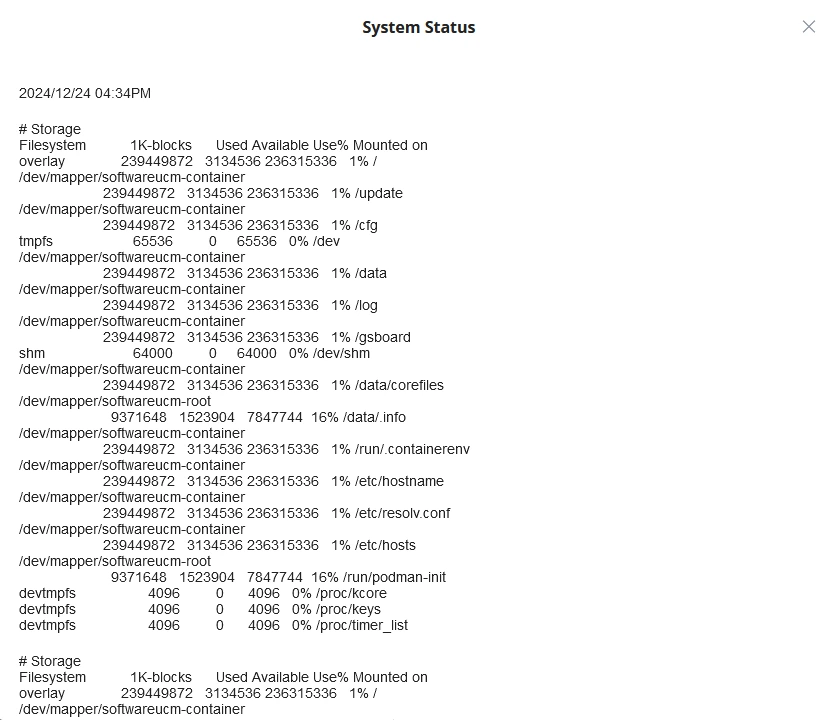
The System Status diagnostic provides insights into storage, CPU, and memory usage of SoftwareUCM. It allows users to ensure that the system has sufficient resources to operate efficiently and handle demanding tasks. This diagnostic tool is crucial for identifying potential performance issues, such as high CPU usage or low available memory.
To use this feature, click on the “Start Obtaining” button.
ADDITIONAL GDMS OPTIONS
GDMS offers some additional configuration options for SoftwareUCM, that can be found on the drop-down list shown below:
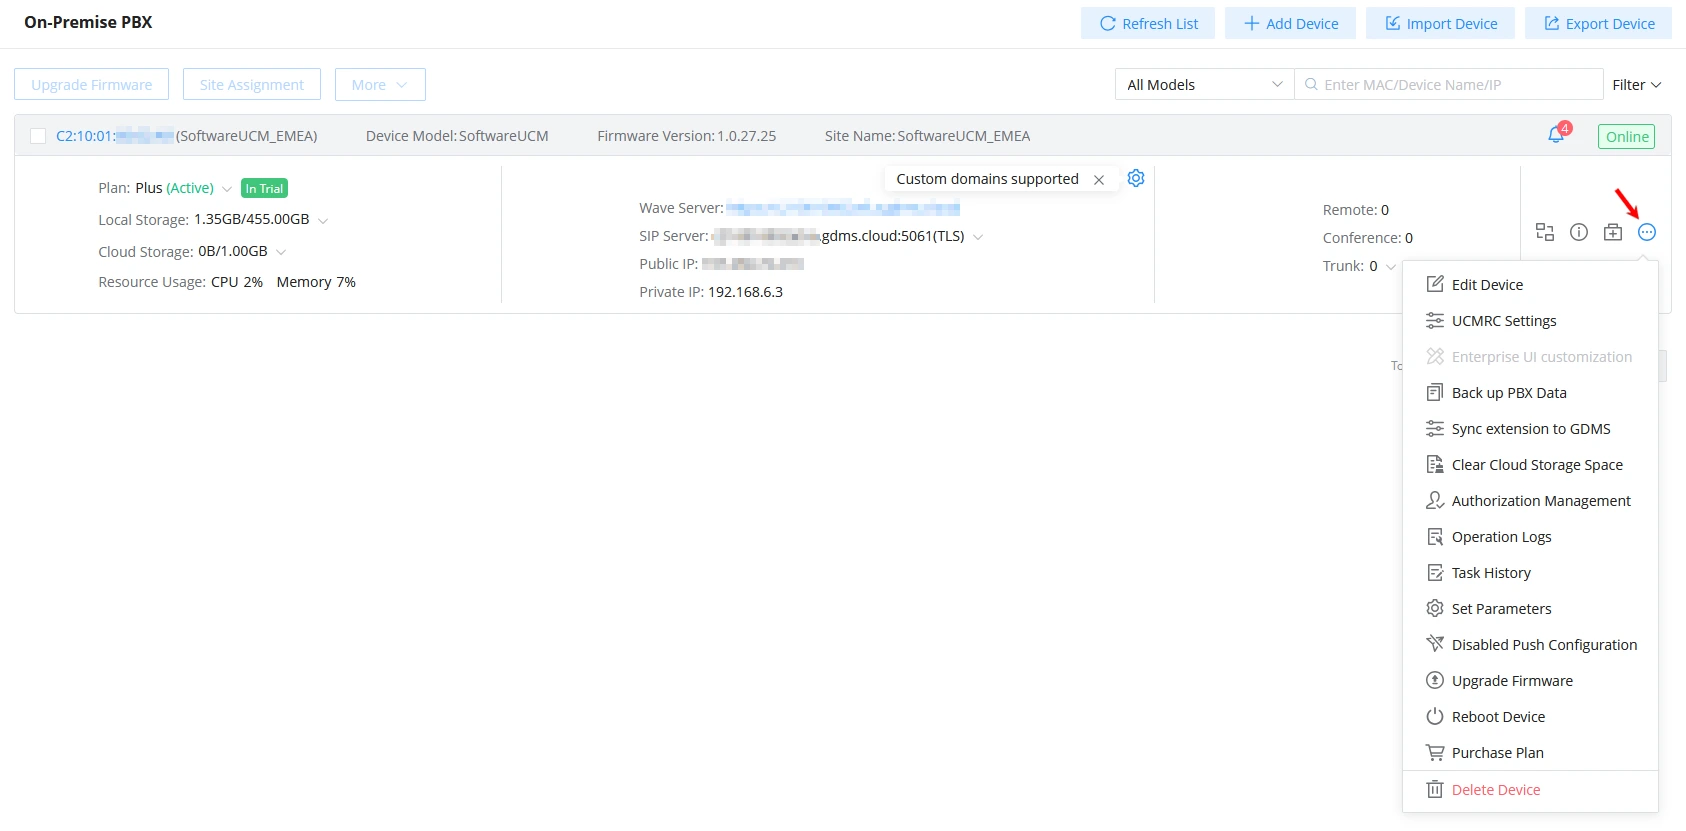
This section of the guide describes in detail each of the available options under this menu.
Edit Device
The Edit Device window allows users to configure the SoftwareUCM information related to GDMS mentioned in the table below.
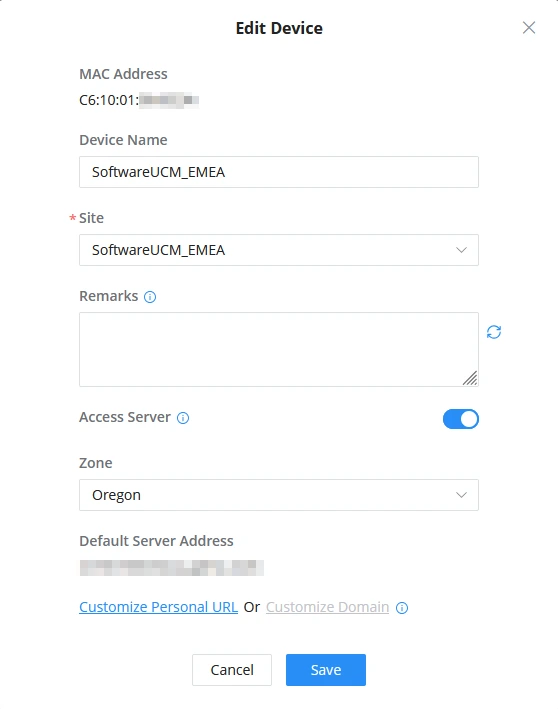
MAC Address | Shows the MAC Address of the SoftwareUCM. |
Device Name | Configures the device name of the SoftwareUCM on GDMS. |
Site | Allows users to choose the site to which this SoftwareUCM is assigned. |
Remarks | Includes all relevant comments about this SoftwareUCM system. Note: This data is synchronized with the “Remark” field set locally in SoftwareUCM under System Status→System Information. |
Access Server | Enables configuration of the remote access address for Wave. |
Zone | Allows users to choose the zone for the remote Wave access address.
|
Default Server Address | Shows the default remote Wave access address for SoftwareUCM. |
Custom Server Address | Enables customization of the remote Wave access address. |
UCMRC Settings
This can be used as a shortcut to remotely access SoftwareUCM’s RemoteConnect Plan Settings page, which allows to configure the parameters presented in the table below.
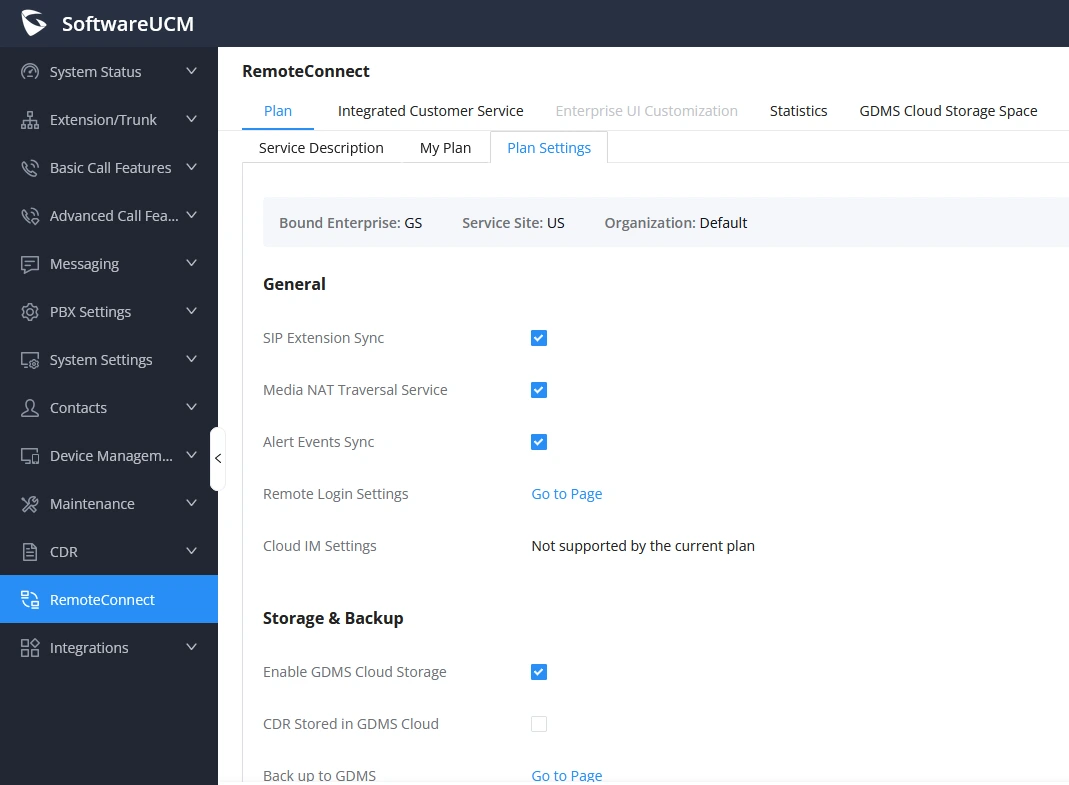
General | |
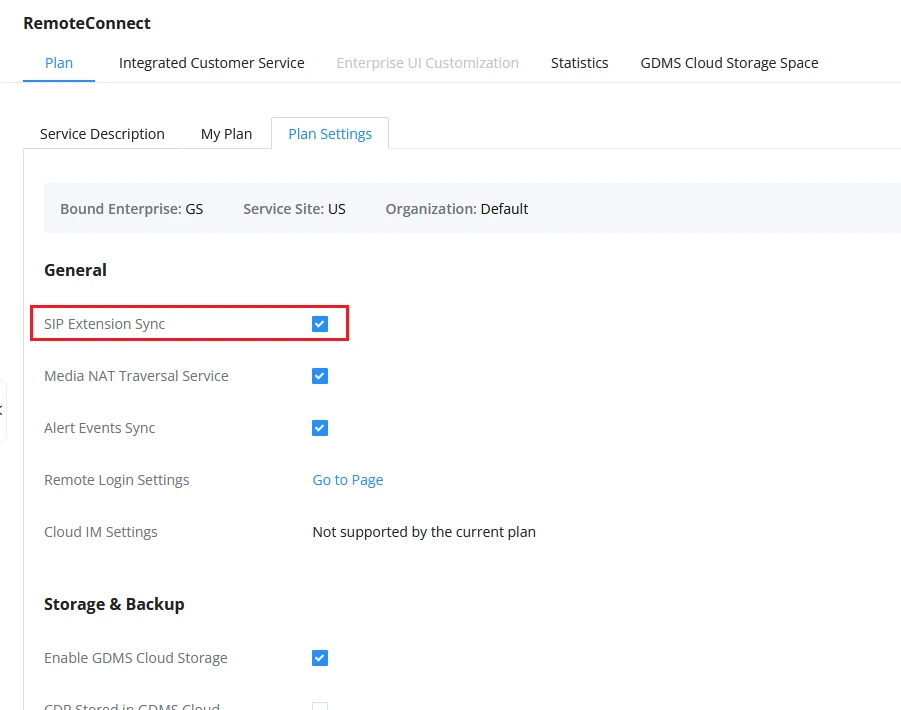
SIP Extension Sync | This option enables users to automatically export the SIP extensions configured on SoftwareUCM to GDMS. |
Media NAT Traversal Service | Enables/Disables NAT traversal service provided by GDMS. Notes:
|
Alert Events Sync | Allows users to enable/disable synchronization of SoftwareUCM’s alert information with GDMS. |
Remote Login Settings | Redirects to SoftwareUCM’s Remote Login page under Maintenance→Login Settings, which allows to configure trusted login locations. |
Cloud IM Settings | Configures cloud-based instant messaging services for SoftwareUCM.
|
Storage & Backup | |
Enable GDMS Cloud Storage | Configures whether or not to enable GDMS cloud storage. |
CDR Stored in GDMS Cloud | If enabled, SoftwareUCM CDR data will be synced to the GDMS server at 2 AM on the 1st of each month based on the SoftwareUCM’s system time. |
Back up to GDMS | Redirects to SoftwareUCM’s Backup page under Maintenance, where users can start or schedule a backup with GDMS Cloud Storage configured as the destination. |
Recordings Stored in GDMS Cloud | Redirects to SoftwareUCM’s File Manager page under PBX Settings, where users can choose to store recording files on GDMS Cloud Storage. |
Chat Data Cloud Storage | Redirects to SoftwareUCM’s File Manager page under PBX Settings, where users can choose to store IM files on GDMS Cloud Storage. |
Passwordless Remote Access | |
Enable Passwordless Remote Access | This option allows users to remotely access SoftwareUCM using GDMS, eliminating the need for a login password. |
Enterprise UI Customization
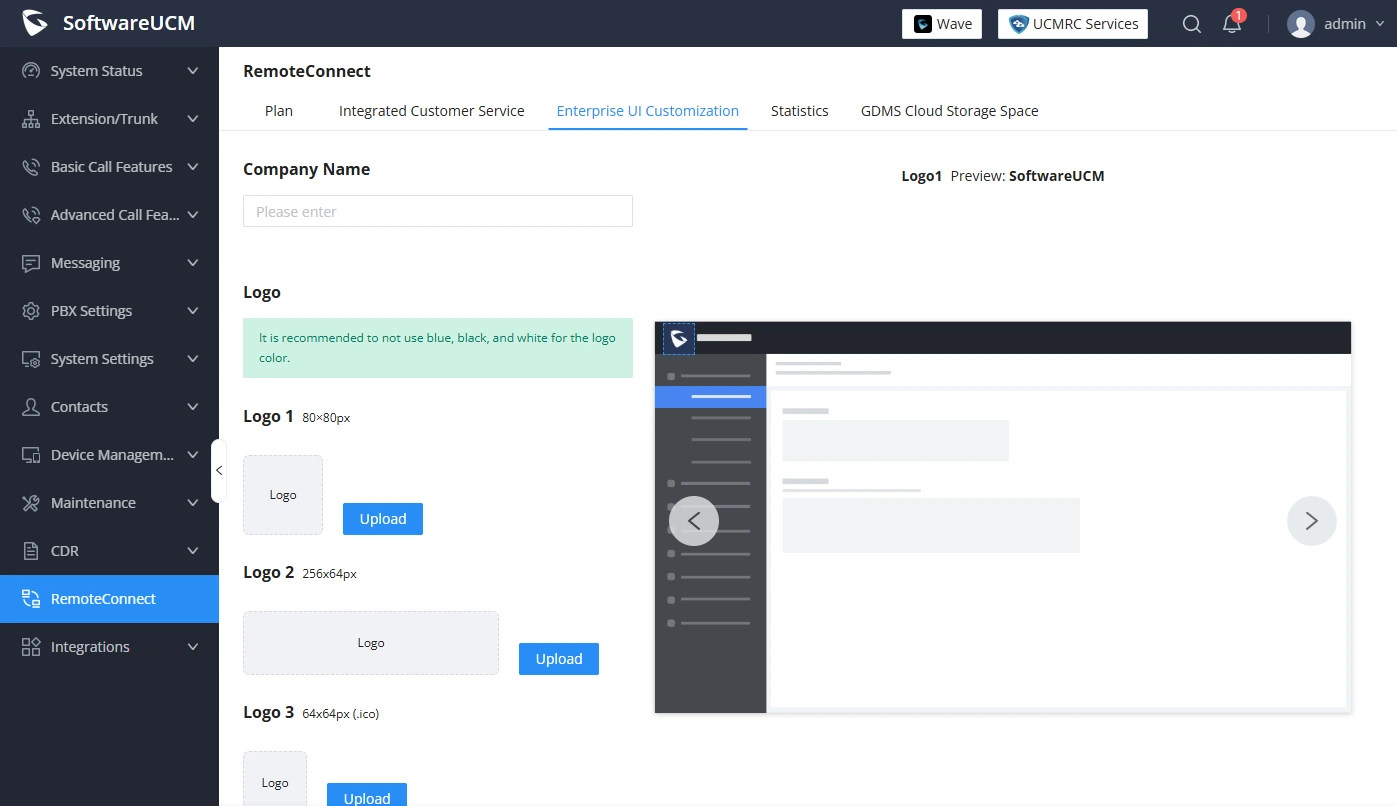
This option on GDMS enables users to remotely access SoftwareUCM’s RemoteConnect→Enterprise UI Customization page, where organizations can modify the interface based on their preferences. It provides the ability to personalize elements such as the logos of SoftwareUCM and Wave, both on the Web UI and in emails sent by SoftwareUCM.
Back up PBX Data
The Back up PBX Data option redirects users to SoftwareUCM’s Maintenance→Backup page, where users can perform or schedule system backups.
In order to create a new backup that will be stored in GDMS, please follow the steps below:
- Click on the “Backup” button, and select “GDMS Cloud Storage” under Choose Storage Location.
- Choose a Name for the backup file and the types of data that will be included.
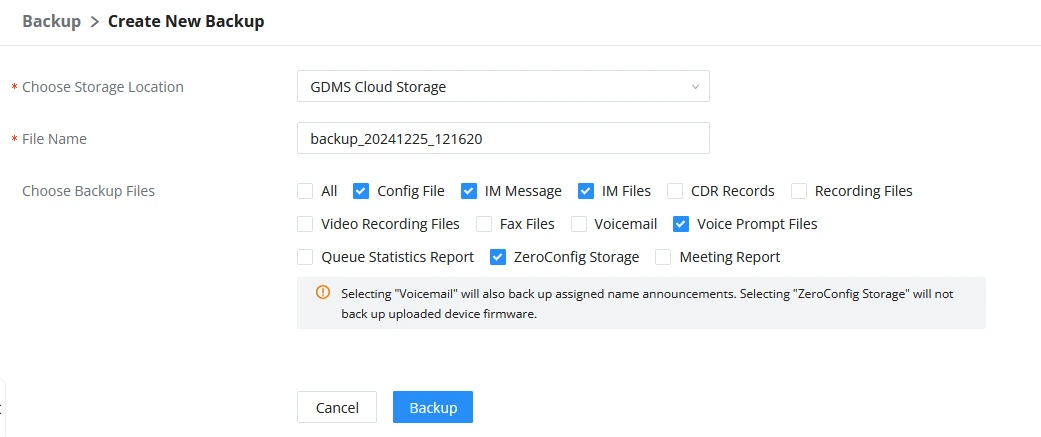
- Click on “Backup” and wait for SoftwareUCM to complete the backup process.
- To access the backup on GDMS go to UCMRC Cloud Storage
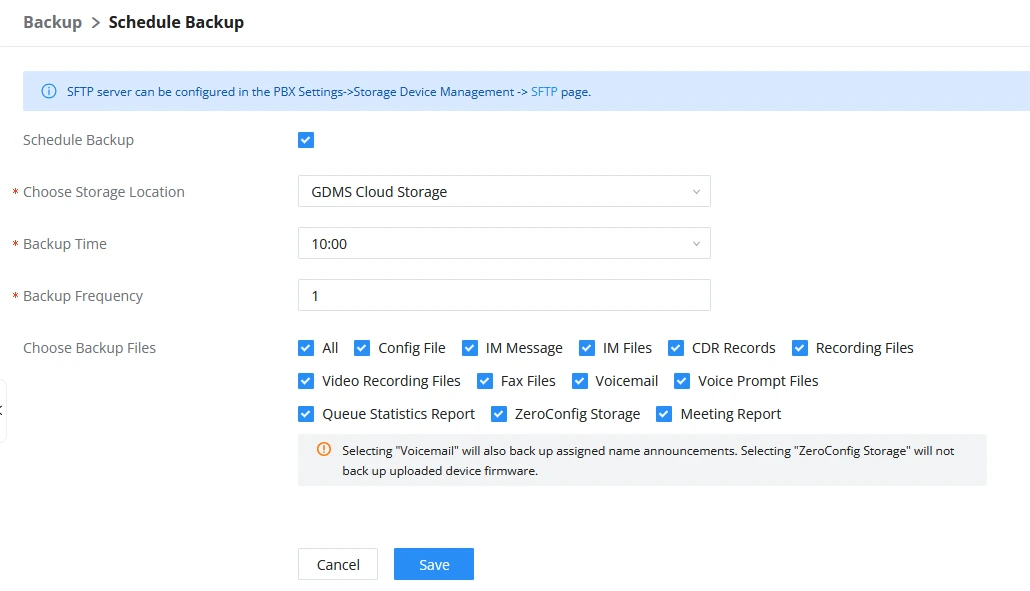
To schedule a backup from SoftwareUCM’s web UI, please refer to the following instructions:
- Click the “Schedule Backup” button and check the box to enable scheduled backups.
- Select “GDMS Cloud Storage” under Choose Storage Location.
- Choose the desired Backup Time for SoftwareUCM to schedule the backup.
- Enter the Backup Frequency (in days), the valid range is 1 to 30.
- Select the types of data that will be included in the backup and Click on “Save“
Users can perform the following actions:
- Copy the file URL.
- Download the backup file.
- Rename the backup file.
- Delete the backup file.
- Restore the back up file to SoftwareUCM.
Clear Cloud Storage Space
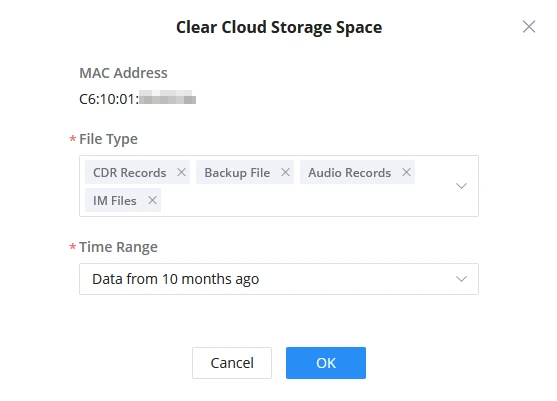
Users can use this option to delete specific saved data in cloud storage, helping to free space and prevent unnecessary storage usage. To clear storage space, users can select the types of files to delete, as well as define the time range as shown in the image below:
Authorization Management
If assistance from Grandstream Support is needed to troubleshoot an issue, the user can enable Authorization Management to allow device management through GDMS Support.
To grant Grandstream Support authorization to manage the SoftwareUCM, please follow the steps below:
- Select “Authorization Management” and enter the authorization duration, which can be set between 1 to 9999 minutes, according to the time required for troubleshooting.
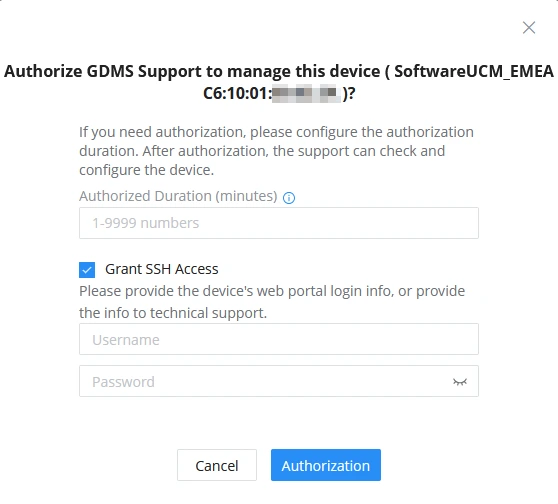
- Check the Grant SSH Access box, and enter the username and password of SoftwareUCM’s web portal login.
- Click on the “Authorization” button, to allow Grandstream Support to manage SoftwareUCM within the authorization period.
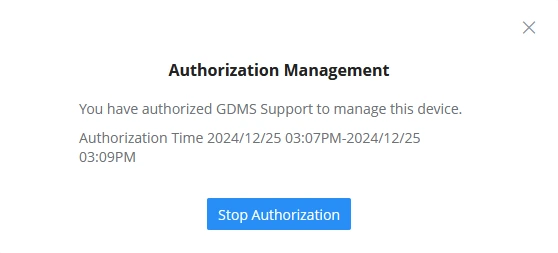
In case users wish to stop authorization before the configured period ends, they can select Authorization Management again and click the “Stop Authorization” button.
Operation Logs
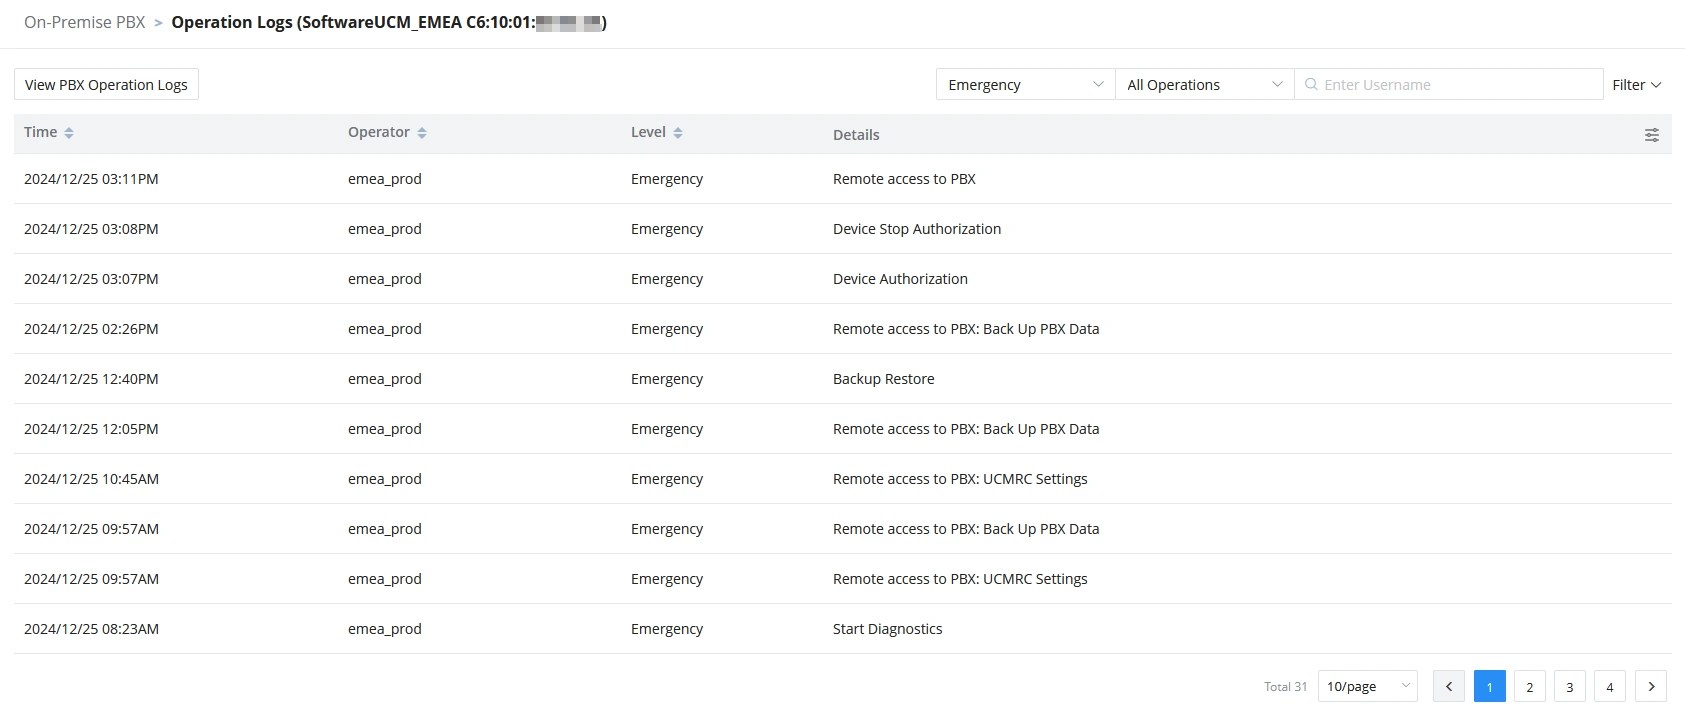
This feature helps users track the operations performed on SoftwareUCM through GDMS by providing a time-log. The records allow users to review the history of the changes made in order to monitor system activity.
Task History
The Task History page provides a detailed log of all the tasks performed on this SoftwareUCM. This includes the task type, time and status.

Add a Task
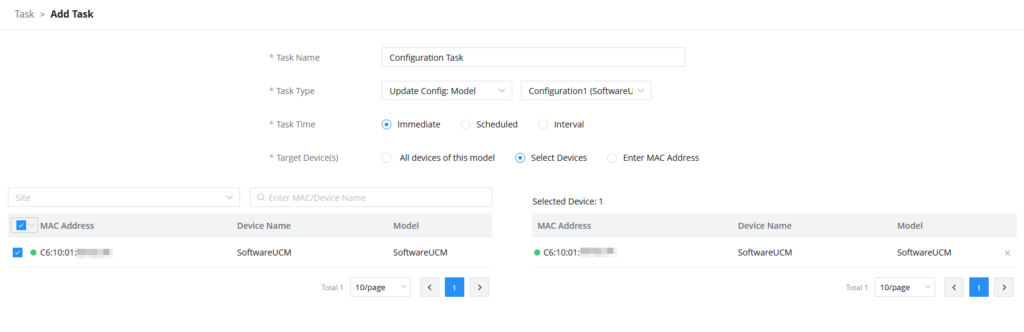
To add a task for SoftwareUCM, navigate to the Task page and click on “Add Task“. The table below provides explanation of the parameters on this page.
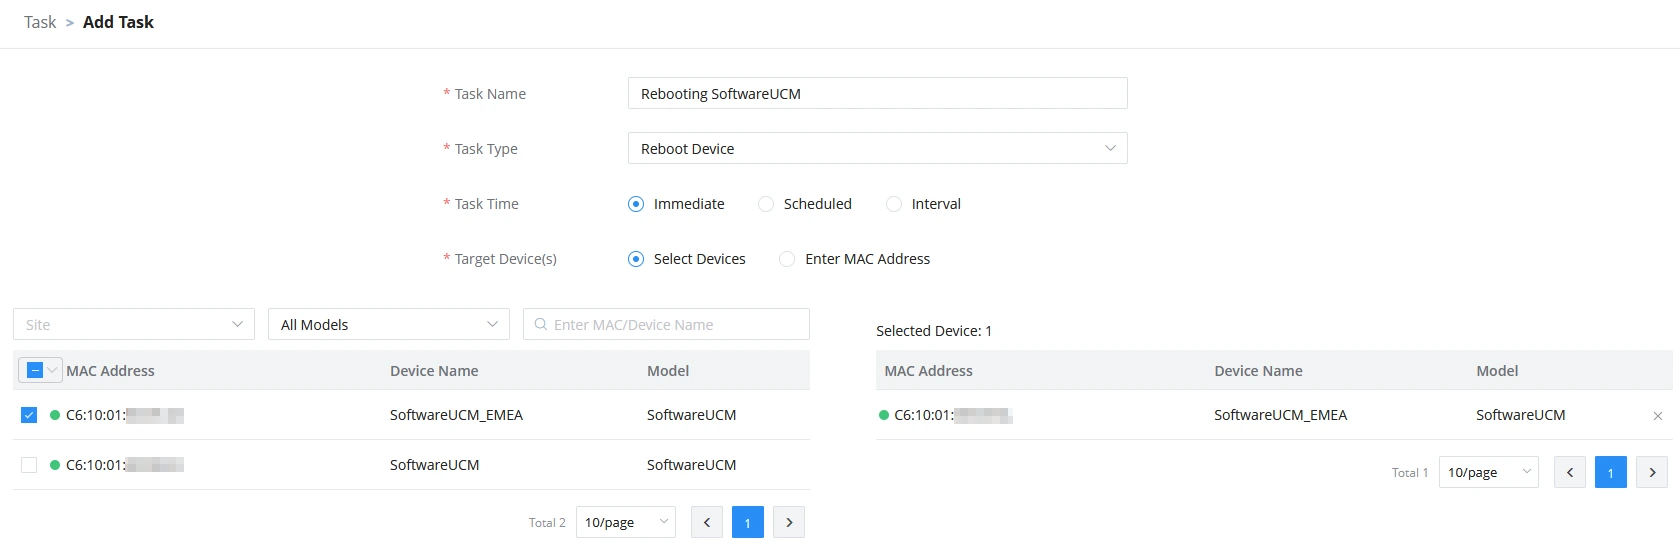
Task Name | Enter the name of the task. |
Task Time |
|
Task Type |
|
Upgrade Method | This option is available only when Upgrade Firmware is selected as the Task Type.
 |
Current Firmware Range | This option is available only when Firmware Upgrade is selected as the Task Type. Devices will be upgraded only if they meet certain requirements:
|
Target Device(s) |
|
Click on the Save button to finalize the task creation. Users can view this task on the Task page.
Task Status
Users can see the status of all completed and pending tasks by checking the Status column on the Task page.
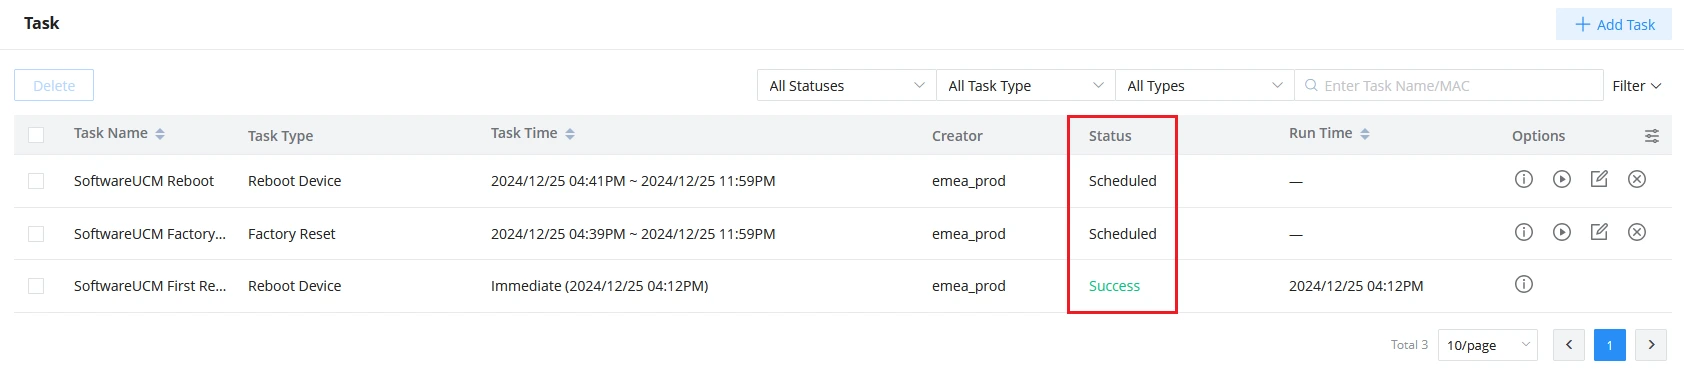
The following statuses are supported:
Scheduled | The task is scheduled at a future time. |
Ongoing | The task is currently in progress. |
Success | The task has been completed successfully. |
Failed | The task has failed. |
Cancelled | The task was canceled before its start time. |
Stopped | The task was stopped while in progress |
Timeout | The task was not executed once it has reached its ending time. |
Search Task
Users can search for specific tasks by using the search bar and filters at the top-right corner of the Task page.

Start Scheduled Tasks
Users can start pending scheduled tasks immediately by clicking on the button.
Cancel Pending Tasks
To cancel a pending task, click on the button for the desired task. The task status will be changed to Cancelled. If the task is recurring, users could select whether to cancel the entire recurring task or just cancel the single task.
To run the task again, click on View Task Details→Run Again for the desired task.
Stop Task
To stop a running task, click on the button to immediately end it.
If the device has already completed the task (e.g., Reboot Device), it will finish the task. If not, the device will no longer execute the task.
Delete Task
Users can delete tasks at any time. Select one or more tasks and click on the Delete button at the top of the page to delete them.
Upgrade Firmware
This option allows users to create a task to upgrade the firmware version of SoftwareUCM based on the latest release, or a specific upload.
To upgrade the firmware of SoftwareUCM, please follow the steps below:
- Select “Upgrade Firmware” from the options menu on the UCMRC→On-Premise PBX. A window will appear to create a task for firmware upgrade.
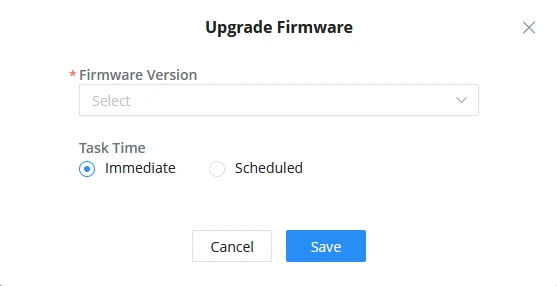
- Choose the latest official firmware, or an uploaded version. (Firmware files can be added in GDMS under Resources→Firmware→Custom Firmware)
- Schedule the time of the firmware upgrade, or choose to run it immediately then click on the Save button.
- Go to the Task page, to check on the status of the firmware upgrade task.
Reboot Device
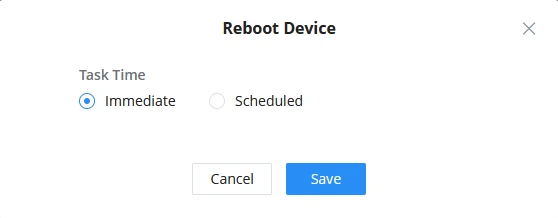
This option allows users to create a task to reboot SoftwareUCM. Users can choose whether to reboot the device immediately or schedule it at a later time.
Purchase Plan
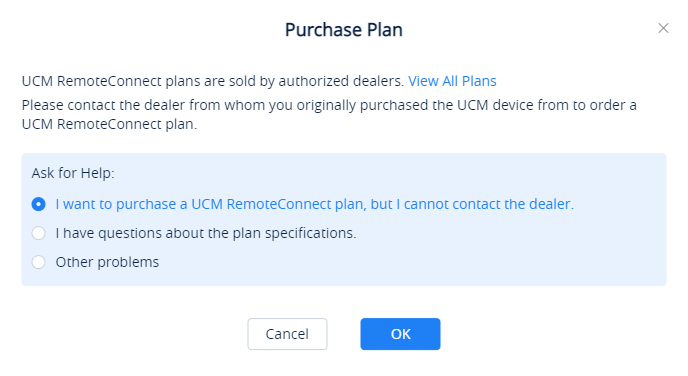
Users can purchase one or more UCM RemoteConnect plans and assign them to the corresponding SoftwareUCM instances. If the user wants to purchase a UCM RemoteConnect plan, they need to contact the device distributor.
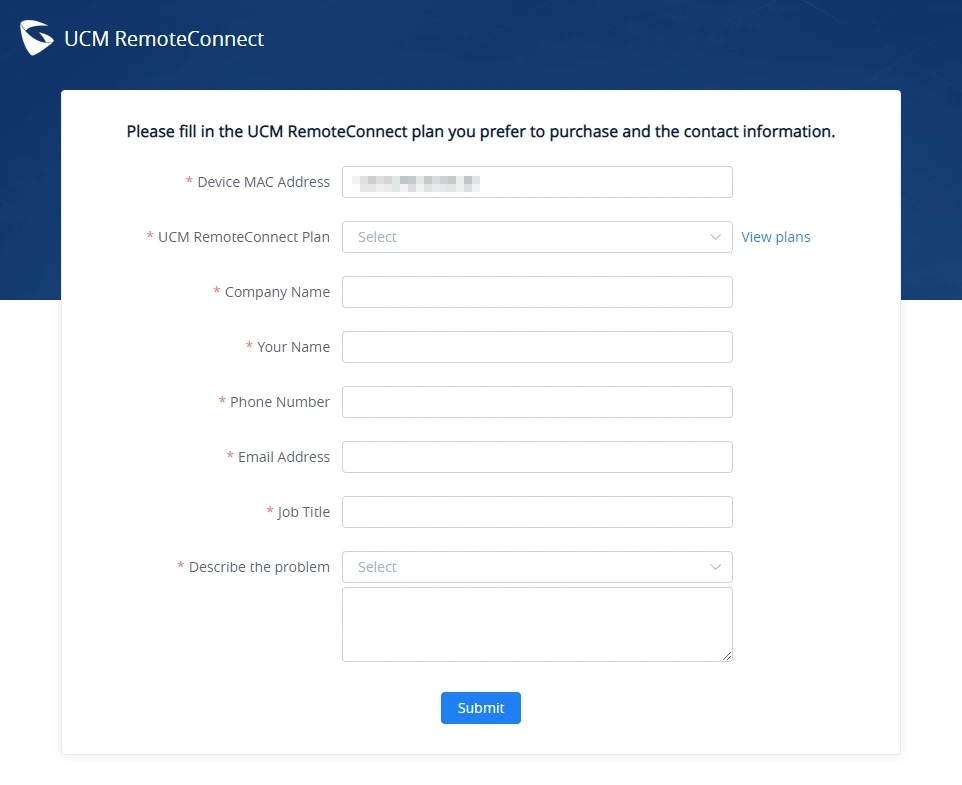
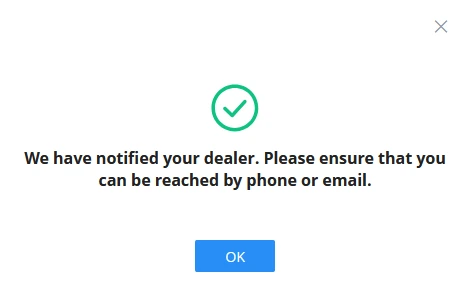
If the user cannot contact the device distributor, they can use this option to notify the device distributor to contact them as soon as possible.
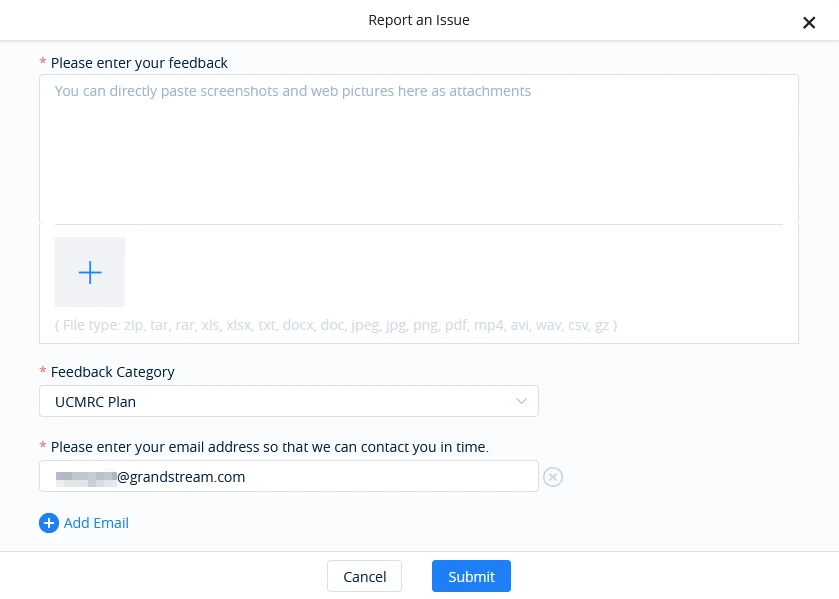
If the user has questions about the plan specifications or encounters any issues, they will be directed to a window where they can report the issue to the support team.
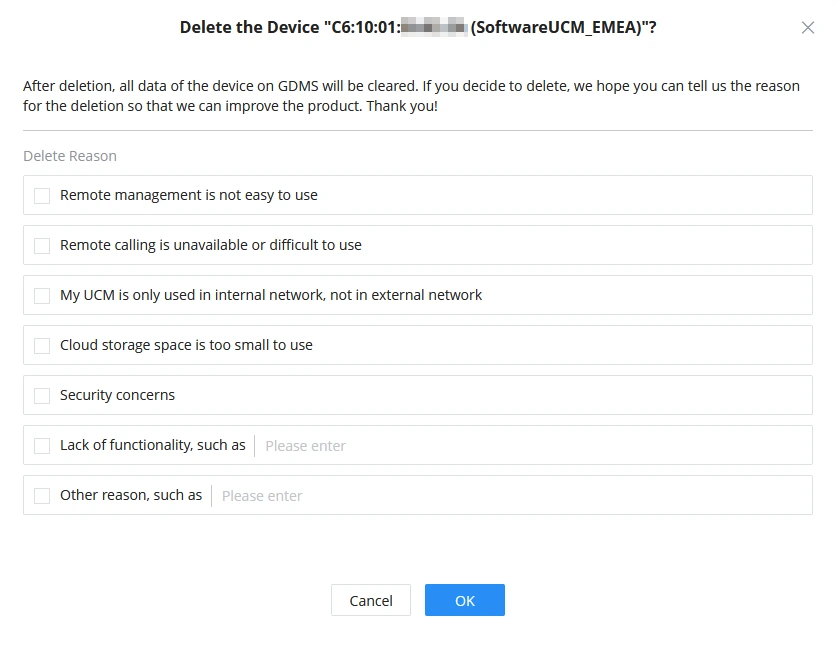
Delete Device
To delete SoftwareUCM from GDMS, please follow the steps below:
- Go to UCMRC→On-Premise-PBX and select “Delete Device” from the SoftwareUCM options menu.
- Choose a reason from the list then, click on OK
SOFTWAREUCM EXTENSION MANAGEMENT IN GDMS
The extension section in GDMS allows users to manage SoftwareUCM extensions and assign them to existing SIP endpoints.
SIP Extension Sync
Users can enable the “SIP Extension Sync” option on SoftwareUCM under RemoteConnect→Plan Settings, which synchronizes the SIP extension created on the PBX with GDMS.
SIP Account
On the SIP Account page, users can perform the following actions on an existing extension:

Delete | Select one or multiple extensions to delete from GDMS. |
Modify SIP Server | Change the SIP Server of one or multiple selected extensions. |
Add Account | Add a new SIP account to GDMS. |
Import Account | Import one or multiple SIP account to GDMS using the corresponding provided template. |
Export Account | Export an excel file containing all the SIP accounts on GDMS . |
Go to PBX Web UI to edit extension | This option redirects users to the extension settings of this specific account on SoftwareUCM’s Web UI. |
Edit Account | Allows to edit the extension account name and assign it to a specific SIP endpoint on GDMS. |
Delete Account | Delete this specific account from GDMS only. The extension will still remain on SoftwareUCM’s extensions page. |
SIP Account Status
The status of the SIP accounts in GDMS is summarized in the table below:

Status | Description |
Status | Normal: All devices using the account are registered, and the account is working normally. Abnormal Registration: At least one device using this account is not registered. Possible reasons include:
Unassigned: No devices are using this account. |
From PBX | This represents the SIP accounts are synchronized from the IPPBX device. If the user modifies the SIP accounts in IPPBX device, the updates will be synchronized to GDMS platform. |
From CloudUCM | This represents the SIP accounts are synchronized from the CloudUCM. If the user modifies the SIP accounts in CloudUCM , the updates will be synchronized to GDMS platform. |
Add SIP Account
To add a new SIP extension, click on the “Add Account” button under the SIP Account page, and fill the information mentioned below:
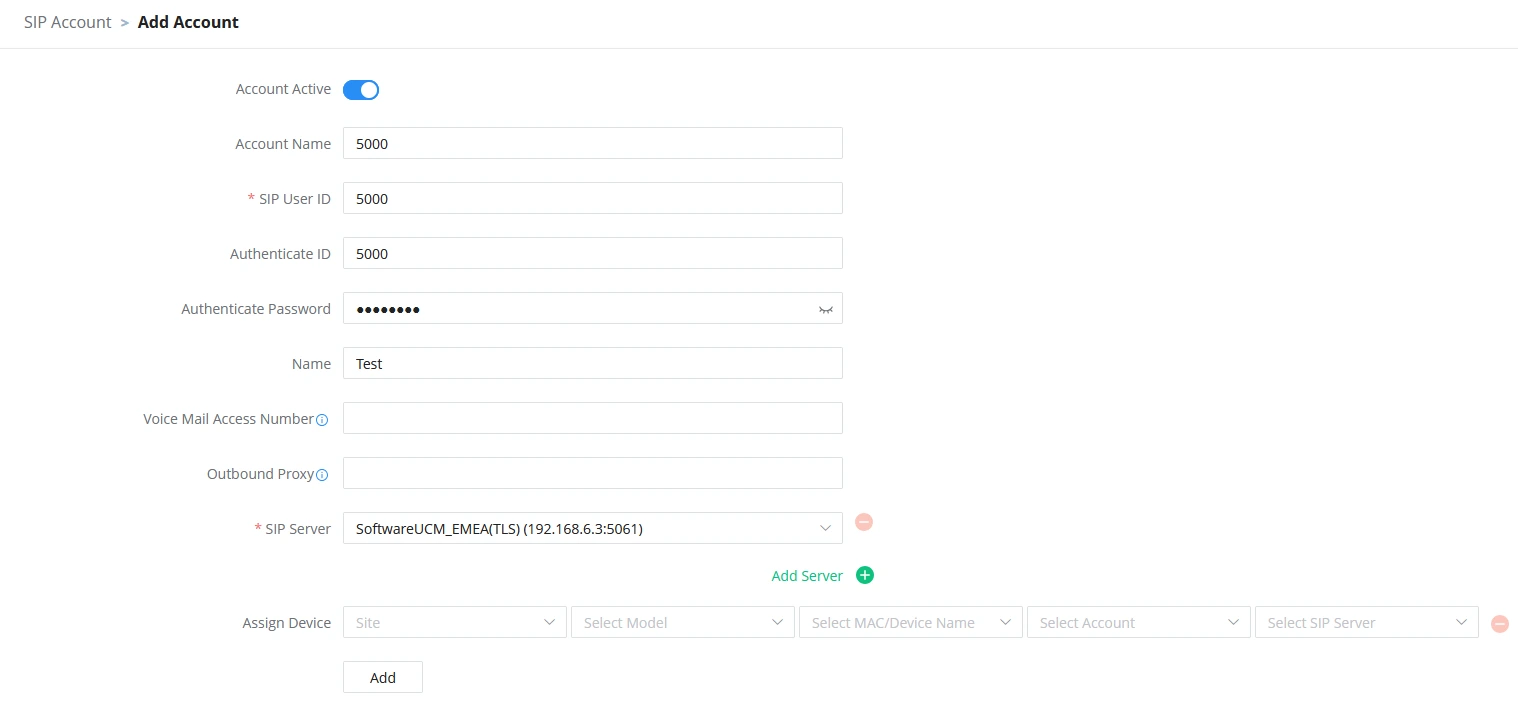
Account Active | Activates/deactivates the SIP account. |
Account Name | This is a necessary option. Specifies an identity name for the SIP account. |
SIP User ID | This is a necessary option. Configures user account information provided by your VoIP service provider (ITSP). It is usually in the form of digits similar to a phone number or actually a phone number. |
SIP Authentication ID | This is a necessary option. Configures the SIP service subscriber’s Authenticate ID used for authentication. It can be identical to or different from the SIP User ID. |
Password | This is a necessary option. Configures the account password required for the phone to authenticate with the ITSP (SIP) server before the account can be registered. After saving, it will appear as hidden for security purposes. |
Name | Configure the display name of the SIP account. This option will be used for Caller ID display. The configured content will be included in the From, Contact, and P-Preferred-Identity headers of the SIP INVITE message |
Voicemail Access Number | If the SIP Server also configures this item, this configuration will prevail. |
SIP Server | This is a necessary option. Users need to select the SIP server for the SIP account. If there is no available SIP server for the current SIP account, users could click on the “Add Server” option to add a new SIP server for the SIP account. |
Add Server | If the user needs to configure multiple SIP server addresses for a single SIP account, such as the UDP/TLS protocol server address (SoftwareUCM with paid UCM RemoteConnect plan can synchronize multiple protocol server addresses to the GDMS platform), the user can configure it and assign to devices separately. |
Assign device | This option will allow assigning a specific device to this account. |
Import SIP Account
The GDMS platform allows users to import a batch of SIP accounts and SIP servers to the system and allocate them to the devices via Excel files.
- On the SIP Account page, click on the Import Account button. The following window will appear:
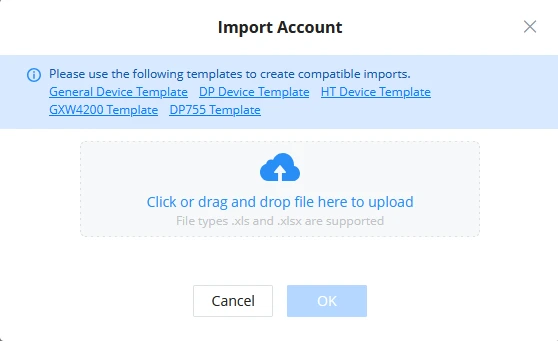
- Download the SIP account templates based on the assigned devices, and fill in the information provided in the table below within the file:
Account Name | This is an optional option. Users need to set the identity name for the SIP account. |
SIP Server | This is a necessary option. Users need to input the SIP server address. If the SIP server does not exist in the GDMS platform, the GDMS platform will create the SIP server in the system. |
SIP User ID | This is a necessary option. Configures user account information provided by your VoIP service provider (ITSP). It is usually in the form of digits similar to a phone number or actually a phone number. |
SIP Authentication ID | This is a necessary option. Configures the SIP service subscriber’s Authenticate ID used for authentication. It can be identical to or different from the SIP User ID. |
SIP Authentication Password | This is a necessary option. Configures the account password required for the phone to authenticate with the ITSP (SIP) server before the account can be registered. After saving, it will appear as hidden for security purposes. |
Display Name | Configure the display name of the SIP account. This option will be used for Caller ID display. The configured content will be included in the From, Contact, and P-Preferred-Identity headers of the SIP INVITE message. |
Device MAC Address | (Required) Enter the MAC address of SoftwareUCM. The valid characters (0-9, a-z, A-Z) can be entered either consecutively or separated by colons (:) or hyphens (-).
|
Account Index | Users need to select the account index to which the account will be allocated (e.g. Account 1 – Account 16). If the current account location has a configured account, the configured account will be replaced with the new account information. |
Profile | For DP devices and HT devices only. Enter the profile that the account will use (e.g. Profile1, Profile2, etc.). If multiple different SIP servers use the same profile, the import will fail. |
HS Mode | For DP devices only. Enter the HS mode for the account. Available options are “Circular”, “Linear”, “Parallel”, and “HSx”, where x can be 1 to 5. |
HS1-HS5 | For DP devices only. Users could configure the Line for each handset from Line 1 to Line 10. Each SIP account can be allocated to different handsets. |
Port Type (FXS/FXO) | This option is valid only for HT devices. Input the port type which will be assigned to the device. Users could select FXO port type or FXS port type. |
Port Serial Number | This option is valid only for HT devices. Input the port serial number which will be assigned to the device. Users could input the port serial number from Port 1 to Port 10. |
Search Group | This option is valid only for HT devices. Users could select the search group between None (default), Active, and other port serial numbers beside their own. |
- Once the template is filled out, drag, and drop the file to the upload window or select the file from your local device. Click on the OK button to confirm.
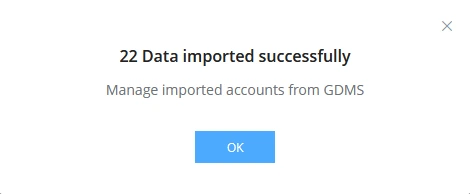
- A confirmation window will appear indicating that the SIP accounts were imported successfully. Click OK to close it.
Export SIP Account
Users can export all existing SIP accounts in GDMS to an Excel file by clicking the “Export Account” button in the top-right corner of the SIP Account page.
Allocate SIP Accounts to Devices
Users can allocate SoftwareUCM SIP accounts to the devices on GDMS. This can be done while editing SIP accounts, or importing a batch of SIP accounts to the GDMS platform using templates (as seen in the previous section).
To assign a SIP extension to a device in editing mode, please follow the steps below:
- In GDMS, navigate to the Extension→SIP Account page and click the edit button
 under the options for the desired SIP account.
 - Under the Assign Device section, enter the information provided in the table below:
 under the options for the desired SIP account.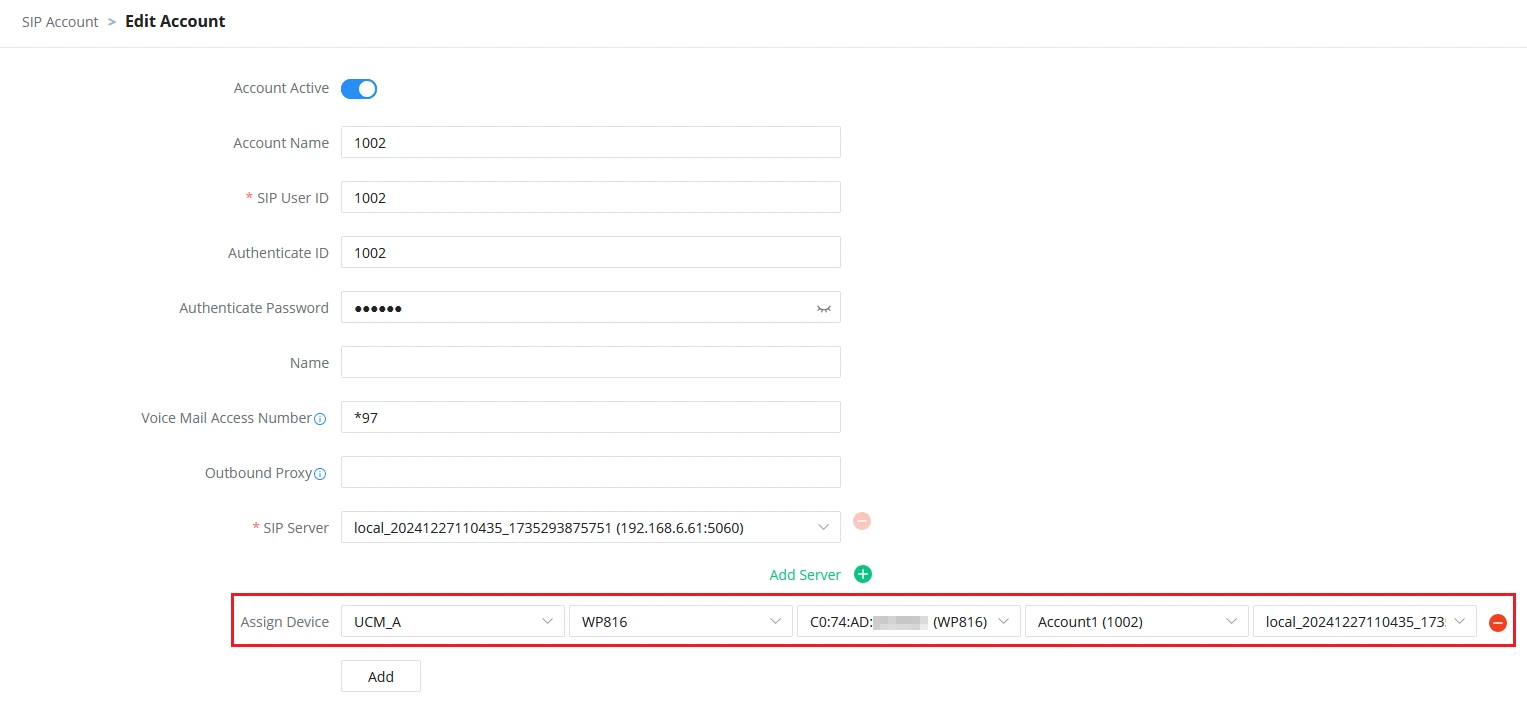
Site | This option is used to set which site this device belongs to. |
Select Device Model | This is a necessary option. Users need to select the device model to which the account will be allocated. |
Select Device MAC Address | This is a necessary option. Users need to select the device MAC address to which the account will be allocated. |
Select Account Index | This is a necessary option. Users need to select the account index to which the account will be allocated to (e.g. Account 1 – Account 16). If the account location has a configured account, the account number will be displayed. |
Select Server Address | This is a necessary option. Users can select the SIP Server address for the device, such as the UDP server address or UCM RemoteConnect server address. |
Modify SIP Server
Users can modify the SIP server of one or multiple SIP accounts (e.g. Modify the SIP protocol of the SIP server from UDP to TCP)
- On the “SIP Account” interface, select the SIP accounts that need to be modified.
- Click on the “Modify SIP Server” button at the top of the interface.
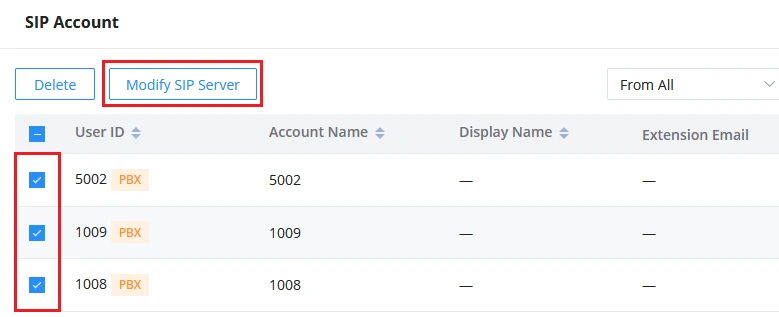
- Select the target SIP server, which can be searched by the server name.
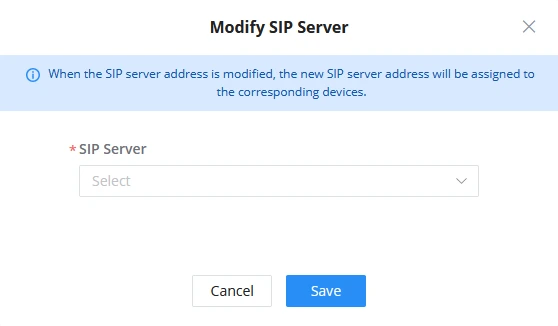
- After clicking the OK button, the SIP server of the accounts will be modified. Then, the updated account information will be assigned to the corresponding VOIP devices.
SOFTWAREUCM CALL QUALITY IN GDMS
The Call Quality page displays reports for calls made by SIP endpoints that are added on GDMS and registered to SoftwareUCM.
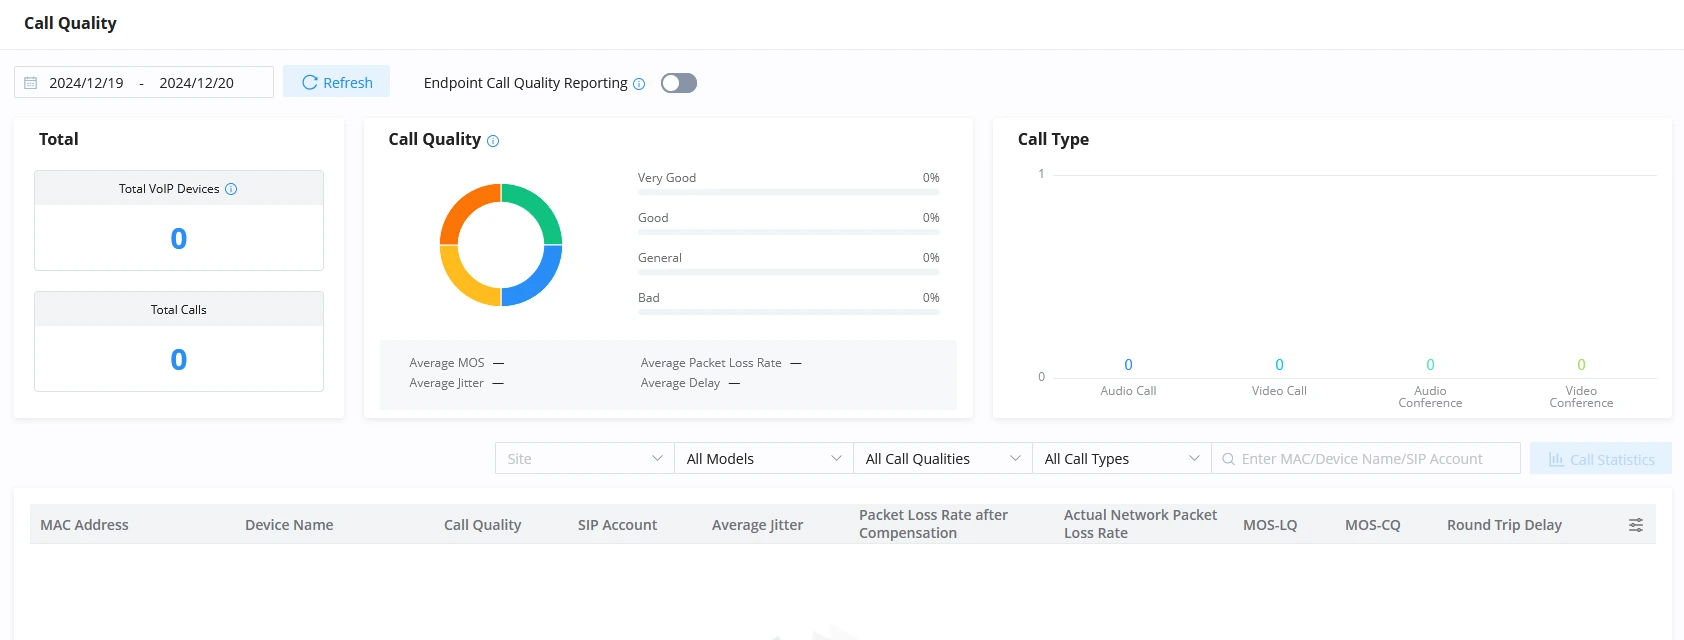
The call quality page shows the following information:
Total VoIP Devices | Displays the number of VoIP devices reported by the current organization. |
Total Calls | Displays the number of calls reported by the current organization based on the time filter. |
Call Quality | Displays the following values:
|
Call Type | Show the call types for the reported call history associated with the current organization. The available types are:
|
The GDMS platform supports filtering call quality records by date and searching for records by site, device model, call quality, call type, device MAC address, device name, and SIP Account.
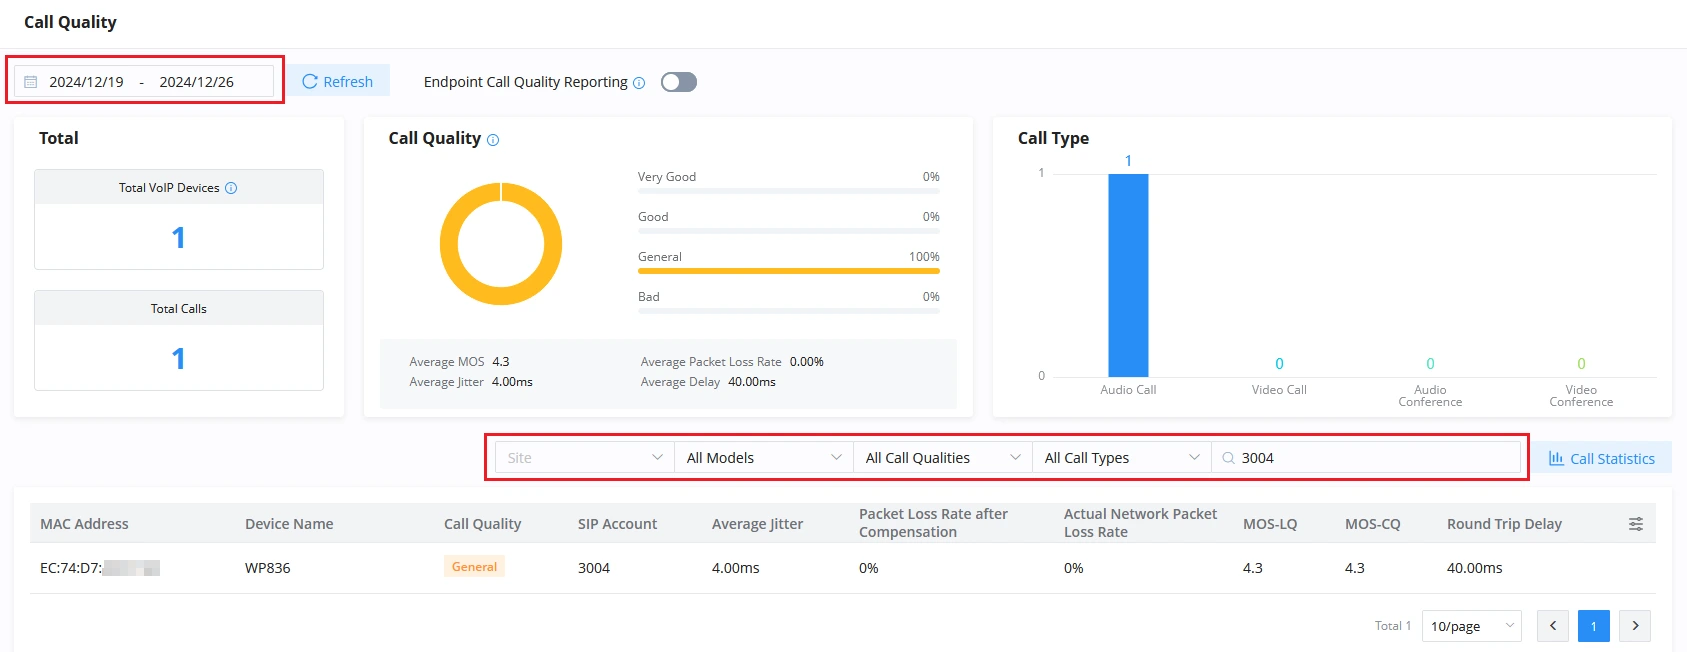
Users can toggle the “Endpoint Call Quality Reporting” option on this page to enable/disable call quality reports to GDMS.
SOFTWAREUCM CLOUD IM SERVICE IN GDMS
In order to benefit from SoftwareUCM’s Cloud IM service, users need to purchase a RemoteConnect plan that supports this feature. (Visit this page for more information regarding UCMRC plans)
After purchasing the UCM RemoteConnect plan which contains the Cloud IM for SoftwareUCM, the user can enable the service through GDMS. To do this, please follow the instructions below:
- On the GDMS platform, navigate to UCMRC→On-Premise PBX, expand the plan information list for the desired SoftwareUCM and “Edit Cloud IM“.
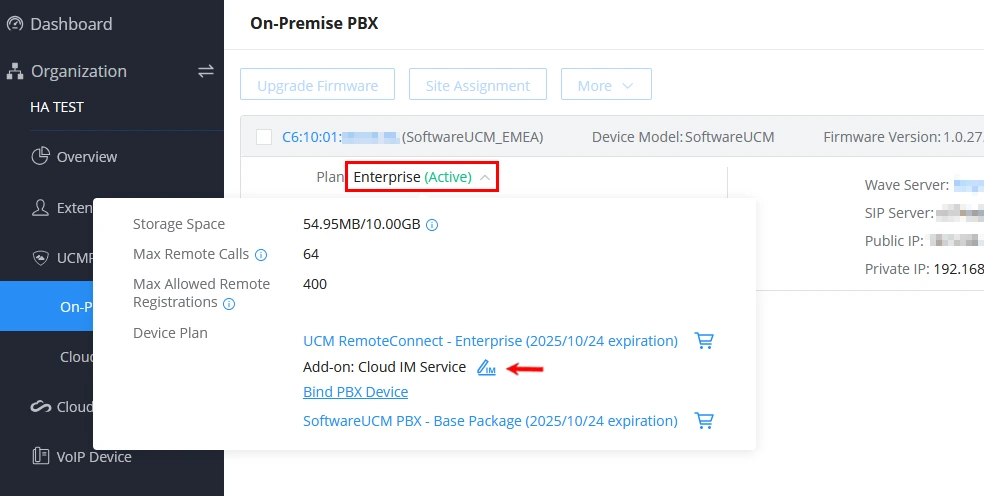
- Fill in the information mentioned in the table below:
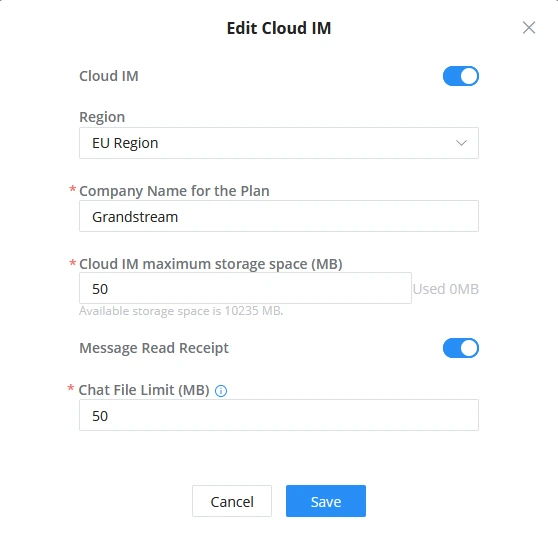
Cloud IM | Toggle on/off Cloud IM service. Note: If the user wants to disable the Cloud IM service which is currently in use and will no longer use it, the data in the Cloud IM server will be cleared after disabling it. |
Region | US Region / EU Region Note:
|
Company Name For the Plan. | The user can customize the name of the company which will use the Cloud IM service. |
Cloud IM Maximum Storage Space | The user can edit the maximum available storage space for the Cloud IM service. Note:
|
Message Read Receipt | When this option is toggled on, Wave clients will display that the message has been seen when the message is read by the recipient. |
Chat File Limit (MB) | Set the limit of the chat file which can sent over Wave clients. |
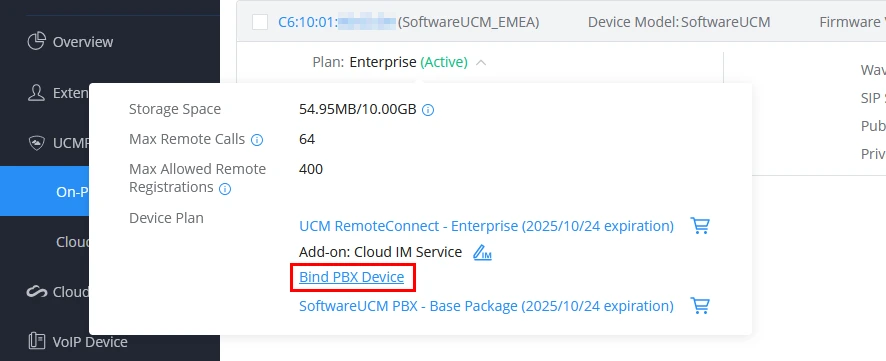
- To bind the SoftwareUCM for the Cloud IM service, select “Bind PBX Device” from the UCMRC plan information.
- Fill in the information mentioned in the table below to bind the SoftwareUCM:
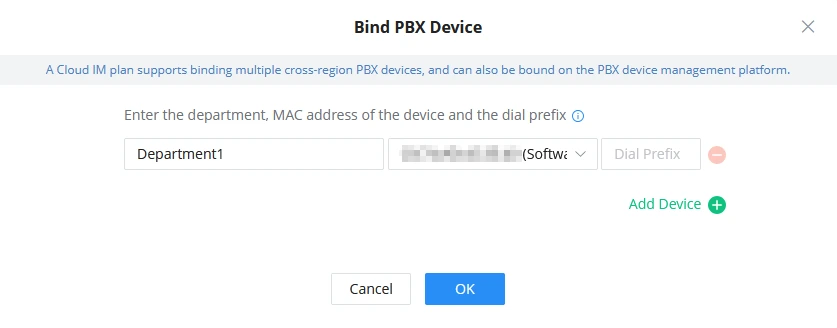
Department Name | Enter the name of the department using this SoftwareUCM so that the contact details in the Wave application can be viewed. |
UCM MAC Address | Enter the MAC address of the SoftwareUCM that uses the Cloud IM service. It only supports the SoftwareUCM devices which have been associated with the GDMS platform. |
Dial Prefix | Dial prefix: It must be consistent with the prefix configuration of the call trunk on the SoftwareUCM. It is not required and it supports special characters, letters and numbers. |
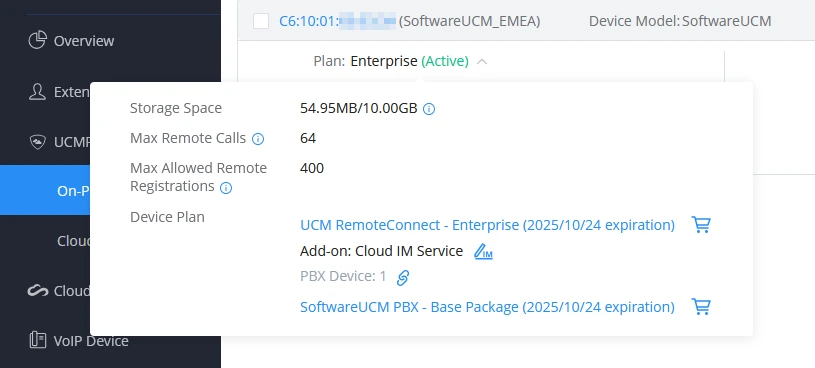
- Select OK to confirm, and verify the changes in the plan information.
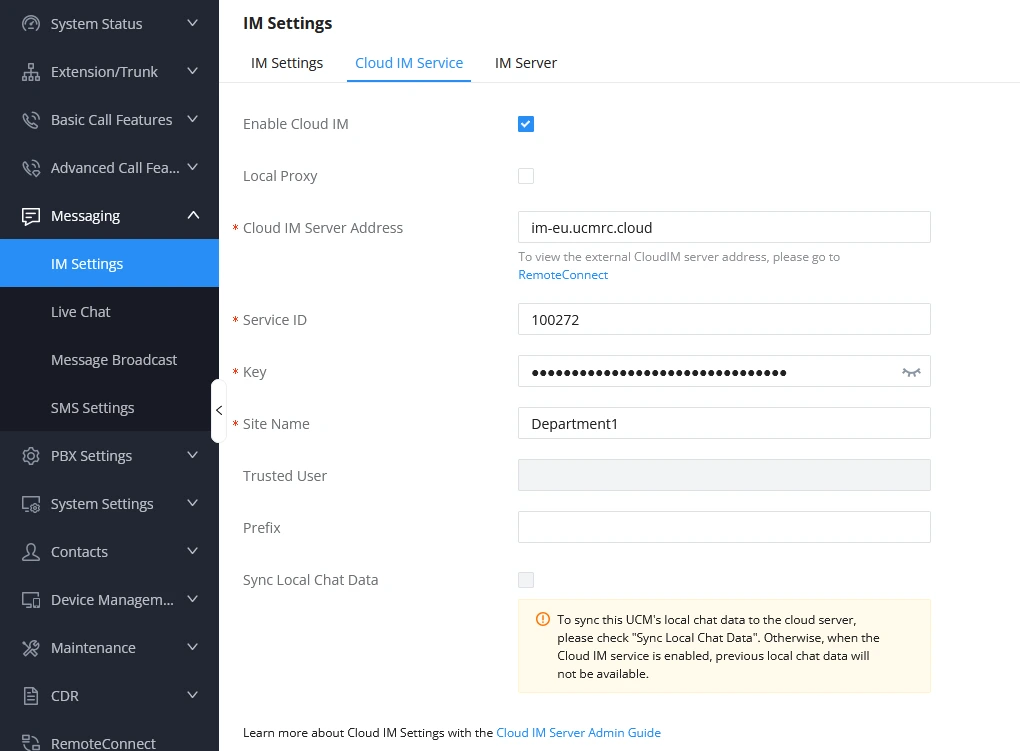
Once these steps are completed successfully, the Cloud IM settings page on the SoftwareUCM will automatically populate with the Cloud IM server information:
SOFTWAREUCM ALERT SYNC WITH GDMS
Users can synchronize certain SoftwareUCM alert events with GDMS, which are marked with the GDMS logo on the System Events→Alert Events List page on SoftwareUCM.
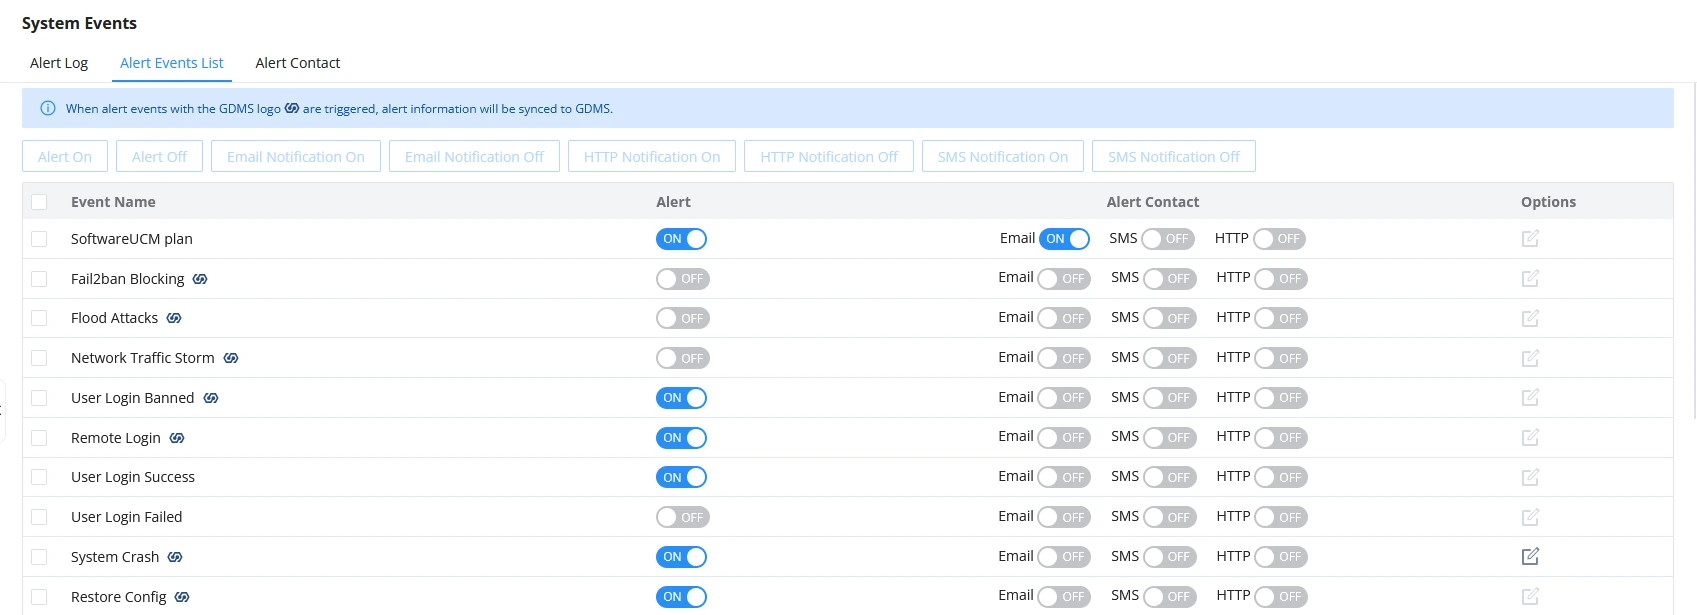
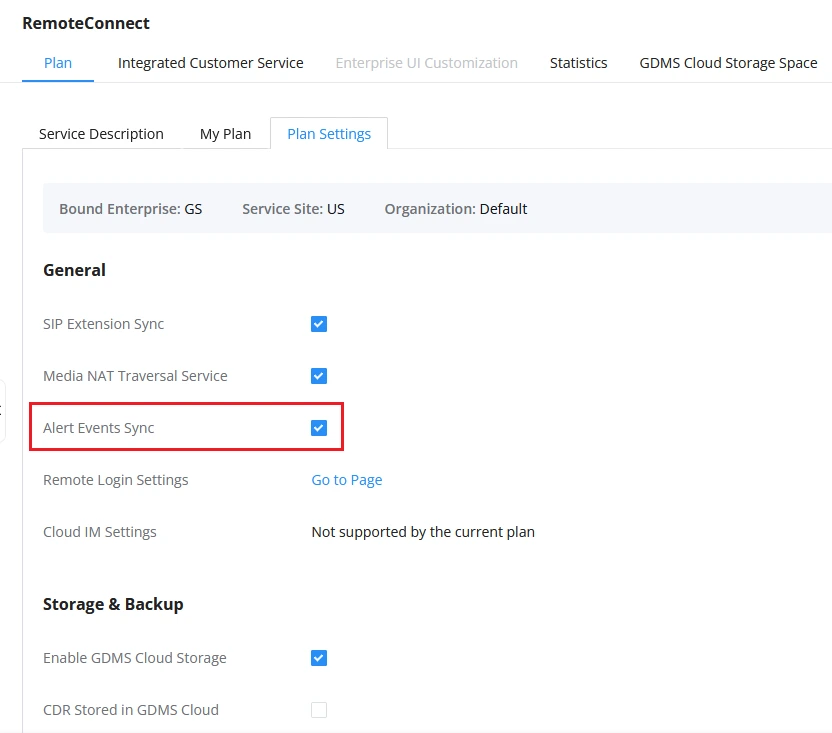
In order to synchronize these alerts with GDMS, please ensure that the “Alert Events Sync” option is checked under RemoteConnect→Plan Settings.
Configuring Alerts in GDMS
GDMS has an alert system that will trigger when certain conditions are fulfilled. There are 3 alert levels: High, Medium, and Low.
Users can view and receive alert notifications in two ways: Message Notification and Email Notification.
Message Notification Settings
This displays the alert as a notification under the bell icon  in the top right corner of the GDMS page.
- To manage message alert notifications, click on the Message Notification Settings button on the top-right corner of the Alert page.

- On the Message Notification Settings page, select PBX and fill the information included in the table below.
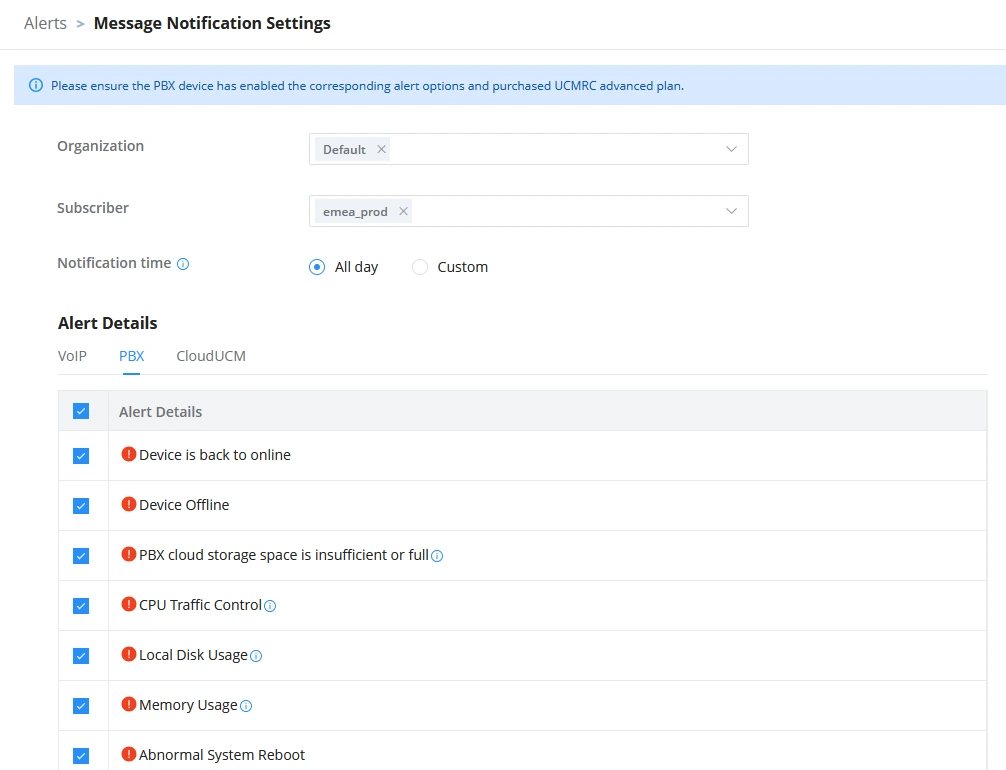
Organization | Select the organization in question. |
Subsriber | Select the users that will be alerted. Only sub-users created by the current user can be selected. The administrator can also add email addresses as subscribers instead of selecting the user account. This is a convenient feature when the email address is not linked to any GDMS user. |
Notification Time | Set the time for sending notifications. Only alerts that are generated during this time period will be sent as notifications. |
PBX | |
Alert Details | Users can specify what alerts to receive. The following alert priority levels are available: High Level:
Medium Level:
Note: Only the SoftwareUCM devices that have UCM RemoteConnect advanced plans can report the alert contents and send the alert notifications. |
- When there are unread alerts, and a user subscribed to alerts logs in, the bell
 icon will shake. Hovering over the icon will show the unread messages. Clicking on these messages will show more details about the alerts.
 icon will shake. Hovering over the icon will show the unread messages. Clicking on these messages will show more details about the alerts.
Email Notification Settings
Alerts will be sent as emails to subscribers. The subscribers chosen can either be a GDMS sub-user or the administrator can directly enter an email address as a subscriber.
- To manage email alert notifications, click on the “Email Notification Settings” button on the top-right corner of the Alert Management page.

- On the Email Notification Settings page, select PBX and fill the information included in the table below.
Organization | Select the organization in question. |
Subsriber | Select the users that will be alerted. Only sub-users created by the current user can be selected. The administrator can also add email addresses as subscribers instead of selecting the user account. This is a convenient feature when the email address is not linked to any GDMS user. |
Notification Time | Set the time for sending notifications. Only alerts that are generated during this time period will be sent as notifications. |
PBX | |
Alert Details | Users can specify what alerts to receive. The following alert priority levels are available: High Level:
Medium Level:
Note: Only the SoftwareUCM devices that have UCM RemoteConnect advanced plans can report the alert contents and send the alert notifications. |
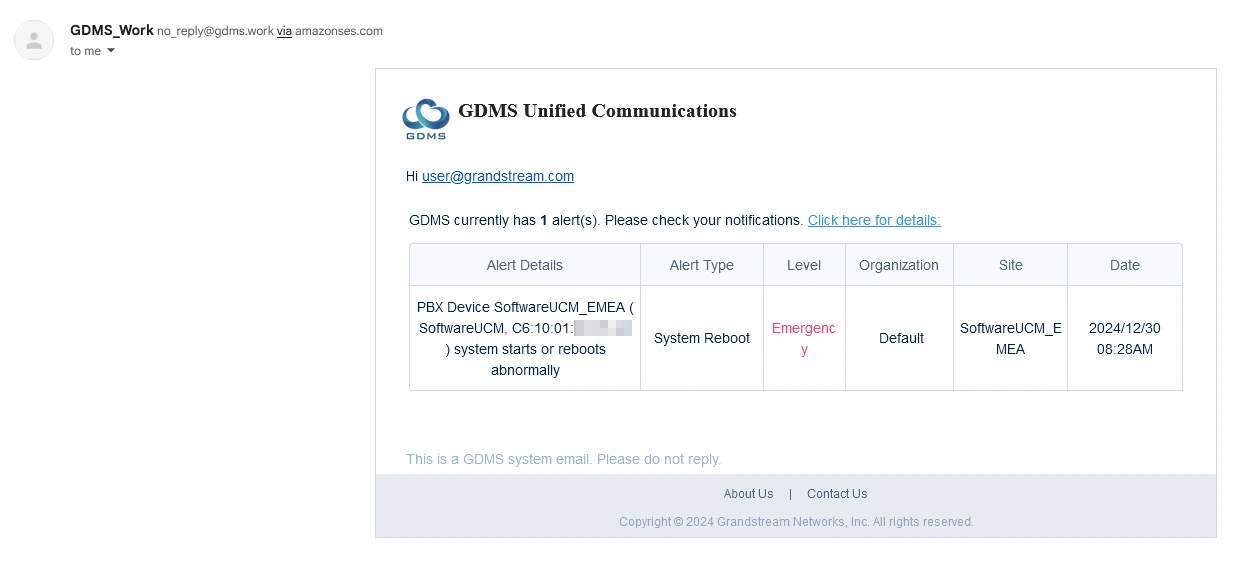
- With the email notifications successfully set up, users will receive an email for each configured event. The email will appear as follows:
App Notification Settings
The alerts can be pushed to the subscribers through the App notifications.
- Select the “App Notification Settings” button to access the App notification settings interface.

- On the App Notification Settings page, select PBX and fill the information included in the table below.
Organization | Select the organization in question. |
Subsriber | Select the users that will be alerted. Only sub-users created by the current user can be selected. The administrator can also add email addresses as subscribers instead of selecting the user account. This is a convenient feature when the email address is not linked to any GDMS user. |
Notification Time | Set the time for sending notifications. Only alerts that are generated during this time period will be sent as notifications. |
PBX | |
Alert Details | Users can specify what alerts to receive. The following alert priority levels are available: High Level:
Medium Level:
Note: Only the SoftwareUCM devices that have UCM RemoteConnect advanced plans can report the alert contents and send the alert notifications. |
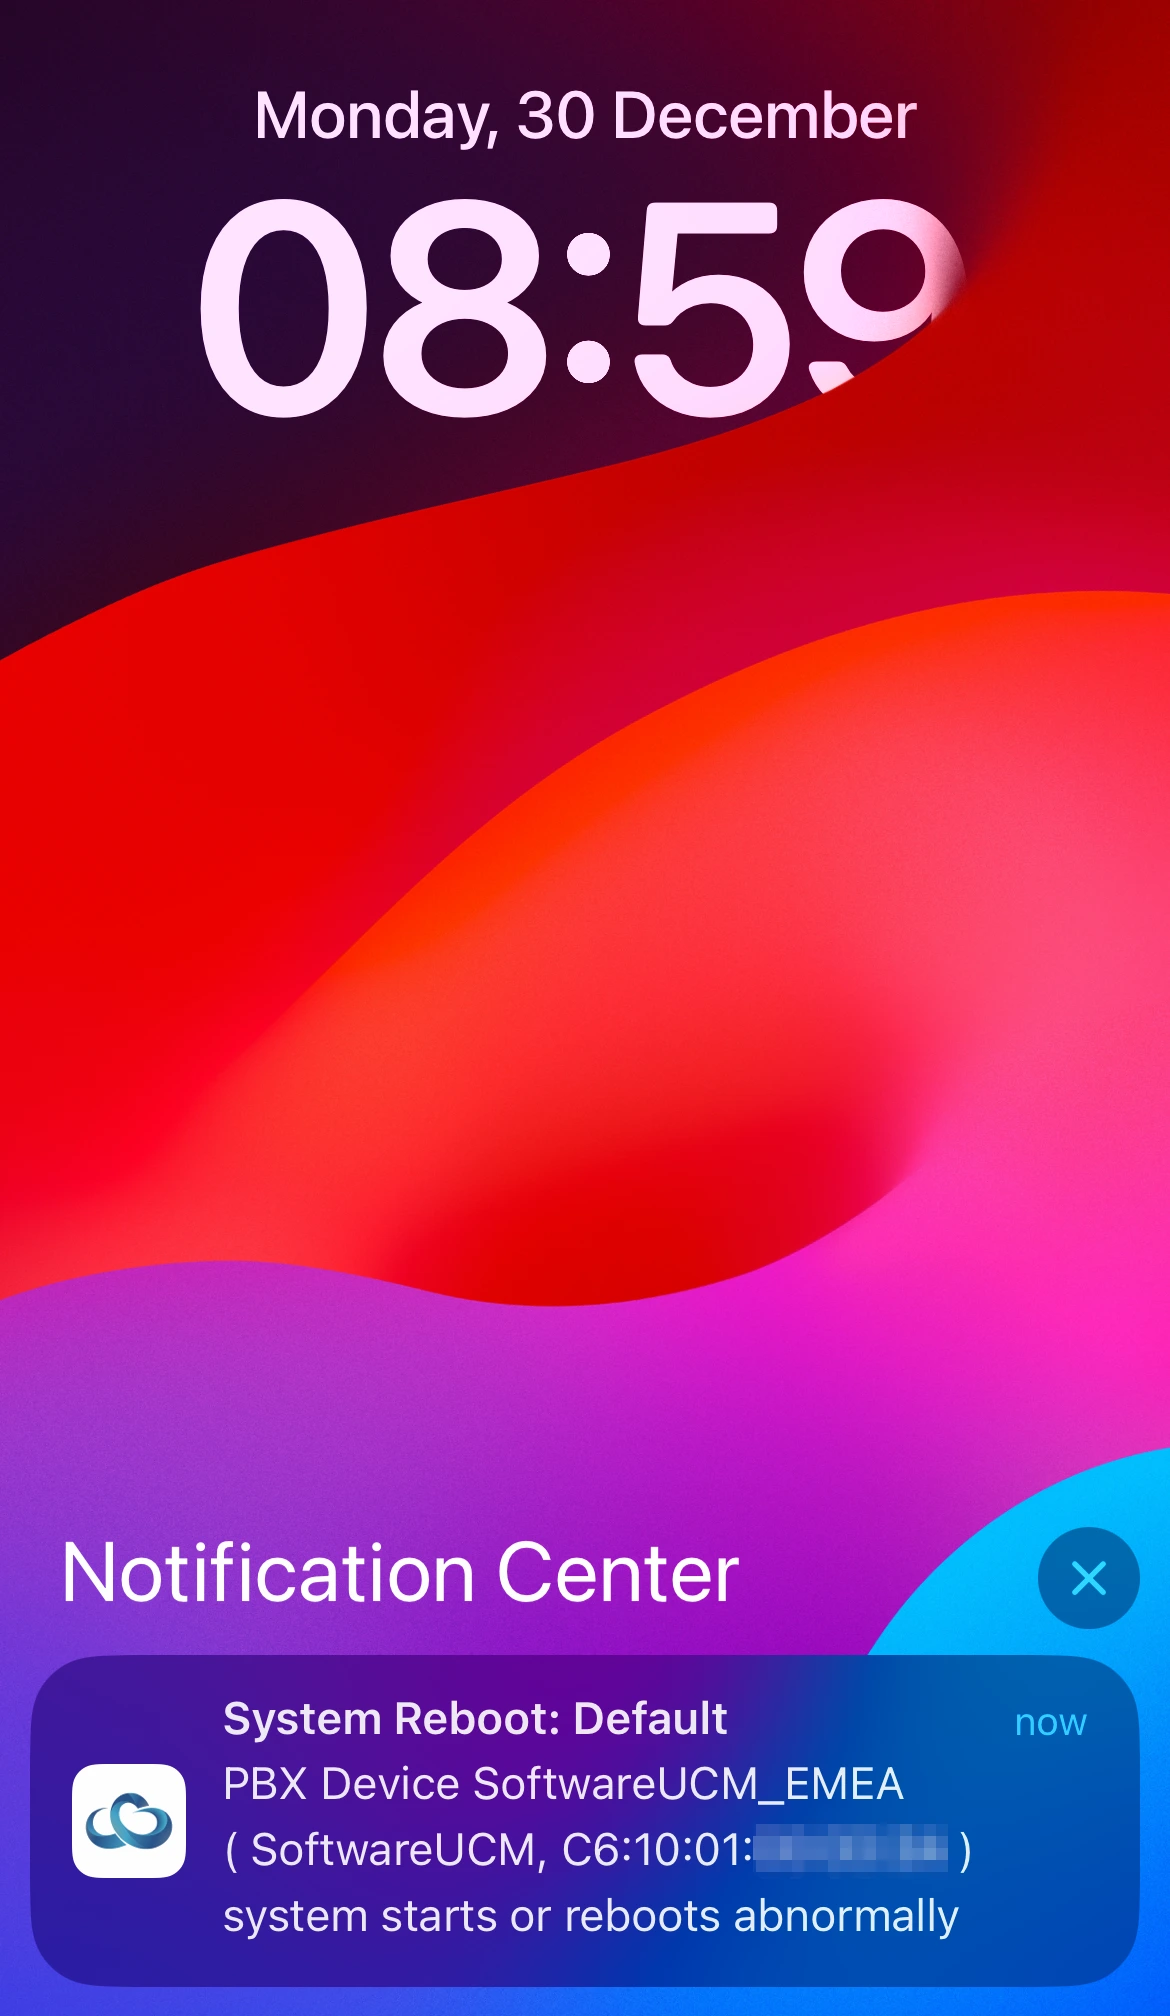
- Once the app notifications are successfully set up, users will receive push notifications for each configured event as follows:
SMS Notification Settings
SoftwareUCMs with UCMRC plans can utilize the SMS Notification function to receive alert notifications. (Visit this page for more information regarding UCMRC plans)
To configure SMS notifications, please follow the steps below:
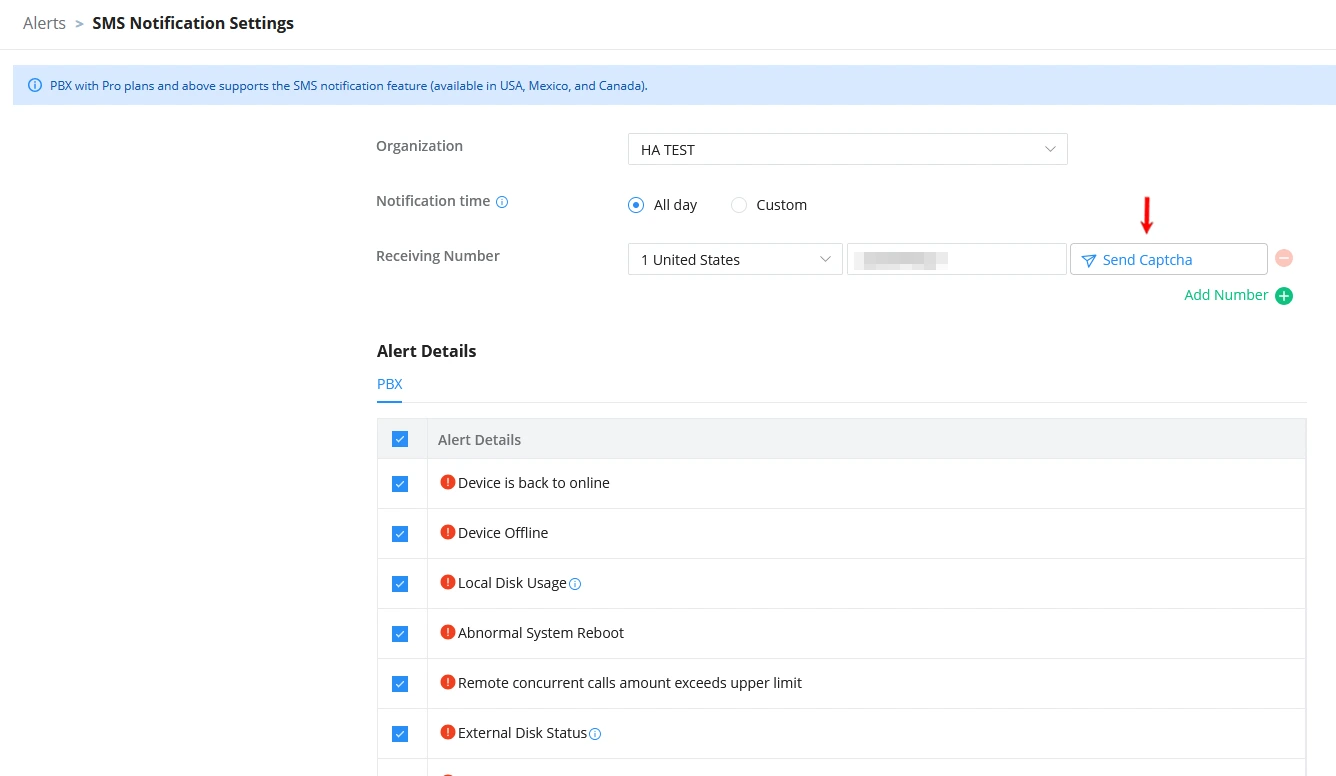
- On the GDMS Alerts page, select the “SMS Notification Settings” button.

- Choose the organization, set the notification time, and select the alerts to be sent via SMS. Then, enter a valid phone number and click “Send Captcha” to receive a verification code.
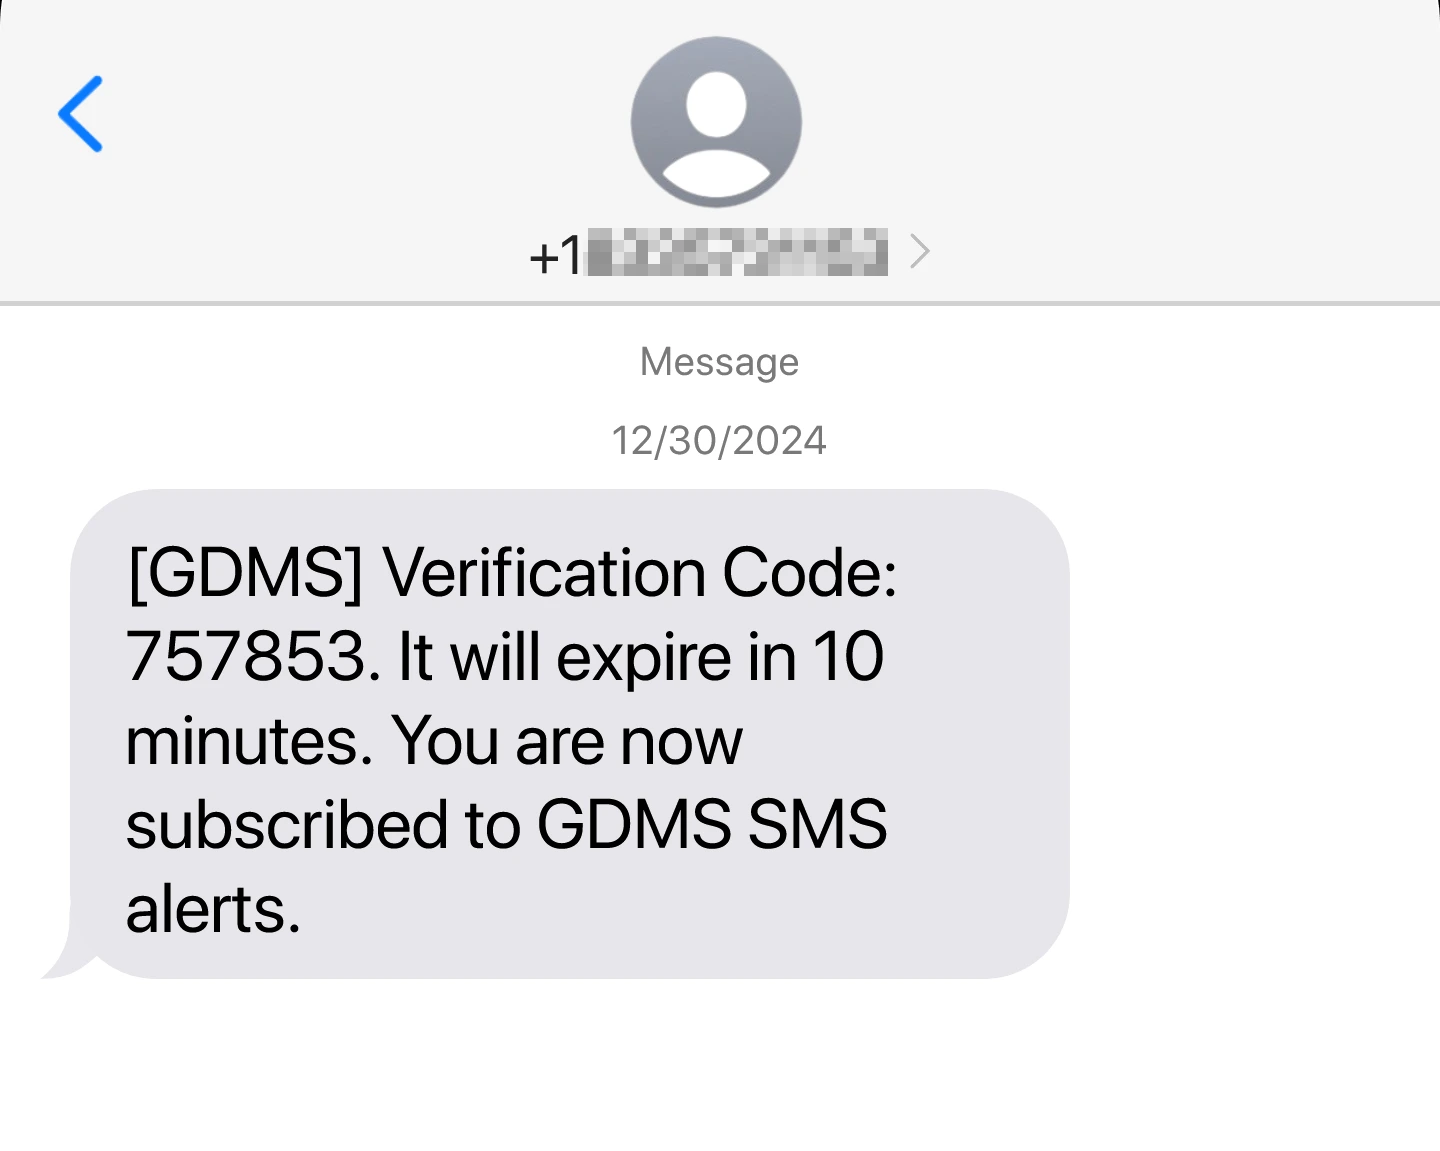
- Check your SMS inbox, and copy the verification code received from GDMS.
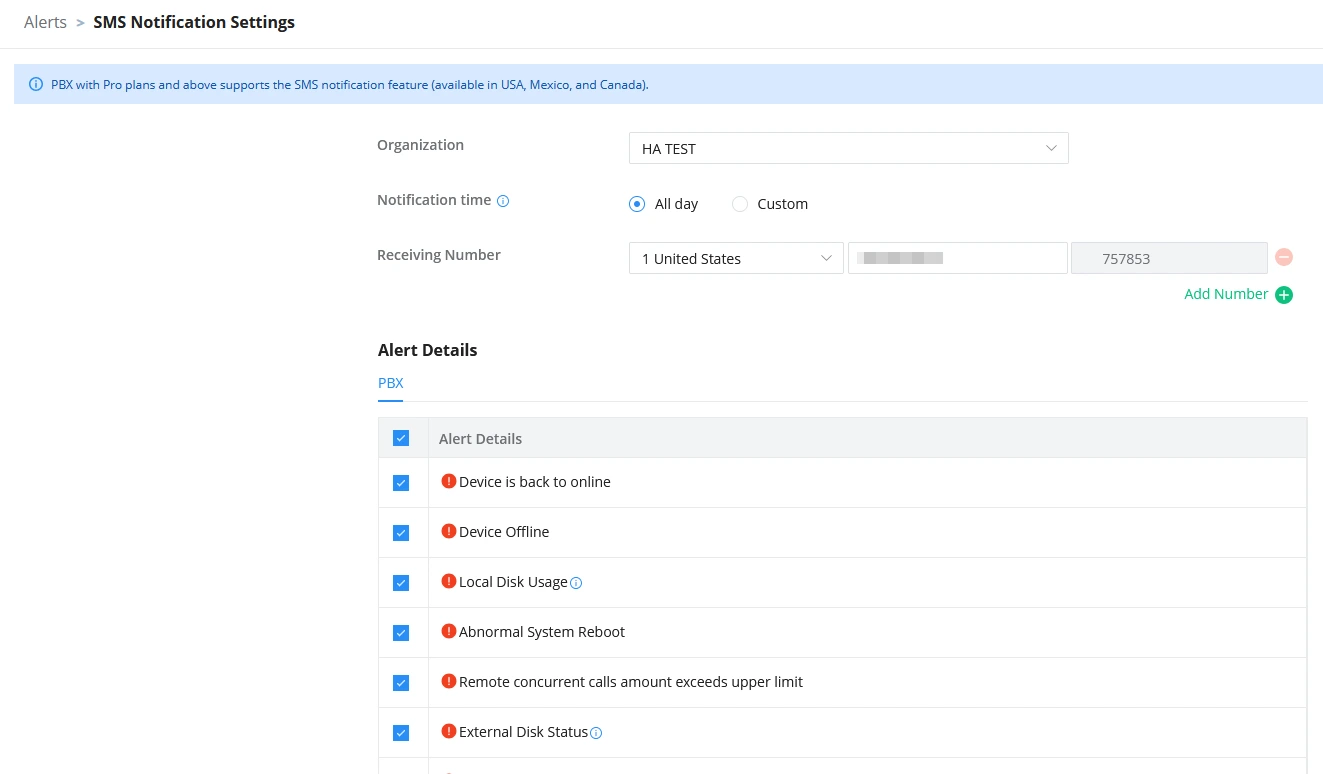
- Paste the code into the “Captcha” field and click the Save button to apply the settings.
Viewing Alert Notifications
The Alerts page shows all alerts that have been generated by GDMS.
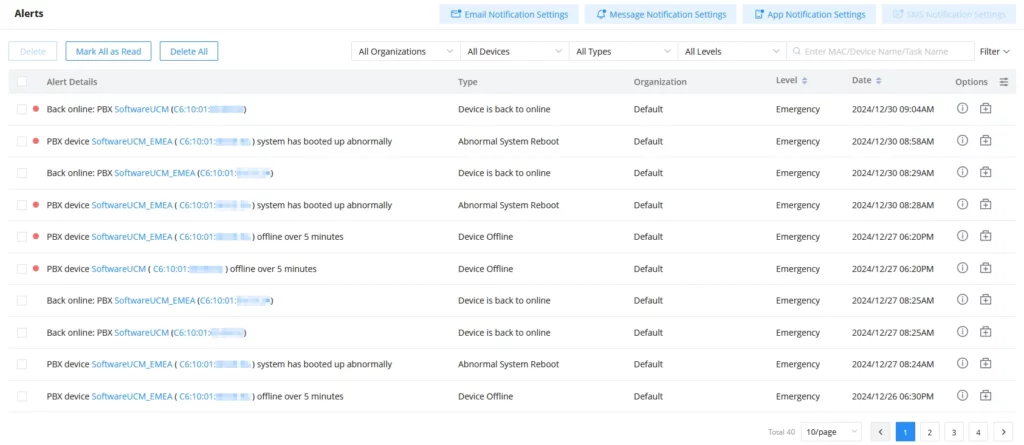
- Search: Users can find specific alerts by using the filter and search features in the top right corner of the Alert Management page.
- Latest alarm notification: If the alarm notification includes a red dot at the beginning of the item, it means the alarm notification is unread. Users could click on the “Mark All as Read” button to mark all unread notifications as “Read.”
- View Details: Users can click the button next to the alert notification to view its details. The red dot will disappear, indicating that the notification has been marked as “Read.”
 next to the alert notification to view its details. The red dot will disappear, indicating that the notification has been marked as “Read.”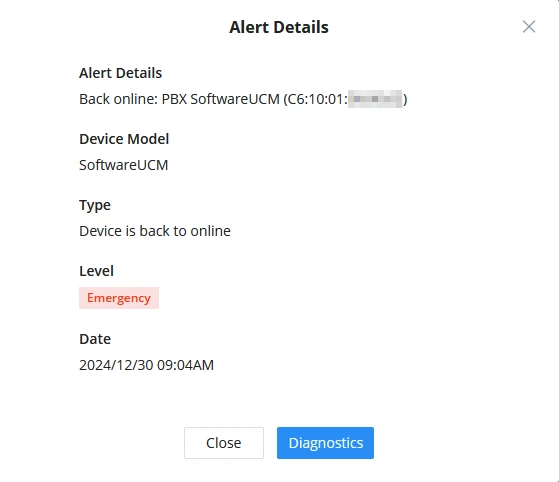
- Device Diagnostics: For the device that has a fault, the user could click on the option to access the Device Diagnostics page.
- Delete Alerts: Users can delete notifications by selecting one or more items and clicking on the Delete button.
- To display the device that has generated the event, the user can click on the hyperlinked MAC address to view more information about the device.
 to access the Device Diagnostics page.
GDMS SITE MANAGEMENT
The GDMS Site page allows users to organize their devices, including SoftwareUCM, by sites and categories for easier management
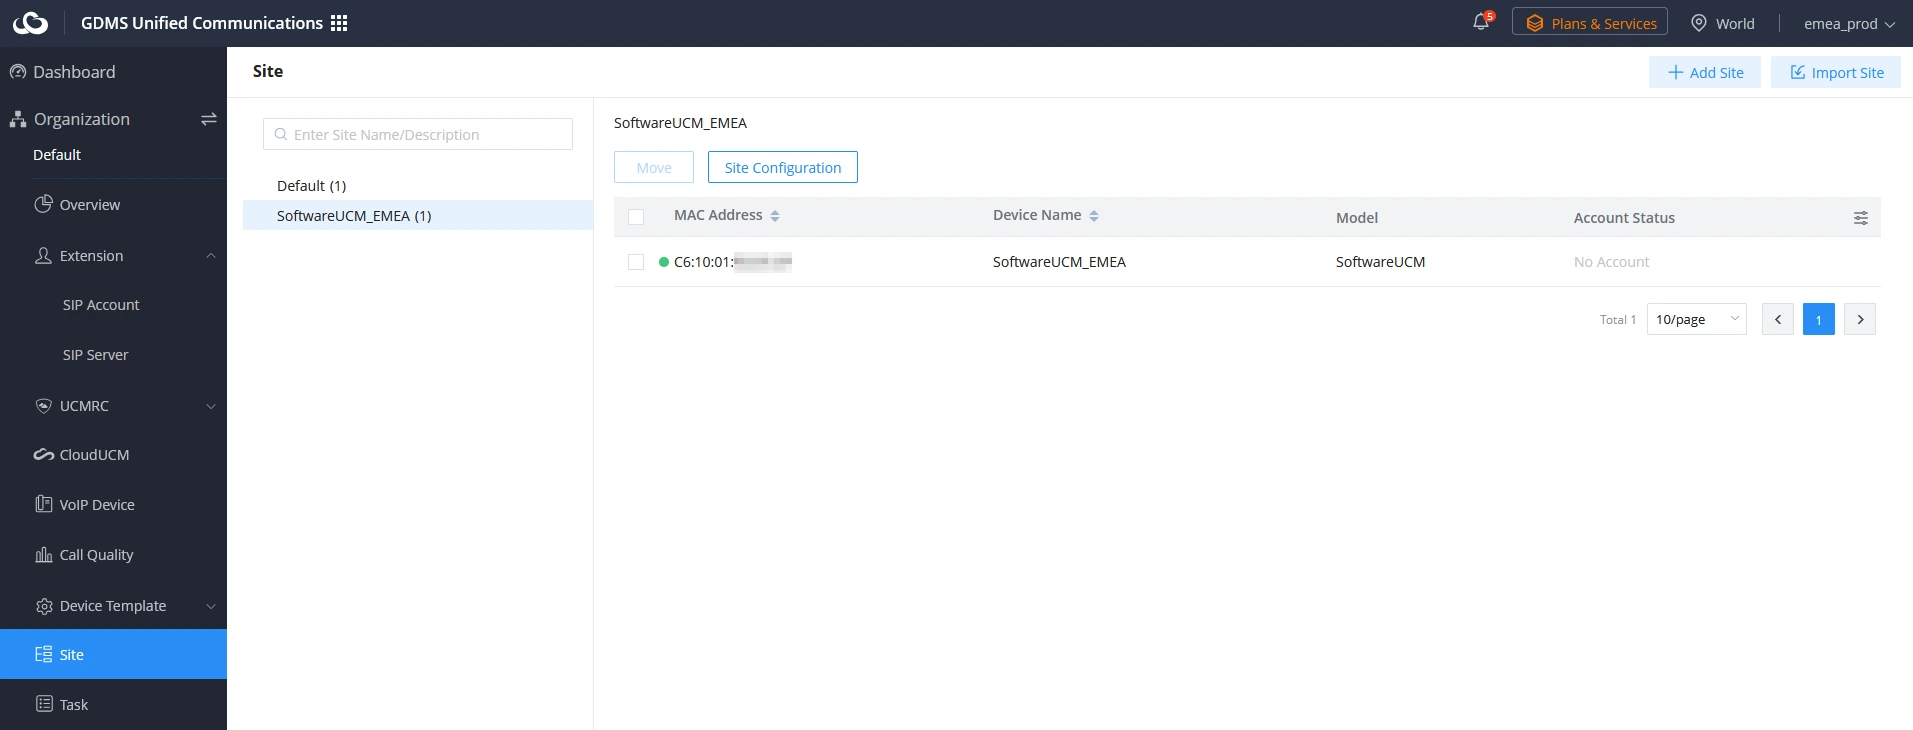
Add Site
Users can add a site at any time on the GDMS platform.
- Click the “Add Site” button at the top-right corner of the Site page. To quickly add a site or sub-site, hover over an existing site and click the plus icon shown in the image below:

- Fill in the information mentioned in the table below:
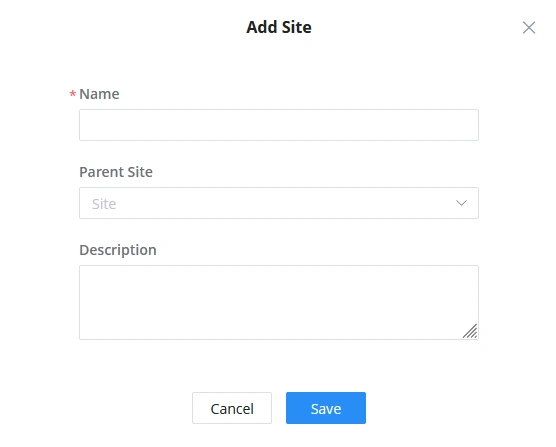
Site Name | (Optional) Select the site to which the SoftwareUCM will be assigned. The maximum allowed length is 64 characters.
|
Description | Enter the description of the site. The maximum allowed length is 256 characters. |
- Once the site is created, users can then assign devices to it.
Batch Import Sites
Users could import a batch of sites into the GDMS platform.
- Click on the Import Site button at the top right corner of the Site Management page. The following window will appear:
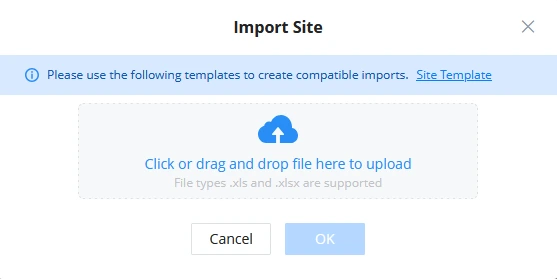
- Click on the Download button to get a template that will be used to import site information.
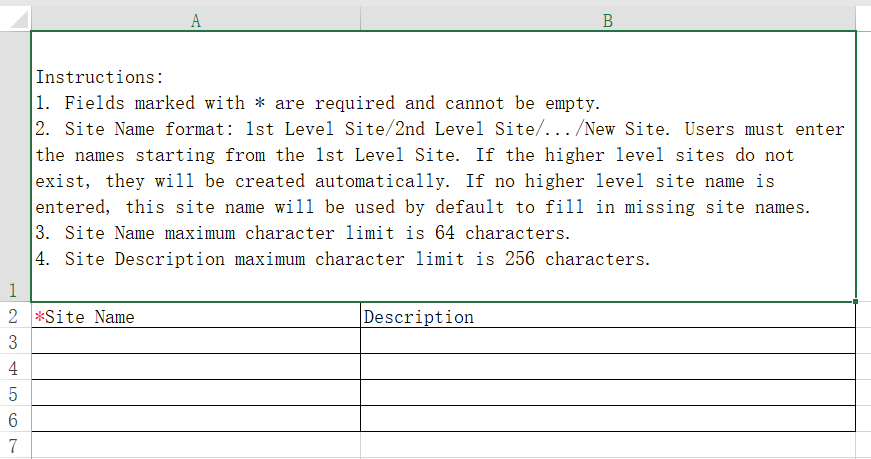
Site Name | (Optional) Select the site to which the SoftwareUCM will be assigned. The maximum allowed length is 64 characters.
|
Description | Enter the description of the site. The maximum allowed length is 256 characters. |
- Once the template is filled out, drag, and drop the file to the upload window or select the file from your local device. Click on the OK button to confirm the import.
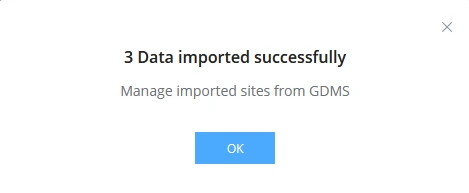
- A confirmation prompt will appear once the sites have been imported successfully.
Edit Site
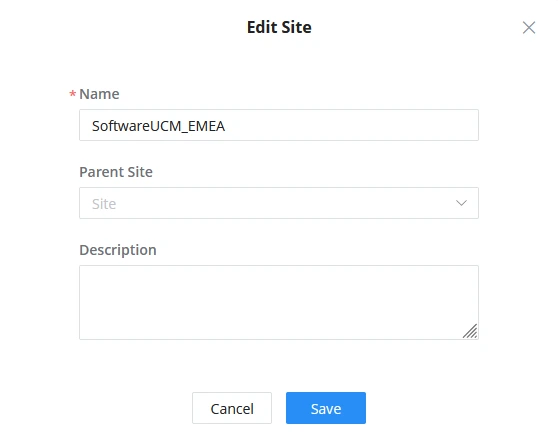
Users could edit the information of the site on the GDMS platform.
- Click on the button next to the desired site.
- Edit the desired fields and click on the Save button to finalize changes.
Delete Site
To remove a site from GDMS, click on the  button next to the desired site.
Transfer Site
Users can select devices on a site and move them to another site by clicking on the Move button.

Clicking on the Save button will finalize the move to the specified site.
GDMS ORGANIZATION MANAGEMENT
If users want to manage devices in multiple associated companies, users could create multiple organizations (such as customer enterprises, and sub-companies), and assign the devices to multiple users to manage separately. The devices, SIP accounts, and other parameters are separated between different organizations. The data in a specific organization can only be viewed and managed by the administrator who has permission.
All devices and data are in the “Default” organization by default.
Multiple organizations and administrators:

Switch Organization
If the user has permissions for multiple organizations, the user could switch to manage different organizations.
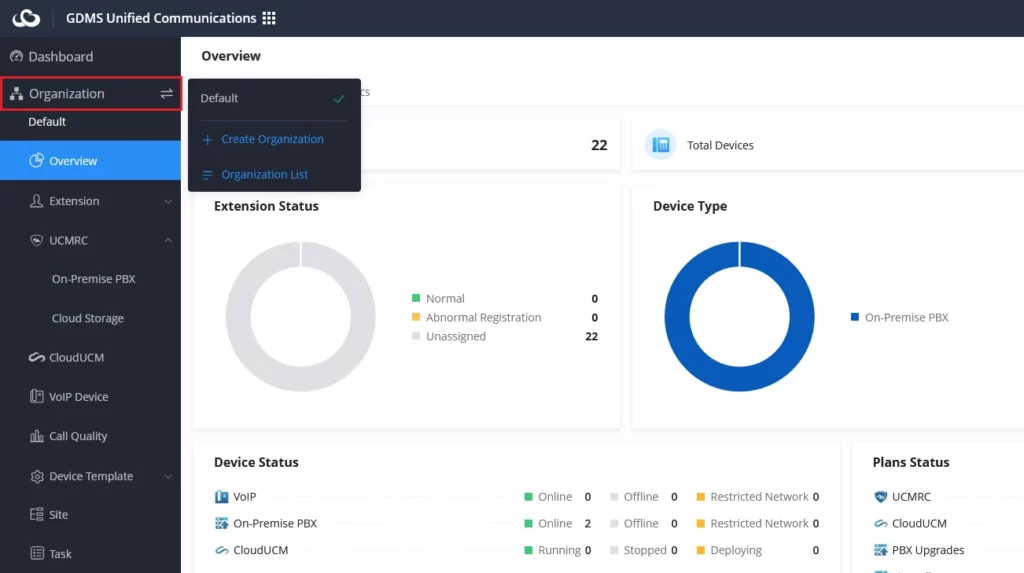
- Click the drop-down box of the Organizations menu at the upper left corner of the page to select the organization the user wants to manage.
- After switching the organization, the user only could view/edit the Device, SIP Account, Template, and other data under the organization.
Add Organization
The user could create an organization if the user has permission.
- On the menu at the right side of the page, under System category, select the tab Users, and select the Organization tab, click the “Add Organization” button at the upper right corner.
- Fill in the information of the organization as shown in the following figure:
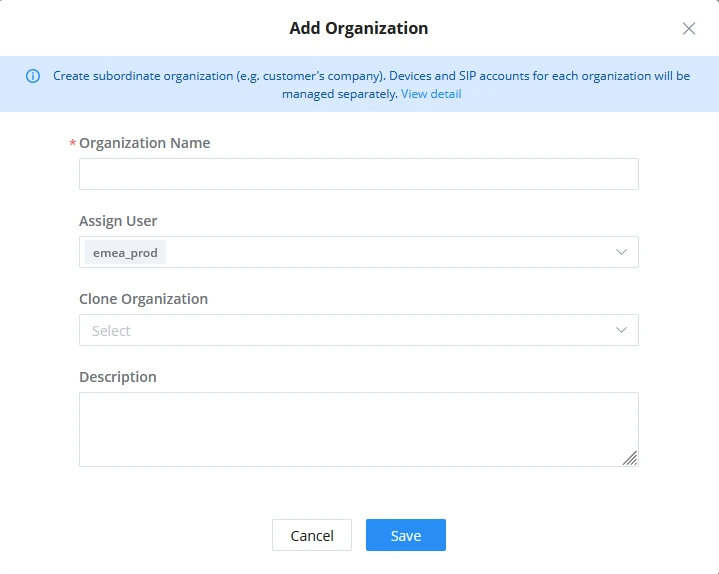
Organization Name | Input the name of the organization. |
Assign User | Select the users who will have permission to manage the organization. |
Clone Organization | This is used to select to copy data from other organizations, the data include SIP accounts, model templates, group templates, sites, etc. When the organization is created successfully, the data under the specific organization will be copied to the current organization. |
Description | Input detailed descriptions of the organization. |
- Click the Save button to save the organization in the GDMS platform.
- The system will switch to the newly created organization by default, and the user could add devices to the newly created organization for management.
Edit Organization
Users can edit the organization’s information at any time.
- On the menu at the right side of the page, select System→Users, and select the “Organization” tab to view all organizations under the account.
- Click on the button following the organization name to access the editing page. The user could edit the organization name, the administrator of the organization, and descriptions, as the figure shows below:
 following the organization name to access the editing page. The user could edit the organization name, the administrator of the organization, and descriptions, as the figure shows below: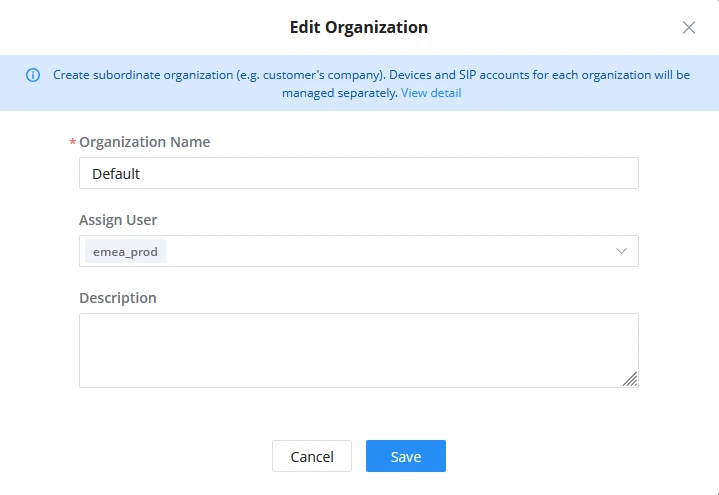
Delete Organization
- On the menu at the right side of the page, select System→Users, and select the “Organization” tab to view all organizations under the account.
- Click on the Delete button following the organization name, the organization will be deleted completely after confirmation, including the SIP accounts, templates, tasks, diagnostics histories, and other data under the organization.
Share Organization
The user can select to share the organizations with the associated enterprises. There are two methods of sharing permissions: Co-management and Authorized Management.
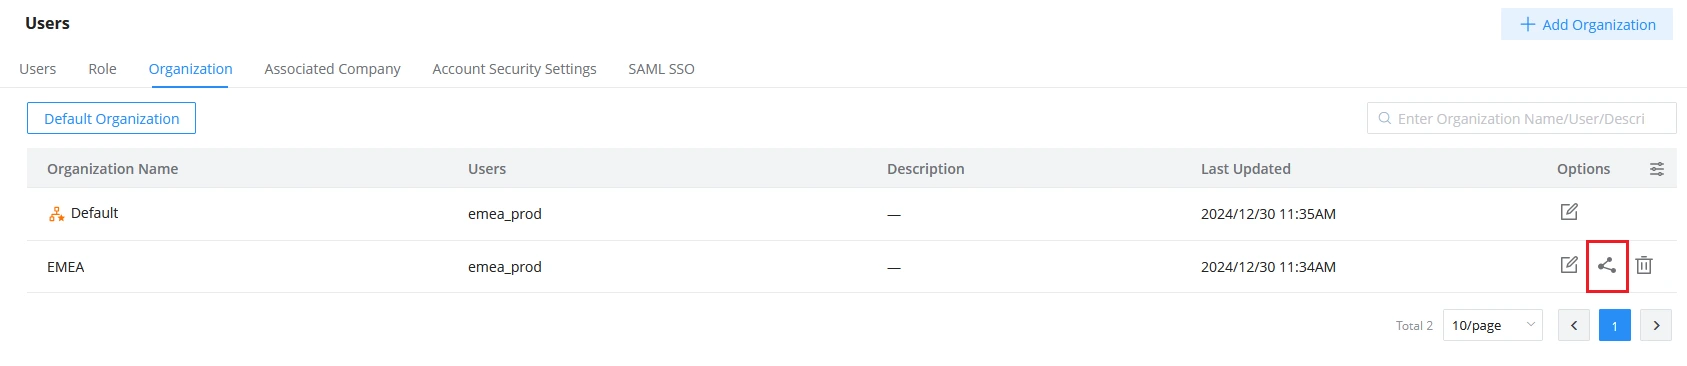
- On the “Organization” management interface, the user can select the organization that the user wants to share with another enterprise for management and click the button to access the “Share” organization interface. Please see the screenshot below:
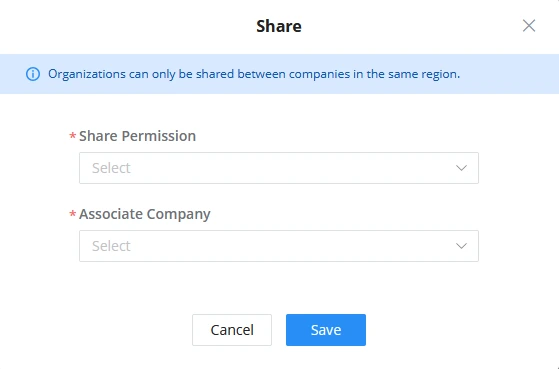
Share Permission | There are 2 methods of sharing permissions to another enterprise: Co-management and Authorized Management. Co-management: After sharing the organization, the user can manage the organization with the associated enterprise together. The associated enterprise can manage all devices in the shared organization and view the related data. Notes:
Authorized Management: After sharing the organization to the associated enterprise, the user can fully authorize the management permissions to the associated enterprise for management, and the user does not have permission to manage this organization anymore. Note:
|
Associate Enterprise | The user needs to select the associated enterprise with which the user wants to share the organization. |
2. The user can select “Share Permission“: “Co-management” or “Authorized Management“.
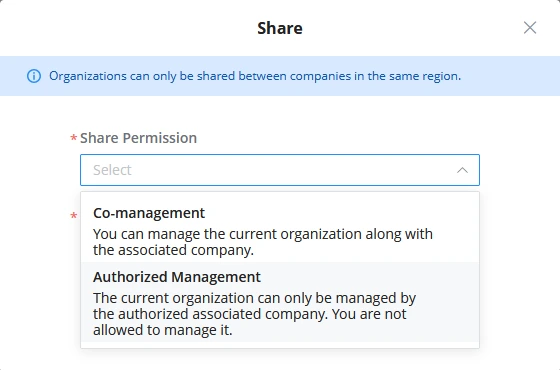
3. Select the associated enterprise to which the user wants to share the organization.
4. After clicking the “Save” button, the selected organization will be shared with the selected associated enterprise.
5. After the operation steps above, the user can view the organizations that were shared with other associated enterprises and shared with other associated enterprises on the “Organization” list. Please see the screenshot below:

 : The label indicates the organization has been shared with another associated enterprise for management together.
 : The label indicates the organization is shared with another associated enterprise for management together.
Cancel Sharing Organization
The user can cancel sharing the organization with the associated enterprise.
- On the “Organization” list, the user can select the organization with which the user wants to cancel sharing with the associated enterprise and click the button to cancel sharing with the organization. Please see the screenshot below:

2. After canceling sharing the organization, the user will get the organization management permission back, and the associated enterprise cannot manage this organization anymore.
Return Organization
After receiving the shared organization, the associated enterprise can return the management permission to the user.
On the “Organization” list, the user can view the received shared organizations and select the organization to which the user wants to return it by clicking the button  as the screenshot shows below:

After returning the organization, the organization will be removed from the “Organization” list of the associated enterprise, and the associated enterprise will lose the management permission of the organization.
Default Organization
The user can select one organization to be the default organization. This organization will be selected by default when logging into the GDMS platform or when adding a new device. To set a specific organization as the default organization, please navigate to Users→Organization, the click on the button “Default Organization“.
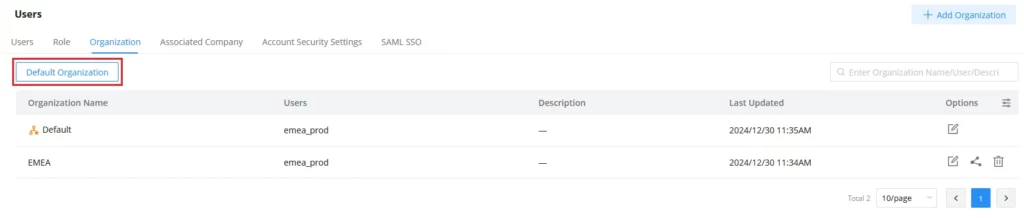
Then from the list of organizations, please choose the organization that you want to make as the default organization.
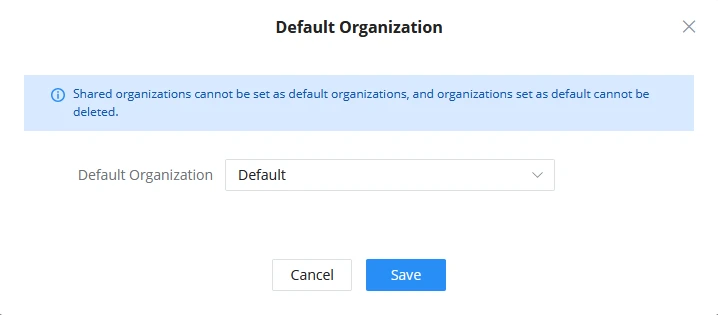
PROVISIONING SOFTWAREUCM THROUGH GDMS
SoftwareUCM supports configuration provisioning via GDMS, enabling users to configure a single SoftwareUCM instance or perform batch configurations using predefined templates to ensure consistency and increase efficiency.
This section describes in detail how SoftwareUCM leverages GDMS to facilitate efficient configuration provisioning for both individual devices and large-scale deployments.
Configuration Parameters
To give users a better understanding of the configuration possibilities, the following diagram outlines the key configuration parameters available in GDMS for SoftwareUCM.
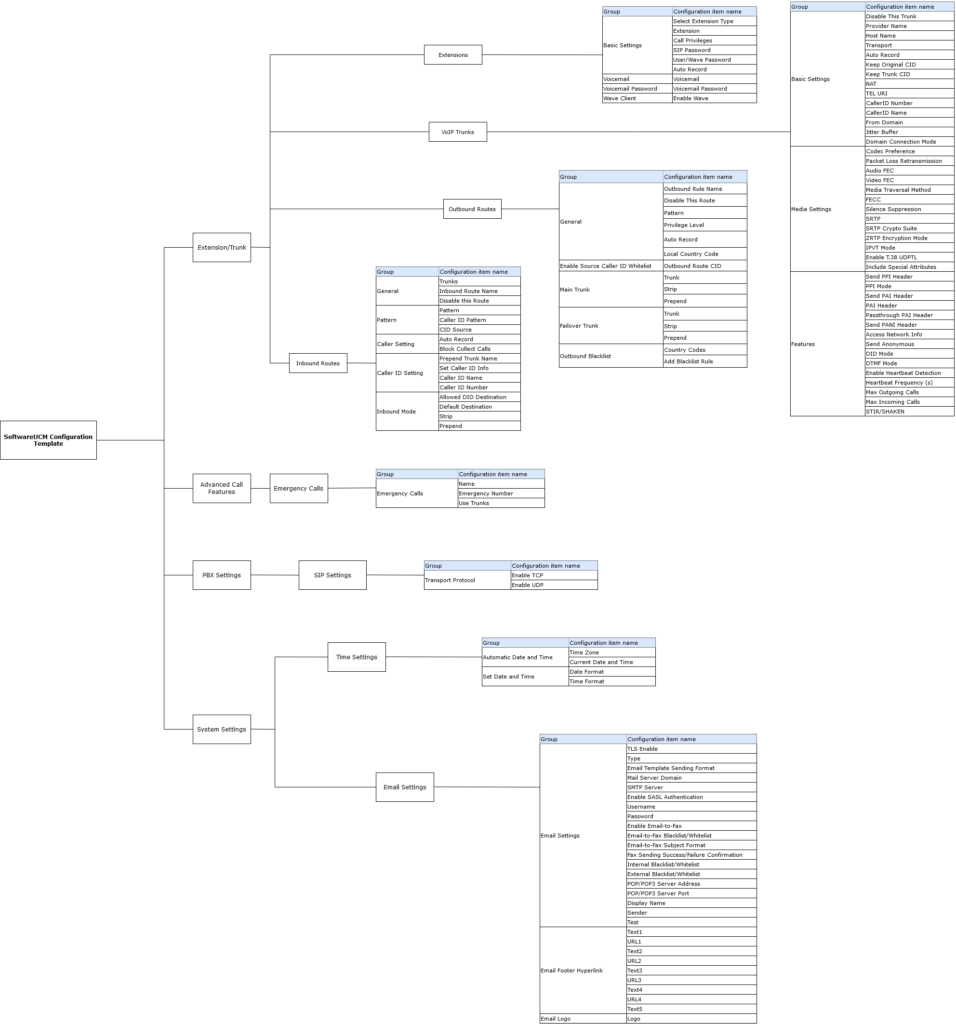
Creating SoftwareUCM Configuration Templates
SoftwareUCM supports provisioning using two types of templates:
Model Template
In order to add a SoftwareUCM Model template, please follow these steps:
- Go to Organization → Device Template → By Model and click on

- Enter a name for this template and select SoftwareUCM from the Model list.

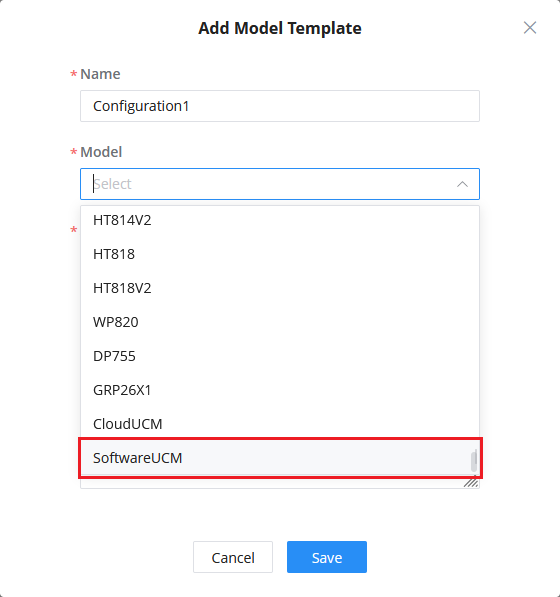
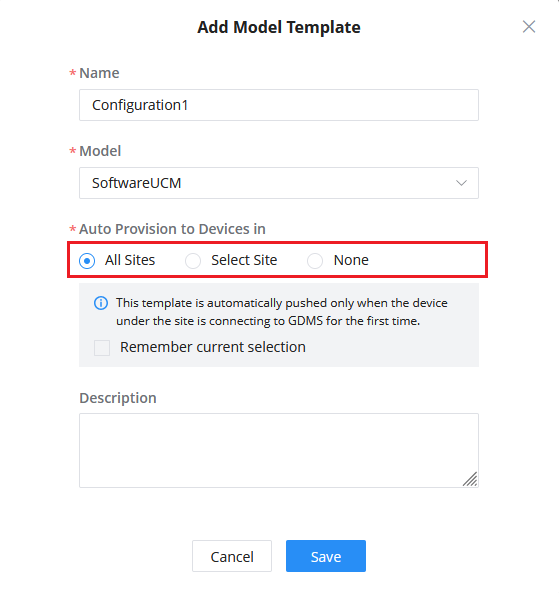
- Choose whether to automatically push this template to a specific site, all sites or none. Users can also add a description for this template (optional).
- Configure the model template parameters and click Save. A prompt will appear, confirming the change and offering the option to push the configuration to the entire site or to specific devices.

Group Template
Users can configure a group of SoftwareUCM instances and apply settings to the entire group simultaneously by following the instructions below:
- Under Organization → Device Template → By Group, click on
- Name the group and choose the SoftwareUCM from the Type drop-down list. Writing a description is optional.

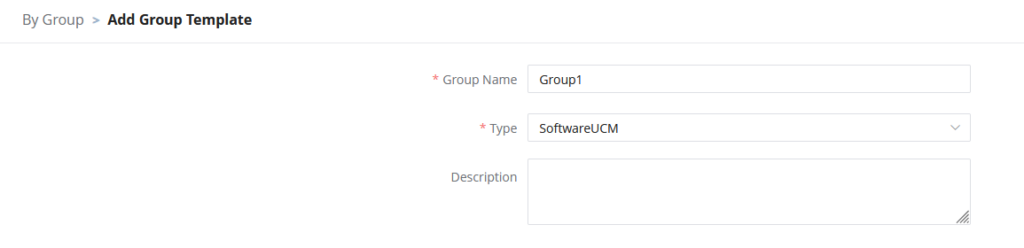
- Select the target devices by checking the boxes or by entering their MAC Address.
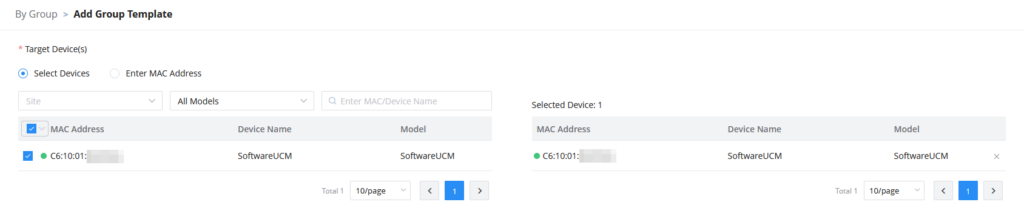
- Configure the group template parameters and select Save. Once this is done, the configuration template will be pushed to all the devices in the group.
Pushing Configuration for SoftwareUCM
There are several methods available for users to push configurations to SoftwareUCM. This section will explain each method in detail, but first, it is important to highlight some important notes.
Setting Parameters for a single SoftwareUCM
Users can edit the configuration for a single SoftwareUCM by going to Organization → Device Template → Options and selecting Set Parameters.
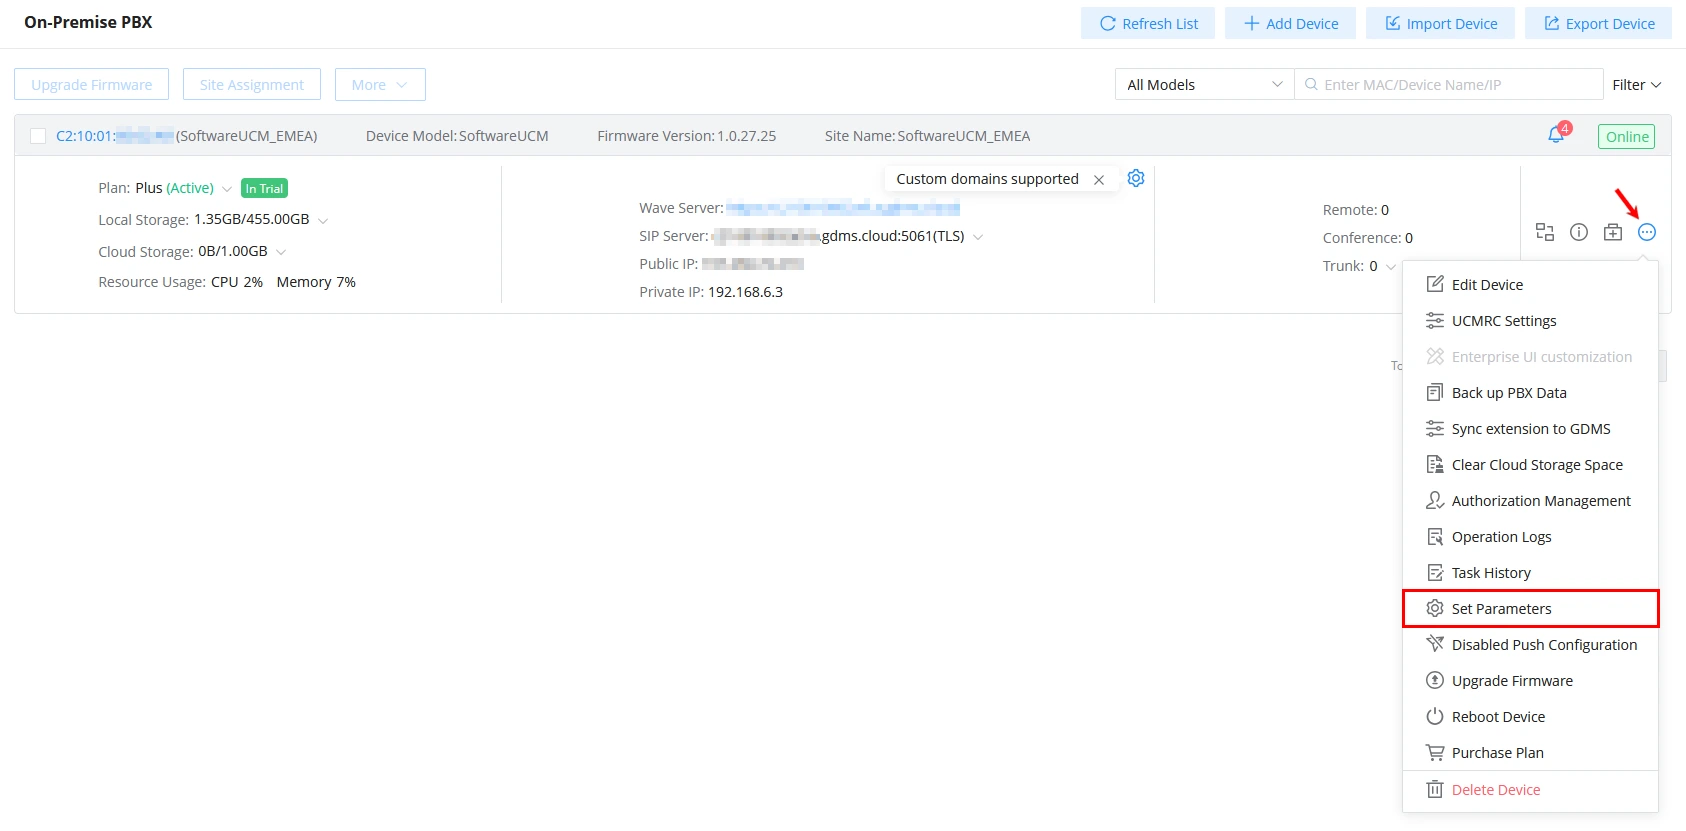
Configuring Multiple SoftwareUCM Devices
It is possible to manually push model configuration templates or group configuration templates to multiple SoftwareUCMs. This can be done by clicking on the Push Configuration Update icon that can be found under Organization → Device Template → By Model/By Group.

Users can also manually create tasks to push model or group configuration templates. These tasks can be applied immediately, scheduled for a later time, or set at specific intervals.