
GVC32XX CLIENT
About GVC3220
The GVC3220 is a high-end video conferencing system that provides an interactive and immersive video conferencing environment to increase collaboration and productivity. The SIP-based GVC3220 provides flexibility to support any SIP or H.323 video conferencing platform, including Grandstream’s IPVideoTalk Meetings. With IPVideoTalk, the GVC Option plan turns any meeting hosted on a GVC device into an online meeting that can be joined seamlessly by up to thousands of people from a web browser, mobile app or other GVC devices. The GVC3220 is based on Android 9.0 and offers powerful features including 4K Ultra HD video, the ability to locally host up to 5-way 1080p video conferences, wireless screen-sharing capabilities, integrated Wi-Fi, Bluetooth and more. It comes equipped with the GMD1208 desktop wireless microphone to enhance audio quality and provide full room coverage for up to 5m pickup range. Thanks to its suite of powerful, high-end video collaboration features, support for 4k Ultra HD video, ease-of-use and platform flexibility, the GVC3220 is ideal for boardrooms, large conference rooms, auditoriums, classrooms and more.
About GVC3212
The GVC3212 is a compact and affordable HD video conferencing endpoint ideal for remote workers and small conference rooms. This device easily mounts on any TV and runs on Grandstream’s IPVideoTalk Meeting plans, an online conferencing platform that allows you to host meetings that can be joined on nearly any device including mobile, PCs, and laptops. The GVC3212 provides up to 1080pHD video and comes equipped with integrated dual microphones that offer high quality voice pickup at up to 3-meter distance, advanced echo cancellation, and sophisticated background noise suppression. It supports Miracast for convenient wireless content screen sharing, allowing meeting participants to share presentations, videos, or other content directly from their PC/ Mac or Android/iOS devices without tangling cables. This compact, easy-to-use, easy-to-deploy video conferencing endpoint is the ideal choice for remote workers and who need a price-friendly option that still provides the features necessary to sustain high quality video communications.
About GVC3210
GVC3210 is a ground-breaking solution that offers small-to-medium businesses a revolutionary video conferencing Endpoint with unprecedented flexibility and the power of support for multiple popular video conferencing protocols and platforms right out of the box. The SIP-based GVC3210 supports Grandstream’s robust IPVideoTalk cloud platform for plug and play video conferencing.
Additionally, since it is based on AndroidTM 6.0.1, the GVC3210 offers full access to all video conferencing applications.
The GVC3210 eliminates the traditional barriers to video conferencing and sets a new bar for business class video conferencing solutions by offering industry-leading flexibility, interoperability, system compatibility, application richness and ease of use.
About GVC3200/GVC3202
The GVC3200/GVC3202 is a ground-breaking solution that offers businesses a revolutionary video conferencing system with unprecedented flexibility and the power of support for multiple popular video conferencing protocols and platforms right out of the box. The SIP-based GVC3200/GVC3202 supports Grandstream’s robust IPVideoTalk cloud platform for plug and play video conferencing while also being interoperable with any 3rd party SIP video conferencing platform – thus offering a great option to expand or implement a 3rd party platform. Additionally, since it is based on Android 4.4, the GVC3200/GVC3202 offers full access to all video conferencing apps in the Google Play Store — such as Skype®, Skype for Business®, Google Hangouts™ and more. The GVC3200/GVC3202 supports an innovative, patent-pending embedded MCU that supports up to 9-way (GVC3200) / 3-way (GVC3202) conferencing with local mixing between SIP and other protocols. The GVC3200/GVC3202 eliminates the traditional barriers to video conferencing and sets a new bar for business-class video conferencing solutions by offering industry-leading flexibility, interoperability, system compatibility, application richness and ease of use.
Note:
OVERVIEW
Users can attend an IPVideoTalk meeting on the GVC32XX using different ways:
- Start a one-click instant meeting
- Start an instant meeting with another GVC32XX
- Join an active meeting that has already been hosted by other GVC32XX
- Schedule a meeting as a host on IPVideoTalk Portal
The following sections describe the steps for each above way. Additionally, once the GVC32XX is in an IPVideoTalk meeting, such as adding other GVC32XX participants into the meeting, set PIN code to protect your meeting from being disturbed by unnecessary incoming calls, share presentation, and record the meeting. These meeting control operations are explained in the last section of the document.
For more information about IPVideoTalk usage or GVC32XX usage, please refer to the links below:
- IPVideoTalk https://documentation.grandstream.com/knowledge-base/ipvideotalk-user-guide/
- GVC3220 User Manual: User Guide / Administration Guide
- GVC3212 User Manual: User Guide / Administration Guide
- GVC320X User Manual: User Guide / Administration Guide
- GVC3210 User Manual: User Guide / Administration Guide
- IPVideoTalk Website: http://www.ipvideotalk.com/
- Grandstream Networks Website: http://www.grandstream.com/
Activate/De-Activate IPVideoTalk ID
The GVC3200/GVC3202/GVC3210/GVC3220 comes with an IPVideoTalk ID. If users want to start using IPVideoTalk Service, users need to activate the IPVideoTalk ID on GVC32XX.
- Go to GVC3200/GVC3202/GVC3210/GVC3220’s LCD Menu🡪Application and click on “IPVideoTalk” application.
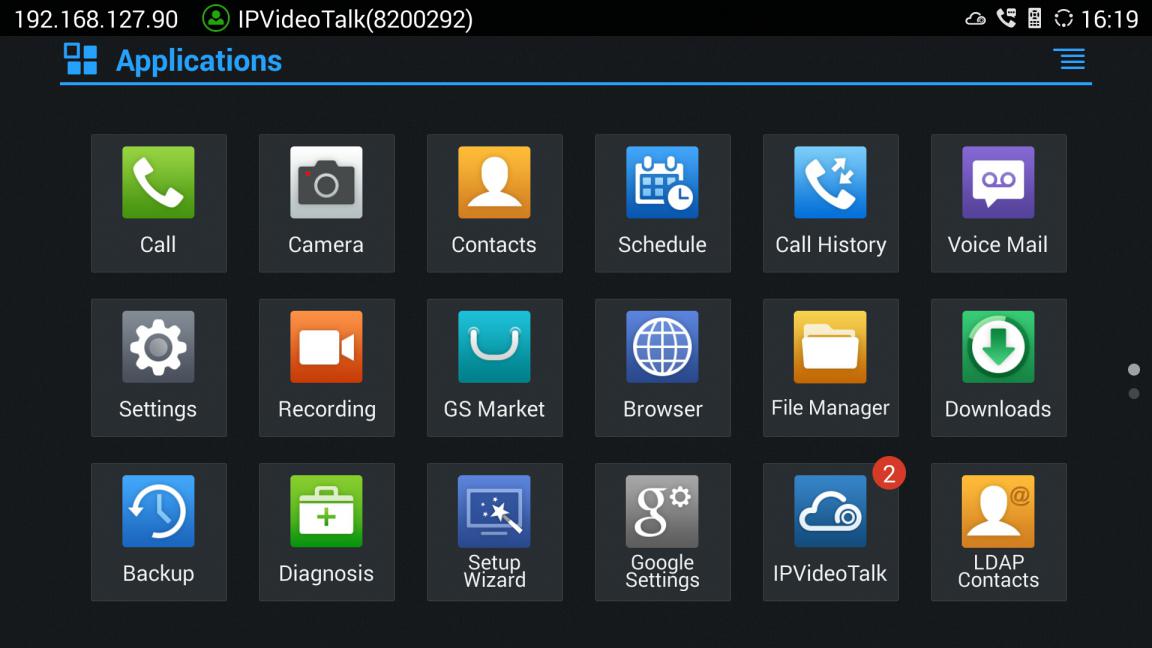
- Open IPVideoTalk application, click on “Settings”, and check “Account Active”. If this option is checked, it means the IPVideoTalk ID has been activated. See figure below:

- Users could edit “Display Name”. The Display Name will be displayed on the callee side when the users make an IPVideoTalk call.
- When users finish editing, click on the yellow shortcut key
 on GVC remote control to save the configuration.
 - Users will see the Account displayed with a green icon on the top status bar of GVC3200/GVC3202/GVC3210/GVC3220’s display device, which indicates the IPVideoTalk ID is registered. This account can be used to establish call with other IPVideoTalk IDs or join IPVideoTalk meetings now.
Note:
Link Device
If users would like to schedule a meeting on IPVideoTalk Portal or check company contacts, users need to link the GVC3200/GVC3202/GVC3210/GVC3220’s on IPVideoTalk Portal first. Please note users must have an admin account signed up in http://www.ipvideotalk.com before linking the device.
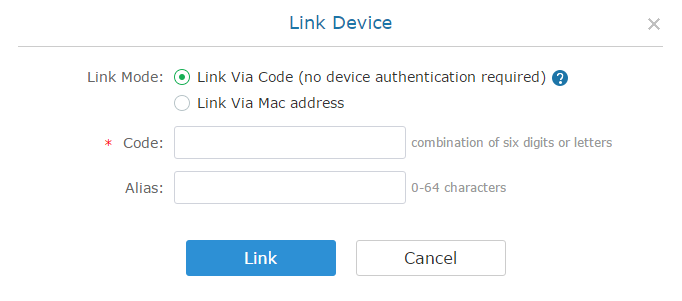
There are two ways to link the GVC3200/GVC3202/GVC3210/GVC3220’s to the IPVideoTalk Portal: using device code or using device MAC address.
- To link device using device code, follow the steps below:
- Go to GVC3200/GVC3202/GVC3210/GVC3220’s LCD Menu🡪Applications, click on “IPVideoTalk” application 🡪 Settings, and find the device code.
For the GVC3212, users could check and click on “Device code” This unique code is used to link your GVC3212 to an IPVideoTalk Account to manage and schedule meetings from there. From LCD Menu 🡪 Settings 🡪 Advance 🡪 Account🡪 Device Code.
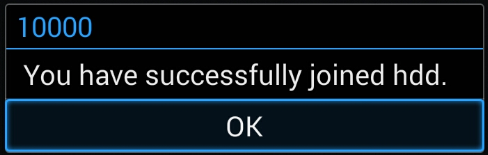
- Log in IPVideoTalk Portal using your admin account. Click on tab “Devices” and select “Link Device”. Enter the device code in the prompt.
- On the GVC32XX, go to LCD menu 🡪 Applications 🡪 IPVideoTalk application 🡪 Notices, the users will see a new message as below. This means you have linked your device successfully.
- To link device using MAC address, follow the steps below:
- In IPVideoTalk Portal🡪Devices, click on “Link Device” and enter the device MAC address.
- The GVC32XX will receive a new message from IPVideoTalk system. Icon
 will display on the top status bar of the GVC32XX display device to indicate new message notification.
 - In GVC32XX LCD menu🡪Applications🡪IPVideoTalk application, users will see a new unread message notification on IPVideoTalk application icon.

- Open the IPVideoTalk application and click on “Notices”, users will see a new message about “Device authentication”. Open this message to check the enterprise name and ID. If the enterprise name and ID belong to the user, please selects “Yes” to confirm to link the device. Otherwise, select “No” to reject to link the device.


- Once the user confirms to link the device, the administrator could see the device shown as online on IPVideoTalk Portal. The device can be controlled and managed via IPVideoTalk Portal by the administrator now.
USE GVC32XX IN IPVIDEOTALK MEETINGS
Start a Meeting
Users could start an instant meeting on all GVC32XX models or schedule a meeting via IPVideoTalk Portal.
Instant Meeting
An instant IPVideoTalk meeting can be started on GVC32XX by the following steps:
- On GVC32XX, select LCD menu🡪Call icon to access the dialing interface.
- Enter another GVC32XX’s IPVideoTalk ID or select it from contacts/call history.
- Press the dialing button
 on the remote control or click on the “dialing” icon
  to start a meeting.
 to start a meeting.
 Note:
Additionally, users could start an instant meeting by only clicking on the “dialing” icon  on dialing interface on GVC32XX without entering any IPVideoTalk ID. The GVC32XX will be the meeting host by default. IPVideoTalk cloud system will assign a meeting ID to this instant meeting for other users (such as WebRTC client) to join the meeting.
If the IPVideoTalk ID on the GVC32XX has another session in progress, the user cannot start an instant meeting on the GVC32XX. For instant, the GVC32XX passes the meeting host to a WebRTC client and leaves the meeting, the user cannot start an instant meeting on this GVC32XX.
Schedule a Meeting
Users could schedule a meeting on IPVideoTalk Portal. For details, please check sections Start Scheduled Meeting Manually, Cancel Scheduled Meeting and Start Scheduled Meeting Manually.
Start a Webinar
IPVideoTalk offers the possibility to schedule a Webinar through IPVideoTalk Portal and to Start it either from the Portal or from a GVC32XX device.
When schedule a Webinar, the default Webinar will stay at preparation period, the participants cannot join into the Webinar until the scheduled time arrives.
Users could join into the Webinar as the host via browser. Once the Webinar is ready, users could click to start the Webinar and the participants could join into the Webinar.
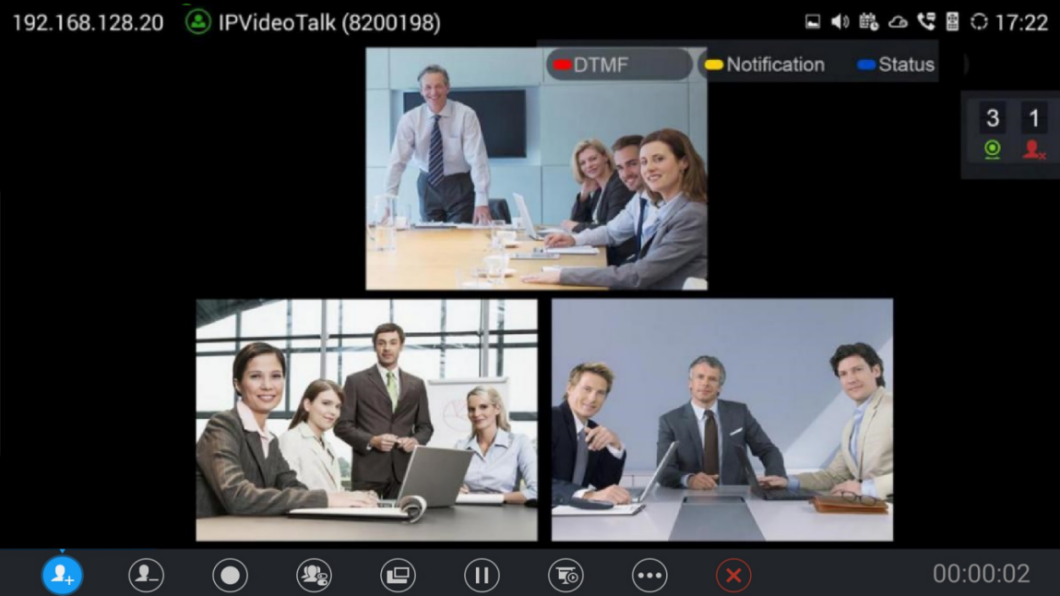
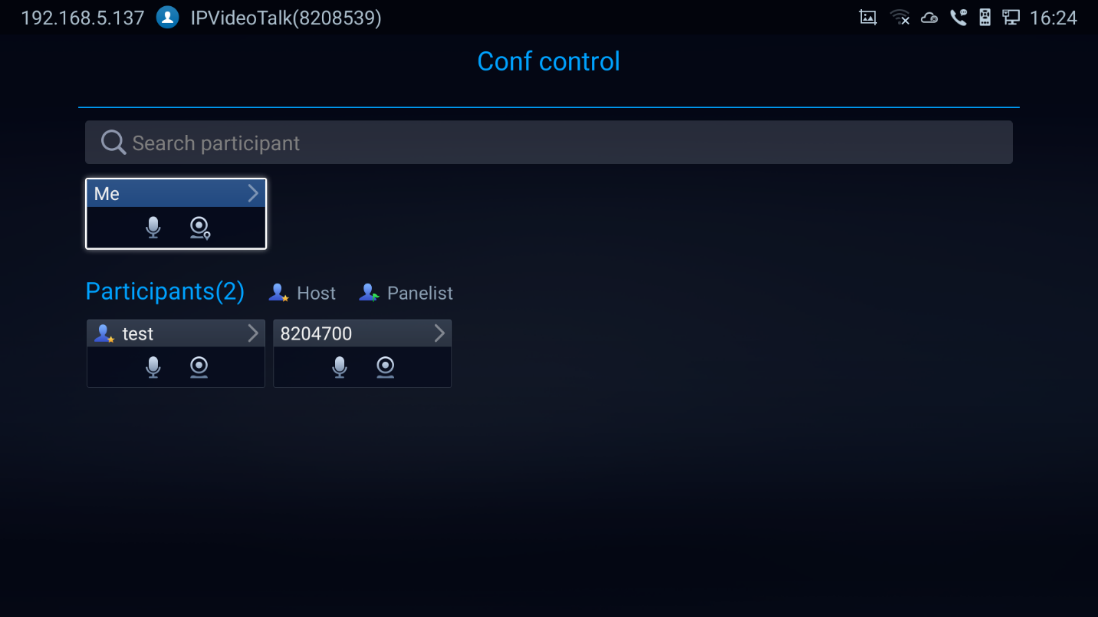
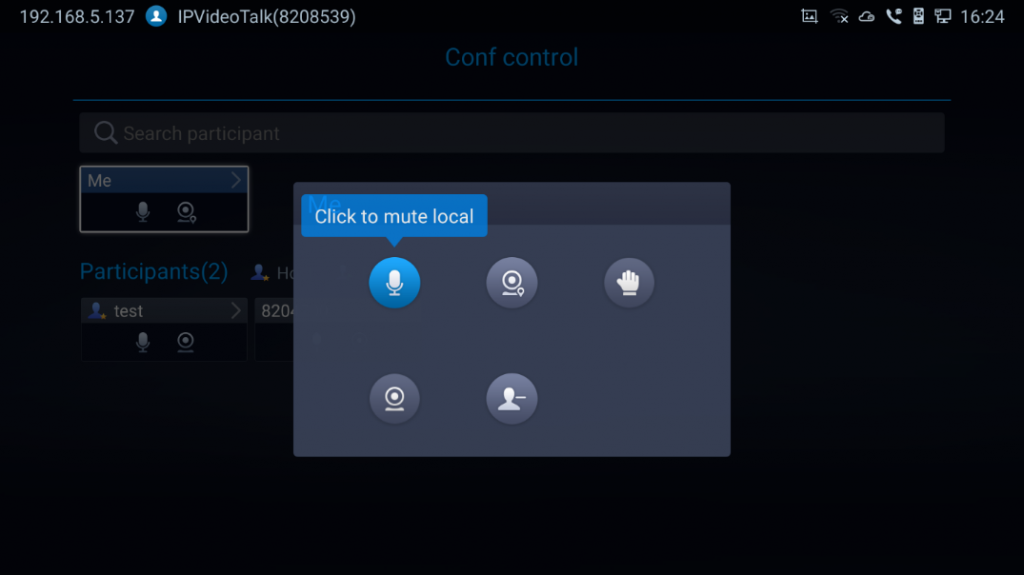
Conference Control for GVC3200/GVC3202/GVC3210
Users could use the conference control features on a GVC3200/3202/3210 to manage the participants during the meeting. See figure below:
-
 Redial
 Redial
If there is a failed call, users could redial this number by clicking on this button. If multiple participants are in the previous call, “Redial” will call all the participants.
-
 Add Member
 Add Member
Users could click on this button to open the dialing interface and add participants into the exiting conference.
-
Conference Control
 Conference Control
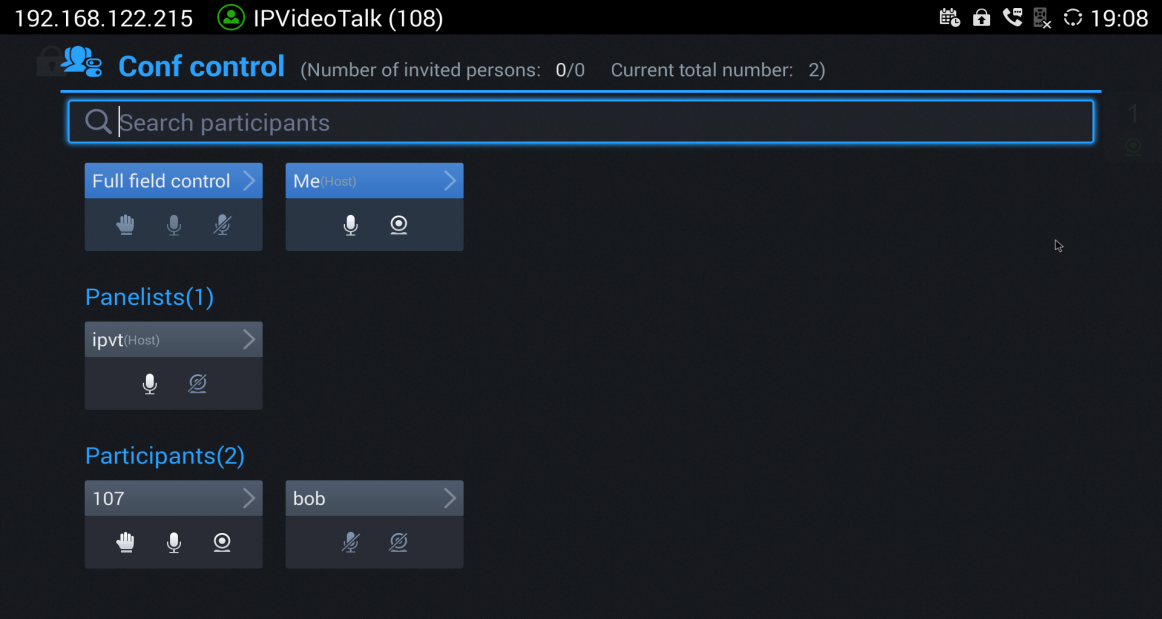
- If the user is muted by the meeting host, there will be an icon
 shown on the label; in this case, the user cannot unmute himself/herself, only the host can do it. If the user mutes himself/herself, the user could unmute by himself/herself.
 - If the video from GVC32XX is terminated by the meeting host, the icon
 will be shown on the label. Users can click on this icon
  and enable/disable the video from GVC32XX during the meeting.
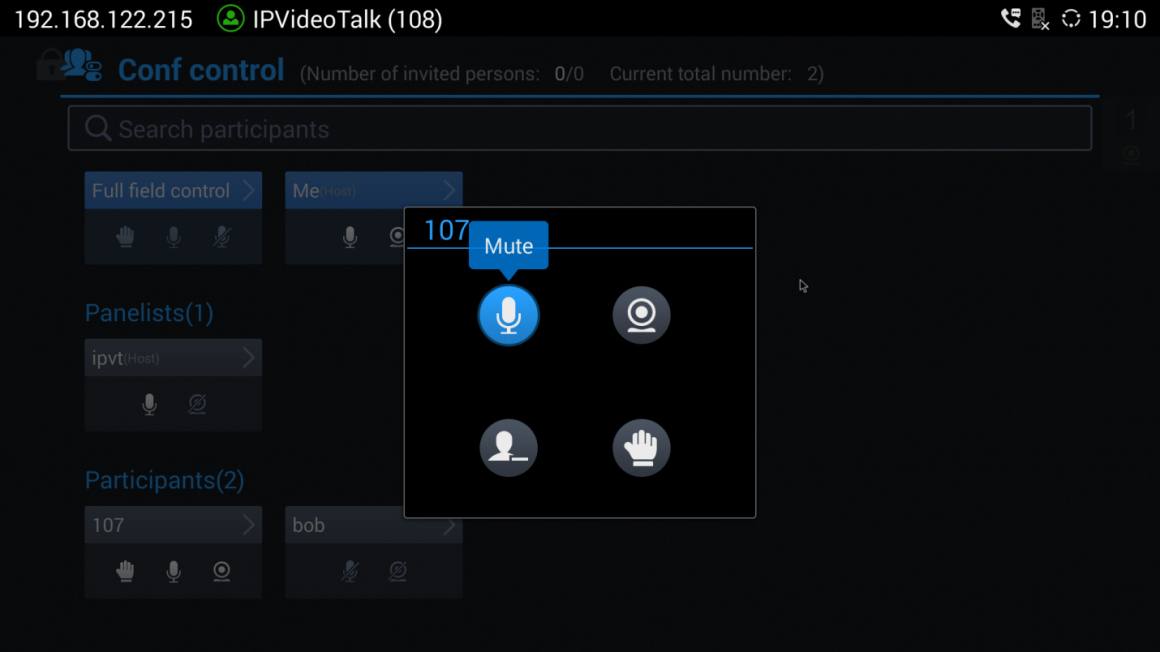
- If the participant needs help or wants to be unmuted, the participant could click on Raise Hand button
 , and the meeting host will see the Raise Hand icon in Participants List.
Notes:
-
 Layout
 - When only two participants (GVC device) are in the meeting, both can see each other’s videos without occupying conference room resources.
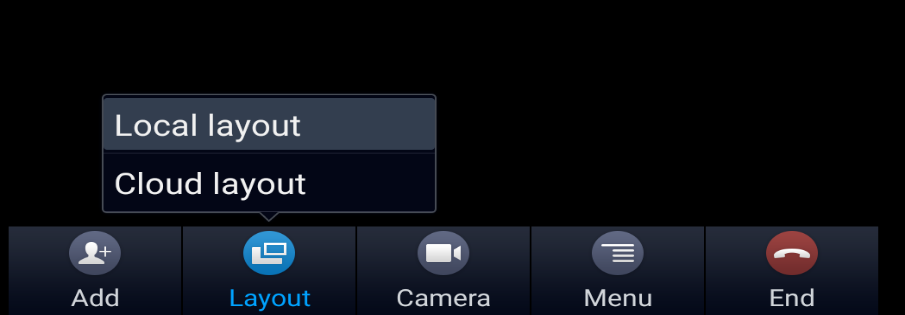
- Only the moderator can set the layout of the cloud video conference.
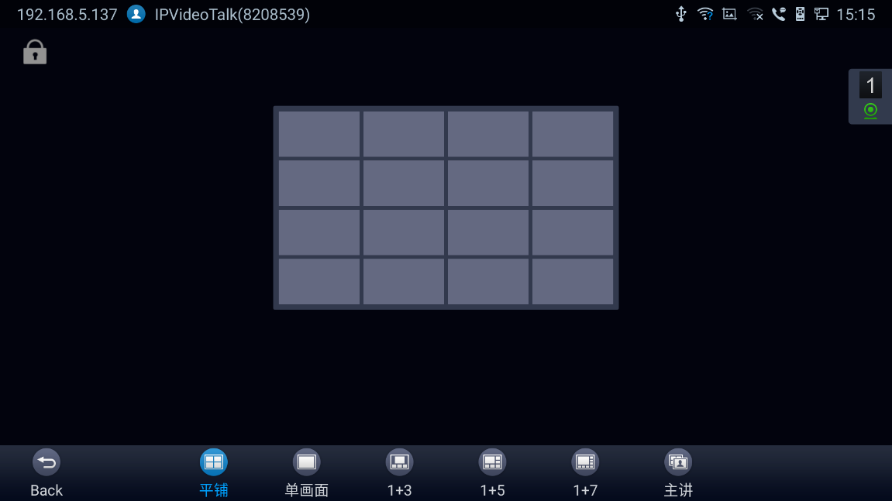
- Select “Layout 🡪 Cloud Layout” to control the IPVT conference room Layout. There are Three Layout mode: Tile (Default), Focus 1+N, and Speaker (The selected participant is displayed in full size).
- Tile: Auto (Default): The video for all attendees will be tiled and adapted automatically based on the number of video images.
- Focus 1+N: There are four mode for users: “Solo” layout, “1+3” layout, “1+5” layout, and “1+7” layout, which means one large video image with N smaller video images (polling mode). The current large video image is displaying the video image from current speaker.
- Speaker: Select one participant in the Participants List as speaker. The participants display the speaker in full screen, and the speaker shows all participants’ videos (except the speaker video) in sequence.
- Fixed Video Location: If the user wants to make a participant’s video image display in a specific location in the layout, the user could set it up. This function is only supported in 1+N mode. Select a grid in the layout, press the confirmation key, select the participant to be displayed in this grid, and confirm the configuration. Then, the grid will display the selected participant’s video image. If the selected participant does not turn on the camera, the participant’s name will be displayed.


- If the host allows participants to change to any layout freely, the layout switching function will be available. The meeting host is unrestricted, and if there are multiple available layouts, users could switch layouts among the available layouts.
Select “Cloud Layout”, and click on “Select Layout”, users could see the figure as shown below:
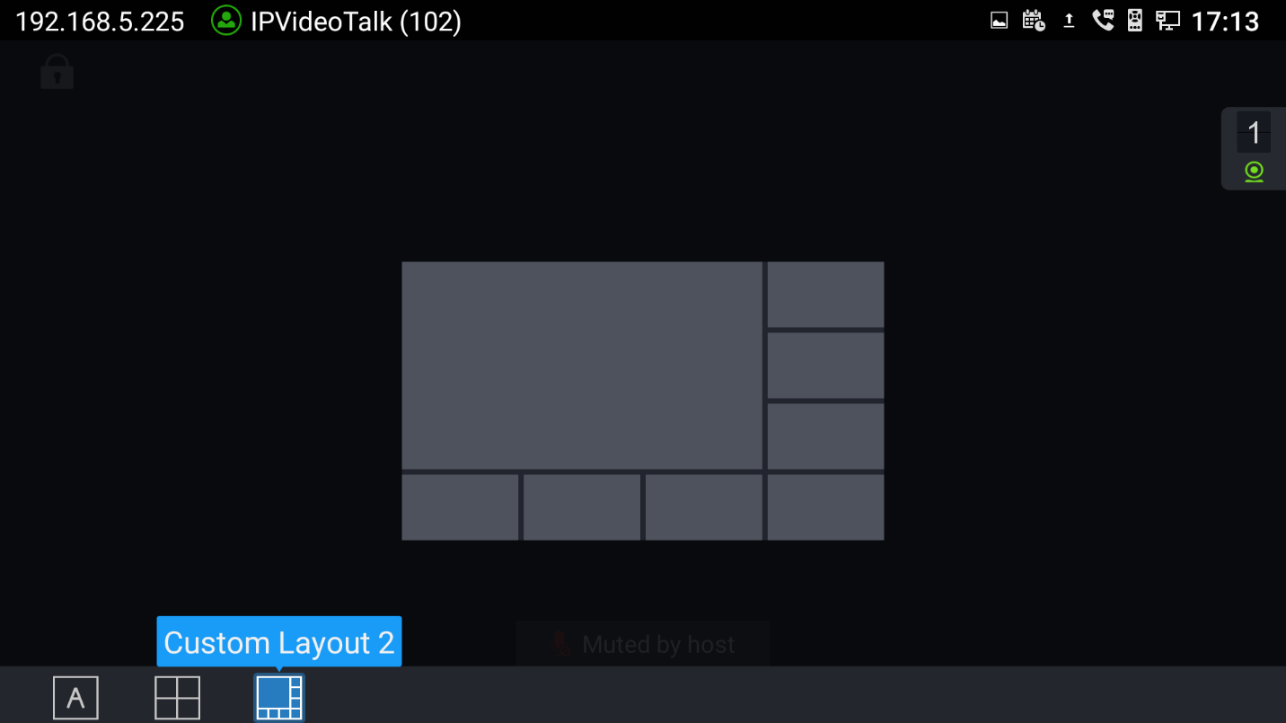
Select a layout, and users could switch the displaying layouts among available layouts at any time.
Note:
-
Hold
 Hold
Hold
This is used to hold/resume the conference. If the conference is put on hold, the video will stop and users cannot see the video from all other participants.
-
Presentation
 Presentation
This is used to open/close sharing presentation. If this feature is enabled, all participants will see the presentation from the GVC32XX.
If starting presentation fails, it may be caused by the user’s current role, which does not have the permission to start presentation.
-
More
 More
More
Users could click on this option to use the 3rd party application (This option will be found only if the GVC32XX has already installed the 3rd party application), check the Call Info, Set PIN Code, and Open DTMF, check Meeting Info and Participants list.
-
 Raise Hand
 Raise Hand
If the participant needs help or wants to be unmuted, the participant could click on Raise Hand button, and the meeting host will see the Raise Hand icon in Participants List. The meeting host cannot click to raise hand.
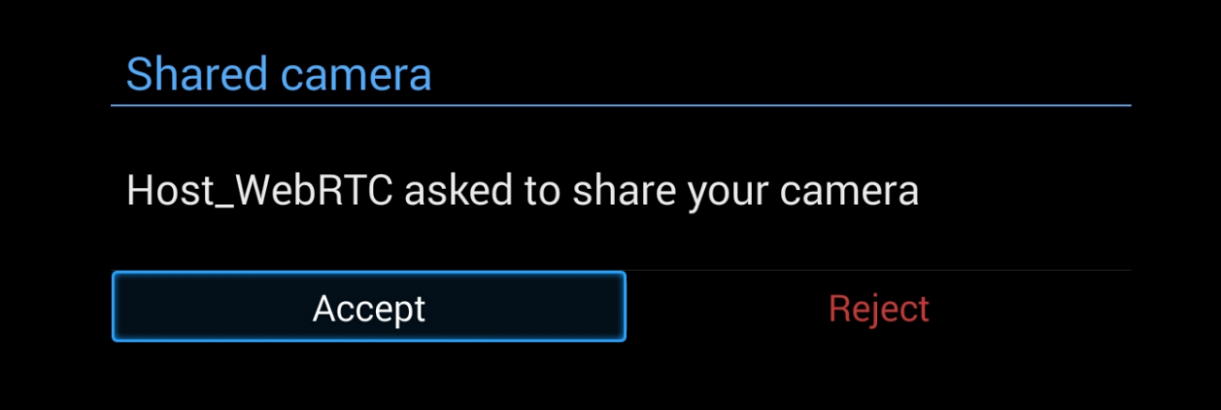
Request to Share Webcam for GVC3200/GVC3202
If the GVC’s camera is not shared during an IPVideoTalk meeting, the WebRTC acting as host can request GVC clients to share their camera. A prompt will be displayed on the screen to accept or reject the request as shown in the figure below.
Note:
Conference Control for GVC3212
Users will see a list of icons for menu options. This menu will be automatically hidden if there is no operation in 5 seconds. Press any key to bring up the menu options again.
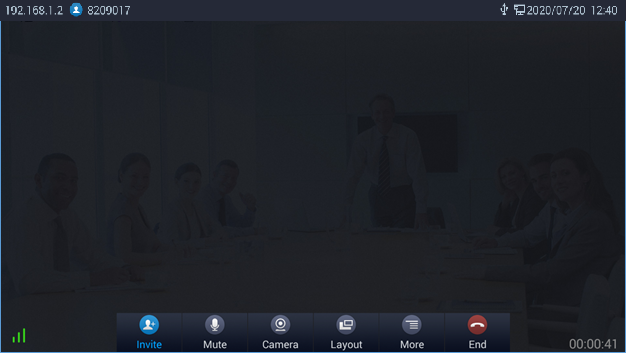
-
 Add Member
 Add Member
Users can add new members to the conference either from the corporate contact phonebook or by dialing their number in the dial screen.
-
 Mute
Mute
Other call parties will not hear you if you mute yourself. Press the button again to unmute.
-
 Camera
Turn On/Off local camera.
-
 Layout
Adjust the layout for the video display for video call. Conference host can choose the meeting layout from Meeting Layout, the following layouts are available:
- Tile: The video for all attendees will be tiled and adapted automatically based on the number of video images.
- 1+N: One large video image with N smaller video images (polling mode). The current large video image is displaying the video image from current speaker.
-
 More
More
This option allows conference host to start Recording by pressing on Record, the recorded call will be saved in the account’s IPVideoTalk Cloud. Users can bring up DTMF dialing screen by pressing on Open DTMF Option. Users also adjust Echo Delay feature and view Meeting details.
-
 End
End
Conference host can choose to either just exit the meeting by pressing on Leave alone, the conference in this case will continue. Or End the meeting completely by pressing on End the meeting.
Conference Control for GVC3220
Tap  on to make operations such as mute, disable sound, camera control and suspend video. The conference control screen is as shown below:
- Use Up/Down navigation keys on GVC3220 remote control to select conference member.
- Use Left/Right navigation keys on GVC3220 remote control to make operations, press “OK” key to confirm the operation, press “OK” key again to cancel, e.g. tap on to mute one member and the icon will turn to tap on it again to restore.
- To remove a member from the conference, click on the DELETE icon on conference screen. Select the member from the member list and press “OK” key to delete it.
Note:
Pause Conference
The video will be stopped if the conference is paused. You will not see the video view of the members and the other members will not see your video either.
Notes:
Conference Layout
During a video conference, users can customize screen layout when using multiple connected HDMI outputs, to specify particular video feeds to be displayed on each screen.
Under GVC Call screen 🡺 Layout, users can choose the most convenient layout.
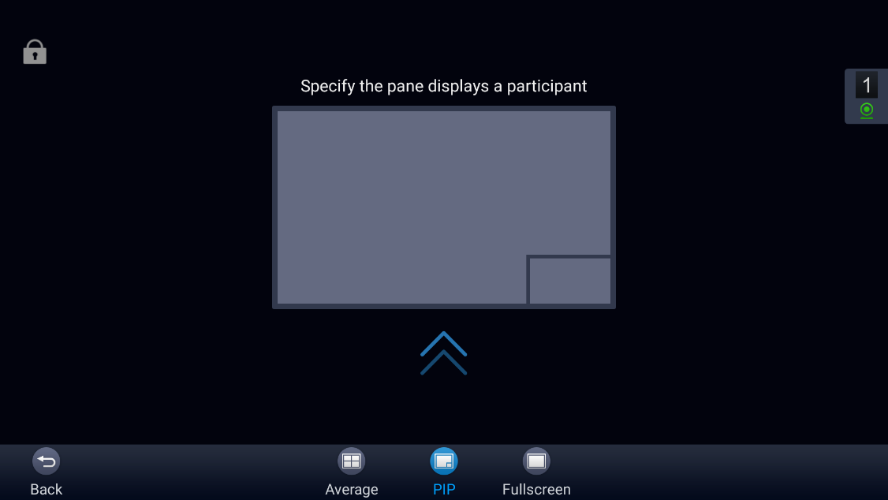
- Local Layout: Users can choose the local layout that will be shown only on the GVC3220 where the local layout was adjusted, and not for all the participants. The available local layouts are: Average, PIP (Picture in picture) and Full screen display.
- Cloud Layout: The host user can choose a cloud layout to be used for the whole conference and will be shown for users as well (this feature needs to be supported by the server as well). The available Cloud Layouts are: Tile, Solo, 1+3, 1+5, 1+7, Speaker.
- When solo mode meeting layout is set: Users could specify a pane to display a certain participant.
- When Speaker mode meeting layout is set: Users could specify a pane to display a certain participant. The speaker can view all participants video images, and the participants can only view the speaker’s video image.
Check Meeting Information for GVC3200/GVC3202/GVC3210/GVC3220
Users could check the meeting subject, meeting ID, Host, Password and URL during the meeting. The meeting host could share the meeting ID or URL for other participants to join the meeting via WebRTC/IPVideoTalk Mobile App.
- During meeting, click on “More” icon
 on GVC3200/GVC3202/GVC3210/GVC3220, then click on “Meeting Info”.
 - GVC32XX will show the information prompt as below:
The meeting Subject, Meeting ID, Host, Password, URL, Host code, PSTN access number (for IPVideoTalk Pro and Plus) and Server location area will be listed there.
 on GVC3200/GVC3202/GVC3210/GVC3220, then click on “
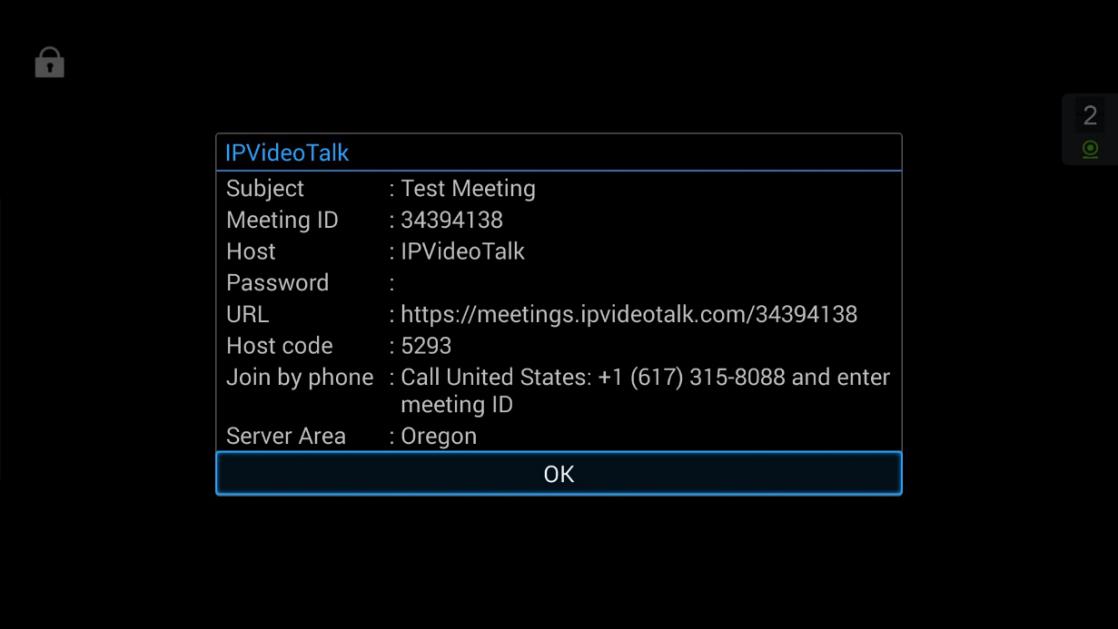
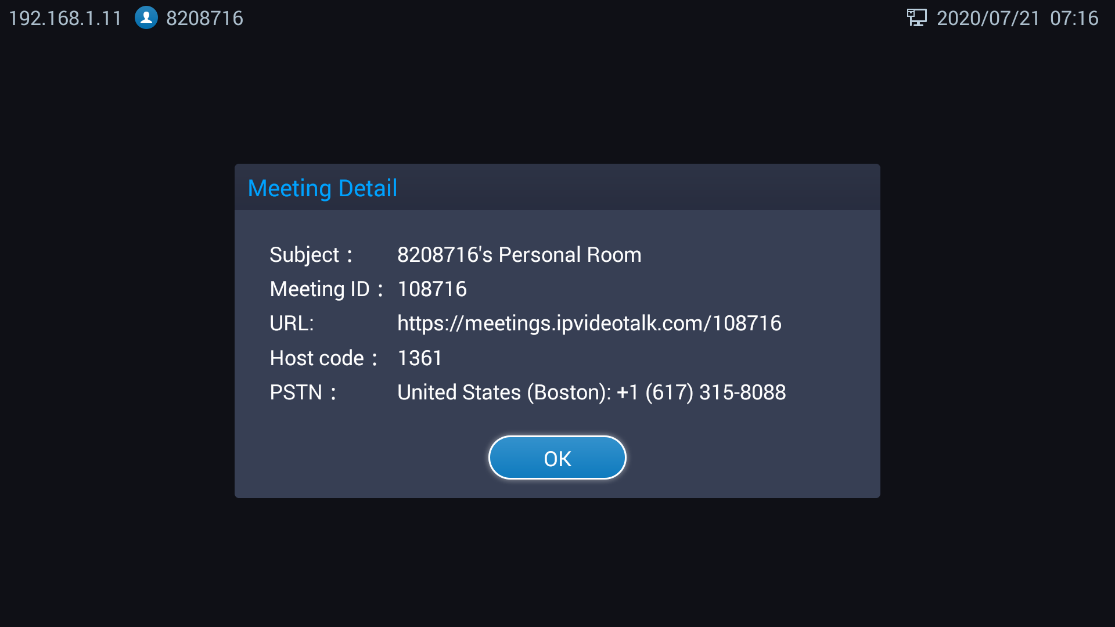
Check Meeting Information for GVC3212
To check the Meeting details, users can view the meeting related details such as the subject, Meeting ID, Meeting’s URL, PSTN number by pressing on More button ![]() and selecting meetings details:
and selecting meetings details:
Recording for GVC32XX
Local Recording
- When the GVC3200/3202/3210/3220 is in an IPVideoTalk video call, the user could click
 on the bottom of the call interface, or
  on the remote control to start recording.
 - Once start recording, the audio and video on the GVC3200/3202/3210/3220 will be recorded. Users could see the recording icon
 flashing at the upper left corner during recording. If the meeting participant enables presentation function during recording, it will record the presentation as default. If the meeting participant disables presentation function during recording, it will switch to record the video and audio. Click button again to stop recording, and the recording file will be saved in the GVC3200/3202/3210/3220 automatically.
 - Each recorded file will not be bigger than 1.9G, the system will create a new file automatically to continue recording if the previous recorded file exceeds 1.9G. There will be a prompt to indicate the storage space is insufficient if the disk storage is full.
- Once the recording is completed, users could go to Recording application on the GVC3200/3202/3210/3220 to check the recording file, or look for the recording file in File Manager application. Users could play, export, lock/unlock, send, rename, or delete the recording file.
Note:
Cloud Recording
All the GVC32XX models support cloud recording feature.
- When users join into the IPVideoTalk meeting, users could click on recording button or shortcut button to see the recording menu which including “Start local recording” and “Start cloud recording”.
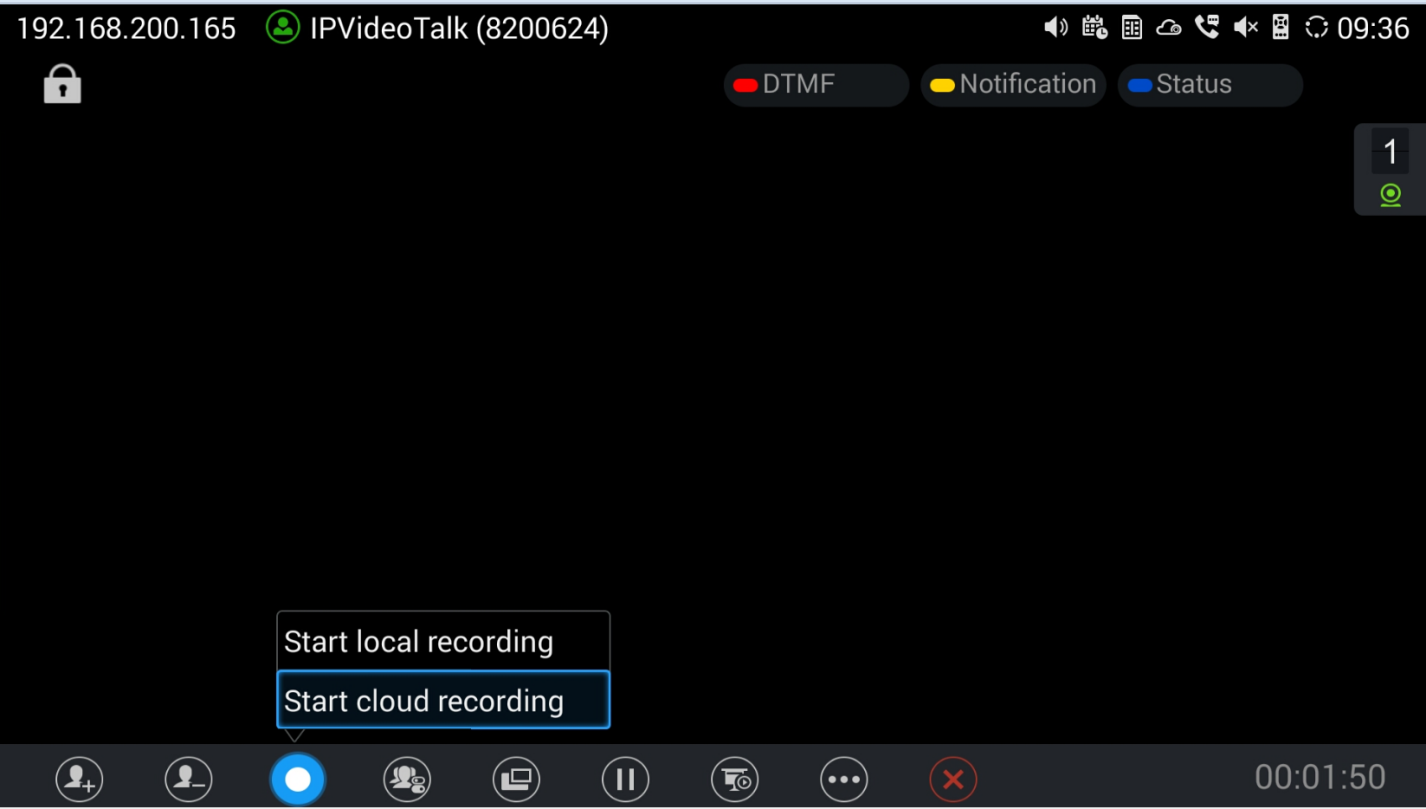
- Users could start the cloud recording by selecting “Start cloud recording” option. If there is no more available storage, there will be a prompt to show that the storage space is full.
- All the meeting participants will see the “Cloud Recording” icon
 during the meeting, including GVC participants.
 - When finish recording, users could click on the recording button or shortcut button and select “Stop cloud recording” option to stop cloud recording.
- The recording files will be saved in the storage server, and users need to login IPVideoTalk Portal to check or download the recording files.
 during the meeting, including GVC participants.
 Prerequisites:
- GVC32XX needs to be linked with IPVideoTalk account, otherwise, the user cannot use cloud recording feature.
- The IPVideoTalk Plan needs to include the Cloud Recording feature.
- The enterprise account should have enough storage space in cloud sever. The sum of all spaces for all activated plans which belong to the same enterprise account will be counted. The used storage spaces are counted with all recording files for the enterprise account.
Join Meeting
On GVC32XX, users could join a meeting by dialing the host’s IPVideoTalk ID number or the meeting ID. The users can find the meeting ID in the meeting invitation Email, or contact the host directly for the IPVideoTalk ID number or the meeting ID.
- Go to dialing interface, input the meeting ID or meeting host’s IPVideoTalk ID number, and press the dialing button to join the meeting.
- If the meeting status is “To be hosted” or “In Process”, users could dial into the meeting successfully. If the meeting status is “Ended” or “Not Started”, the call will be failed, and users could see the prompt on GVC32XX output.
- If the meeting has a PIN Code configured by the GVC32XX host, users need to input the password before joining the meeting. Users could input the PIN Code via remote control, followed by the # key. See figure below:
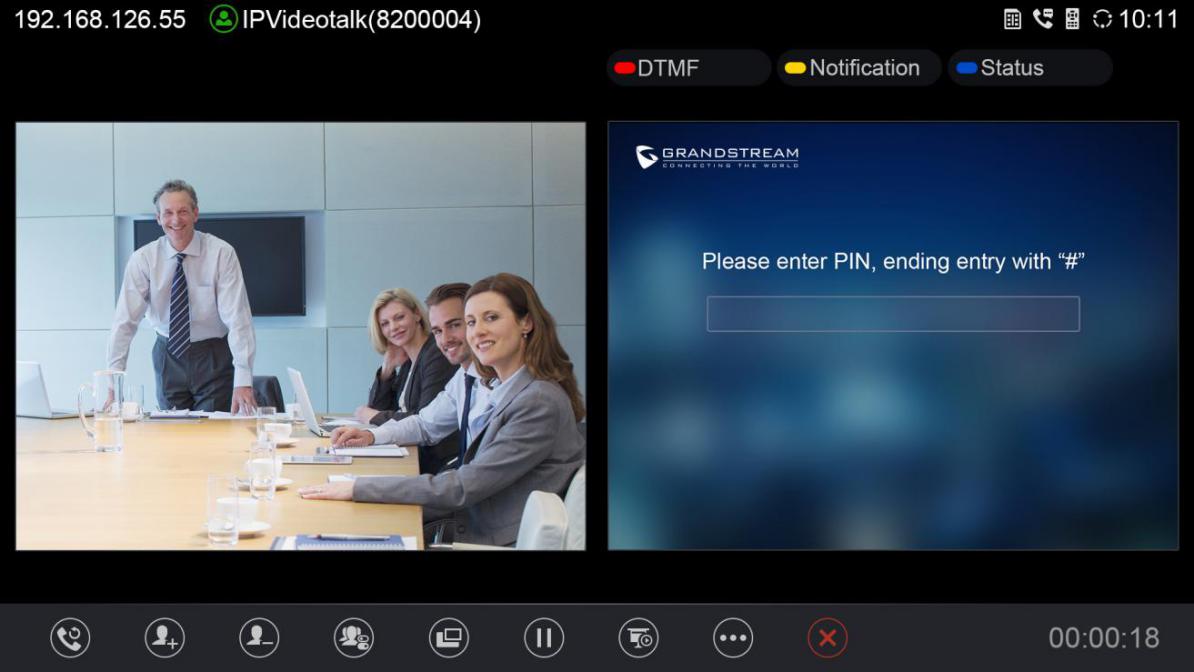
- If the user is the participant in the invited list, the user does not need to input the PIN Code.
- If the meeting is not started yet, the user cannot join the meeting by dialing the meeting ID.
- If the WebRTC host leaves the meeting without ending it, and the meeting is still in process, other participants can still join into the meeting.
Note:
Schedule Meeting
To schedule an IPVideoTalk meeting using IPVideoTalk service, the users need to login as admin in IPVideoTalk Portal first. Please refer to the Guide below: Schedule IPVideoTalk Meeting from Portal
Check Scheduled Meetings
Once the meeting is scheduled on IPVideoTalk Portal, the scheduled meeting will be provisioned to the GVC32XX host. Users can check the meeting details under Schedule interface in GVC32XX LCD or Web UI.
- On the GVC32XX LCD idle screen, click on the “Schedule” icon
 .
. - In the scheduled meetings list, the IPVideoTalk meeting scheduled via IPVideoTalk service will be marked with
 icon.
icon.
 .
. 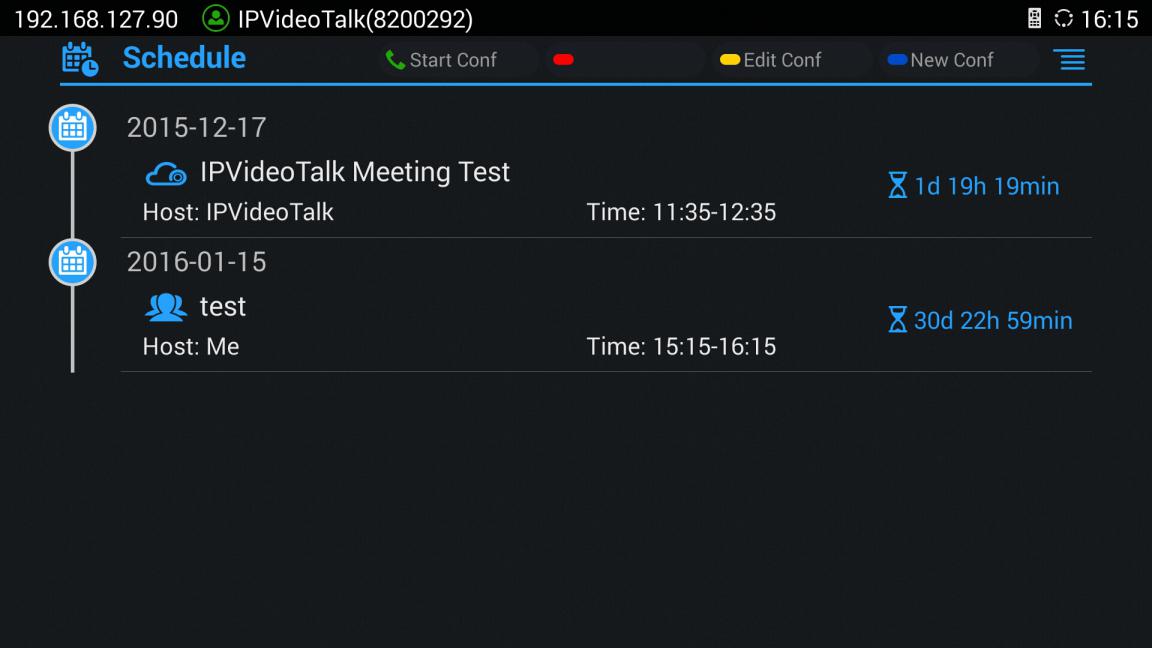
- Select the meeting entry and press “OK” button on GVC remote control to check the detailed information of the scheduled meeting.
Start Scheduled Meeting Automatically
A meeting notification will be prompted on the host GVC32XX display device 10 minutes and 5 minutes before meeting starts. Once the scheduled time arrives, the scheduled meeting will be started and GVC32XX will dial all invited participants automatically.
Note:
Start Scheduled Meeting Manually
If users want to start the scheduled meeting before the scheduled time, or if users have missed the scheduled meeting, users could start the meeting manually.
- Go to GVC32XX schedule list on LCD by clicking on icon
 and select the meeting entry in the meeting history.
 - Press the Call button
 on the GVC remote control or click on “Start conference” option on GVC32XX display device.
 - If the IPVideoTalk ID on the GVC32XX has another session in progress, the user cannot start an instant meeting on the GVC32XX.
 and select the meeting entry in the meeting history.
 Cancel Scheduled Meeting
Users could cancel the scheduled meeting at any time before the meeting starts. IPVideoTalk cloud system will send Emails to the invited participants notifying them the meeting is canceled.
- Go to “Schedule” List on GVC32XX by clicking on icon .
- Select the meeting that the user wants to cancel.
 .
. Note:
IPVideoTalk Application
All GVC32XX models come with a built-in IPVideoTalk ID as well as a pre-installed IPVideoTalk application (For the GVC3212 it’s the main LCD Menu). Users could experience IPVideoTalk service out-of-box without additional efforts to install any other applications.
The IPVideoTalk application helps users to view messages from IPVideoTalk platform, manage contacts and account configurations. To access IPVideoTalk application, go to GVC32XX LCD menu🡪Applications🡪IPVideoTalk. Users will see the following options in IPVideoTalk application:
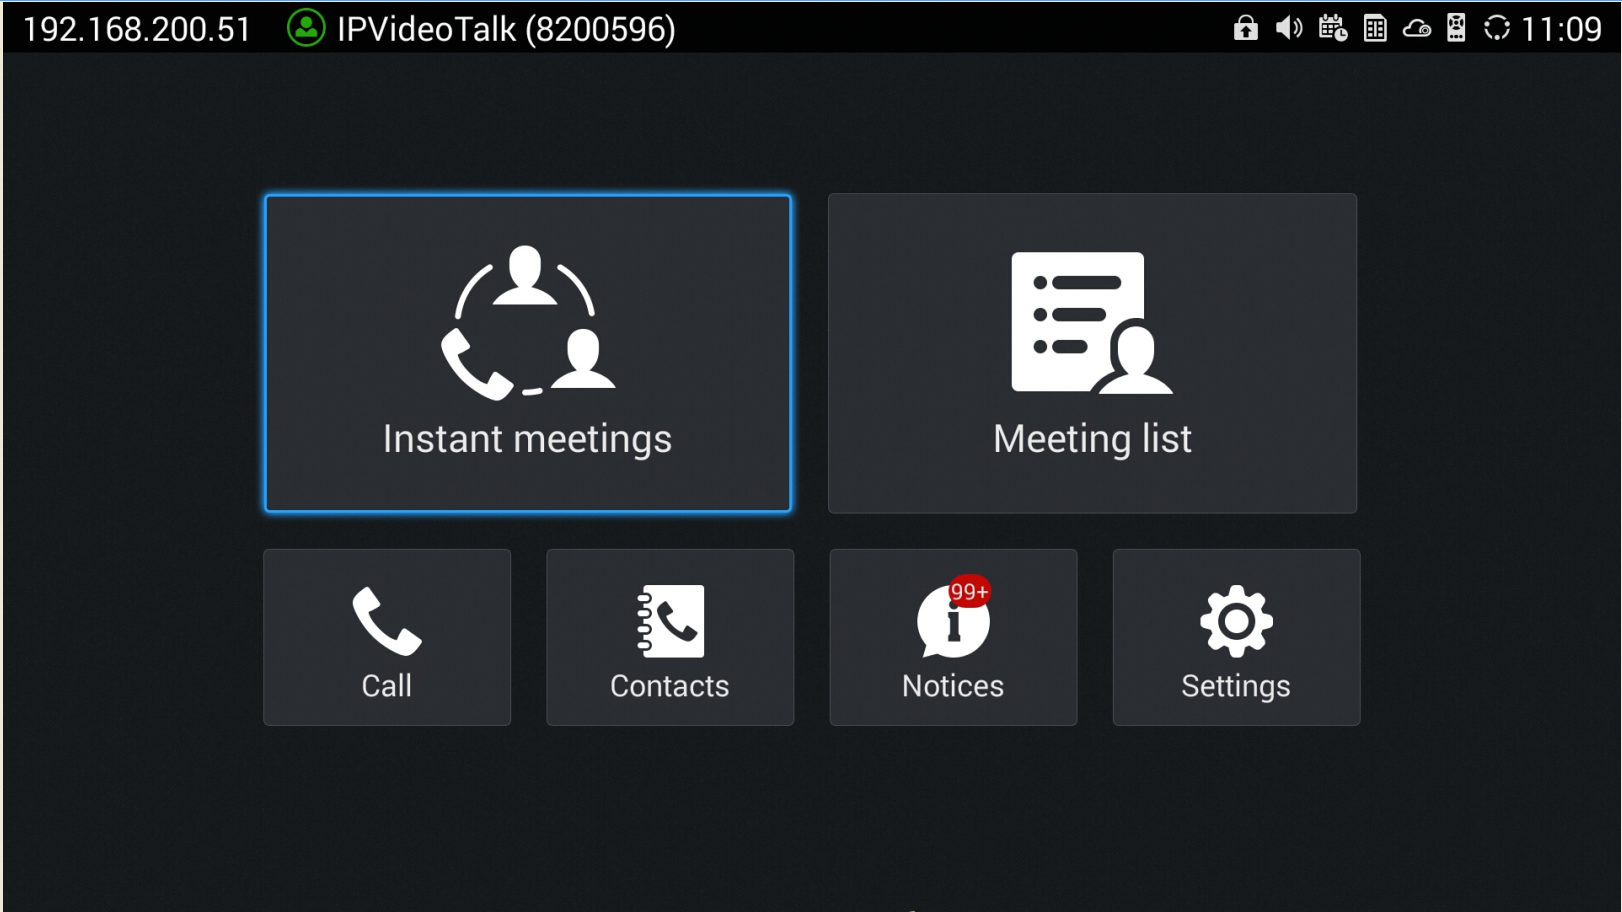
- Instant Meeting
When the user clicks on this option, the IPVideoTalk Personal Room will be created immediately, and the GVC user will join into the meeting afterwards.
- Schedule Meeting
When the user clicks on this option, it will show the Schedule Meeting interface. The user needs to fill the meeting title, schedule, invitees and other meeting information to save the scheduled meeting.
- Meeting List
All IPVideoTalk upcoming meetings will be shown on the list.
Note:
- Contacts
This is used to show the business contacts. If the device is not linked on IPVideoTalk Portal, this will be empty.
- Dial
When the user clicks on this option, the user will be directed to dialing interface, input other GVC’s IPVideoTalk ID to dial out and the meeting will be created immediately.
- Notices
This is used to receive the notices from IPVideoTalk cloud system. Users can check system messages here.
- Settings
This is used to configure IPVideoTalk ID related settings and check plan related information. Users may activate the IPVideoTalk ID, edit display name, check device code, view current plan and linked enterprise information.
Contacts
After the users link the IPVideoTalk ID on the IPVideoTalk Portal, the users could check the business contacts here (if the contact exists in IPVideoTalk Portal). The contacts are centrally managed in the IPVideoTalk Portal, and all GVC32XX can sync up with the IPVideoTalk Portal for the contacts in IPVideoTalk Portal. Currently, the users cannot directly edit the business contacts on GVC32XX.
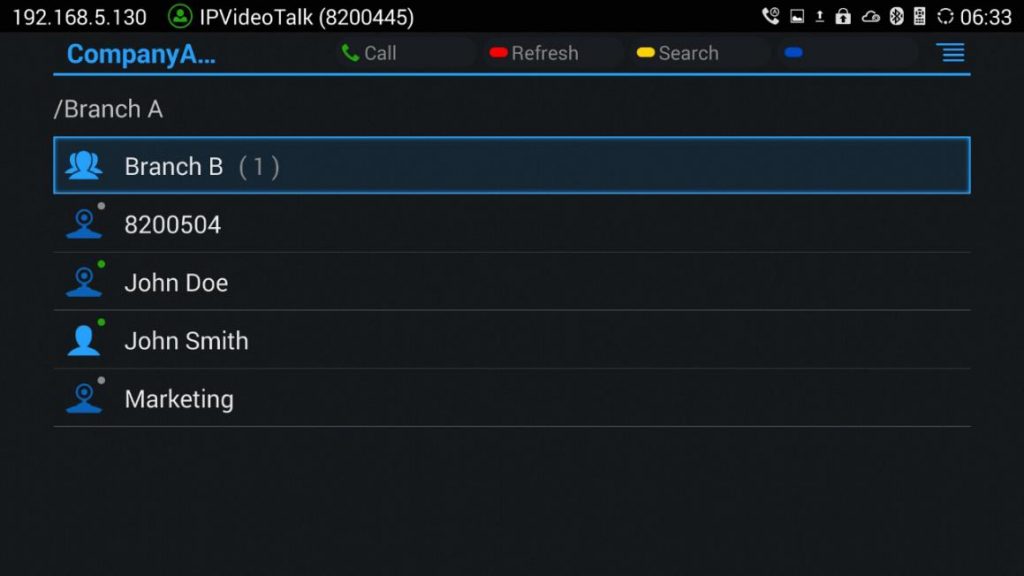
-
 Group
Group
This is used to check the contacts under this group.
-
 Contacts
This is used to check the detailed information of the contacts, such as name, phone number, Email address and so on. The green dot represents “online, and the grey dot represents “offline”.
-
 Public Device
This is used to check the detailed information of the device, such as device name, IPVideoTalk ID, and so on. The green dot represents “online” and the grey dot represents “offline”.
-
 Call
Call
 Call
Call
Users could select one contact and press this button to dial out. This will join an IPVideoTalk meeting with the callee immediately. If the callee does not have an IPVideoTalk ID, this call cannot be made.
-
 Refresh
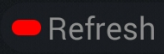 Refresh
Users could select “Refresh” to refresh online status.
-
 Search
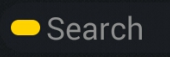 Search
Users could input contact name or IPVideoTalk ID to search the entry.
-
 Batch Call
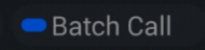 Batch Call
Users could select multiple contacts and make batch call to dial all selected contacts into the one IPVideoTalk meeting.
Note:
Notices
“Notices” is used to receive message from IPVideoTalk server which is available on all GVC32XX models except for GVC3212. The following table lists possible notices from IPVideoTalk server and what the user is expected to do after receiving the message.
Notices | Solutions |
When the IPVideoTalk plan is about to expire or already expired, users will receive a notice. | If the IPVideoTalk plan is expired, the calls using the IPVideoTalk ID will be restricted. Users will not be able to dial out or answer the call using the IPVideoTalk ID. Users could go to www.ipvideotalk.com to contact service provider to renew the IPVideoTalk plan associated with the IPVideoTalk ID. |
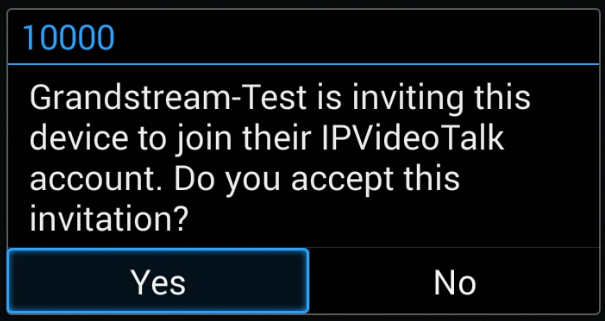
When the user links the device on IPVideoTalk Portal using MAC address, the GVC3200/GVC3202/GVC3210/GVC3220 will receive a message to reply to authentication request. | Users could open this message and select “Yes” or “No” to reply. If “Yes” is selected, the device can be linked to IPVideoTalk Portal. |
When the user’s GVC3200/GVC3202/GVC3210/GVC3220 firmware is too old to be used with the IPVideoTalk service, the user will receive a notice. | Click to open the message, the user could select to upgrade the device. The GVC32XX will be configured with an available firmware upgrading path to upgrade to the required firmware version. |
When there is an upgrade on IPVideoTalk cloud system, the users will receive notifications from the server about upgrading time and duration. | During cloud system upgrade and maintenance, the users cannot use the GVC32XX for IPVideoTalk meetings. Please do not schedule meetings during the upgrade and maintenance period. |
When the user’s IPVideoTalk ID is frozen/unfrozen, the user will receive a notice. | This issue may be caused by the Plan definition. |
Others | Users may receive other system notification messages, please pay attention to the notices. |
Unread Messages
When there is an unread message in GVC3200/GVC3202/GVC3210/GVC3220 LCD menu 🡪 Applications 🡪 IPVideoTalk application 🡪Notices, GVC32XX will notify users via the following ways:
- Users could find the IPVideoTalk icon
 on the system status bar on the top of the screen.
 - In LCD menu🡪Applications, users could find the red digit on “IPVideoTalk” application
 indicating the number of unread messages.
 - In LCD menu🡪Applications🡪IPVideoTalk application🡪Notices, users could find the red digit showing the number of unread messages. The format of the message is “x/y” where “x” is the number of unread messages and “y” is the number of total saved messages. Please see figure below:
 indicating the number of unread messages.
To check and reply (if required) messages in “Notices” section:
- Select “Notices” and open the notices list.
- Select the message. There will be a dialog prompted to display message content.
- For some notices, users may be required to reply. Please use GVC remote control to navigate and make necessary selections to finish the operation. The following figure shows the authentication request message for users to confirm to link device to IPVideoTalk Portal when the link operation is done via MAC address.
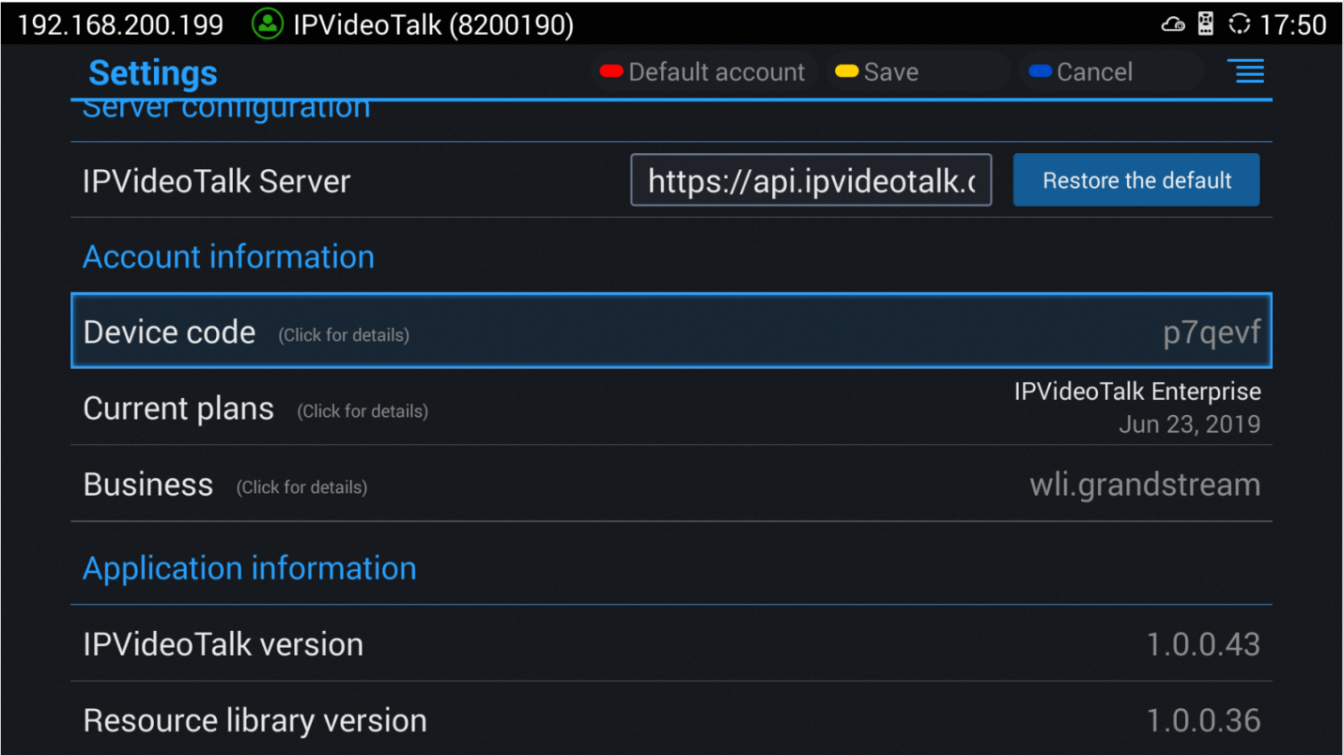
Settings
Users could configure IPVideoTalk ID related settings and check information in GVC3200/GVC3202/GVC3210/GVC3220 LCD menu 🡪Applications🡪IPVideoTalk application🡪Settings. See figure below:
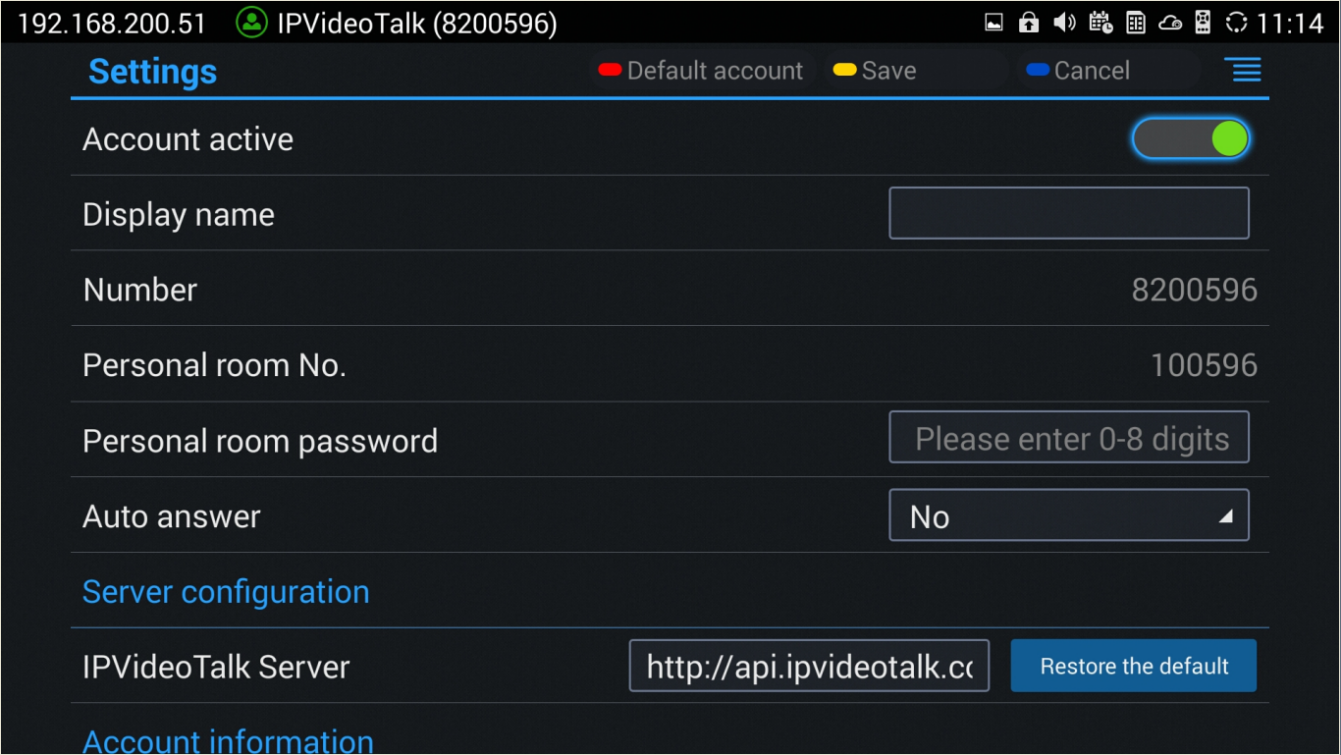
- Account Active
This is used to activate/de-activate IPVideoTalk ID. Green icon ![]() indicates active IPVideoTalk ID while Grey icon
indicates active IPVideoTalk ID while Grey icon ![]() indicates inactive IPVideoTalk ID. Users can click on this box to activate and de-activate IPVideoTalk ID.
indicates inactive IPVideoTalk ID. Users can click on this box to activate and de-activate IPVideoTalk ID.
- Display Name
This is used to set the display name for the IPVideoTalk ID on GVC32XX. When the user uses this device to dial out, the callee will see the display name.
- Personal Room Number
Each GVC32XX device has one Personal Room Number, the instant meeting/meeting now will use this Personal Room Number to start the meeting. The participants could join into the meeting via this Personal Room Number any time.
- Personal Room Password
Each GVC32XX device has one Personal Room Password, the default password is none.
If the owner sets the Personal Room Password, all participants need to input the correct password to join into the Personal Room. Users could update the Personal Room Password, or login IPVideoTalk Portal to update the Personal Room Password.
- IPVideoTalk Service Address
If the users would like to use the Enterprise internal deployed server or try our trial service system (which might not be as stable as the official IPVideoTalk platform), please obtain the trial service address from Grandstream and enter it here.
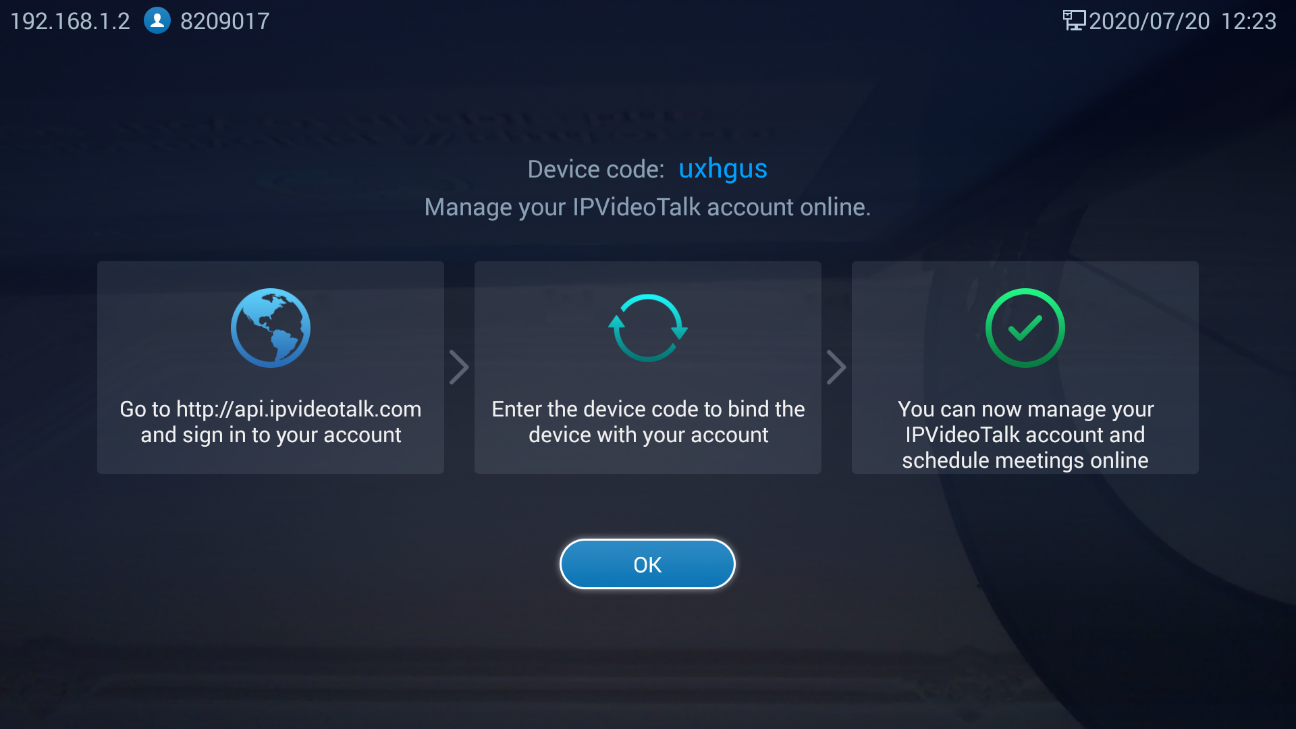
- Device Code
This is a six-digit code for the device to link to IPVideoTalk Portal quickly. Authentication response is not required for the GVC32XX user to link the device if device code is entered in IPVideoTalk Portal.
- Number
This is the IPVideoTalk ID number assigned by IPVideoTalk cloud system and it cannot be edited. Other IPVideoTalk ID users could dial this number to join the meeting. If the IPVideoTalk ID on the GVC32XX fails to obtain association with the IPVideoTalk cloud system, this field will show the MAC address of GVC32XX instead of IPVideoTalk ID number. In this case, please check your network connection, network settings, or trial service settings on the GVC32XX to make sure it has properly connected to the IPVideoTalk platform over the Internet.
- Current Plans
This is used to show the plan of the IPVideoTalk service and the expiration date. Users could click on it to check plan details.
- Business
This is used to show the enterprise name if the user has linked the device on IPVideoTalk Portal.
- Save
After editing, users need to save the configuration by pressing the yellow shortcut key on GVC remote control or selecting the “Save” option at the top right corner to have the changes take effect.
IPVideoTalk Application Menu
GVC3212 comes with a built-in IPVideoTalk account. The IPVideoTalk Account settings can be configured from LCD Menu 🡪 Settings 🡪 Advance 🡪 Account. The following figure shows the IPVideoTalk account registered successfully (account icon is blue with IPVideoTalk ID displayed):

On Account page, users can configure their IPVideoTalk Settings such as the Display name, Enable/Disable Auto answer, Set IPVideoTalk Server address and check their registered IPVideoTalk related details and current Plan information.
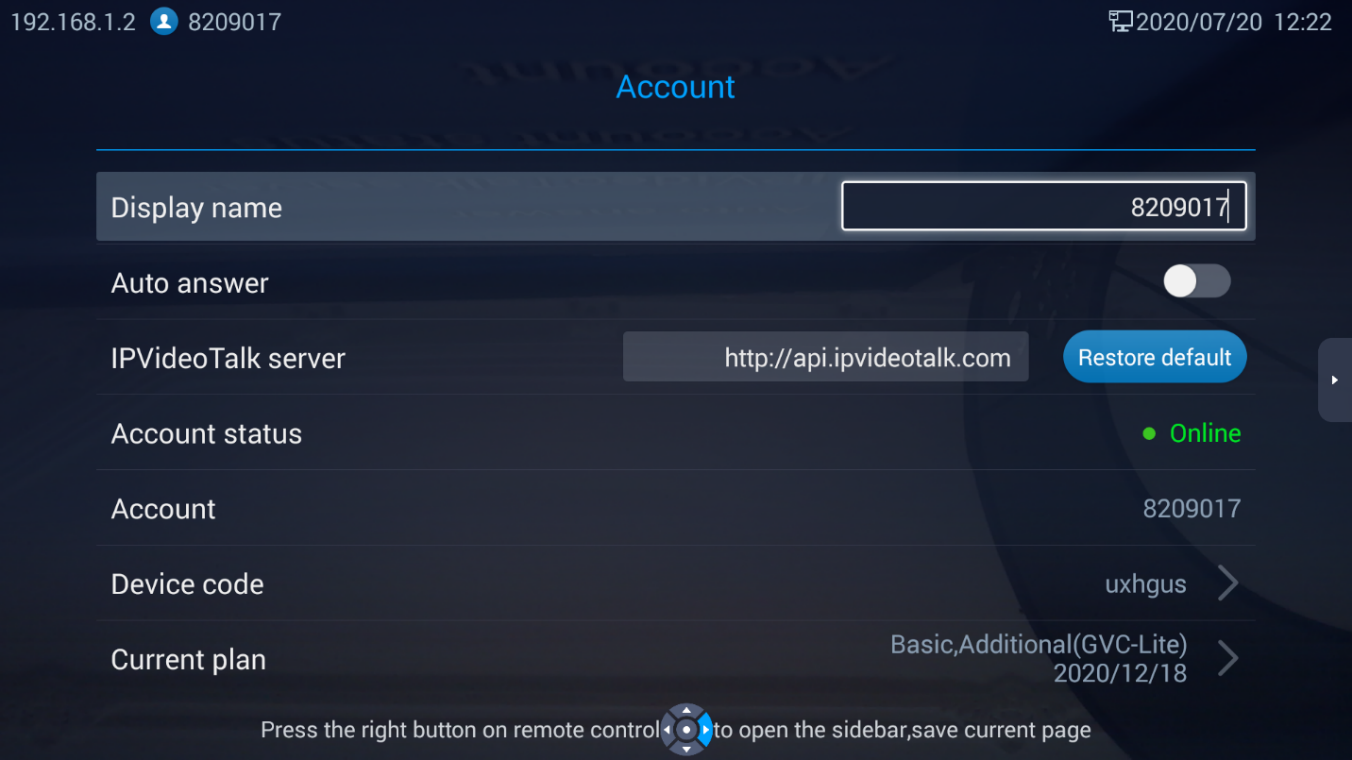
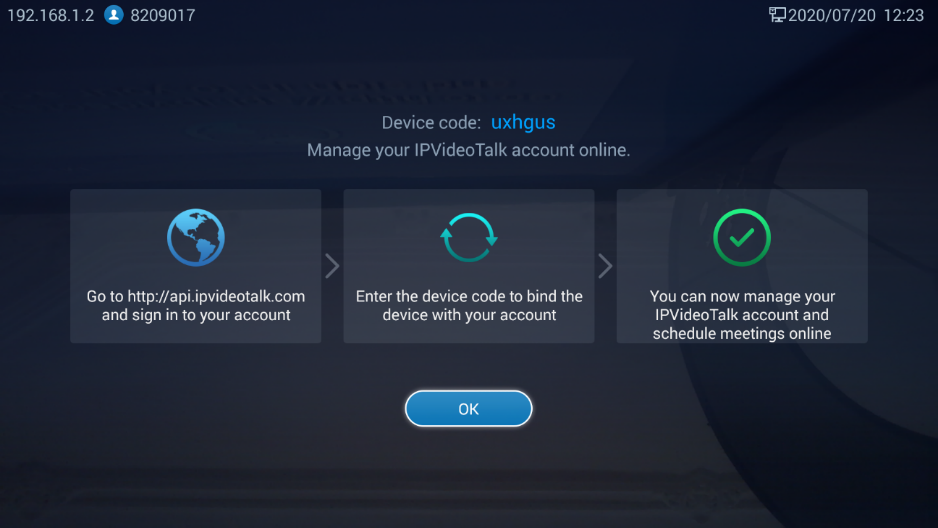
As the screenshot above shows, users could check and click on “Device code” This unique code is used to link your GVC3212 to an IPVideoTalk Account to manage and schedule meetings from there.
Note:
Unlink Enterprise
- Go to GVC3200/GVC3202/GVC3210 LCD Menu 🡪 Applications 🡪 IPVideoTalk application 🡪 Settings, click on “Business”.
- Click on “UnLink”.

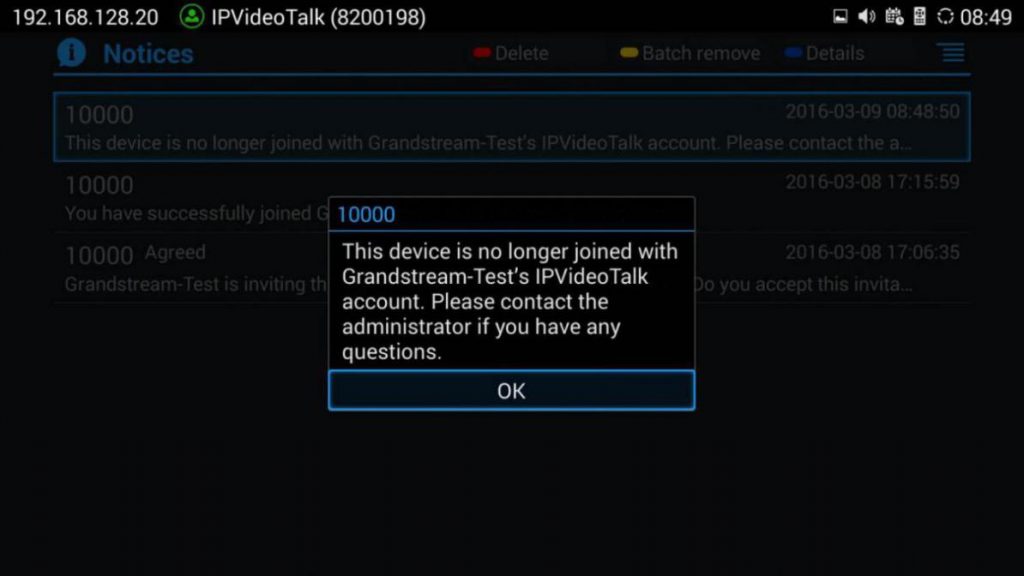
- Once unlinked, the GVC32XX will receive a message notification as shown below. Click on “Notices” to access messages to view this message.
Messages on GVC3200/GVC3202/GVC3210/GVC3220 Main Page
The main page of the GVC3200/GVC3202/GVC3210/GVC3220 displays important notification messages of IPVideoTalk service, such as plan expiration notification, low firmware notification, temporarily out of service for maintenance notification, which may cause the users to be unable to use IPVideoTalk service properly.
- The GVC3200/GVC3202/GVC3210/GVC3220 supports displaying important notification messages on the bottom of its main page. Press the yellow key on the remote control to view the message details. The firmware of the GVC3200/GVC3202/GVC3210/GVC3220 is too low, please update the firmware as soon as possible.
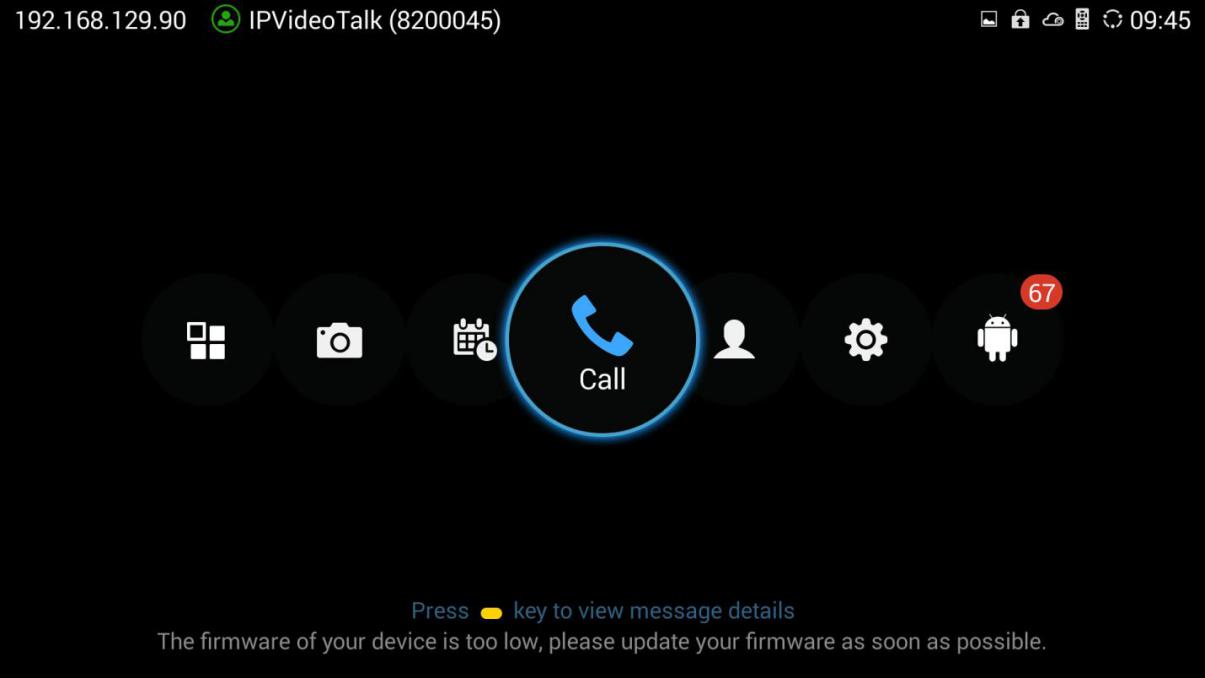
- Display the notification messages in different priority (e.g., the priority from high to low is low firmware notification, plan expiration notification, system upgrade maintenance notification), and display the latest message in accordance with the release time.
- Plan expiration. When the user continues the plan of IPVideoTalk service, the notification message displayed on the bottom of the screen will disappear.
- Low firmware notification. When the user upgrades the firmware to the latest version on the GVC3200/GVC3202/GVC3210/GVC3220, the notification message displayed on the bottom of the screen will disappear.
- System upgrade maintenance notification. Once the maintenance is done, the notification message displayed on the bottom of the screen will disappear.