


WELCOME
The WP816/WP826/WP836 are cordless Wi-Fi IP phones suitable for various enterprise and vertical market applications, including offices, retail, logistics, healthcare, and security. Both models feature integrated dual band Wi-Fi 6, advanced antenna design, roaming support, and support for the Opus HD voice codec, ensuring high-quality communication. The WP816 supports 3-way voice conferencing, offers 6 hours of talk-time, and 120 hours of standby time (laboratory data) with a 1500mAh battery. In contrast, the WP826 and WP836 support 4-way voice conferencing, provide 240 hours of standby, 12 hours of talk-time for WP826 and 10 hours of talk-time for WP836 (laboratory data) with a 3000mAh battery. WP816/WP826/WP836 phones offer a sleek design, easy-to-use interface, and a variety of practical, customizable features, providing mobility and flexibility to all voice solutions.
PRODUCT OVERVIEW
Feature Highlights
The following table contains the major features of the WP8x6:
 WP816 |
|
 WP826 |
|
 WP836 |
|
WP8x6 Features at a Glance
Technical Specifications
The following table resumes all the technical specifications including the protocols/standards supported, voice codecs, telephony features, languages, and upgrade/provisioning settings.
- WP816
Protocol/Standards | SIP RFC3261, DNS (A record, SRV, NATPR), DHCP, SSH, NTP, STUN, LDAP, TR069, SNMP, STRP, RTP/RTCP, RTCP-XR, TFTP, SIMPLE, HTTP/HTTPS, TCP, UDP, TLS, ARP, ICMP, IPv4, IPv6, 802.1x |
Voice Codecs and Capabilities | G.729A/B, G.711µ/a-law, G.726, G.722(wide-band), G.723,iLBC, Opus, in- band and out-of-band DTMF (in audio, RFC2833, SIP INFO), VAD, AEC, CNG, PLC, AGC, AJB, Headset Noise Shield |
Wi-Fi | Yes, integrated dual-band Wi-Fi 6 802.11 a/b/g/n/ac/ax (2.4GHz & 5GHz). 802.11k/r/v Supported |
Wi-Fi Encryption | Support WEP, WPA, WPA2, WPA3 (personal) |
Graphic | 1.77 inch (128×160) color LCD, 1 * Dual color MWI |
Bluetooth | Yes, integrated |
Peripherals | 2 soft keys, navigation keys, confirm key, dial key, hang up key, speaker key, programmable key, quick access and mute key, backlight DTMF keyboard, volume keys, Push-to-Talk key, accelerometer, proximity sensor |
Push-to-Talk | Customizable function button for alarm and paging |
Auxiliary Ports | 3.5mm headphone interface (CTIA cable sequence), Type-C charging interface (supports fast charging) |
Telephony | Hold, transfer, forward, 3-way audio conference, call park, downloadable phonebook (XML, LDAP, up to 1000 items), call waiting, call log (up to 200 records), auto answer, click to dial, flexible dial plan, personalized music ringtones, server redundancy and fail-over, push-to-talk |
Wall Installation | Base supports wall installation |
Security | Ordinary user and administrator level passwords based on MD5 and MD5 sess authentication, SIP authentication algorithms based on SHA-256, SHA-256 sess, SHA-512-256, SHA-512-256 sess, md5 sess. AES security profile, SRTP, TLS call encryption, 802.1x media access control |
HD Audio | The earpiece is broadband audio, and the speaker is narrowband audio, supporting HAC and dual Mic. |
QoS | Supports Layer 3 QoS (Tos, DiffServ, MPLS, DSCP) |
Multi-language | Simplified Chinese, Traditional Chinese, English, Arabic, Catalan, Czech, German, Greek, Spanish, French, Hebrew, Croatian, Magyar, Italian, Japanese, Korean, Latvian, Dutch, Polish, Portuguese, Russian, Swedish, Slovenian, Slovak, Turkish, Ukrainian |
Upgrade/Provisioning | Firmware upgrade via FTP/TFTP/FTPS/HTTP/HTTPS, mass provisioning using GDMS/TR069 or AES encrypted XML configuration file |
Power & Green Energy Efficiency | Universal power adapter |
Physical | Handset dimensions: 135.00 x 49.00 x 15.5mm Charger cradle dimensions: 85.00 x 85.00 x 25.8mm Handset weight (not including battery): 82g Handset package weight (not including QIG): 389g |
Temperature and Humidity | Operating Temperature: 0ºC to 45ºC; Operating Humidity: 10-90% (non-condensing) Storage Temperature: -20ºC to 60ºC; Storage Humidity: 10-90% (non-condensing) |
Package Contents | WP816 phone, Type-C power adapter, charger base, belt clip, 1 lithium-ion battery, M3 screw, wall bracket, quick installation guide |
Compliance | FCC, CE, RCM, IC |
WP816 Technical Specifications
- WP826
Protocol/Standards | SIP RFC3261, DNS (A record, SRV, NATPR), DHCP, SSH, NTP, STUN, LDAP, TR069, SNMP, STRP, RTP/RTCP, RTCP-XR, TFTP, SIMPLE, HTTP/HTTPS, TCP, UDP, TLS, ARP, ICMP, IPv4, IPv6, 802.1x |
Voice Codecs and Capabilities | G.729A/B, G.711µ/a-law, G.726, G.722(wide-band), G.723, iLBC, Opus, in- band and out-of-band DTMF (in audio, RFC2833, SIP INFO), VAD, AEC, CNG, PLC, AGC, AJB, Headset Noise Shield |
Wi-Fi | Yes, integrated dual-band Wi-Fi 6 802.11 a/b/g/n/ac/ax (2.4GHz & 5GHz). 802.11k/r/v Supported |
Wi-Fi Encryption | Supports WEP, WPA, WPA2, WPA3 (personal) |
Graphic | 2.4 inch (240×320) color LCD, 1 * Dual color MWI |
Bluetooth | Yes, integrated |
Peripherals | 3 soft keys, navigation keys, confirm key, dial key, hang up key, speaker key, quick access and mute key, backlight DTMF keyboard, volume keys, Push-to-Talk key, accelerometer, proximity sensor |
Push-to-Talk | Customizable function button for alarm and paging |
Auxiliary Ports | Type-C charging interface (supports fast charging) |
Telephony | Hold, transfer, forward, 3-way audio conference, call park, downloadable phonebook (XML, LDAP, up to 1000 items), call waiting, call log (up to 200 records), auto answer, click to dial, flexible dial plan, personalized music ringtones, server redundancy and fail-over, push-to-talk |
Wall Installation | Base supports wall installation |
Security | Ordinary user and administrator level passwords based on MD5 and MD5 sess authentication, SIP authentication algorithms based on SHA-256, SHA-256 sess, SHA-512-256, SHA-512-256 sess, md5 sess. AES security profile, SRTP, TLS call encryption, 802.1x media access control |
HD Audio | The earpiece is broadband audio, and the speaker is narrowband audio, supporting HAC and dual Mic. |
QoS | Supports Layer 3 QoS (Tos, DiffServ, MPLS, DSCP) |
Multi-language | Simplified Chinese, Traditional Chinese, English, Arabic, Catalan, Czech, German, Greek, Spanish, French, Hebrew, Croatian, Magyar, Italian, Japanese, Korean, Latvian, Dutch, Polish, Portuguese, Russian, Swedish, Slovenian, Slovak, Turkish, Ukrainian |
Upgrade/Provisioning | Firmware upgrade via FTP/FTPS/TFTP/HTTP/HTTPS, mass provisioning using GDMS/TR069 or AES encrypted XML configuration file |
Power & Green Energy Efficiency | Universal power adapter |
Physical | Handset dimensions: 135.00 x 49.00 x 15.5mm Charger cradle dimensions: 85.00 x 85.00 x 25.8mm Handset weight (not including battery): 82g Handset package weight (not including QIG): 389g |
Temperature and Humidity | Operating Temperature: 0ºC to 45ºC; Operating Humidity: 10-90% (non-condensing) Storage Temperature: -20ºC to 60ºC; Storage Humidity: 10-90% (non-condensing) |
Package Contents | WP816 phone, Type-C power adapter, charger base, belt clip, 1 lithium-ion battery, M3 screw, wall bracket, quick installation guide |
Compliance | FCC, CE, RCM, IC |
WP826 Technical Specifications
- WP836
Protocol/Standards | SIP RFC3261, DNS (A record, SRV, NATPR), DHCP, SSH, NTP, STUN, LDAP, TR069, SRTP, RTP/RTCP, RTCP-XR, TFTP, SIMPLE, HTTP/HTTPS, TCP, UDP, TLS, ARP, ICMP, IPv4, IPv6, 802.1x |
Voice Codecs and Capabilities | G.729A/B, G.711µ/a-law, G.726, G.722(wide-band), G.723, iLBC, Opus, in- band and out-of-band DTMF (in audio, RFC2833, SIP INFO), VAD, AEC, CNG, PLC, AGC, AJB, Noise Shield |
Wi-Fi | Yes, integrated dual-band Wi-Fi 6 802.11 a/b/g/n/ac/ax (2.4GHz & 5GHz). 802.11k/r/v Supported, 2T2R Supported |
Wi-Fi Encryption | Supports WEP, WPA, WPA2, WPA3 (personal) |
Graphic | 2.8 inch (240×320) color LCD, 1 * Dual color MWI |
Bluetooth | Yes, integrated |
Peripherals | 3 soft keys, navigation keys, confirm key, dial key, hang up key, speaker key, quick access and mute key, backlight DTMF keyboard, volume keys, Push-to-Talk key, accelerometer, proximity sensor |
Push-to-Talk | Customizable function buttons such as Alarm and Paging |
Auxiliary Ports | Type-C charging interface (supports fast charging) |
Telephony | Hold, transfer, forward, 4-way audio conference, call park, downloadable phonebook (XML, LDAP, up to 1000 items), call waiting, call log (up to 200 records), auto answer, click to dial, flexible dial plan, personalized music ringtones, server redundancy and fail-over, push-to-talk |
Wall Installation | Base supports wall installation |
Security | Ordinary user and administrator level passwords based on SHA-256 and SHA-256 sess authentication, SIP authentication algorithms based on SHA-256, SHA-256 sess, SHA-512-256, SHA-512-256 sess, MD5 sess. AES security profile, SRTP, TLS call encryption, 802.1x media access control. |
HD Audio | The handset is broadband audio, supporting HAC and dual Mic |
QoS | Supports Layer 3 QoS (Tos, DiffServ, MPLS, DSCP) |
Multi-language | Simplified Chinese, Traditional Chinese, English, Arabic, Catalan, Czech, German, Greek, Spanish, French, Hebrew, Croatian, Magyar, Italian, Japanese, Korean, Latvian, Dutch, Polish, Portuguese, Russian, Swedish, Slovenian, Slovak, Turkish, Ukrainian |
Upgrade/Provisioning | Firmware upgrade via FTP/FTPS/TFTP/HTTP/HTTPS, mass provisioning using GDMS/TR069 or AES encrypted XML configuration file |
Power & Green Energy Efficiency | Universal power adapter |
Physical | Handset dimensions: 155 x 62 x 19mm |
Weatherproof | IP67 Rated -Water-proof, dust-proof, cleaning chemical resistant, antibacterial casing and 2.0m drop safe |
Temperature and Humidity | Operating Temperature: 0ºC to 45ºC; Operating Humidity: 10-90% (non-condensing) Storage Temperature: -20ºC to 60ºC; Storage Humidity: 10-90% (non-condensing) |
Package Contents | WP836 phone, Type-C power adapter, charger base, belt clip, 1 lithium-ion battery, M3 screw, wall bracket, quick installation guide |
Compliance | FCC, CE, RCM, IC |
WP836 Technical Specifications
GETTING STARTED
This chapter provides basic installation instructions including the list of the packaging contents and also information for obtaining the best performance with the WP8x6
Equipment Packaging
- WP816
WP816 |
|
WP816 Equipment Packaging
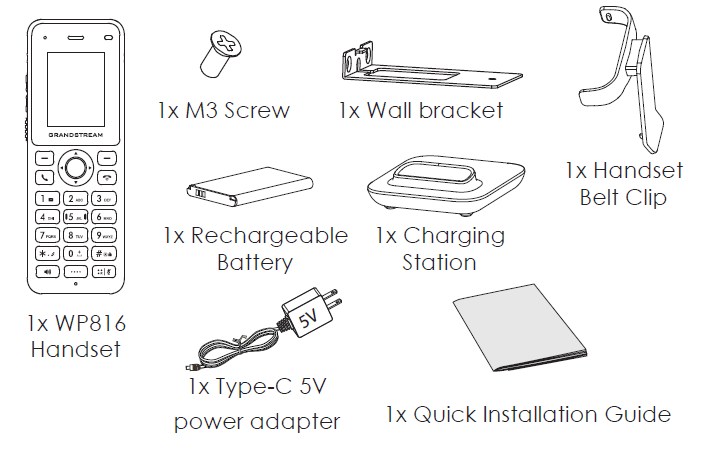
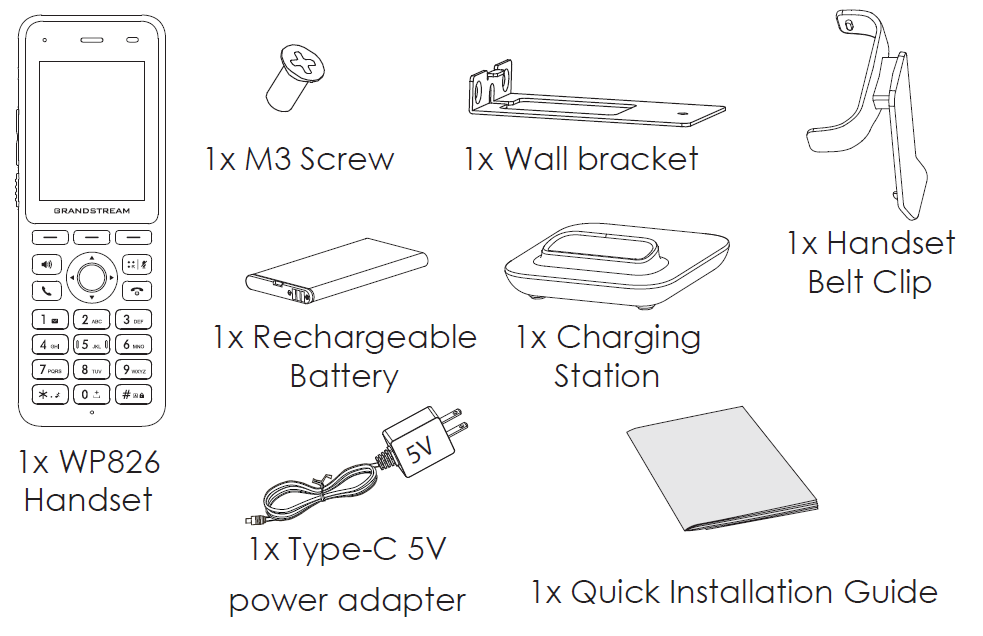
- WP826
WP826 |
|
WP826 Equipment Packaging
- WP836
WP836 |
|
WP836 Equipment Packaging

Setting up the Phone
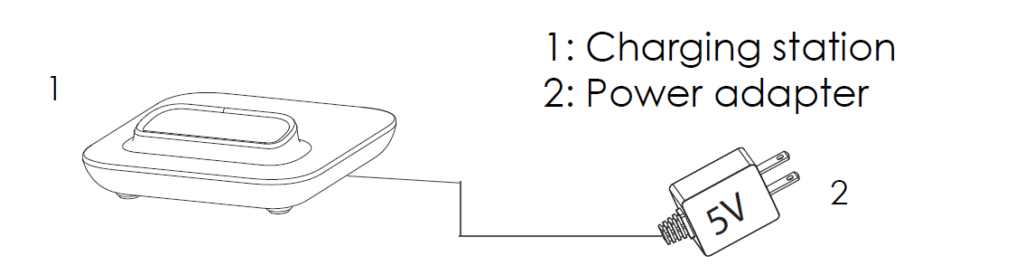
Charging Station
Plug the power adapter into a power source socket to start using the charging station.
Handset
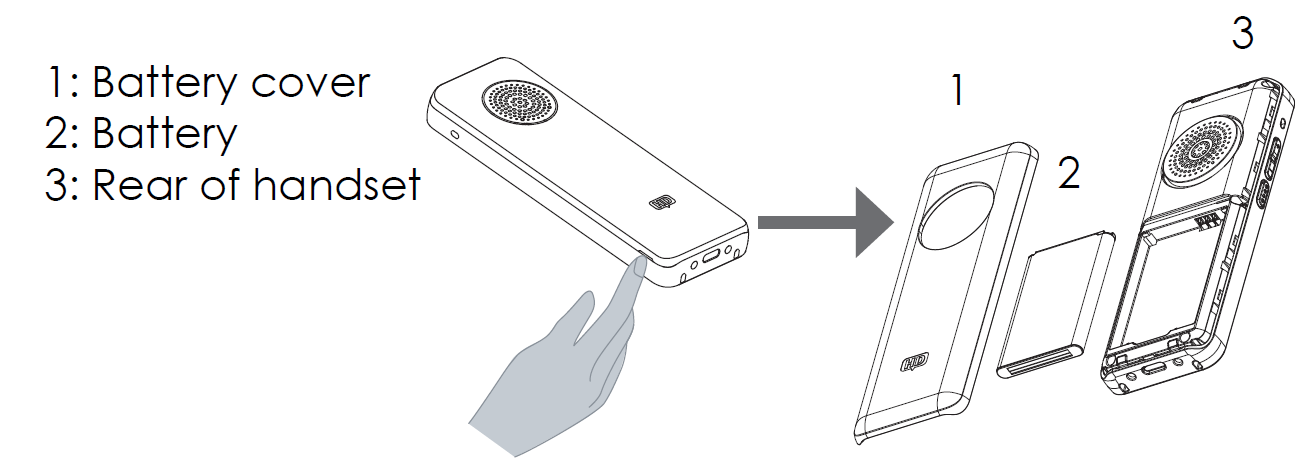
Please refer to the following steps to setup your WP8x6 phone:
- Open the battery cover from the opening port. Remove the battery door for WP836.
- Insert the battery with the electrodes in the top right corner for WP816, and top left corner for WP826/WP836.
- Close the battery cover, after inserting the battery door for WP836.
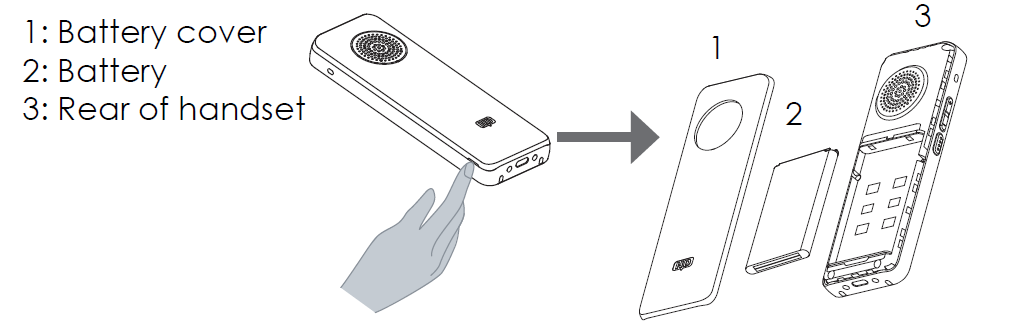

Battery Information
WP816
- Technology: Rechargeable Li-ion Battery
- Capacity: 1500mAh
- Standby time: up to 120 hours (laboratory data)
- Talk time: up to 6 hours of active talk time (laboratory data)
WP826
- Technology: Rechargeable Li-ion Battery
- Capacity: 3000mAh
- Standby time: up to 240 hours (laboratory data)
- Talk time: up to 12 hours of active talk time (laboratory data)
WP836
- Technology: Rechargeable Li-ion Battery
- Capacity: 3000mAh
- Standby time: up to 240 hours (laboratory data)
- Talk time: up to 10 hours of active talk time (laboratory data)
To get the best performance of your WP8x6, we recommend using the original battery provided in the package. The specifications may differ depending on the age and capacity of the battery used.
Handset Keys Description
The WP8x6 Wireless IP phone enhances communication and combines usability and scalability in industries such as warehousing, catering, and retail as well as in factory settings. The following screenshot describes the handset LCD screen and the main hardware components.
- WP816
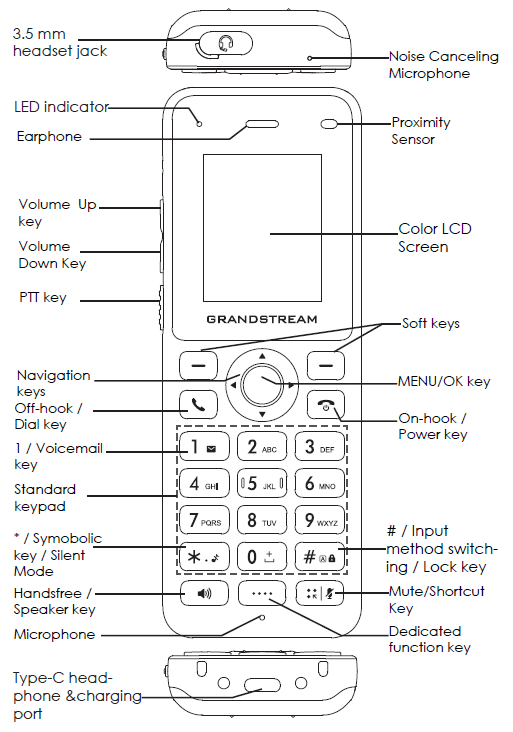
The following table describes the WP816 keypad keys.
Key | Description |
3.5 mm headset jack | This port allows you to connect headphones or external speakers to the phone for audio output. |
LED indicator | A small light that provides visual notifications for various events like incoming calls, messages, or charging status. |
Earphone | Delivers audio output. |
Volume Up key | A button used to increase the volume of audio output. |
Volume Down Key | A button used to decrease the volume of audio output |
PTT Key | PTT (Push-to-Talk) button, to initiate PTT call. This button can also be configured to trigger Alarm. |
Navigation keys | Buttons used to navigate through menus, apps, and interfaces. |
Off-hook / Dial key | Initiates or answers calls when pressed, and also used to dial numbers when making outgoing calls. |
1 / Voicemail key | Long pressing this key initiates a call to your voicemail service, allowing you to check for new messages or manage voicemail settings. |
Standard keypad | A grid of numeric keys used for dialing phone numbers, entering text, and navigating through menus by inputting numbers or letters associated with options. |
* / Symobolic key / Silent Mode | This key is used to toggle the phone’s silent mode on and off, muting all incoming call and message notifications. |
Handsfree / Speaker key | Pressing this key enables the phone’s speakerphone function, allowing for hands-free communication during calls. |
Microphone | Picks up audio earpiece and hands-free calls |
Type-C headphone &charging port | This port serves a dual purpose, allowing you to connect Type-C headphones for audio output and charging the phone using a compatible Type-C cable. |
Dedicated function key | This button is assigned a specific function or shortcut, such as launching a specific app, activating a feature, or performing a predefined action. |
Mute/Shortcut Key | A button that quickly silences incoming calls or notifications when pressed, and may also be customizable to serve as a shortcut for accessing frequently used features. |
# / Input method switching / Lock key | Does one of the following:
|
On-hook /Power key | This key serves a dual purpose, ending calls or switching off the phone when pressed for a longer duration, and turning on the phone or waking it from sleep mode when pressed briefly. |
MENU/OK key | This key serves a dual purpose, opening the menu interface or confirming selections, such as when navigating through apps or options. |
Softkeys | Correspond to functions displayed on the LCD. These functions change depending on the current context. |
Color LCD Screen | 1.77 inch (128×160) IPS color LCD screen |
Proximity sensor | The proximity sensor detects when the phone is close to the caller’s face, turning off the display to prevent accidental touches and save battery life. |
Noise Canceling Microphone | A microphone equipped with technology to reduce background noise, resulting in clearer audio during calls by minimizing unwanted sounds from the surrounding environment. |
WP816 keypad keys Description
- WP826
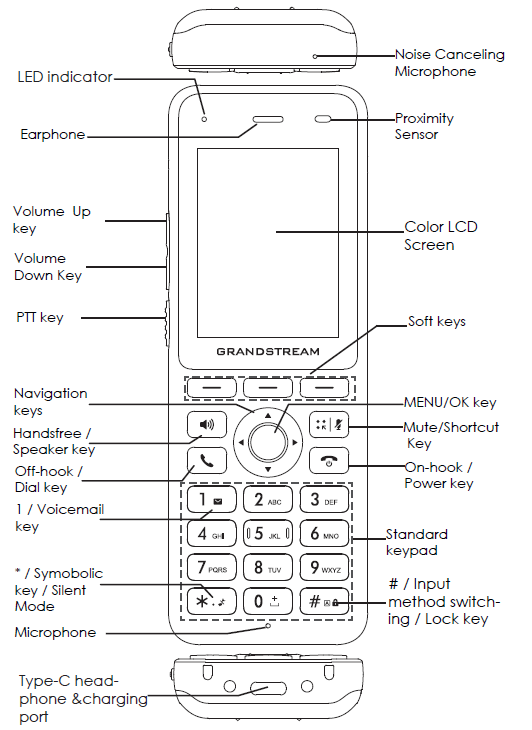
The following table describes the WP826 keypad keys.
Key | Description |
LED indicator | A small light that provides visual notifications for various events like incoming calls, messages, or charging status. |
Earphone | Delivers audio output. |
Volume Up key | A button used to increase the volume of audio output. |
Volume Down Key | A button used to decrease the volume of audio output |
PTT Key | PTT (Push-to-Talk) button, to initiate PTT call. This button can also be configured to trigger Alarm. |
Navigation keys | Buttons used to navigate through menus, apps, and interfaces. |
Off-hook / Dial key | Initiates or answers calls when pressed, and also used to dial numbers when making outgoing calls. |
1 / Voicemail key | Long pressing this key initiates a call to your voicemail service, allowing you to check for new messages or manage voicemail settings. |
Standard keypad | A grid of numeric keys used for dialing phone numbers, entering text, and navigating through menus by inputting numbers or letters associated with options. |
* / Symobolic key / Silent Mode | This key is used to toggle the phone’s silent mode on and off, muting all incoming call and message notifications. |
Handsfree / Speaker key | Pressing this key enables the phone’s speakerphone function, allowing for hands-free communication during calls. |
Microphone | Picks up audio earpiece and hands-free calls |
Type-C headphone &charging port | This port serves a dual purpose, allowing you to connect Type-C headphones for audio output and charging the phone using a compatible Type-C cable. |
Softkeys | These buttons are assigned a specific function or shortcut, such as launching a specific app, activating a feature, or performing a predefined action. |
Mute/Shortcut Key | A button that quickly silences incoming calls or notifications when pressed, and may also be customizable to serve as a shortcut for accessing frequently used features. |
# / Input method switching / Lock key | Does one of the following:
|
On-hook /Power key | This key serves a dual purpose, ending calls or switching off the phone when pressed for a longer duration, and turning on the phone or waking it from sleep mode when pressed briefly. |
MENU/OK key | This key serves a dual purpose, opening the menu interface or confirming selections, such as when navigating through apps or options. |
Softkeys | Correspond to functions displayed on the LCD. These functions change depending on the current context. |
Color LCD Screen | 2.4 inch (240×320) IPS color LCD screen |
Proximity sensor | The proximity sensor can detect when the phone is close to the caller’s face, turning off the display to prevent accidental touches and save battery life. |
Noise Canceling Microphone | A microphone equipped with technology to reduce background noise, resulting in clearer audio during calls by minimizing unwanted sounds from the surrounding environment. |
WP826 keypad keys
- WP836

The following table describes the WP836 keypad keys.
Key | Description |
LED indicator | A small light that provides visual notifications for various events like incoming calls, messages, or charging status. |
Earphone | Delivers audio output. |
Volume Up key | A button used to increase the volume of audio output. |
Volume Down Key | A button used to decrease the volume of audio output |
PTT Key | PTT (Push-to-Talk) button, to initiate PTT call. This button can also be configured to trigger Alarm. |
Navigation keys | Buttons used to navigate through menus, apps, and interfaces. |
Off-hook / Dial key | Initiates or answers calls when pressed, and also used to dial numbers when making outgoing calls. |
1 / Voicemail key | Long pressing this key initiates a call to your voicemail service, allowing you to check for new messages or manage voicemail settings. |
Standard keypad | A grid of numeric keys used for dialing phone numbers, entering text, and navigating through menus by inputting numbers or letters associated with options. |
* / Symobolic key / Silent Mode | This key is used to toggle the phone’s silent mode on and off, muting all incoming call and message notifications. |
Handsfree / Speaker key | Pressing this key enables the phone’s speakerphone function, allowing for hands-free communication during calls. |
Microphone | Picks up audio earpiece and hands-free calls |
Type-C headphone &charging port | This port serves a dual purpose, allowing you to connect Type-C headphones for audio output and charging the phone using a compatible Type-C cable. |
Softkeys | These buttons are assigned a specific function or shortcut, such as launching a specific app, activating a feature, or performing a predefined action. |
Mute/Shortcut Key | A button that quickly silences incoming calls or notifications when pressed, and may also be customizable to serve as a shortcut for accessing frequently used features. |
# / Input method switching / Lock key | Does one of the following:
|
On-hook /Power key | This key serves a dual purpose, ending calls or switching off the phone when pressed for a longer duration, and turning on the phone or waking it from sleep mode when pressed briefly. |
MENU/OK key | This key serves a dual purpose, opening the menu interface or confirming selections, such as when navigating through apps or options. |
Softkeys | Correspond to functions displayed on the LCD. These functions change depending on the current context. |
Color LCD Screen | 2.8 inch (240×320) IPS color LCD screen |
Proximity sensor | The proximity sensor can detect when the phone is close to the caller’s face, turning off the display to prevent accidental touches and save battery life. |
Noise Canceling Microphone | A microphone equipped with technology to reduce background noise, resulting in clearer audio during calls by minimizing unwanted sounds from the surrounding environment. |
WP836 Keypad Keys
Icons Description
The following table contains a description of each icon that might be displayed on the screen of the WP8x6.
 | Battery status Charging | ||
 | Wi-Fi connected on 5G band | ||
 | Wi-Fi connected on 2.4G band | ||
   | Wi-Fi signal status for threshold alarm | ||
 | Outgoing Call notification | ||
 | Missed Call notification | ||
 | Rejected Call notification | ||
 | Incoming Call notification | ||
 | Auto-Answer feature enabled icon | ||
 | Mute enabled icon | ||
 | Silent mode enabled icon | ||
 | Warning icon | ||
 | DND enabled icon | ||
 | Bluetooth enabled icon | ||
 | Bluetooth connected icon | ||
 | Call connected through Bluetooth icon | ||
 | Call Forward Enabled |  | Call Forward Destination Number (shows up to 5 digits) |
 | Call on HD quality icon | ||
 | Call on Noise Shield | ||
 | Call on AI Noise Reduction | ||
 | Call on both Noise Shield and AI Noise Reduction | ||
 | Call in Recording Mode | ||
 | Contacts | ||
 | Instant Messages | ||
 | Call History | ||
 | Voice Mail | ||
 | Settings | ||
 | Status | ||
Icons Description
LED Status
Red Fast Flashing | Upgrading |
Green Slow Flashing | Incoming call |
Green Solid | Charging (full) |
Red Slow Flashing | Missed call (s) |
New voicemail (s) | |
New SIP Message (s) | |
Red Solid | Network disconnected |
LED OFF | Normal |
WP8x6 LED Status
Handset Menu
The handset has an easy-to-use menu structure. Every menu opens a list of options. To open the main menu, unlock the handset first and press “Menu” (softkey in the middle). Press the Arrow keys to navigate to the menu option you require. Then press “Select” (left softkey) or OK/Selection key to access further options or confirm the setting displayed. To go to the previous menu item, press “Back” (right softkey). You can press the Power key at any time to cancel and return to standby mode.
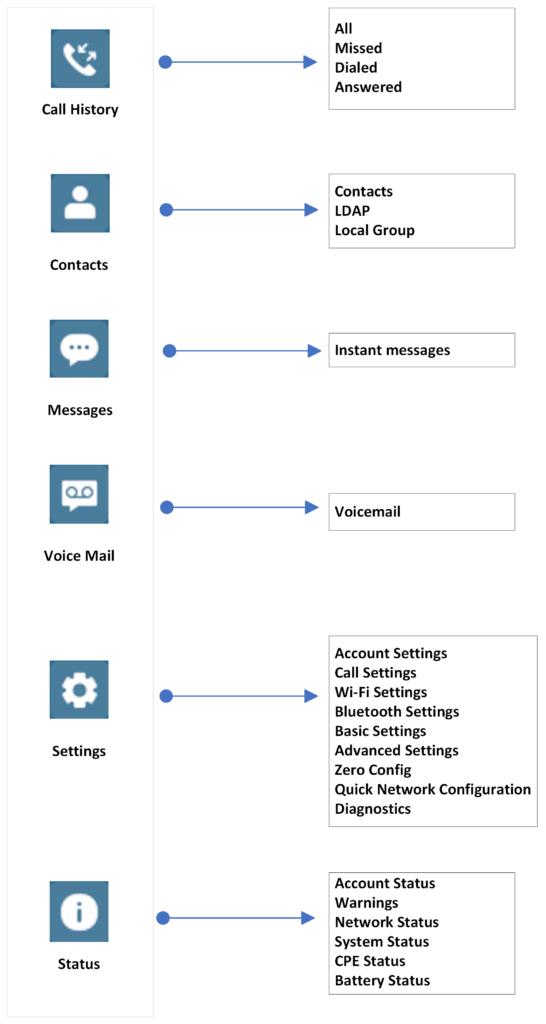
Call History | Display the call history: Missed Calls, Answered Calls, Dialed Calls or All Calls. You can save dialed numbers on the call log to your contacts. |
Contacts | Display the list of the registered contacts and also the LDAP contacts and the local group contacts, with the ability of searching, adding or editing the entries and also deleting the selected contacts. |
Messages | With message, you can send a message by pressing “New ”, then write a message of up to 200 characters to another device or check the received ones. |
Voice Mail | This option alows to view the recieved voicemails with both categories, Normal and Urgent , of both accounts of the WP phone.
|
Settings |
|
Status |
|
Handset Menu
Keypad
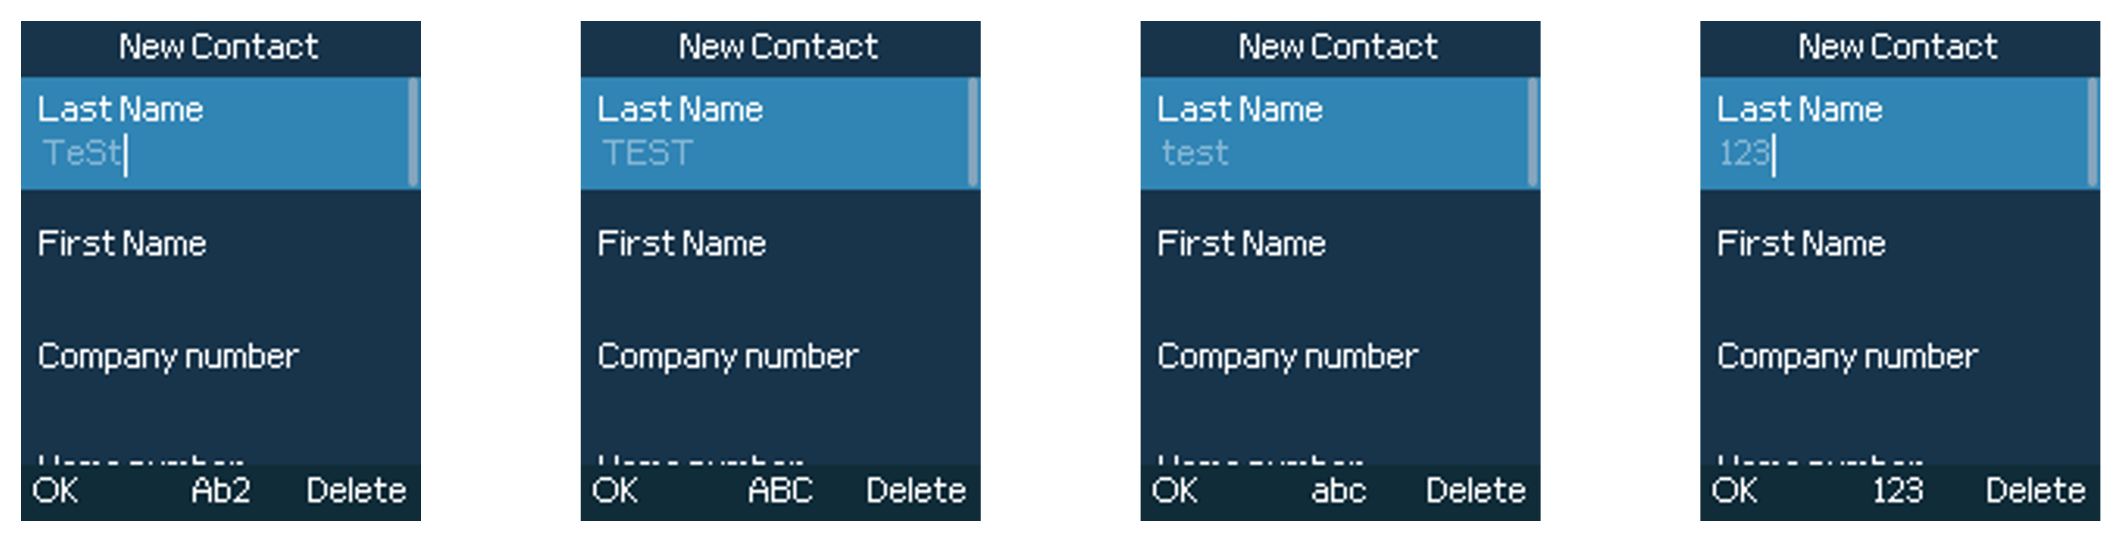
The WP8x6 keypad can be used by tapping on an input field. The keypad has 4 modes “Ab2”, “ABC”, “abc” and “123”. The default mode is “Ab2”.
- “Ab2” Mode:
This mode allows you to enter capital letters, small letters, digits, and symbolic characters.
The following table describes the allowed characters for each key.
| Key | Description | Key | Description | Key | Description |
1 | . , ’ ? ! ” – 1 | 2 | A B C a b c 2 | 3 | D E F d e f 3 |
4 | G H I g h i 4 | 5 | J K L j k l 5 | 6 | M N O m n o 6 |
7 | P Q R S p q r s 7 | 8 | T U V t u v 8 | 9 | W X Y Z w x y z 9 |
* | . , ‘ ? ! “ – ( ) @ / : _ ; + % * = < > $ [ ] { } ~ ^ # | ` & | 0 | Space | # | Switch mode |
- “ABC” Mode:
This mode allows you to enter capital letters, digits, and symbolic characters.
The following table describes the allowed characters for each key.
| Key | Description | Key | Description | Key | Description |
1 | . , ’ ? ! ” – 1 | 2 | A B C 2 | 3 | D E F 3 |
4 | G H I 4 | 5 | J K L 5 | 6 | M N O 6 |
7 | P Q R S 7 | 8 | T U V 8 | 9 | W X Y Z 9 |
* | . , ‘ ? ! “ – ( ) @ / : _ ; + % * = < > $ [ ] { } ~ ^ # | ` & | 0 | Space | # | Switch mode |
- “abc” Mode:
This mode allows you to enter small letters, digits, and symbolic characters.
The following table describes the allowed characters for each key.
| Key | Description | Key | Description | Key | Description |
1 | . , ’ ? ! ” – 1 | 2 | a b c 2 | 3 | d e f 3 |
4 | g h i 4 | 5 | j k l 5 | 6 | m n o 6 |
7 | p q r s 7 | 8 | t u v 8 | 9 | w x y z 9 |
* | . , ‘ ? ! “ – ( ) @ / : _ ; + % * = < > $ [ ] { } ~ ^ # | ` & | 0 | Space | # | Switch mode |
- “123” Mode:
This mode allows you to enter digits only.
The following table describes the allowed characters for each key.
| Key | Description | Key | Description | Key | Description |
1 | 1 | 2 | 2 | 3 | 3 |
4 | 4 | 5 | 5 | 6 | 6 |
7 | 7 | 8 | 8 | 9 | 9 |
* | . | 0 | 0 | # | Switch mode |
Tips for using the keypad:
- To switch between the modes, users could press the # key.
- Press multiple times on the same key to move forward between the allowed characters.
- Use the Right/Left arrow keys to change the cursor’s position on the text entered.
- For languages that support letters with accents, the handset now supports typing letters with accents on modes “AB3”, “abc”, and “ABC”.
Numeric Keys Configuration:
Users can also leverage the numeric keys and assign them different functions by directly pressing the key for 3 seconds and selecting the Mode and Value. The supported modes are : Speed Dial, Speed Dial via Active Account, Dial DTMF, Call Voicemail, Call Return, LDAP Search, History, INFO, Messages, DND, Redial, Open Door, Provision, HTTP Command, Send Message.
Below is an example of configuring the Number 2 key for Speed Dialing the extension 4006.

WEB GUI ACCESS CONFIGURATION
The WP8x6 can be configured using:
- The embedded Web GUI on the handset via PC’s web browser.
- LCD Configuration Menu using the WP8x6 keypad.
Configuration via Web Browser
The WP8x6 embedded Web server responds to HTTP/HTTPS GET/POST requests. Embedded HTML pages allow a user to configure the handset through a Web browser such as Google Chrome, or Mozilla Firefox.
Accessing the Web UI
- Connect the computer to the same network as WP8x6.
- Make sure the handset is booted up and powered correctly.
- You may check the IP address on the phone LCD menu Status → Network Status.
- Open the Web browser on your computer and enter the WP8x6 IP address in the address bar of the browser.
- Enter the administrator’s username and password to access the Web Configuration Menu.
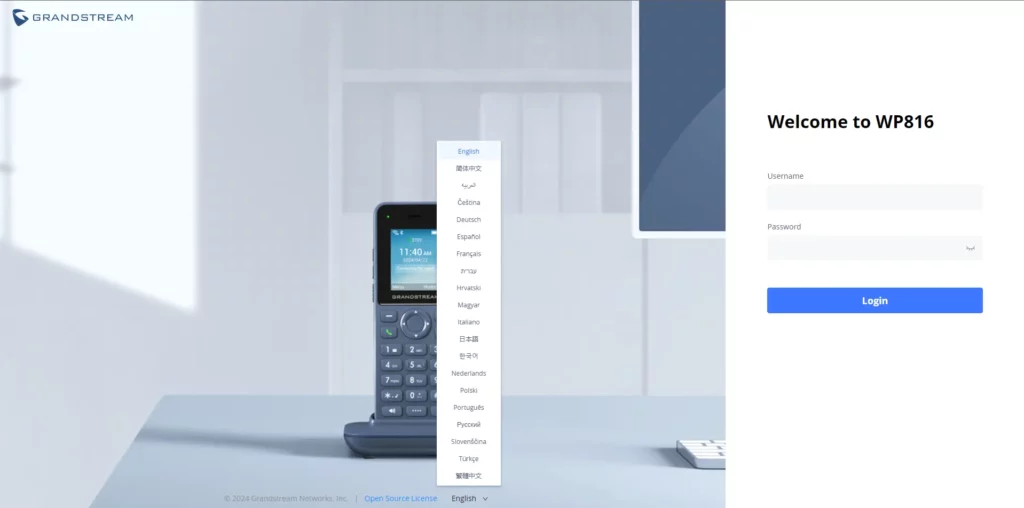
Web GUI Languages
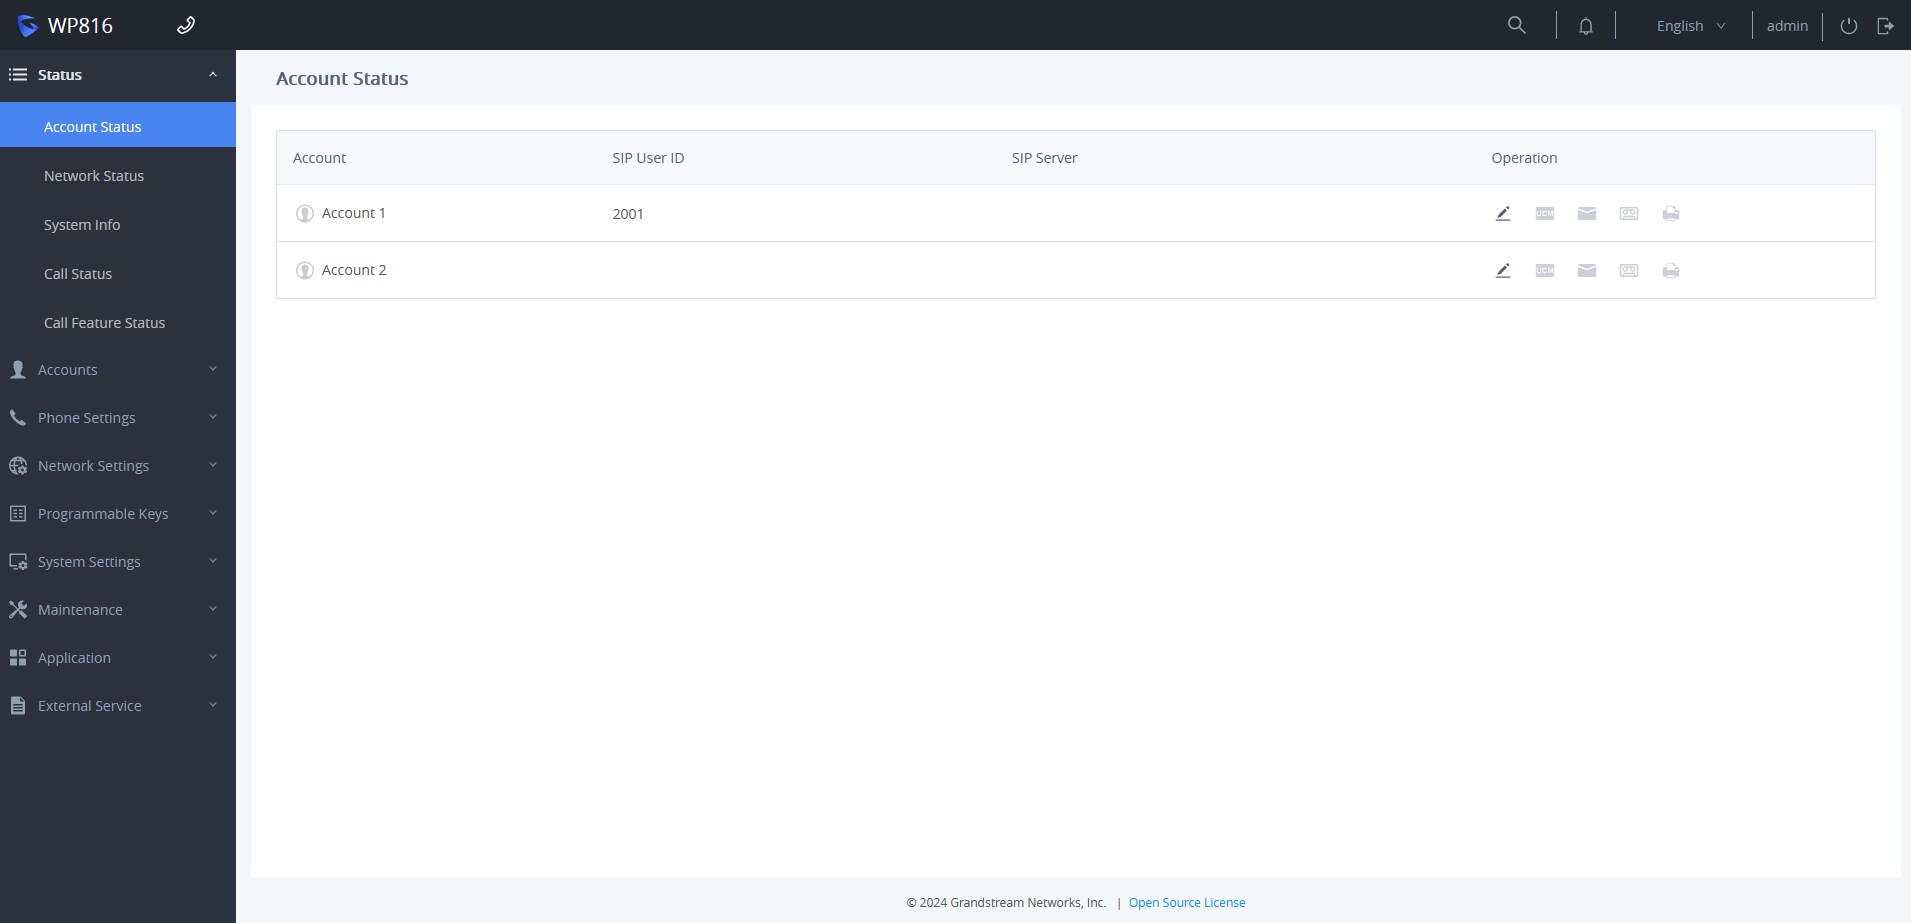
Users can select the language in the web GUI login page, or at the upper right of the web GUI after logging in.
Saving the Configuration Changes
When changing any settings, always submit them by pressing the Save and Apply buttons. If using the Save button, after making all the changes, click on the Apply button on top of the page to submit.
Web UI Access Level Management
There are two default passwords for the login page:
User Level | User Name | Password | Web Pages Allowed |
End User Level | user | 123 | Only Status, Phone Settings, System Settings, Maintenance and System Application with limited options. |
Administrator Level | admin | Random password generated after entering a numbers combination on the keypad | All pages |
Web UI Access Level
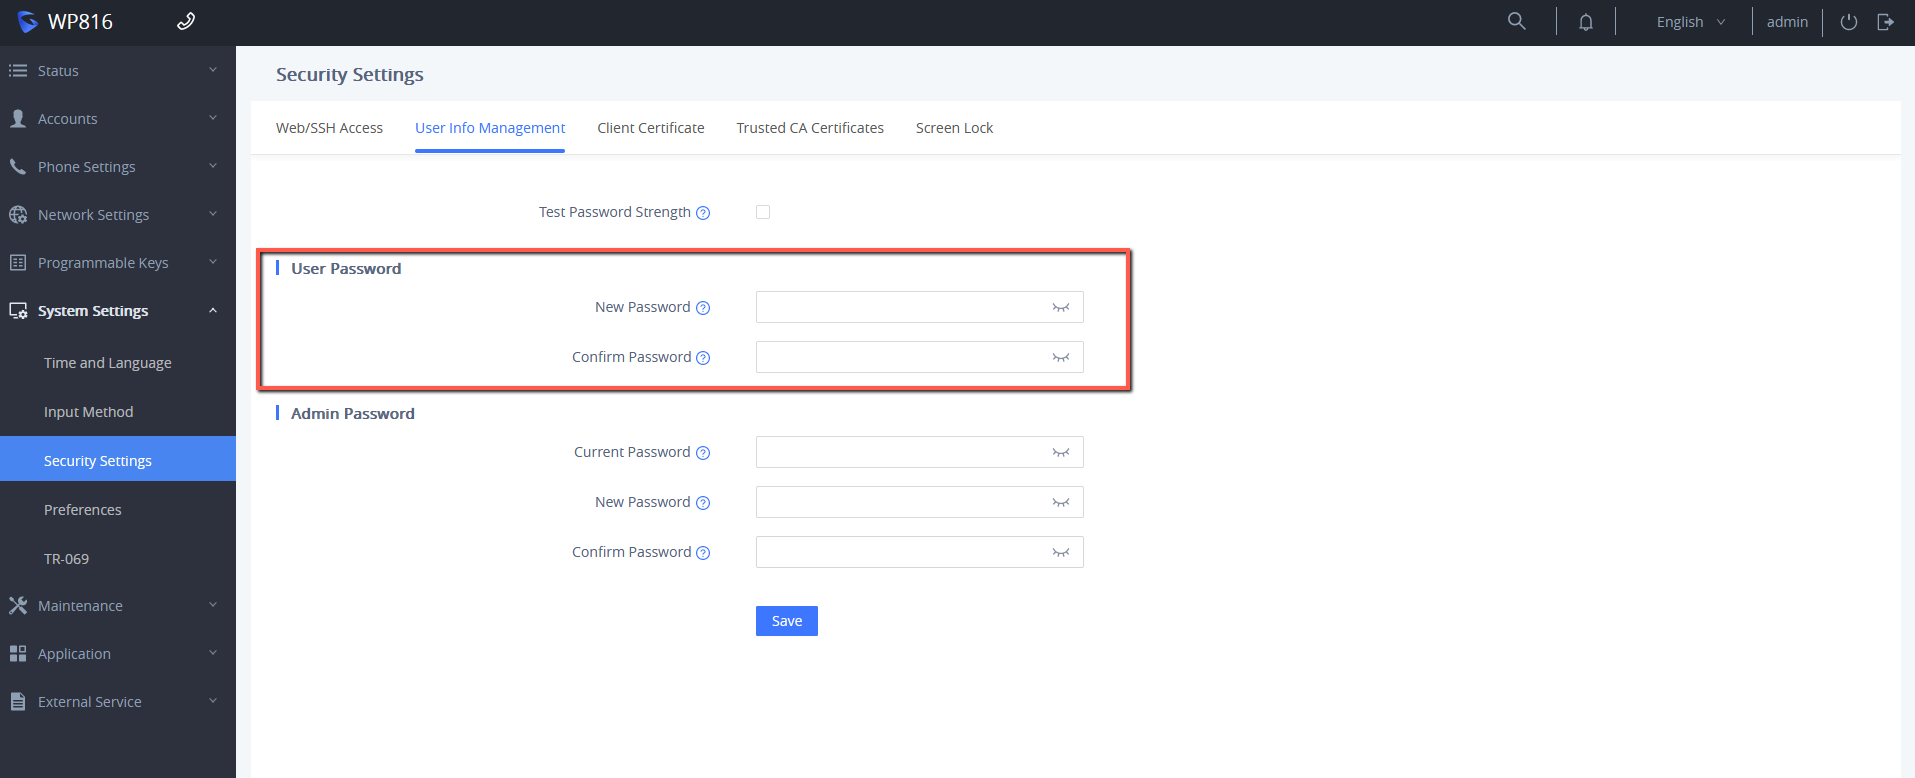
Changing User Level Password
- Access the Web GUI of your phone using the admin’s username and password.
- Press Login to access your settings.
- Go to System Settings → User Info Management.
- Locate User Password section:
- Type in your new user password in the New Password field.
- Type in again same entered password in the Confirm Password field.
- Press the Save button to save your new settings.
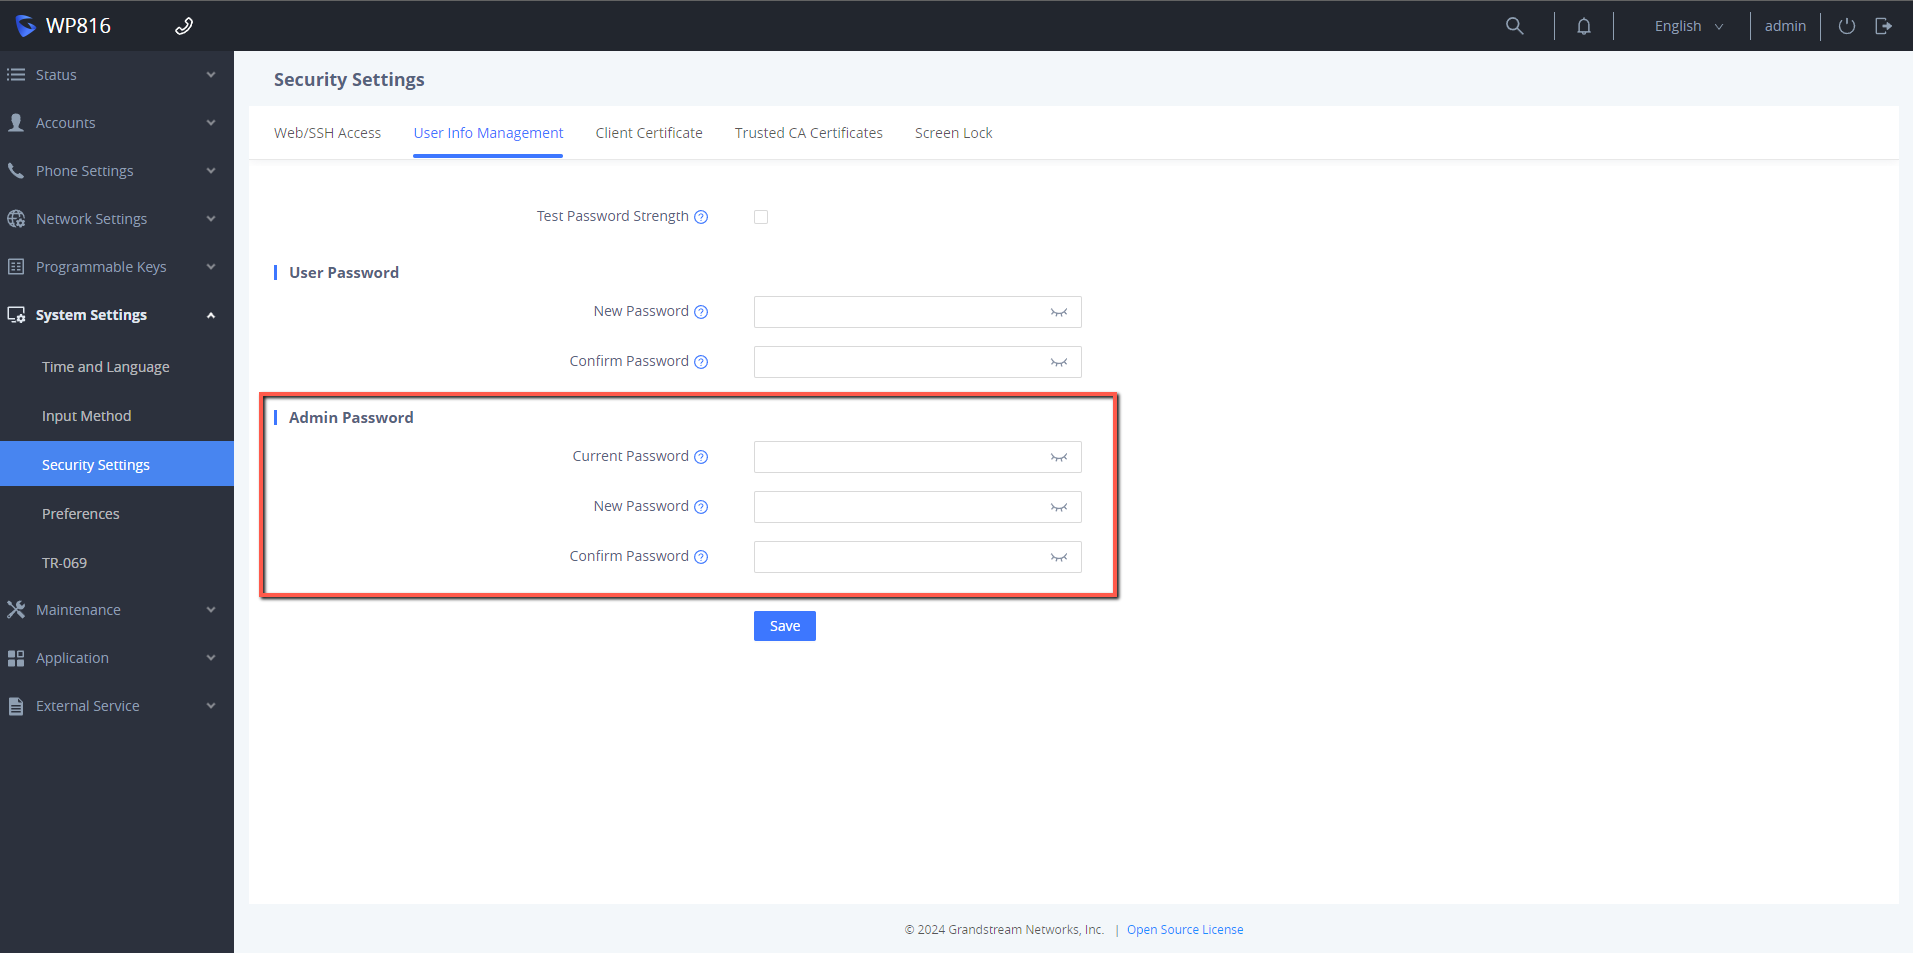
Changing Admin Level Password
- Access the Web GUI of your WP8x6 using the admin’s username and password. (Default username and password is admin/Random Password from the sticker on the back of the unit).
- Press Login to access your settings.
- Go to System Settings → User Info Management.
- Locate Admin Password section:
- Type in the admin password in the Current Password field
- Type in your new admin password in the New Password field.
- Type in again same entered password in the Confirm Password field.
- Press the Save button to save your new settings.
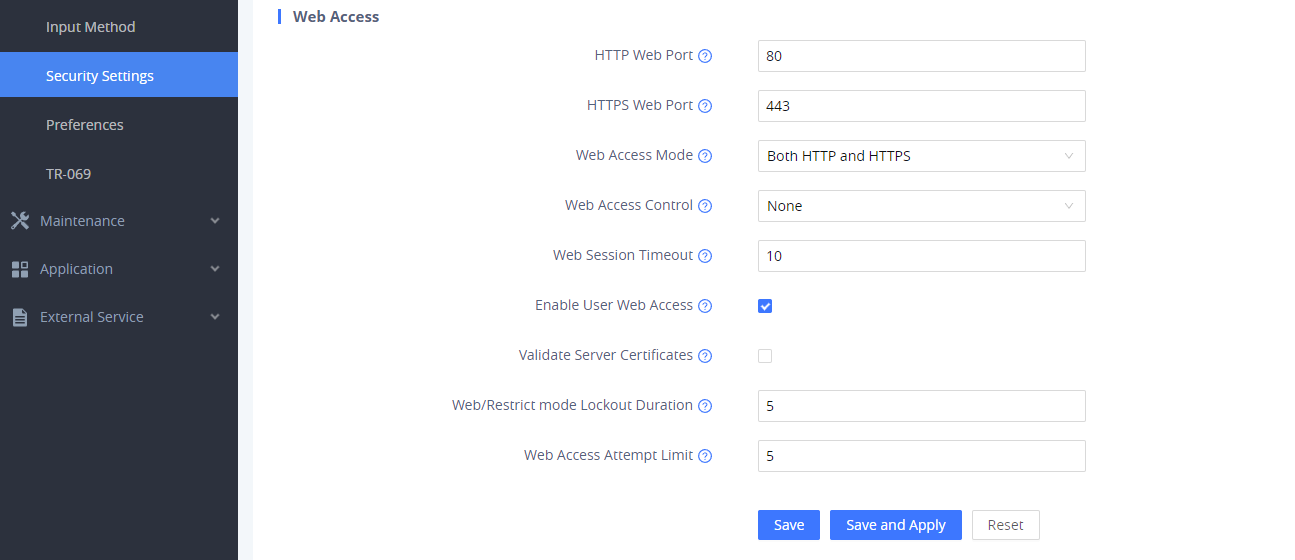
Changing HTTP/HTTPS Web Access Port
- Access the Web GUI of your handset using the admin’s username and password. (Default username and password are admin/random password from the sticker on the back of the unit.).
- Press Login to access your settings.
- Go to Security Settings → Web/SSH Access
- In Web Access Mode, select the access method depending on the desired protocol (HTTP, HTTPS, or Both)
- Locate HTTP / HTTPS Web Port field and change it to your desired/new HTTP / HTTPS port.
Note: By default, the HTTP port is 80 and HTTPS is 443. - Press Save button to save your new settings.
BASIC OPERATIONS
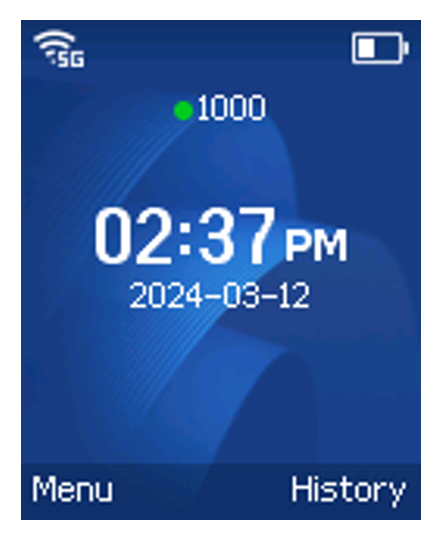
Home Screen
By default, the home screen will be empty but once an account has been registered it will display its extension as shown, in the screenshot below:
Turning the Handset ON/OFF
To turn ON the handset: Long press on Power key  until the LCD screen lights up.
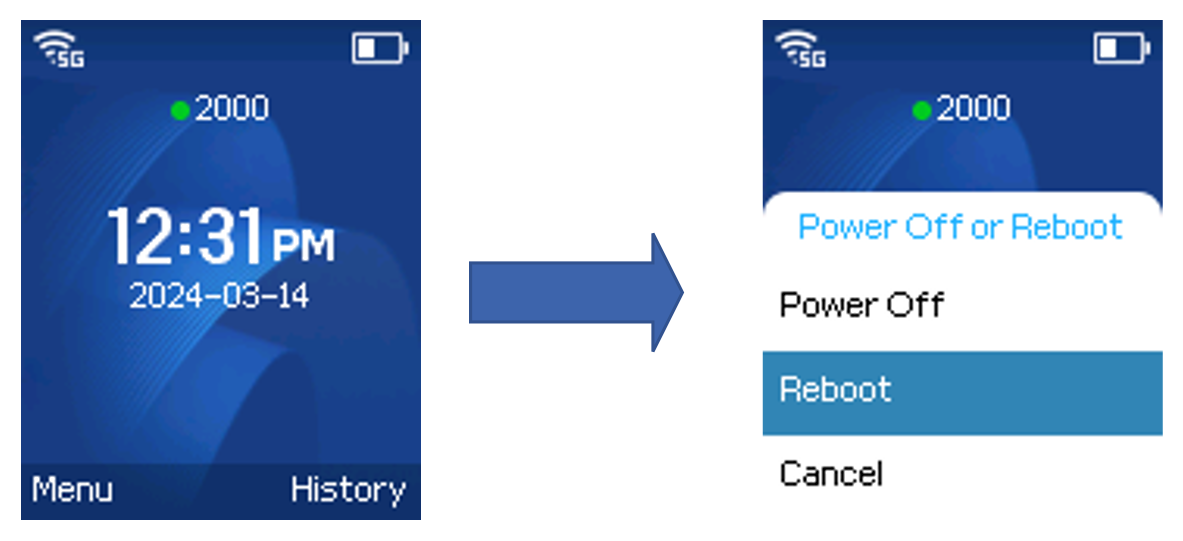
To turn OFF the handset: Long press on Power key again when the handset is idle and press the softkey to choose to power off or reboot.
Connecting to Bluetooth
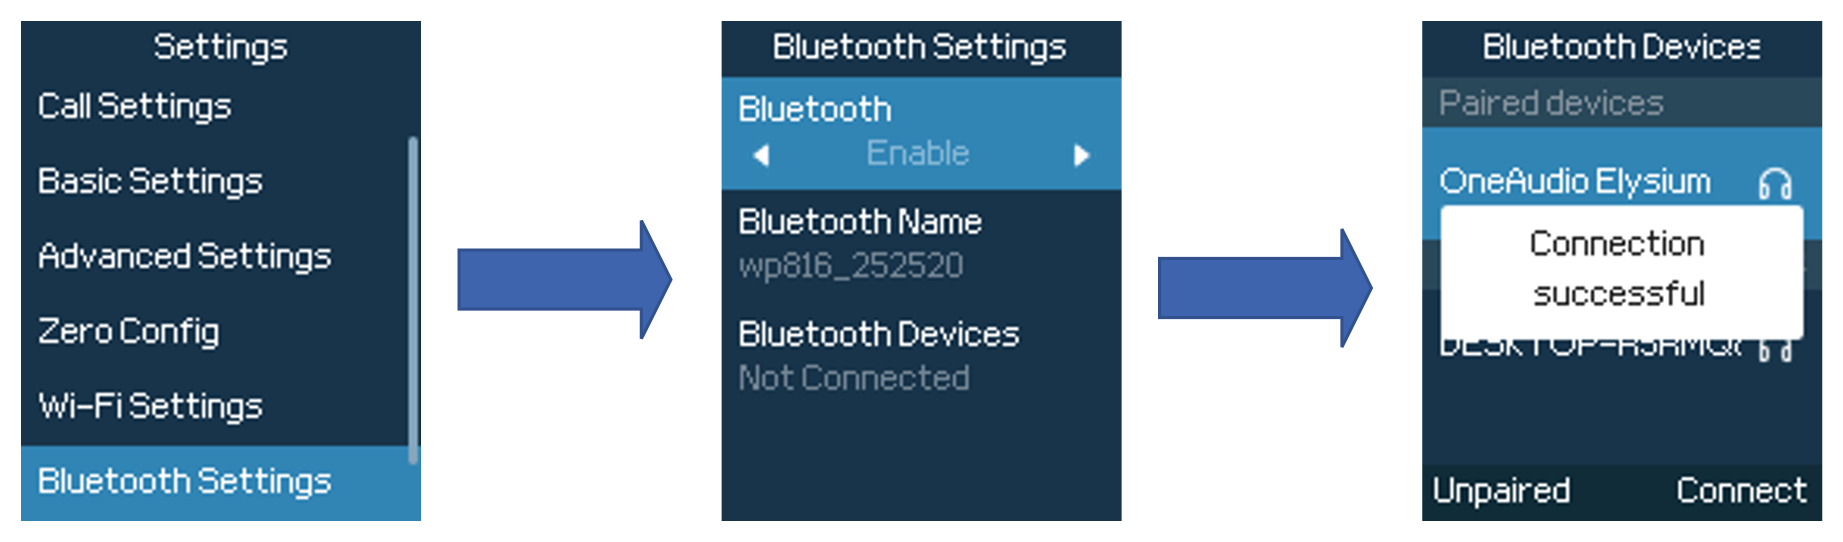
The WP8x6 supports Bluetooth. To connect the device to nearby equipment via Bluetooth, please follow the below steps:
- Go to Settings → Bluetooth Settings
- Enable Bluetooth service
- Discover nearby Bluetooth-enabled devices, and choose the device you want to connect to, then click “Connect”
- The WP8x6 will inform you of a successful Bluetooth pairing
Connecting to Wi-Fi Network
Auto Connection
Go under the web interface of the “Network Settings → Wi-Fi Settings”.
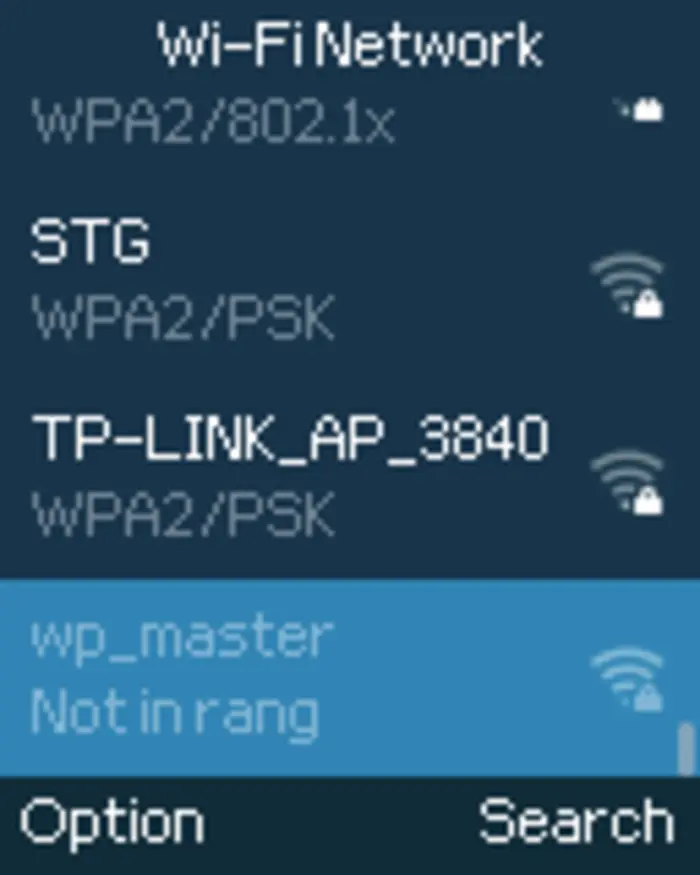
For example, the user can pre-configure the WP8x6 to automatically connect to the Wi-Fi network at the client site, making it easier for the client to use the phone without going through setting up manually the Wi-Fi network. Also, the client could have the SSID show as “not in range by default”, until the SSID is created on your access point and configured to have the following password “wp!987@dmin“. Then the phone will automatically connect to that SSID.
Manual connection
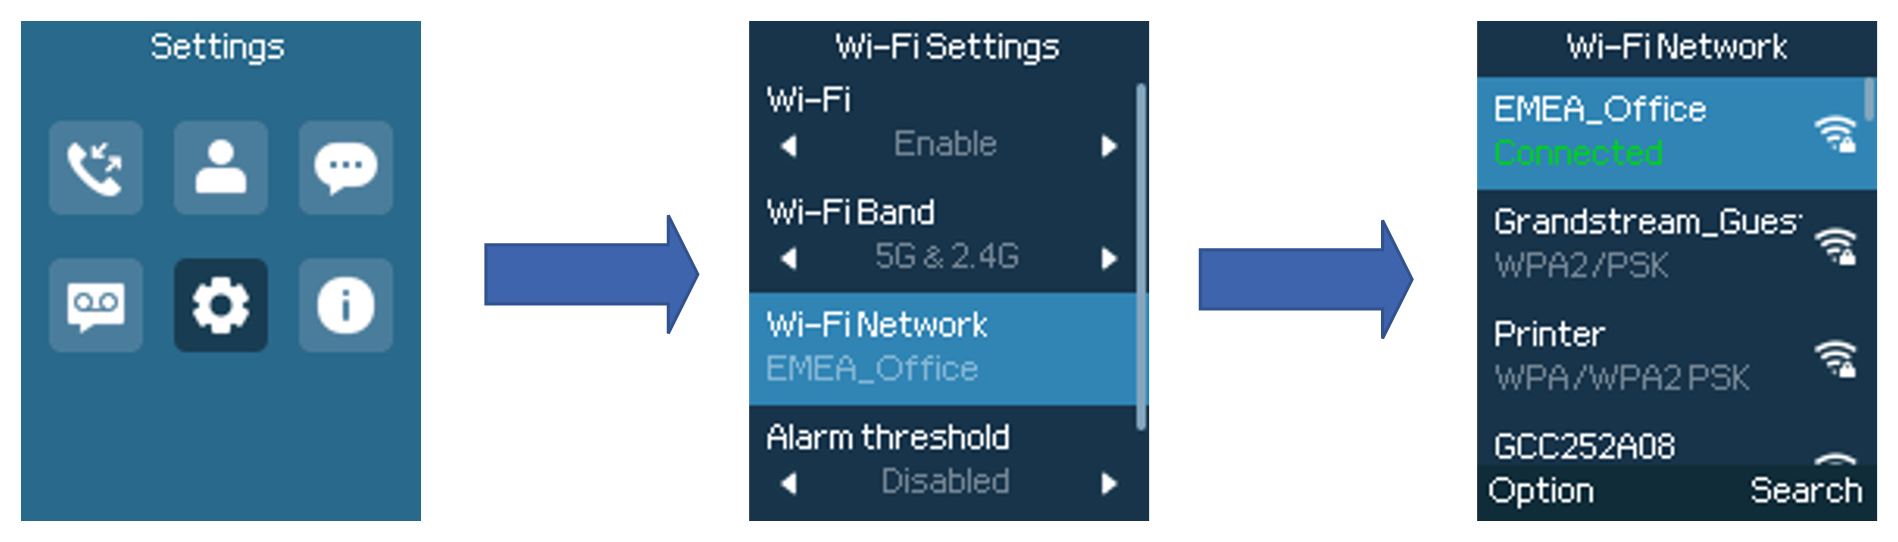
The WP8x6 supports dual-band 802.11a/b/g/n/ac Wi-Fi, please refer to the following steps to connect to the Wi-Fi networks:
- On the LCD menu, press the Menu key and navigate to Settings → Wi-Fi Settings.
- Navigate to “Wi-Fi Networks”. A list of Wi-Fi networks will be displayed.
- Select the desired network to connect to. (Enter the correct password to connect if requested)
The handset will display a Wi-Fi icon on the main LCD menu if the connection to the Wi-Fi network is successful.
Wi-Fi Band Configuration
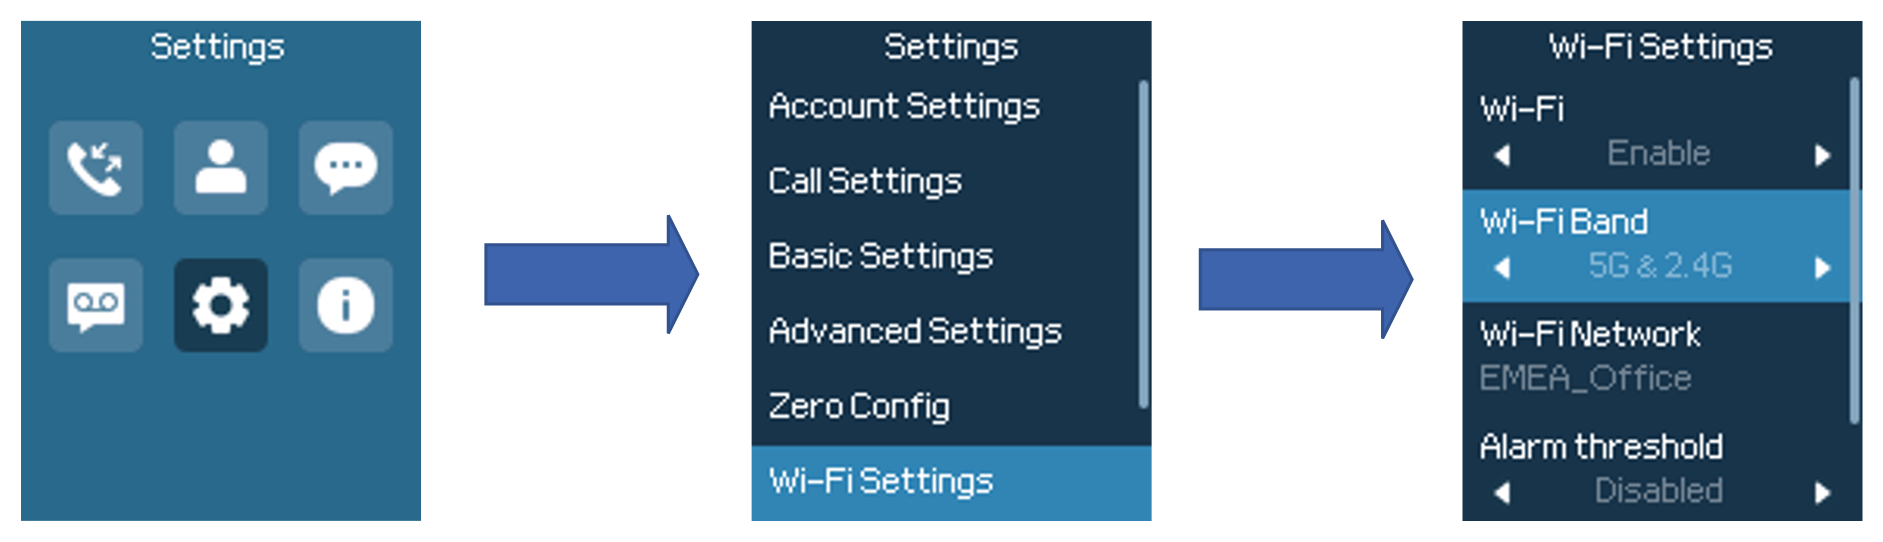
If 5GHz and 2.4GHz are both available, the handset will use 5GHz, but it may switch to 2.4GHz if the signal of 5GHz is poor. Users may also specify the Wi-Fi Band to fix it or to keep it Dual Band (Automatic) under Settings → Wi-Fi Settings → Wi-Fi Band.
CA Certificate Type
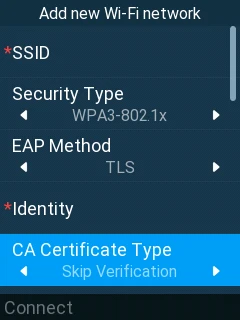
When configuring a new Wi-Fi network by navigating to Settings → Wi-Fi Settings → Wi-Fi Network, then pressing the Options softkey and selecting Add Network, the CA Certificate Type option will be displayed if the selected Security Mode is WPA-802.1X, WPA3-802.1X, or WPA3-192 with an EAP Method of EAP-TLS, EAP-PEAP, or EAP-TTLS.
The available options on the handset are:
- Skip Verification
- System Certificate
- Trust on First Use
Please refer to the CA Certificate Type Guide for more information on the configuration.
Wi-Fi Roaming
The WP8x6 is designed to support seamless roaming between multiple access points (APs) within the same network, helping maintain a stable connection while moving.

To configure roaming setting on the WP8x6 phone:
- Navigate to Menu → Settings → Wi-Fi Settings → Advanced Settings on the LCD screen.
- The following parameters can be configured directly from the handset:
- Warning Threshold: Define the signal level at which the device warns the user of a weakening connection.
- Roaming Threshold: Set the minimum signal strength (RSSI) required before the phone triggers a roam.
- Scan Interval: Configure how frequently the handset scans for better access points.
- Roaming Prompt: Enable or disable on-screen notifications and alert tones during roaming.
- Power-Saving: Adjust roaming behavior to optimize battery life.
- Roaming Mode: Choose between “Default Mode” or “Boost Mode” to control how aggressively the device switches between access points.
ICE Configuration
The ICE (Interactive Connectivity Establishment) feature enables the WP8x6 phone to establish media connections across different network environments by collecting and exchanging candidate addresses during call setup. ICE behavior is configured per account and operates according to the selected media NAT traversal settings and the configured STUN and TURN servers.
The feature supports different candidate collection modes, call fallback behavior, and encrypted media, depending on configuration and network conditions.
For more information on how the feature works, please visit the guide: WP8x6 ICE Configuration
WireGuard Client Configuration
The WireGuard feature enables a the WP8x6 to establish a secure VPN connection to a peer using configured keys, IP addressing, and routing parameters. Once connected, the device can route traffic through the VPN tunnel and reflect the WireGuard client address in system status and application to signal the connection according to the configured settings.
Please refer to the below guide for steps to configure the WP8x6 as WireGuard Client: WP8x6 WireGuard® Client Configuration
Quick Network Configuration
Quickly configure your Wi-Fi network on your phone using three convenient methods:
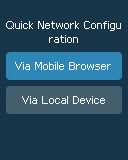
- Via Mobile Browser: Access the router’s settings page via any mobile browser by managing the router and connecting the WP8x6 to Wi-Fi for straightforward configuration.
- Via Local Device: Adjust Wi-Fi settings directly on the device through its settings menu, offering a simple, local solution for configuring network connections without the need for additional tools or apps.
Via Mobile Browser
You can connect the WP8x6 through your mobile browser, to do that:
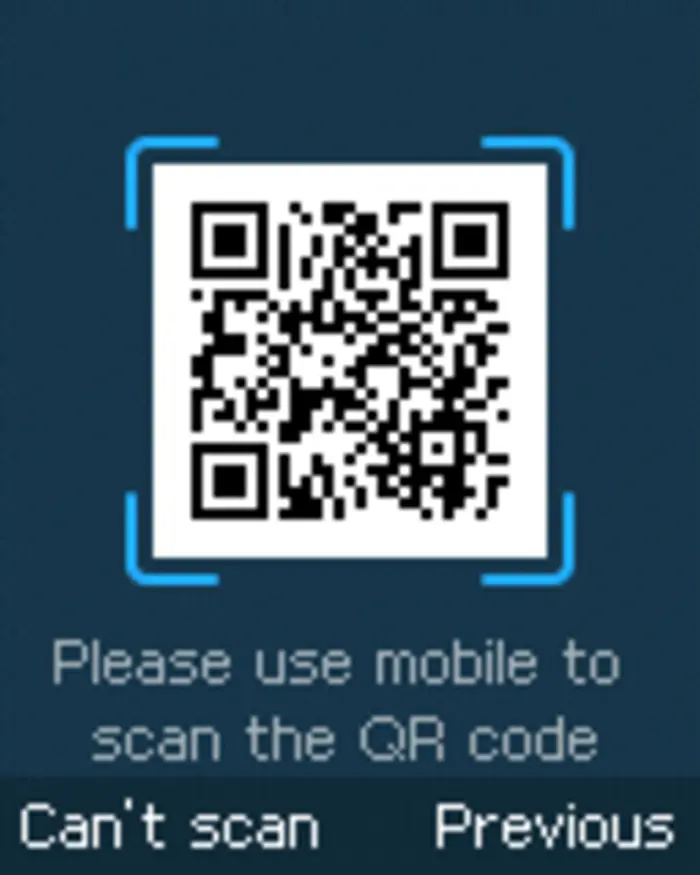
- Go Under Settings → Quick Network Configuration → Via Mobile Browser.
- Scan the QR code using your mobile device.
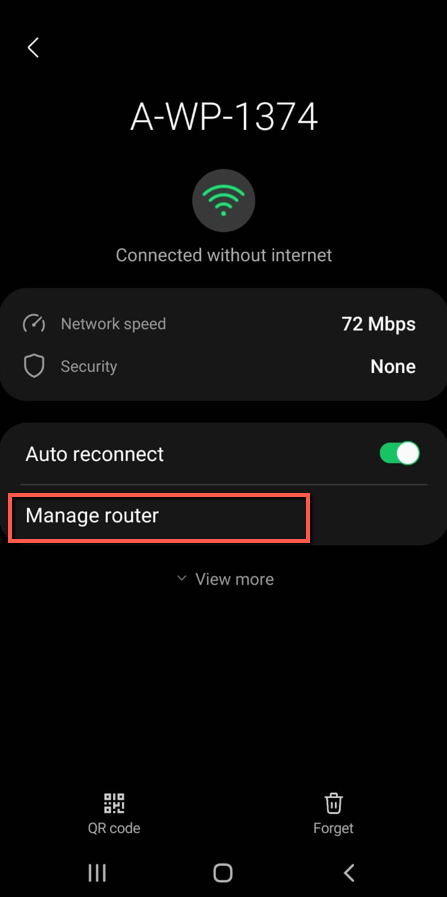
- Once scanned, it will redirect you to the page on your phone to manage router option
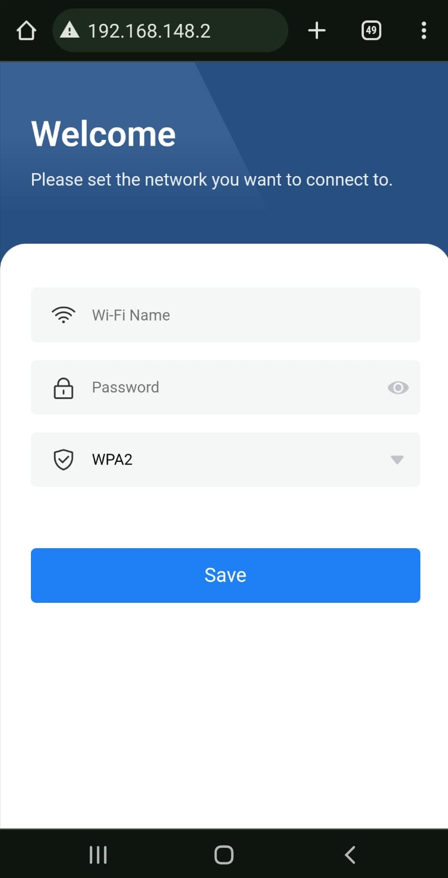
- From there you can connect the WP8x6 to a Wi-Fi Network. by entering the SSID name and password
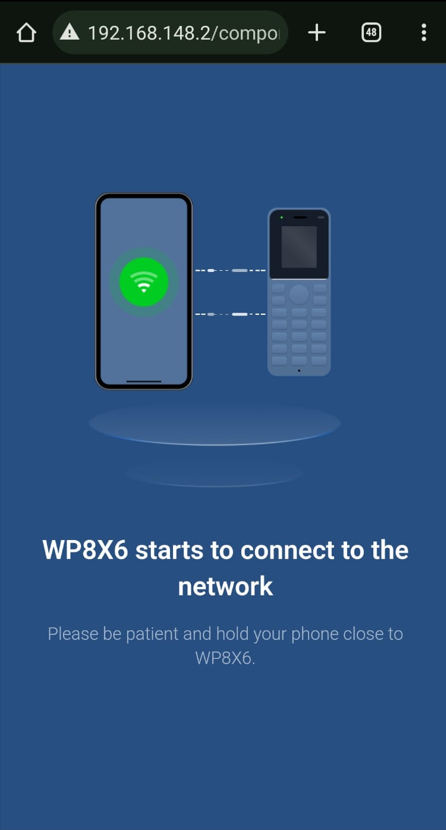
Via Local Device
Please refer to this section of the guide for detailed local device Wi-Fi connection [Manual connection]
Checking Status
General Info
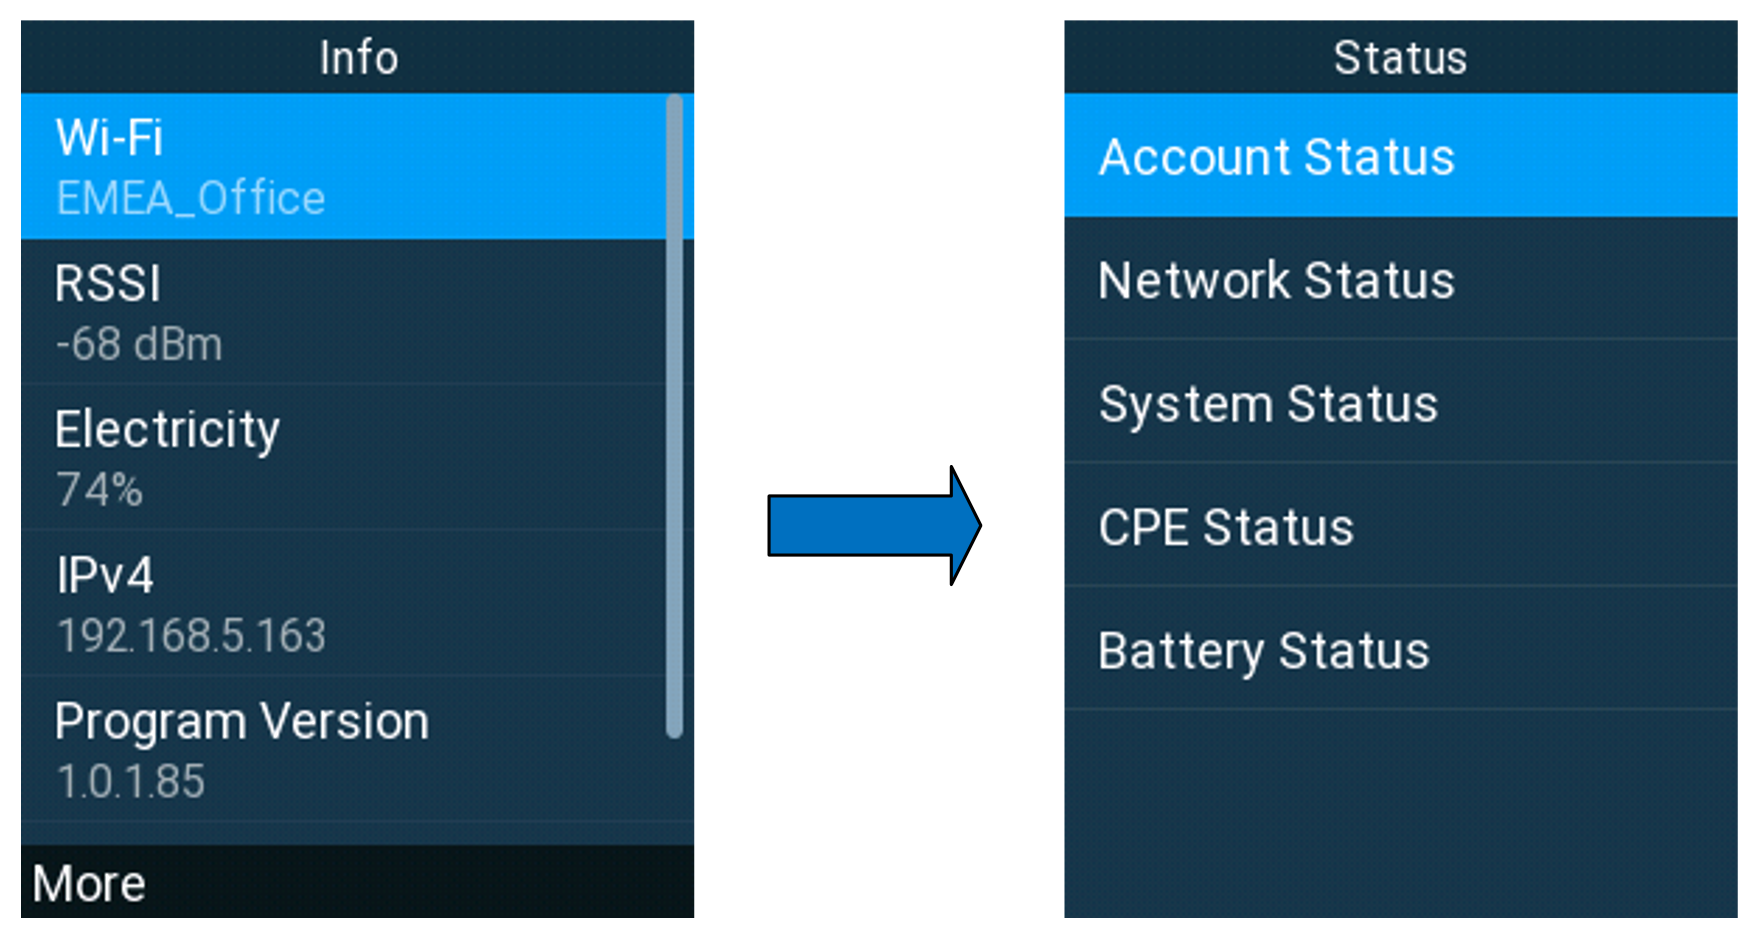
Users can view general information about the WP8x6 device by short pressing the UP navigation key. The display shows details such as network connection status, battery level, IP address, firmware version, and other device information.
Click More to view detailed status information individually.
Account Status
To check the SIP account status, follow these steps:
- Press the Menu key to bring up the operation menu.
- Use arrow keys to Reach Status menu and navigate to Account status.
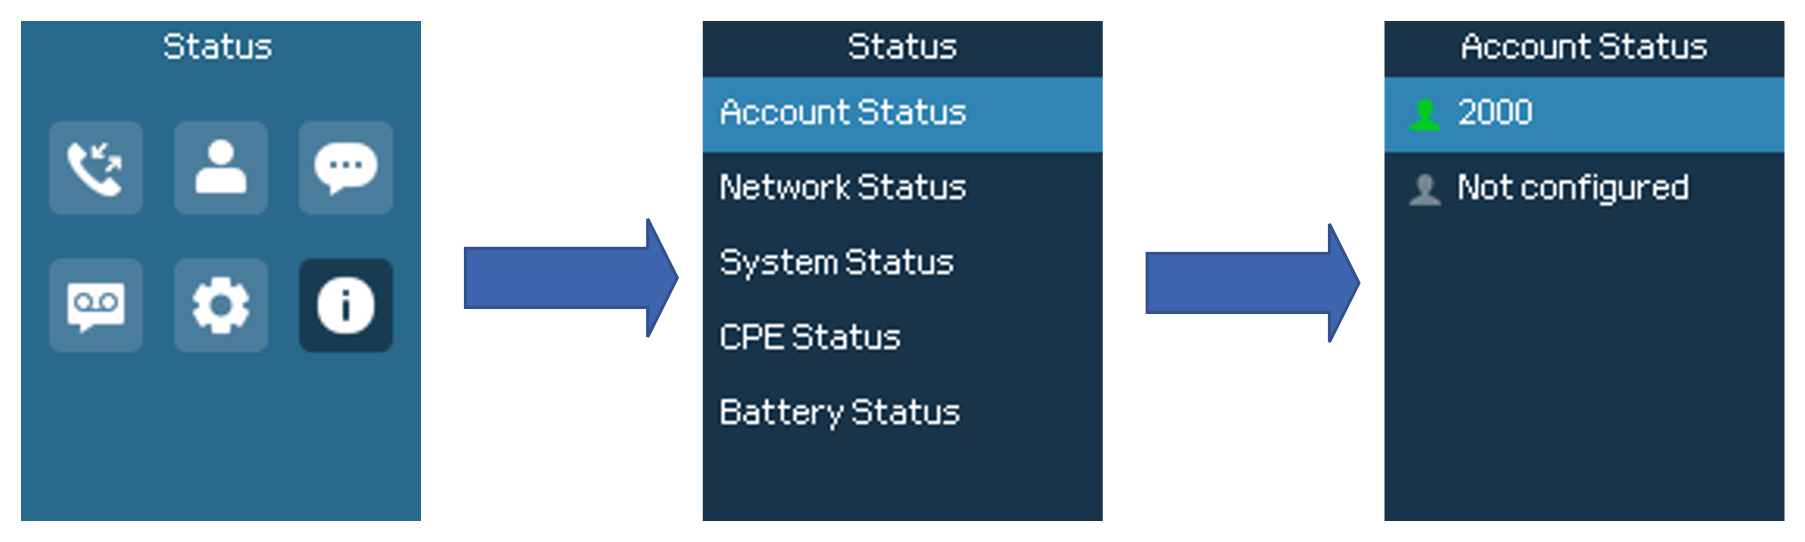
The following information will be displayed:
Item | Description |
Account 1 | Displays the information about the first account including name, number and the status of its registration. |
Account 2 | Displays the information about the second account including name, number and the status of its registration. |
Account 3 (WP826/WP836 Only) | Displays the information about the third account including name, number and the status of its registration. |
Account Status Description
Network Status
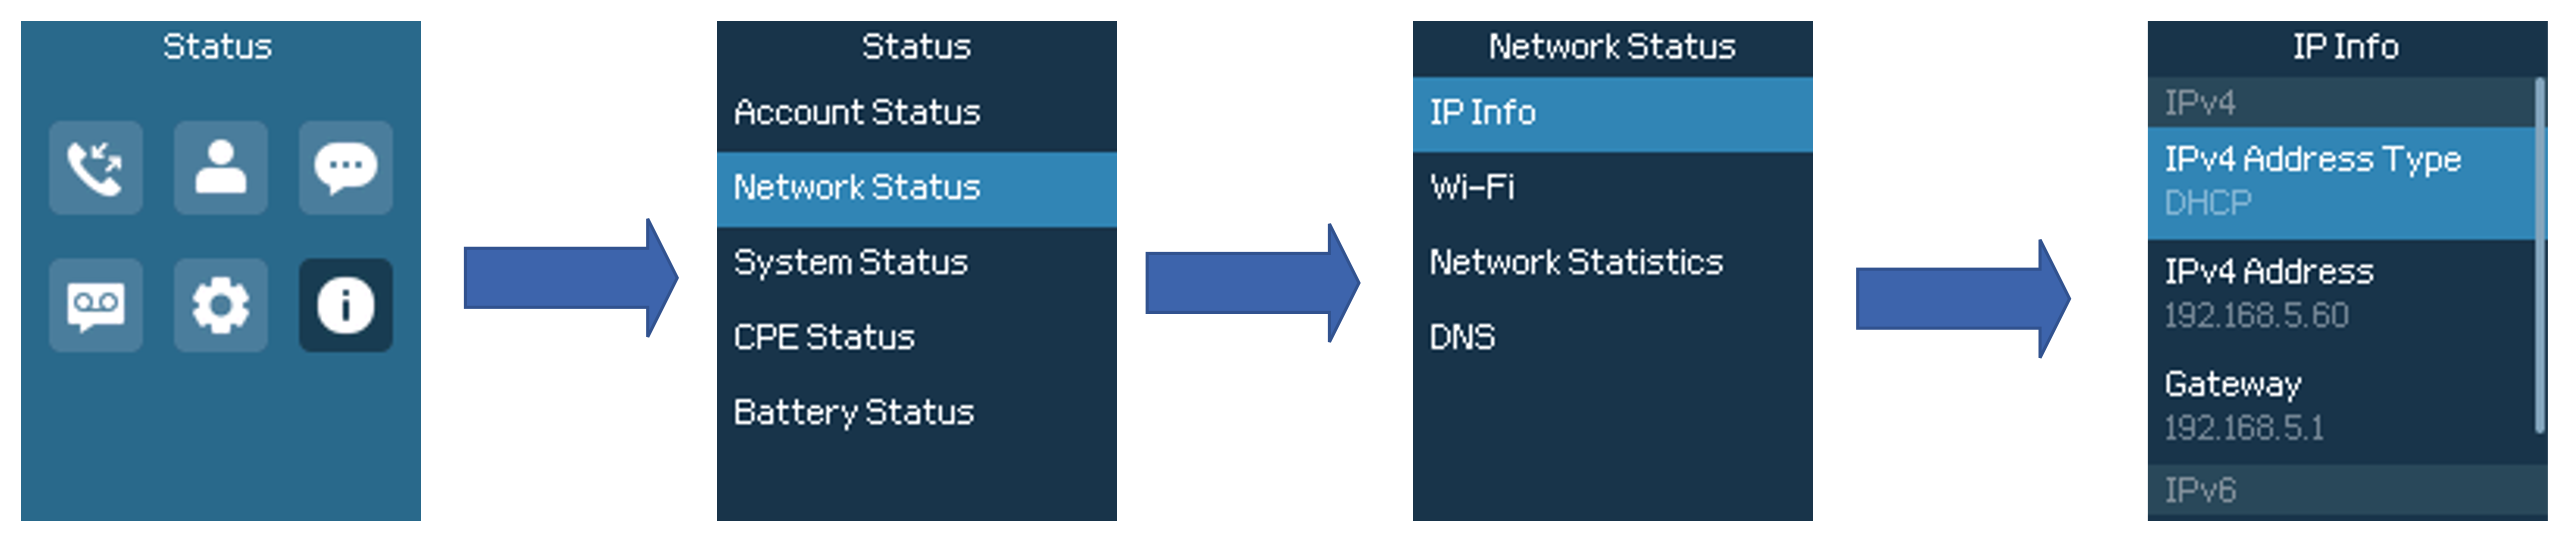
To check the handset network information status, follow these steps:
- Press the Menu key to bring up the operation menu.
- Use arrow keys to reach the Status menu and navigate to Network Status,
- You have then the possibility to view different network information such as the IP info, the Network Statistics…
Item | Description |
IP Info | |
IPv4 Info | |
IPv4 Address Type | Displays the IPv4 address type. |
IPv4 Address | Displays the IPv4 address. |
Subnet mask | Displays the subnet mask address. |
Gateway | Displays the IPv4 address of the router. |
IPv6 Info | |
IPv6 Address Type | Displays the IPv6 address type. |
Wi-Fi | |
SSID | Displays the SSID that the WP phone is connected to. |
WAN MAC | Displays the WAN MAC address |
Highest Technical Standard | Displays the Highest Wi-Fi standard supported by the WP Phone |
Technical Standards | Displays the Wi-Fi standards used currently |
Wi-Fi Support Band | Displays the supported Wi-Fi Bands (2.4G, 5G, 2.4G&5G) |
Wi-Fi Band | Displays the Wi-Fi Band supported |
Channel | Displays the radio chaneel used |
RSSI | RSSI stands for Received Signal Strength Indicator and represents the measurement of the power level of the received Wi-Fi signal. |
Connection Speed | Shows the internet connection speed |
Security Mode | Security mode refers to the type of encryption and authentication used to secure a Wi-Fi network connection. |
Network Statistics | Network statistics provide data on the performance and usage of a network, including metrics like data transfer rates, packet loss, and latency, the following parameters are displayed
|
DNS | Displays the primary and secondary DNS servers. |
Network Info Description
System Status
To check the system info, follow these steps:
- Press the Menu key to bring up the operation menu
- Use arrow keys to reach the Status menu and navigate to the System Status section.
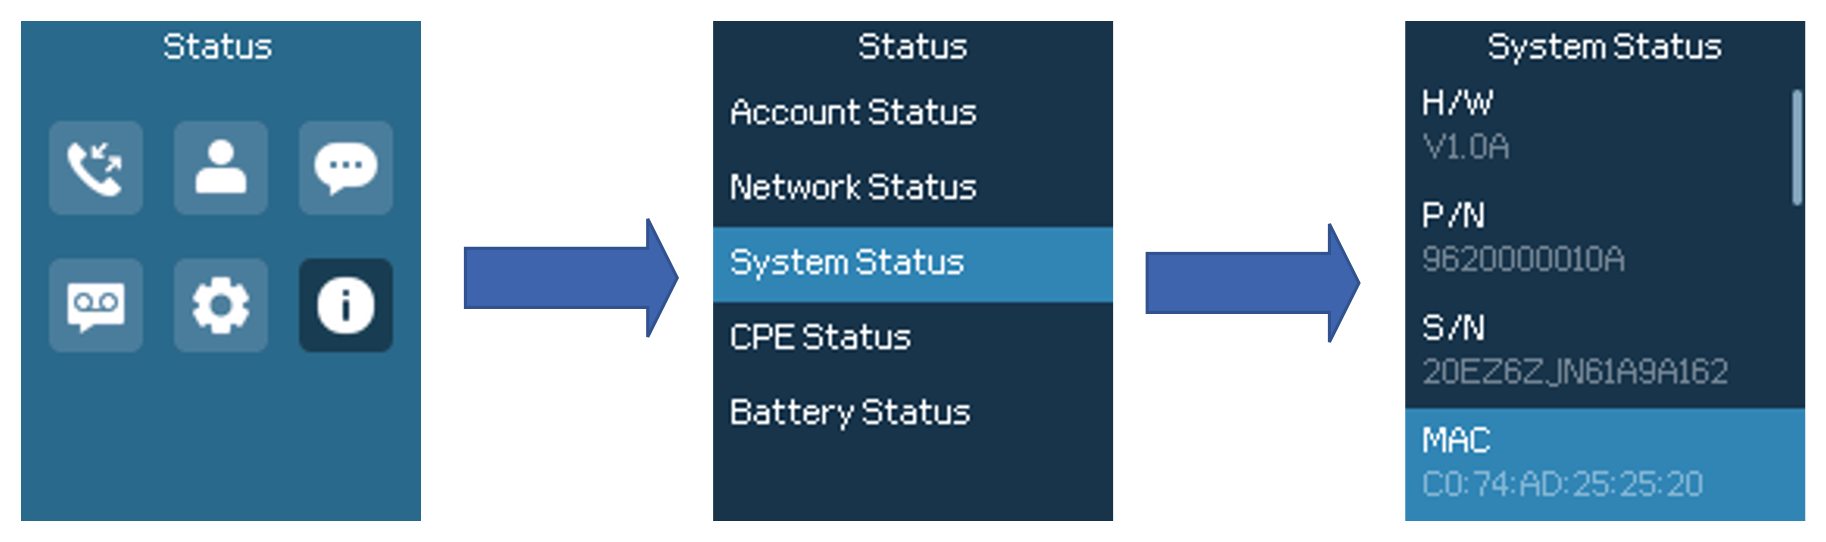
The following information will be displayed:
Item | Description |
Hardware | |
H/W | Displays the hardware version of the phone |
P/N | Displays the Part Number. |
S/N | Displays the Serial Number |
MAC Address | Displays the MAC Address of the phone. |
System Version | Displays the different kind so of software versions installed based on the mode:
|
Time | Includes information such as the system time and system timezone |
IP Geographic Information | Displays information about the phone Geographic Information, this includes : the city, language, and recommended timezone |
System Info Description
CPE Status
To view the CPE status, follow these steps:
- Press the Menu key to bring up the operation menu.
- Use arrow keys to reach the Status menu and navigate to CPE Status.
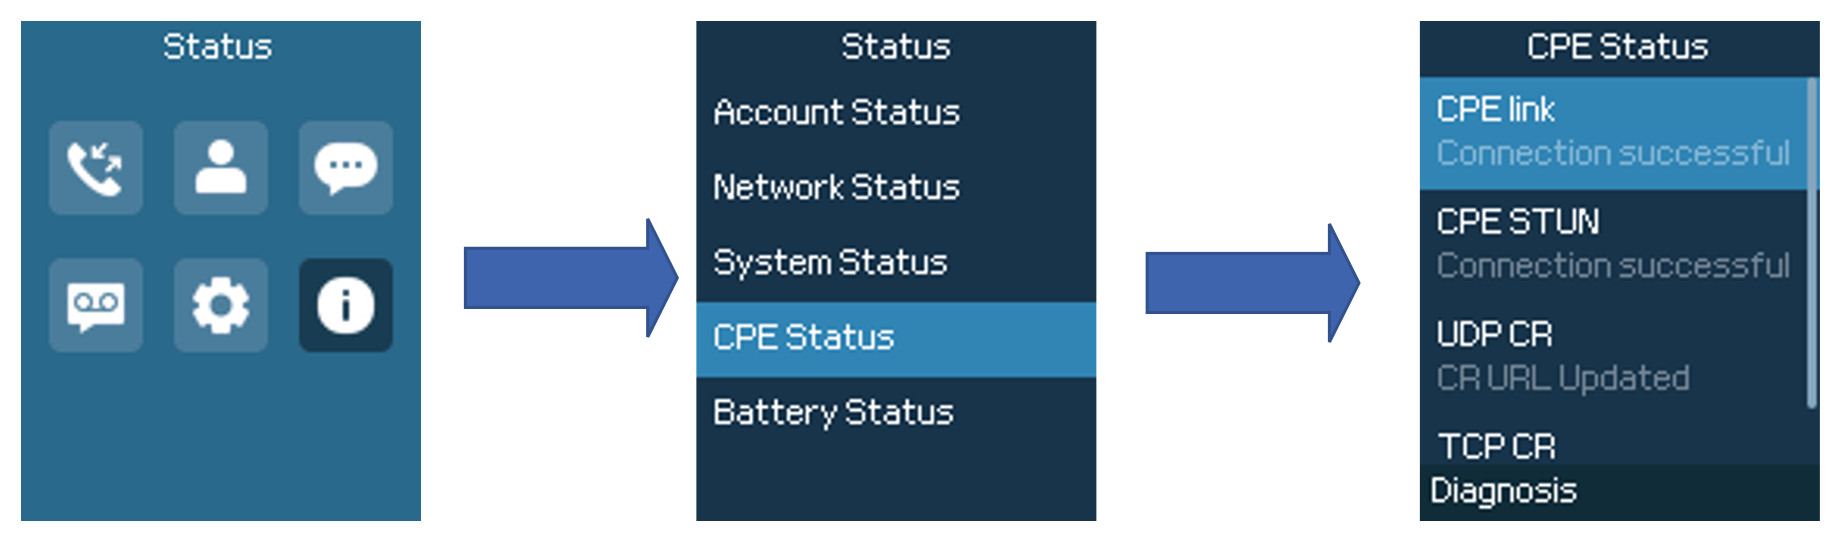
The following information will be displayed:
Item | Description |
CPE link | CPE link refers to the connection between the customer premises equipment (CPE) and the network, detailing its status and performance. |
CPE STUN | indicates the status of the Session Traversal Utilities for NAT (STUN) functionality on the Customer Premises Equipment, used for NAT traversal and connectivity checks in VoIP and other real-time communication protocols. |
UDP CR | indicates the status of control and reporting mechanisms related to UDP (User Datagram Protocol) traffic on the Customer Premises Equipment |
TCP CR | Indicates the status of control and reporting mechanisms related to TCP (Transmission Control Protocol) traffic on the Customer Premises Equipment. |
CPE Status Table
Battery Status
This option is used to display information about the battery of the phone, to view the battery status, please follow the below steps:
- Press the Menu key to bring up the operation menu.
- Use arrow keys to reach the Status menu and navigate to Battery Status.
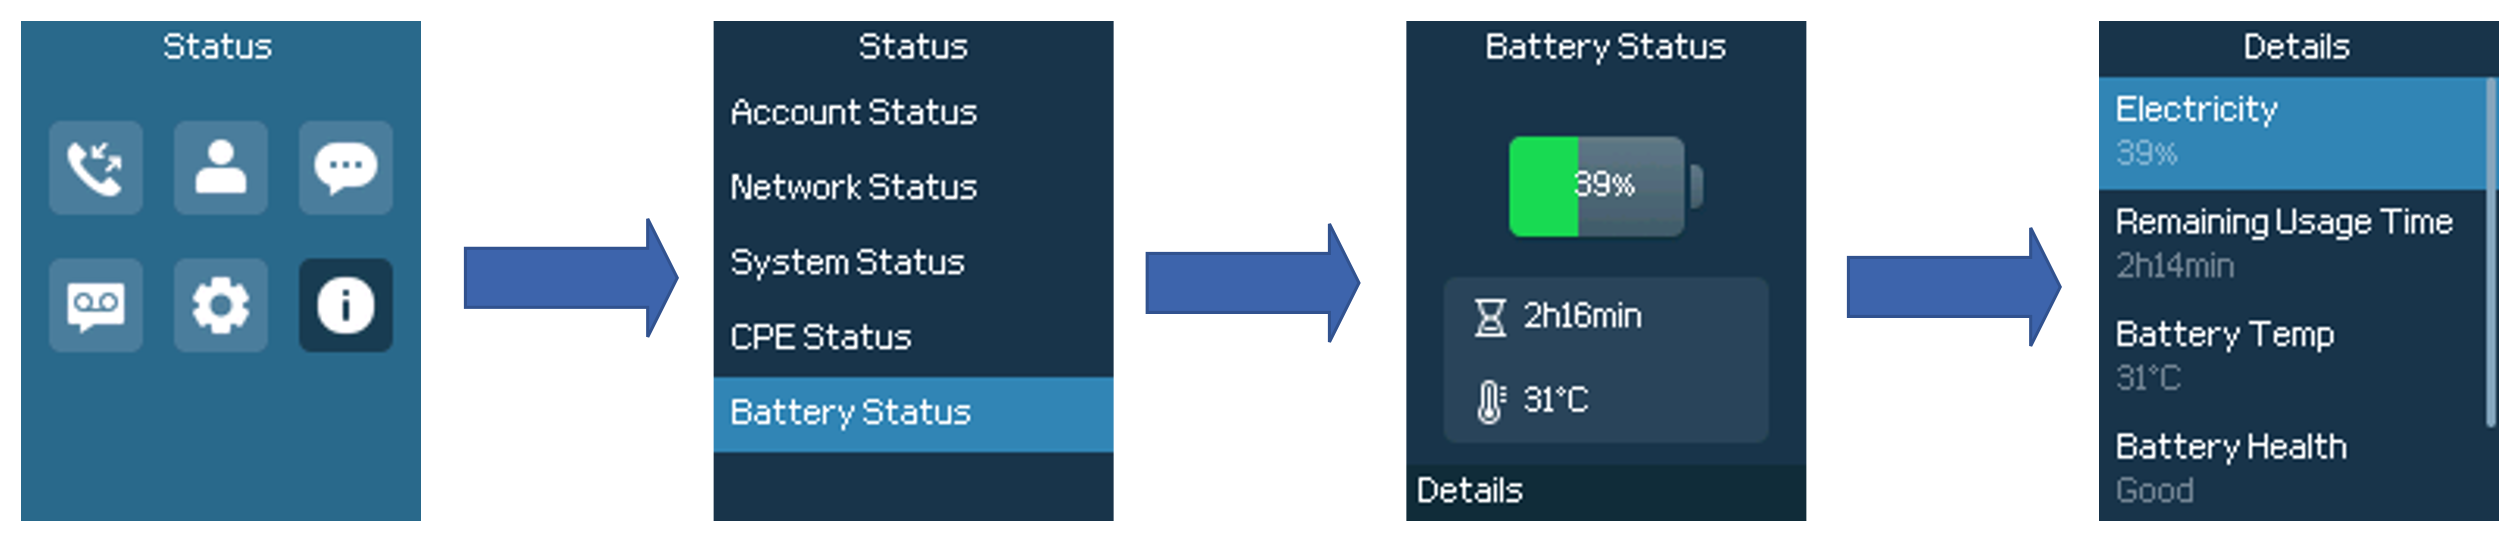
The following information will be displayed:
Item | Description |
Electricity | Displays the battery percentage left |
Remaining Usage Time | Displays the estimated remaining usage time of the phone |
Battery Temp | Displays the battery temperature |
Battery Health | Displays the battery health |
Charge count | Refers to the number of charge cycles completed by the battery, indicating its usage history and potentially its remaining lifespan. |
Battery Status Description
Diagnostics
The Diagnostics feature provides on-device tools to help users and administrators quickly identify, analyze, and troubleshoot system, hardware, and Wi-Fi–related issues directly from the WP8x6 handset. It eliminates the need for external tools by offering real-time visibility into device status, network connectivity, and wireless environment conditions.
The Diagnostics menu is divided into three main categories:
- System Diagnostics
- Device Diagnostics
- Wi-Fi Analyze
System Diagnostics
System Diagnostics provides network- and system-level troubleshooting tools.
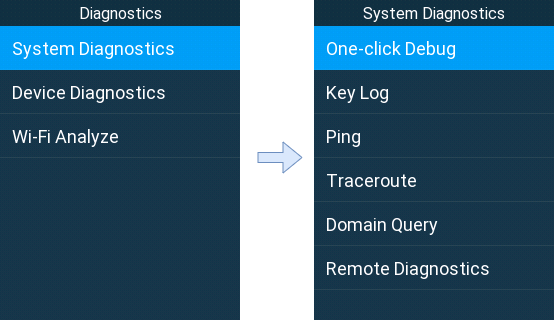
- One-click Debug: Collects system logs and diagnostic data with a single action for troubleshooting and support analysis.
- Key Log: Displays key system events such as boot status, network changes, account registration, and configuration actions.
- Ping: Tests network reachability to a target IP address or domain to verify basic connectivity.
- Traceroute: Traces the network path to a destination and identifies routing or latency issues.
- Domain Query: Performs DNS resolution tests to verify domain name lookup functionality.
- Remote Diagnostics: Allows diagnostics to be initiated or reviewed remotely for centralized troubleshooting.
Device Diagnostics
Device Diagnostics focuses on hardware and peripheral testing to verify proper device operation.
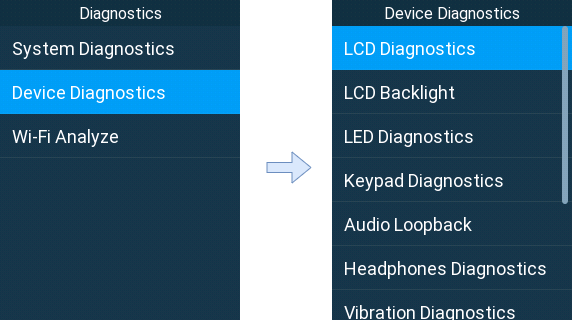
- LCD Diagnostics: Tests the LCD display to ensure proper rendering and responsiveness.
- LCD Backlight: Verifies backlight functionality and brightness operation.
- LED Diagnostics: Checks the status and functionality of device LED indicators.
- Keypad Diagnostics: Tests physical keys to ensure correct input detection.
- Audio Loopback: Verifies audio input and output by looping microphone audio back to the speaker.
- Headphones Diagnostics: Tests headset or headphone audio functionality.
- Vibration Diagnostics: Checks vibration motor operation for alerts and notifications.
Wi-Fi Analyze
Wi-Fi Analyze provides visibility into the surrounding wireless environment and connection quality.
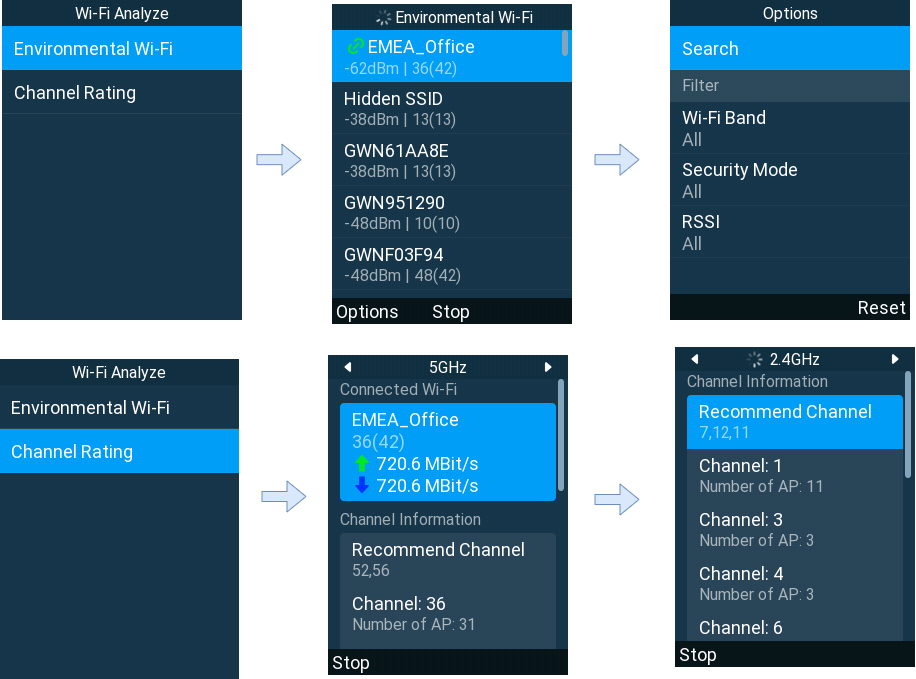
- Environmental Wi-Fi: Displays nearby Wi-Fi networks, including SSID, signal strength (RSSI), channel, and bandwidth information. It allows filtering of scan results by Wi-Fi band, security mode, or signal strength.
- Channel Rating: Analyzes channel congestion and recommends optimal Wi-Fi channels for better performance, it shows detailed channel usage statistics, including the number of access points detected per channel, and suggests the best available Wi-Fi channel based on environmental analysis.
The WiFi Analyze feature allows the device to scan and analyze the surrounding WiFi environment. It displays available wireless networks, their signal and channel information, and provides tools to filter, sort, and inspect detailed WiFi parameters. The feature also evaluates channel occupancy and provides channel recommendations for the currently used frequency band.
For more information on how to use the WiFi analyze feature to enhance your device’s network performance, please visit the guide: WP8x6 WiFi Analyze Feature Guide
Configuring the Appearance Settings
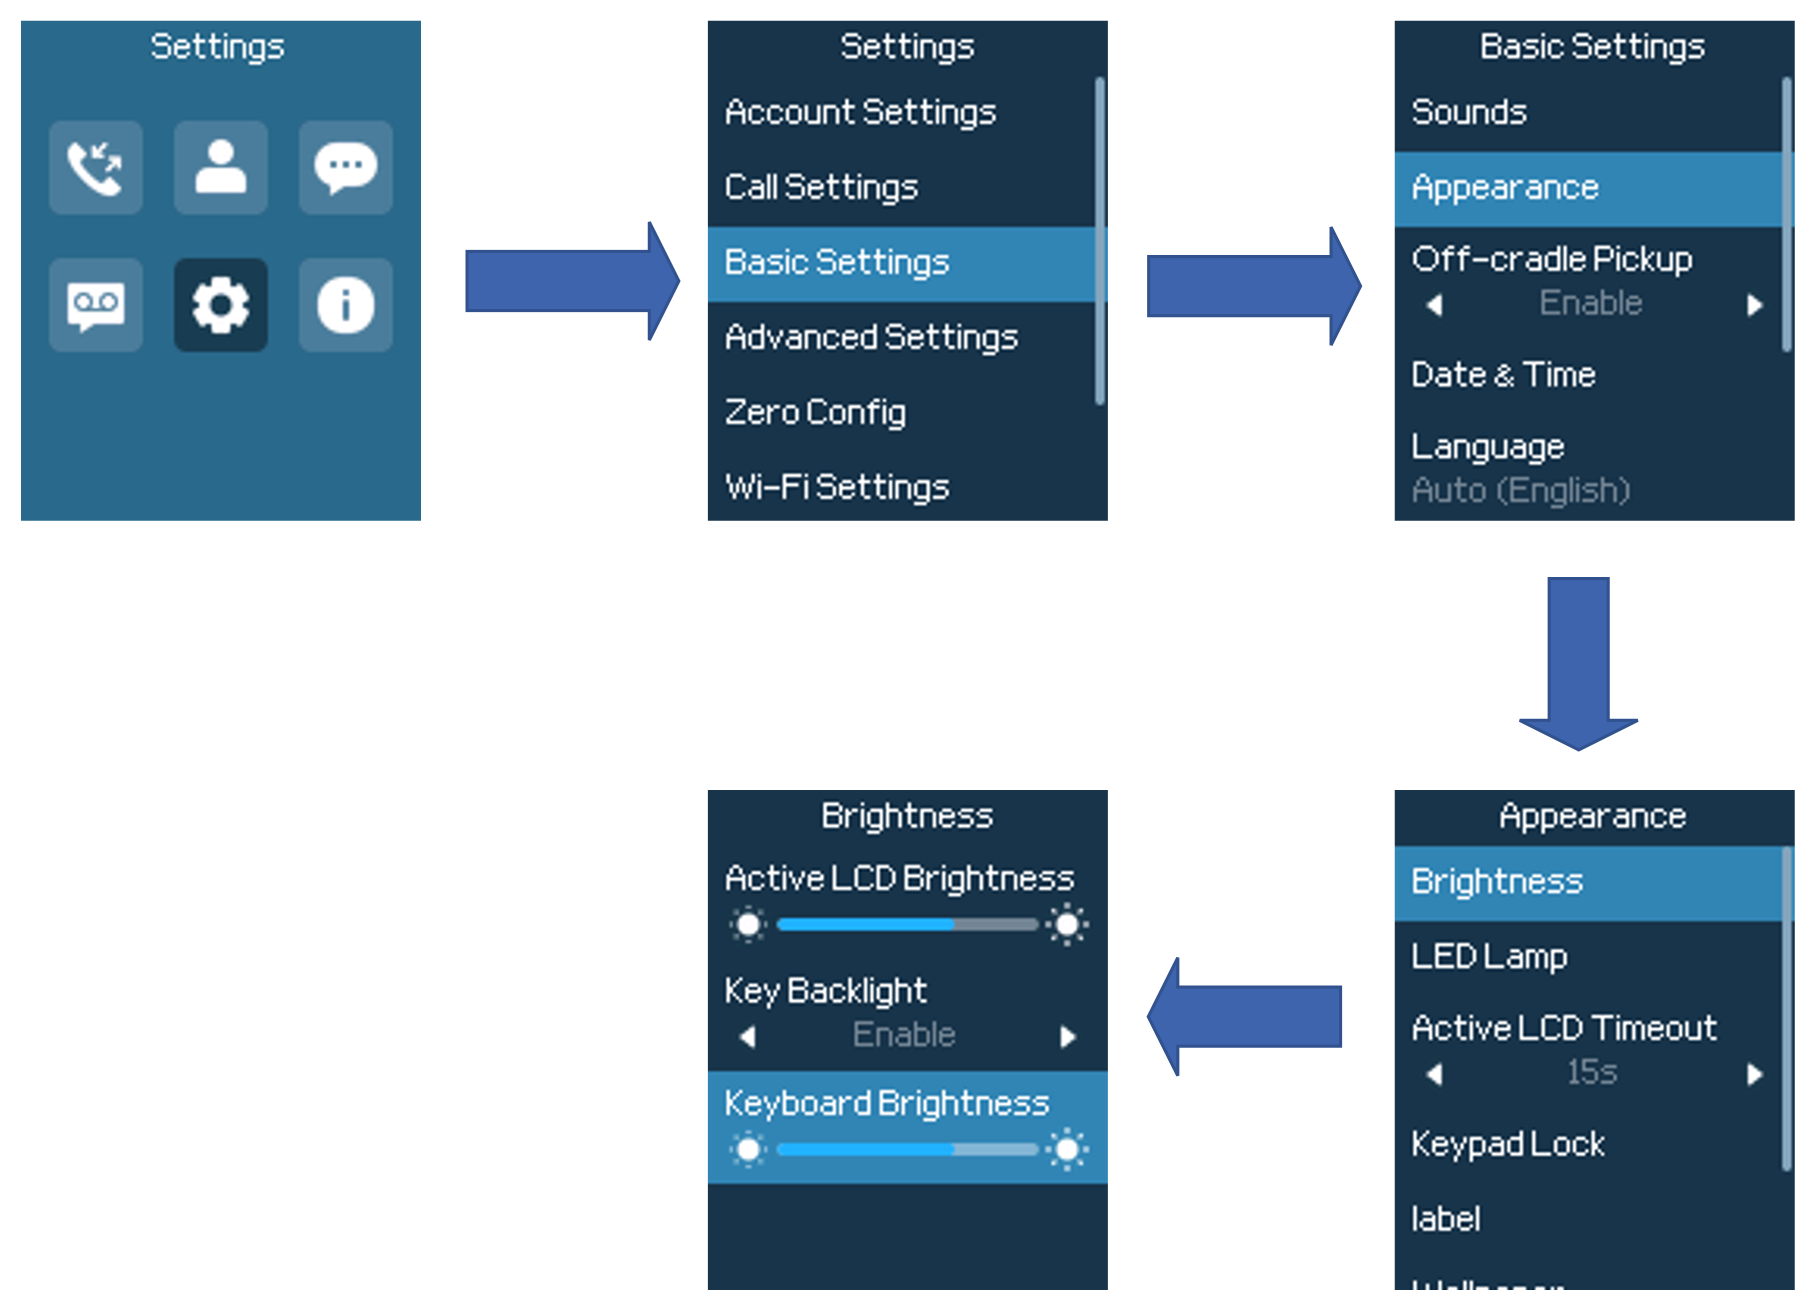
Some of the important parameters that can be defined for the phone’s appearance are: the screen brightness, the LCD Timeout, and the keypad backlight, we can configure them as follows
- Press Menu to bring up the operation menu.
- Use the arrow keys to reach Settings.
- Navigate to Basic Settings, and then Appearance.
- Configures the LCD brightness, key backlight, screen time out, and font size.
- Press “Back” (right softkey) to save and apply the new settings.
Lock Screen
To secure your WP8x6, you can configure the lock screen settings under Menu → Settings → Basic Settings → Lock Screen.
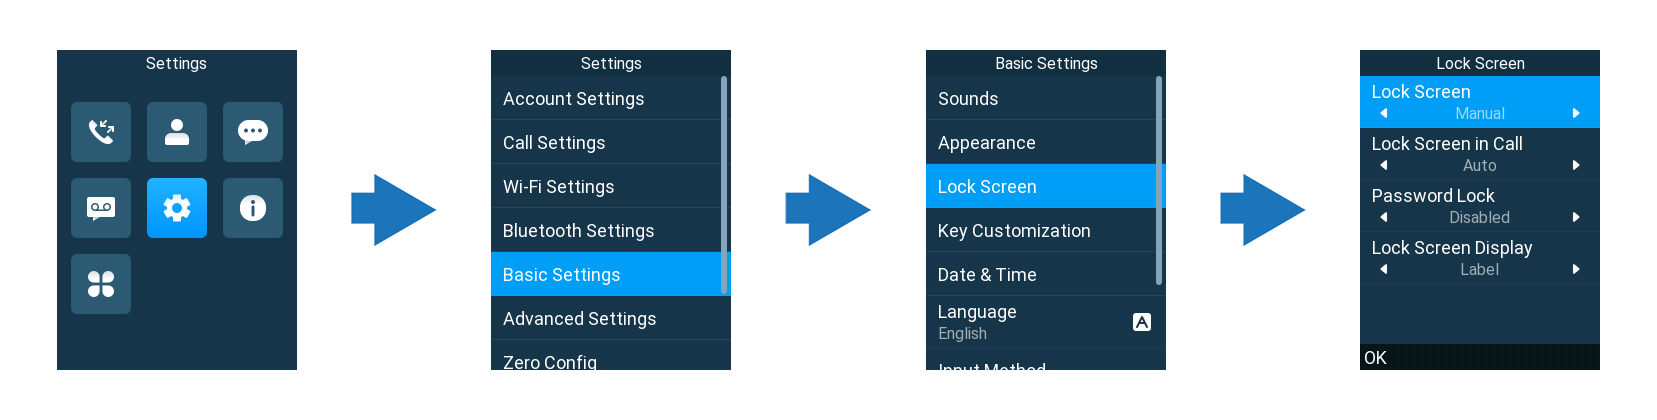
The phone offers two methods for locking the screen:
- Auto: The screen locks automatically after a period of inactivity (30 seconds).
- Manual: Press and hold the # key to lock the screen at any time.
Within the Lock Screen settings, you can also enable screen locking during calls to prevent accidental button presses. Additionally, you can choose to set a password for unlocking the screen instead of using the standard unlock shortcut (Unlock Softkey followed by # key).
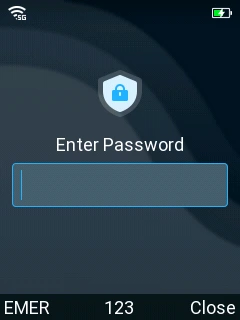
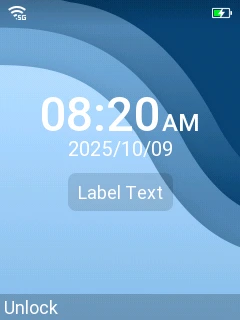
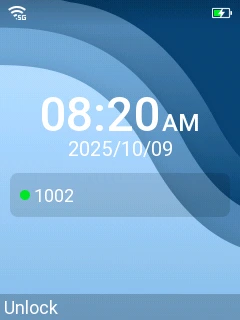
You can also customize the information displayed on the lock screen by choosing between two options:
- Preferred account status: Shows the registration status of your preferred account.
- Label: Displays custom text that can be configured in the appearance settings.
Return to Idle Screen
Press the Power Key to quickly exit the menu and return to the previous page.
When you are navigating on the handset’s menu, and you receive an incoming call, the LCD screen will automatically exit the menu and you can either accept or reject the call, when the call is terminated, the LCD screen will return to the idle screen.
Register a SIP Account
The WP8x6 supports up to 2 SIP accounts for the WP816, and 3 SIP accounts for the WP826 and WP836, they can be configured either using the web GUI or via the keypad menu as described in the following section.
Register Account via Web User Interface
- Access your handset base station web UI by entering its IP address in your favorite browser.
- Enter your admin’s username and password (default username and password: admin/ Random Password from the sticker on the back of the unit).
- Press Login to access your settings.
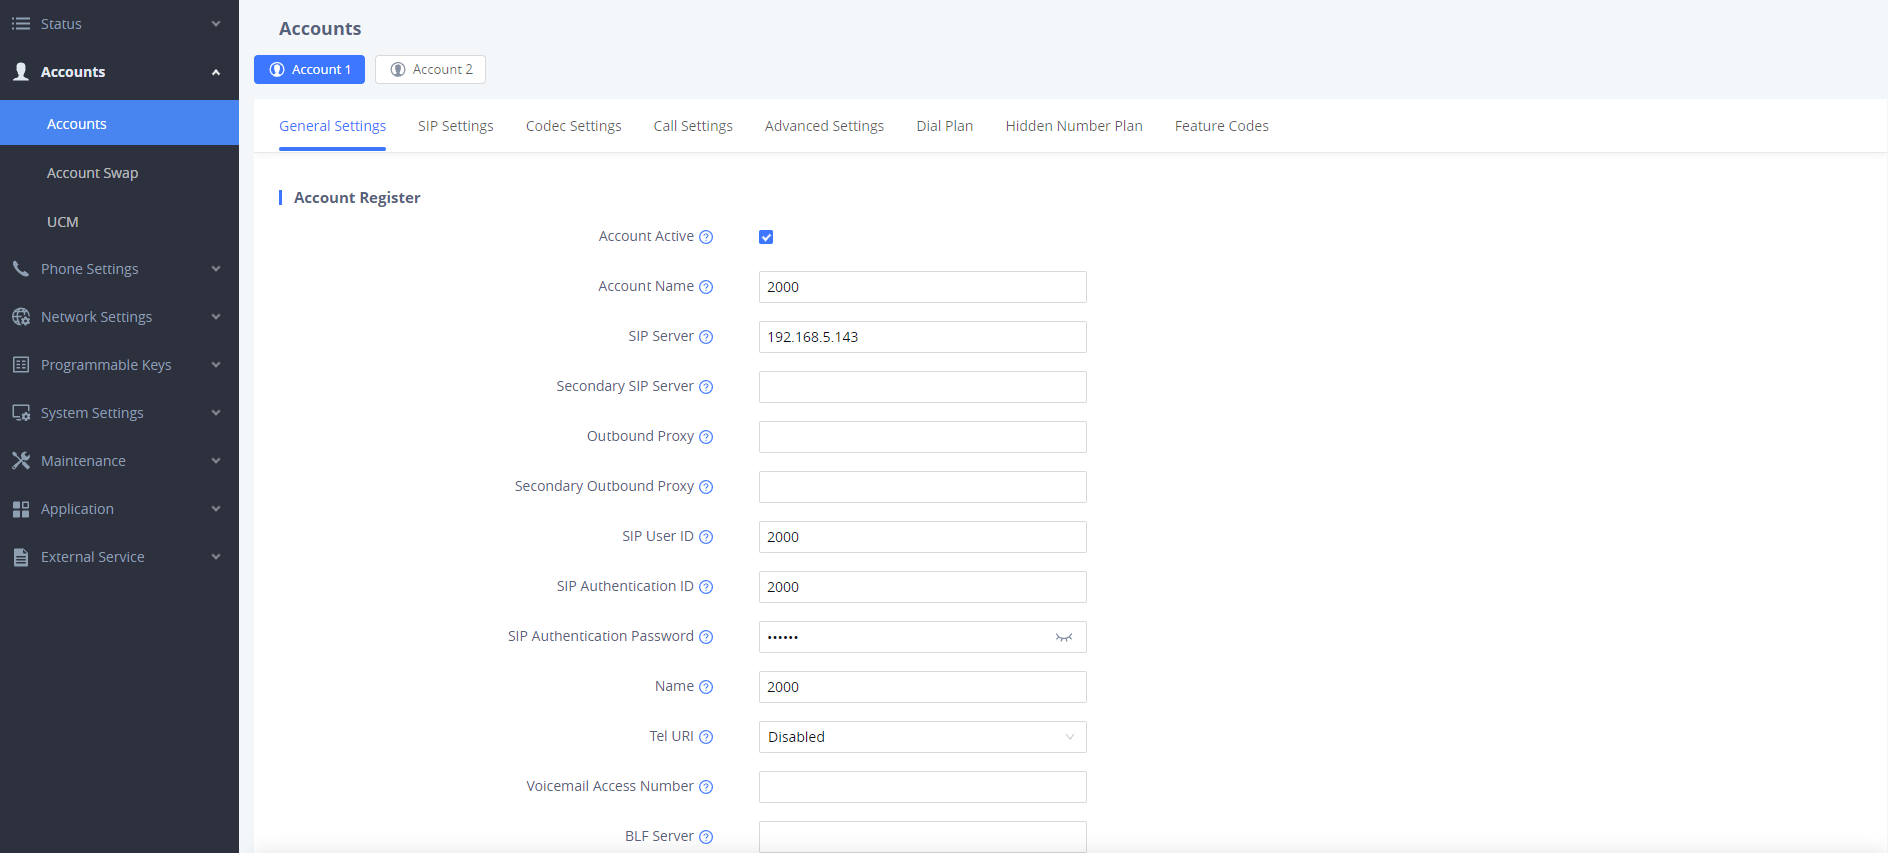
- Go to the Accounts tab and select the account to configure.
- In General Settings, set the following:
- Account Active to Yes.
- Account Name: Any name to identify this specific user.
- SIP Server field with your SIP server IP address or FQDN.
- Secondary SIP Server with your secondary SIP server IP address or FQDN. Leave empty if not available.
- SIP User ID: User account information, provided by VoIP service provider (ITSP). Usually in the form of a digit similar to a phone number or actually a phone number.
- Authenticate ID: SIP service subscriber authenticate ID used for authentication. Can be identical to or different from the SIP User ID.
- Authenticate Password: SIP service subscriber’s account password to register to the SIP server of ITSP. For security reasons, the password field will be shown as empty.
- Outbound Proxy with your outbound proxy IP address or FQDN. Leave empty if not available.
- Press Save and Apply to save your configuration.
After applying your configuration, your phone will register to your SIP Server. You can verify if your device has registered with your SIP server from its web interface under Status → Account Status (“Registered” with green color when the account is correctly registered, or “Unregistered” with red when the account is not properly registered)
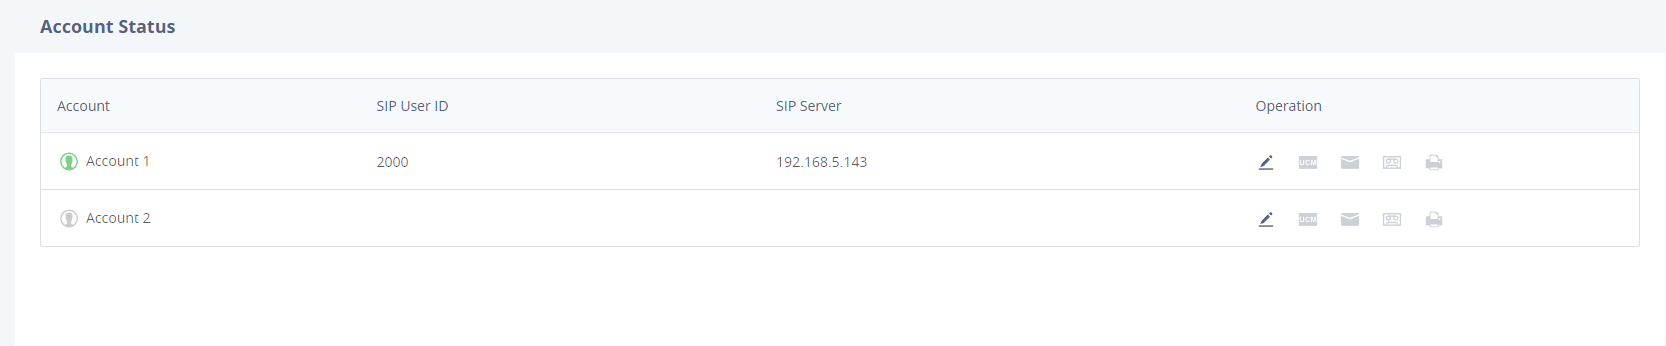
Register Account via LCD Menu
To register your SIP account via the LCD menu, please refer to the following steps:
- Unlock your handset and press Menu to bring up the operation menu.
- Use the arrow keys to reach Settings and then select the Account Settings tab.
- Select which account you want to configure and then set the following:
- Enable Account to “Enable”.
- Account Name: Any name to identify this specific user.
- SIP Server field with your SIP server IP address or FQDN.
- SIP User ID: User account information, provided by VoIP service provider (ITSP). Usually in the form of a digit similar to a phone number or actually a phone number.
- SIP Authenticate ID: SIP service subscriber authenticate ID used for authentication. Can be identical to or different from the SIP User ID.
- SIP Authentication Password: SIP service subscriber’s account password to register to the SIP server of ITSP. For security reasons, the password field will be shown as ******.
- Voicemail Access Number: The voicemail number of your account.
- Display Name: The name that will be used for the caller ID name in SIP INVITE.
- Account Ringtone: Choose the preferred ringtone for this account.
- Press the “OK” softkey to apply the configuration
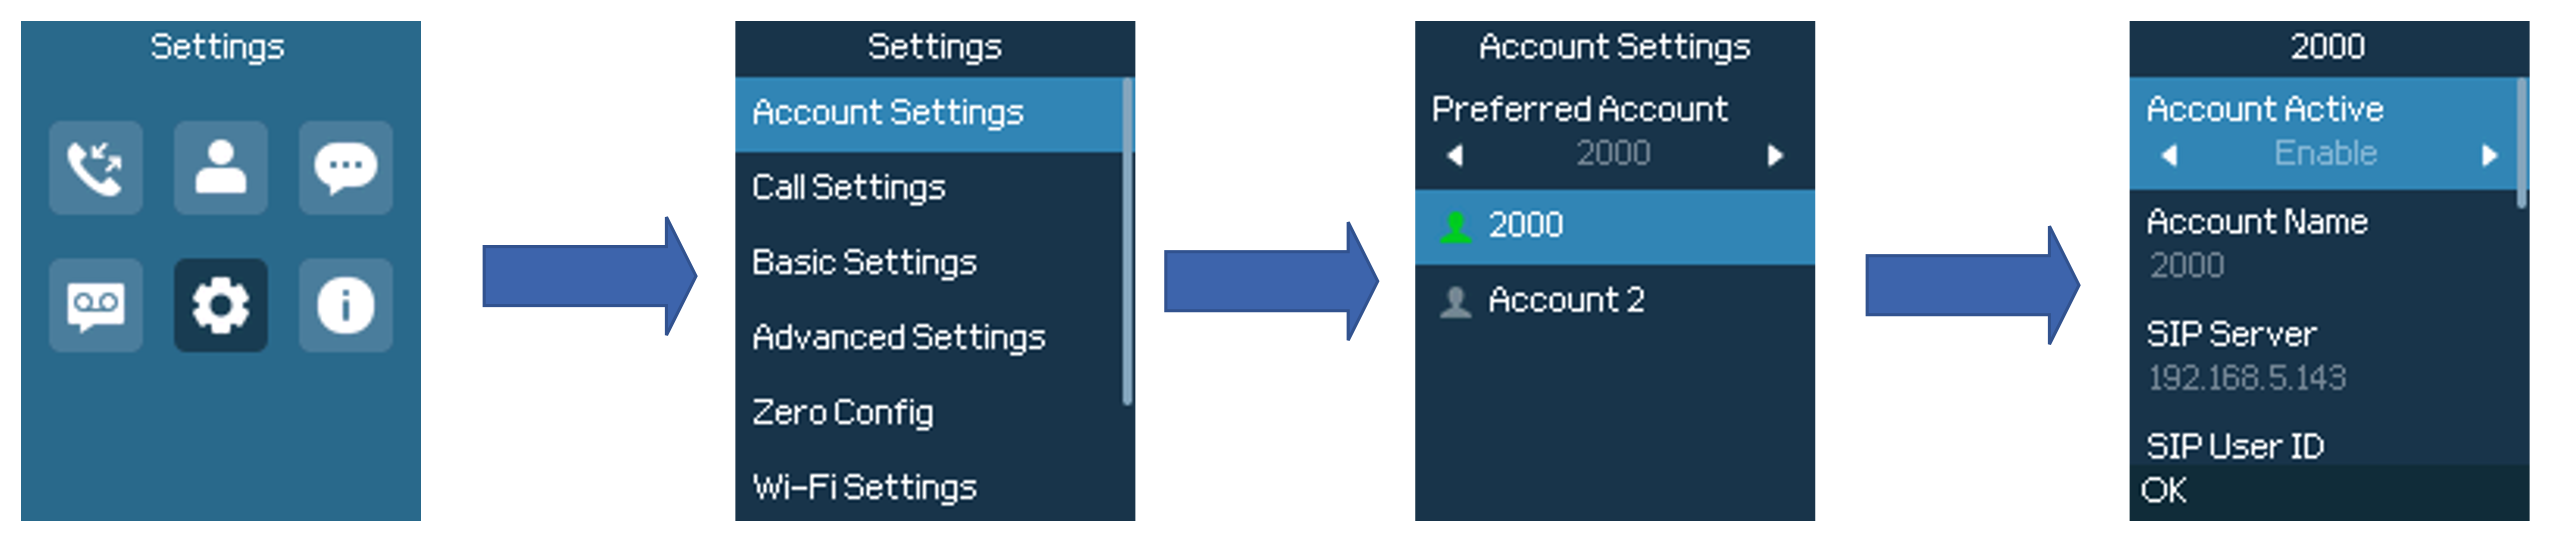
PHONE SETTINGS
Selecting Phone Language
The WP8x6 supports different languages. The default language of the handset is English. To change the language of the handset, please proceed as follows:
- Press Menu to bring up the operation menu.
- Use the arrow keys to reach Settings.
- Navigate to Basic Settings, and then select Language.
- Choose the desired language from the available list and press “OK” and then the phone will apply the selected language.
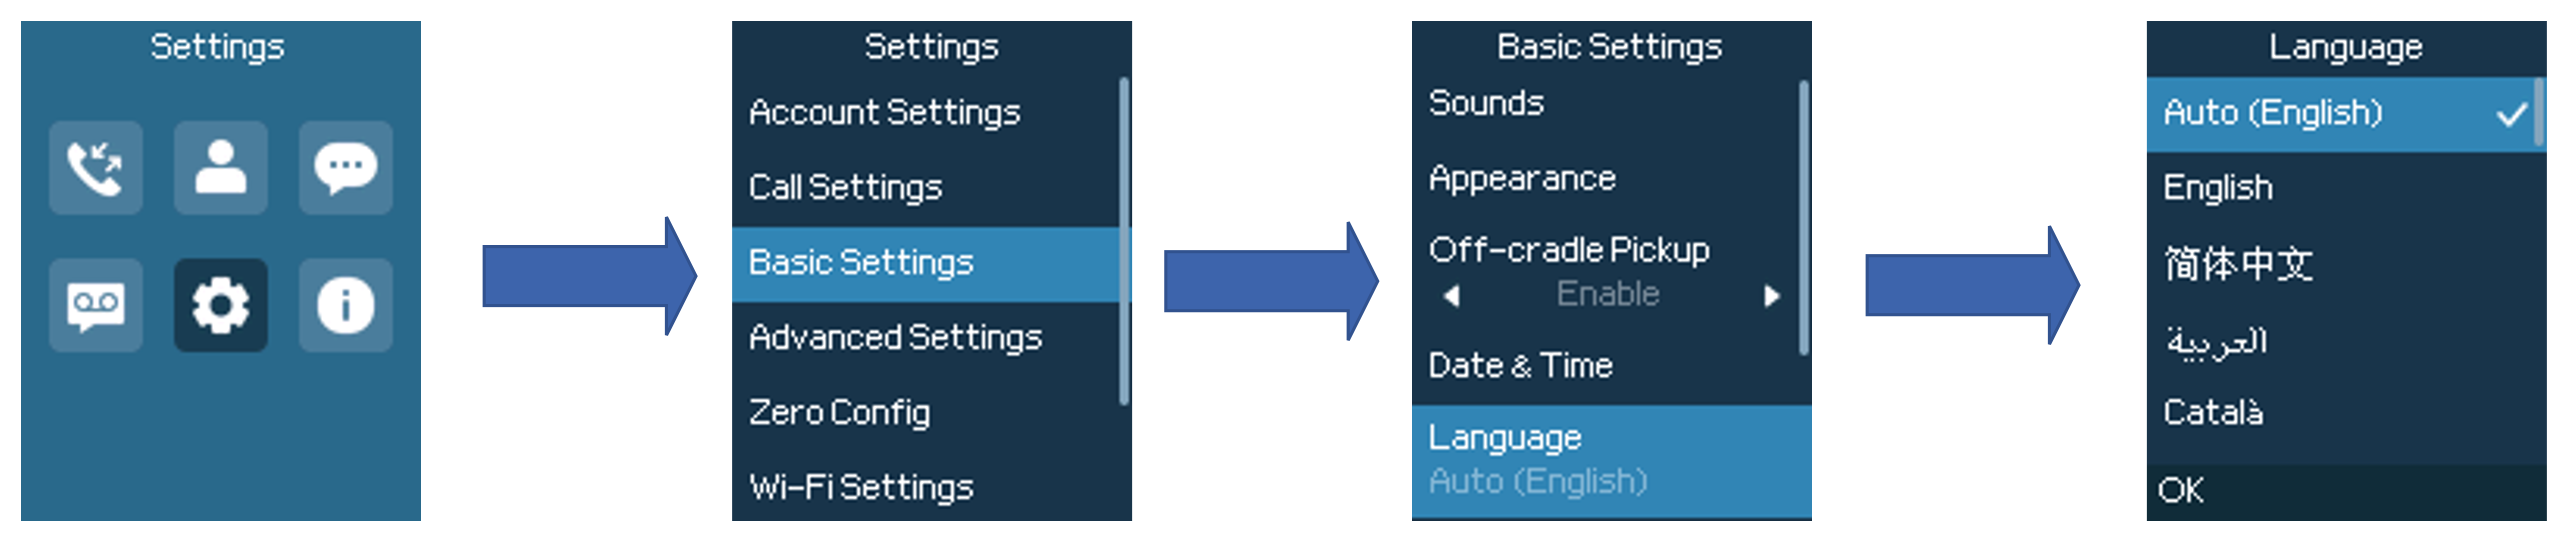
Activate/Deactivate Hands-Free Mode
- Press the Hands-free key
 while making a call or on the idle screen to activate hands-free mode.
 - Press the Hands-free key again to deactivate the hands-free function.
 while making a call or on the idle screen to activate hands-free mode.
Muting the Microphone
- Press the button “Options” (Left softkey) during an established call and a list of the options will be displayed.
- Choose” Mute” and press the “Select” button (left softkey / OK button) to switch on the microphone.
Notes:
- While muted, the icon
 will be displayed on the screen.
 - To unmute the microphone during an established call, press the button
 on the phone to switch off the microphone.
 will be displayed on the screen.
 on the phone to switch off the microphone.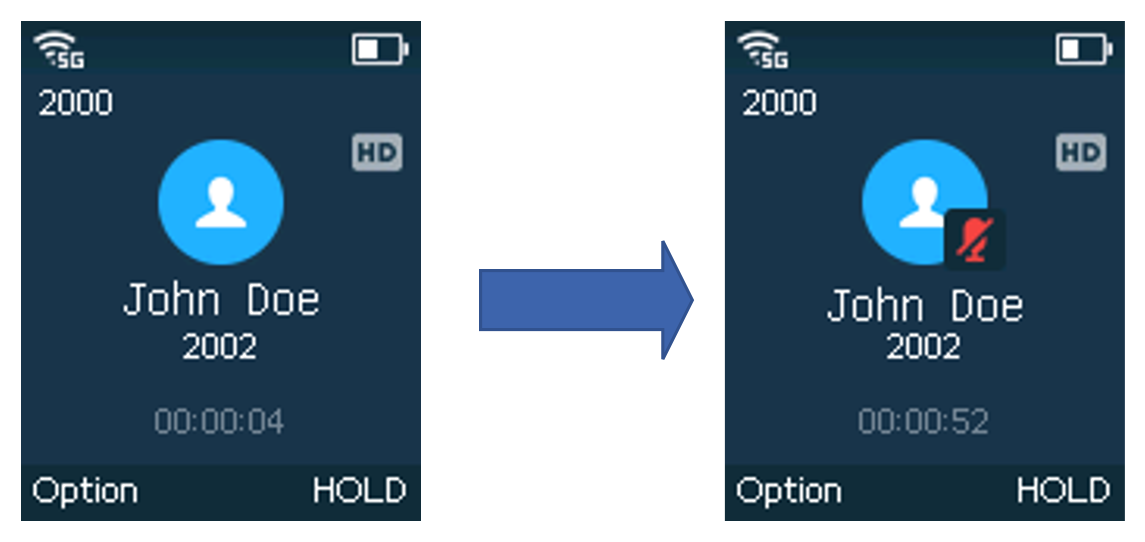
Adjusting Speaker and Earpiece Volume
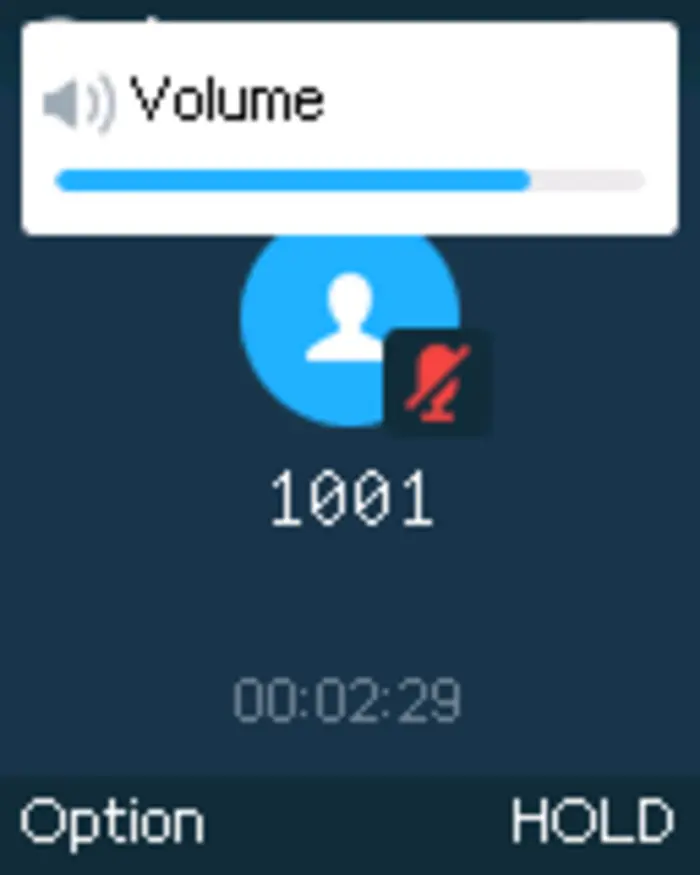
Press the volume up and down keys on the left side of your phone while you are on an established call to set the volume of the earphone/speaker. You can choose between 10 different levels. The default level is 4.
Smart Noise Cancellation
This feature could let the user configure Noise Shield Technology and AI Noise Reduction to improve the audio quality, particularly in noisy environments, by reducing background noise during calls.
Noise shield is mainly used for receivers and some earphones. It can shield sounds outside a certain range and effectively isolate voices and noise outside the range.
While AI noise reduction is applicable to receivers and hands-free headsets, it processes the surrounding environmental noise and can eliminate or reduce external noise, whether speaking or not.
To configure the noise shield feature during a phone call please follow the below steps:
- During the call, press the icon “Options”.
- Click on “Smart Noise Cancellation“.
- Set Noise Shield “Enabled” to activate the feature.
- An icon
 will appear during the call to indicate that the feature has been enabled.
 will appear during the call to indicate that the feature has been enabled.
To enable AI Noise Reduction during a phone call please follow the below steps:
- During the call, press the icon “Options”.
- Click on “Smart Noise Cancellation“.
- Set AI Noise Reduction “Enabled” to activate the feature.
- An icon will appear during the call to indicate that the feature has been enabled.
 will appear during the call to indicate that the feature has been enabled.
Users can also enable both Noise Shield Technology and AI Noise Reduction by following these instructions:
- During the call, press the icon “Options”.
- Click on “Smart Noise Cancellation“.
- Set both AI Noise Reduction and Noise Shield to “Enabled”.
- An icon will appear during the call to indicate that the features have been enabled.
 will appear during the call to indicate that the features have been enabled.
Ringtones
Setting the Ringer Volume
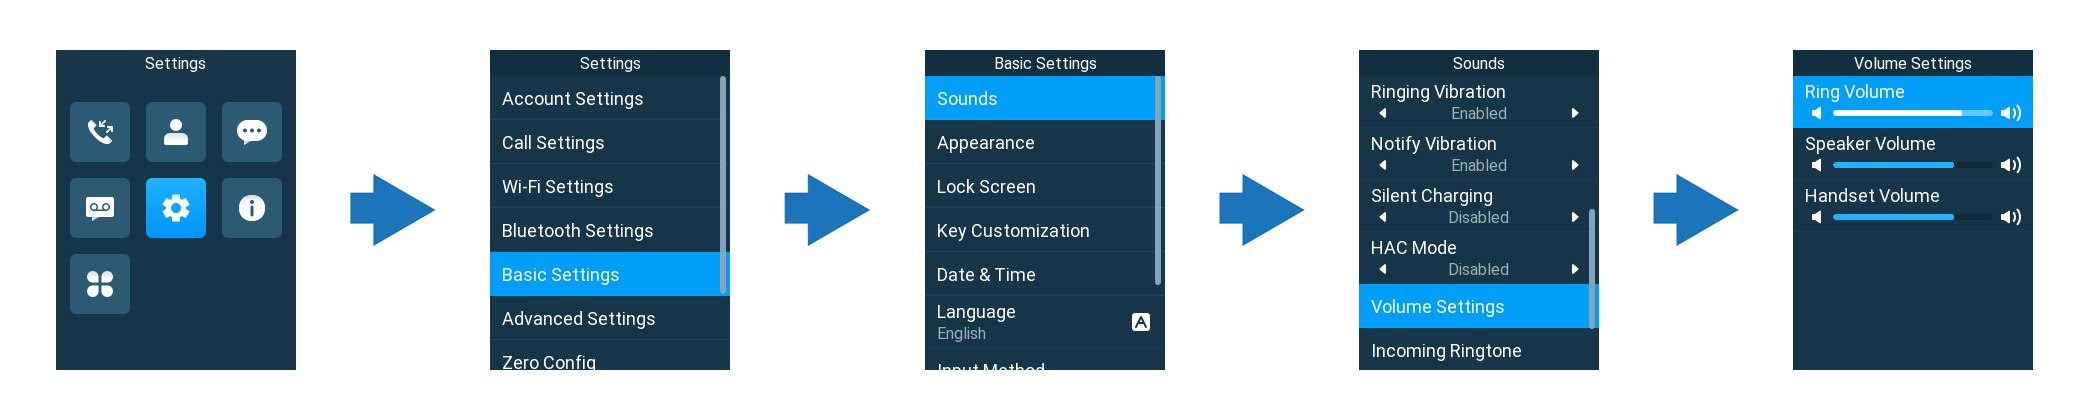
To configure the desired ringer volume, proceed as follows:
- Press Menu to bring up the operation menu and go to Settings.
- Navigate to Basic Settings, and then select the Sounds tab.
- Users can configure the silent and vibrate modes and also the voice ringtones by pressing the left and right arrow keys to change repeatedly and set the desired volume.
- Press “On-Hook” to confirm the new configuration settings.
Setting the Ringtones
You can change the ringer melody for an incoming call. The device has different ringer melodies and to configure the desired melody, proceed as follows:
- Press Menu to bring up the operation menu.
- Use the arrow keys to reach Settings → Basic Settings, and then select the Sounds tab.
- Go to “Incoming ringtone”, and choose the account that the ringtone will be applied on, then select the desired ringtone, and press “OK” to confirm the ringtones selected will be set successfully.

Date and Time
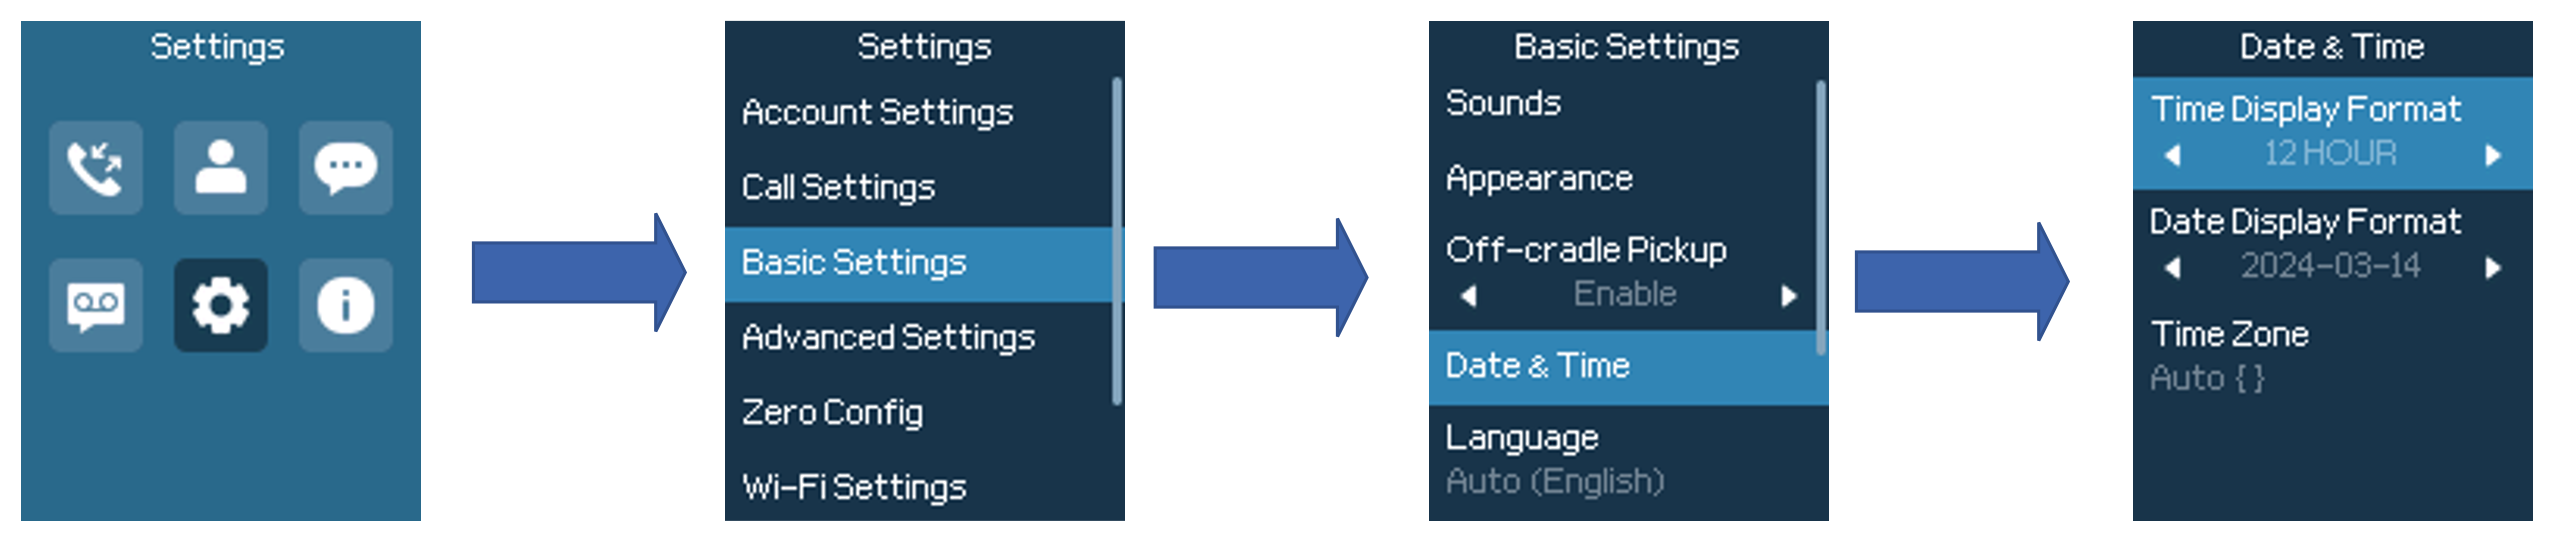
On the WP8x6 the Date and time are displayed on the idle screen and it obtains the date and time from the Simple Network Time Protocol (SNTP) server by default. If your phone cannot obtain the date and time from the SNTP server, you need to configure the date and time manually. You can configure the time format and date format respectively. The handset supports two formats for time (12 Hours or 24 Hours).
To configure date and time manually
- Press Menu to bring up the operation menu.
- Use the arrow keys to reach Settings → Basic Settings, and then select the Date and Time tab.
- Press the “Onhook” key to apply your changes.
Wallpaper
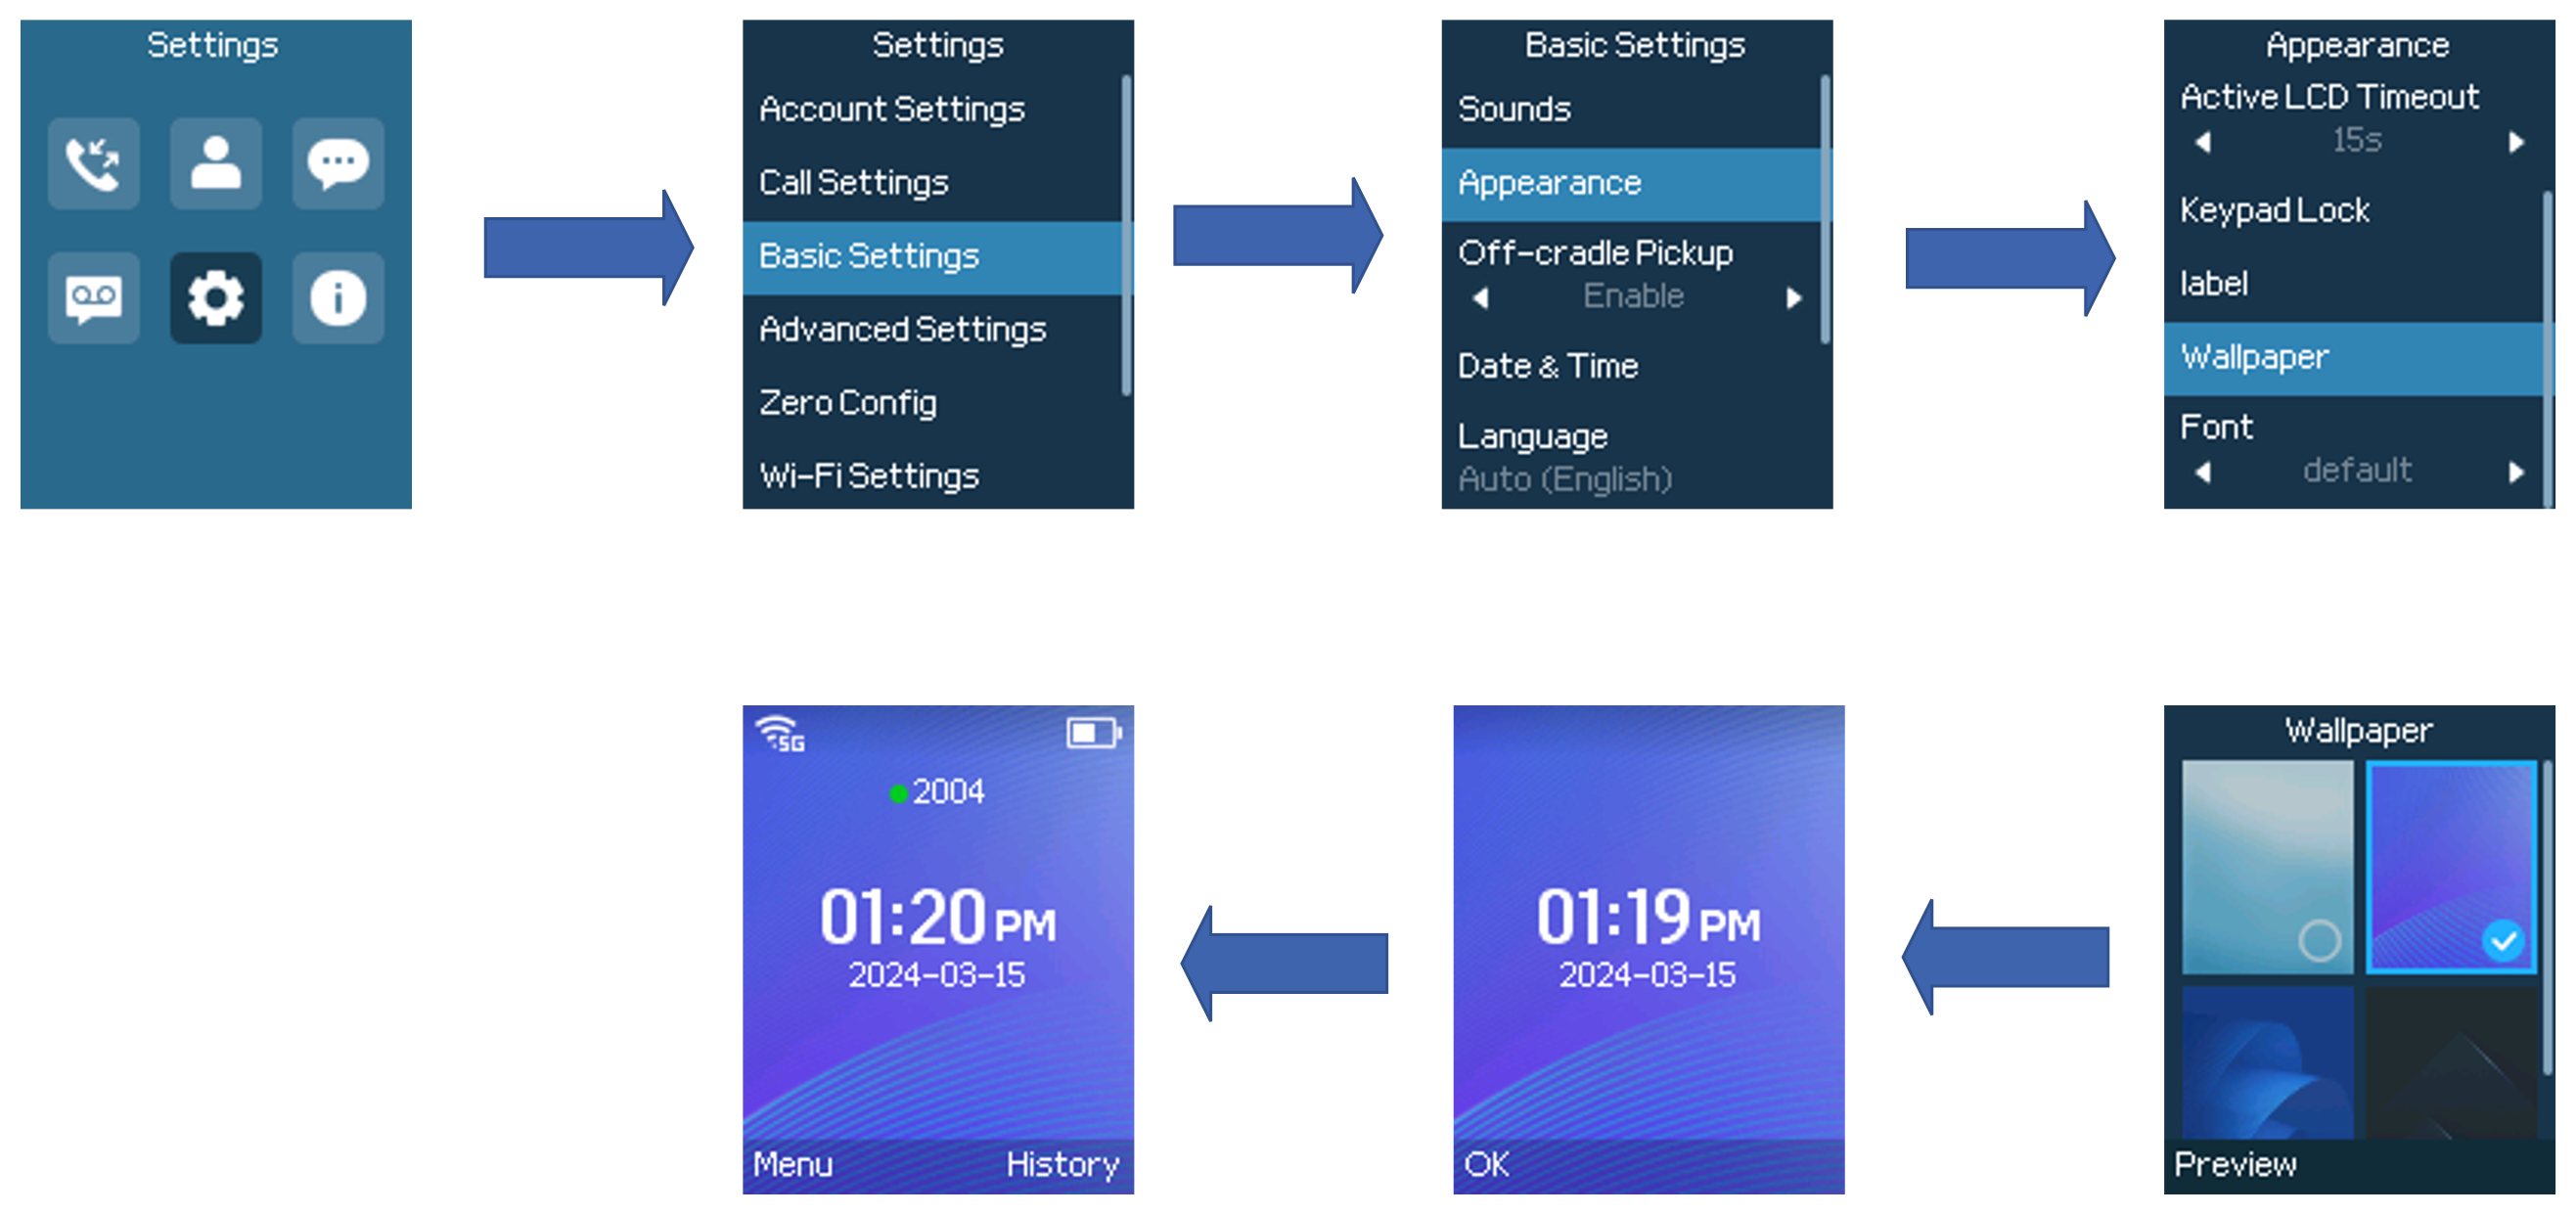
You can change the phone’s wallpaper from the LCD settings by following these steps:
- Press Menu to bring up the operation menu.
- Use the arrow keys to reach Settings → Basic Settings → Appearance, and then select the Wallpaper tab.
- Choose the desired wallpaper and confirm it by clicking “OK”
Battery Percentage
Users can enable the battery percentage to be viewed on the battery icon:
- Press Menu to bring up the operation menu.
- Use the arrow keys to reach Settings → Basic Settings → Appearance.
- Set “Display Battery Percentage” to Display

Reboot
To reboot the handset, please refer to the following steps:
- On the main menu, long press the on-hook power key

- A list of options will be displayed to choose from to either power off the phone or reboot it , choose the reboot option
CALL OPERATIONS
Placing calls
To place calls, you can use the following mode:
- Earpiece mode: Press the off-hook / dial key to dial out.
- Speakerphone mode: Press the speakerphone key to dial out.
- Headset mode: Press the off-hook / dial key to dial out using a connected headset, from either a 3.5mm headset jack (only WP816) or a Bluetooth-connected headset.
During the call, you can switch the call mode by pressing the corresponding keys or connecting a headset.
Make a Call using a Line
Making calls requires the use of SIP lines. So, you should first register the SIP account to the handset beforehand, after registering the sip lines, you can choose between them while trying to make calls by pressing the “Accounts” button displayed on the call screen. Please refer to the following methods to make calls using a line:
- Enter the desired number using the keypad.
- Toggle between the available lines by pressing the “Account” button to choose the line for making calls. (The account name will change on the screen when press the “Account” button).
- Press Dial key
 , # (Use # as dial key” must be configured in web configuration) to initiate the call.
Note: Users can also initiate calls with hands-free mode using the Speaker key .
.
- To terminate the call, press the Hang-Up key.
Notes:
- To dial from the contacts list, choose a contact using the navigation keys and press the Dial key.
- When having unread voicemails on the handset, once accessing the dialing interface a stutter tone will be heard to notify users about voicemails that need to be read.
- The maximum length of dialed digits is limited to 64 characters.
- The duration of the call will be displayed in the lower middle of the LCD screen, with the format hh:mm:ss
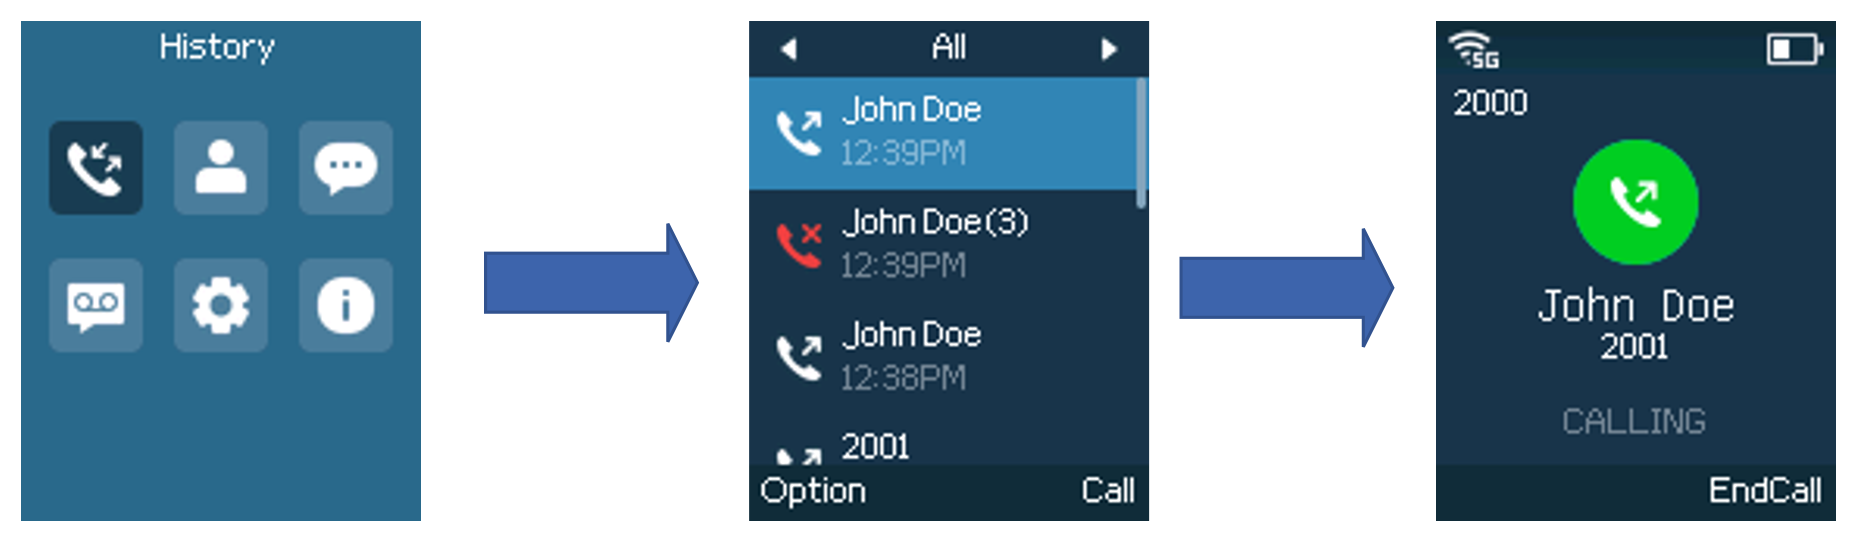
Dialing from Call history
Users may use their call history entries to initiate calls. Please refer to the following steps:
- Press Menu to bring up the operation menu.
- Use arrow keys to reach Call History.
- Select the desired entry and press the “Call” soft key to establish the call.
Dialing from Phonebook
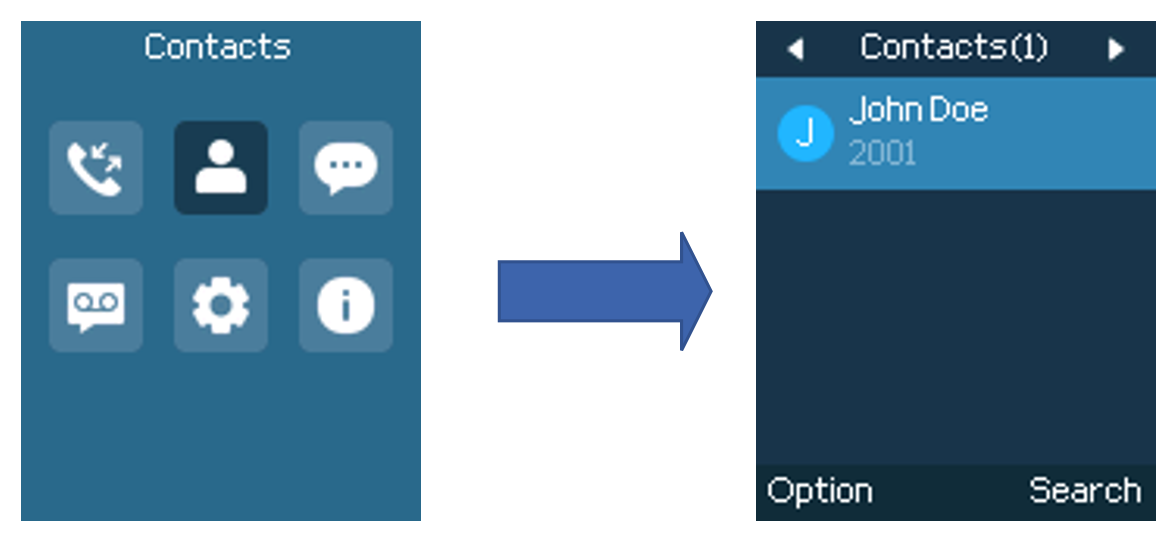
Users may use their contacts list to initiate calls.
- Press Menu to bring up the operation menu and use arrow keys to reach Contacts
- Select the contact to call and press the Dial Key to initiate the call.
Direct IP Call
Direct IP Call allows two phones to talk to each other in an ad-hoc fashion without a SIP server. VoIP calls can be made between two phones if:
- Both phones have public IP addresses; or
- Both phones are on the same LAN/VPN using private or public IP addresses; or
- Both phones can be connected through a router using public or private IP addresses (with necessary port forwarding or DMZ).
To make a direct IP call, dial the IP address of the target. Following the below syntax (Example target IP is 192.168.1.10):
– Dialing 192*168*1*10 (to use 5060 port by default)
– Users can specify the port number as follows 192*168*1*10#5060.
Answering Calls
When receiving an incoming call, you can answer the call using the following steps:
- Earpiece mode:
Press the Dial Key to pick up the call, or the “Answer” softkey (left softkey).
- Speakerphone mode:
Press the Speaker Key to pick up the call in speaker mode.
- Headset mode:
Press Dial Key to pick up the call, or “answer” softkey (left softkey) using a connected headset.
Auto Answer
Users can enable the Auto Answer feature to accept and automatically answer incoming calls.
If enabled, the WP8x6 will automatically answer incoming calls using speaker mode.
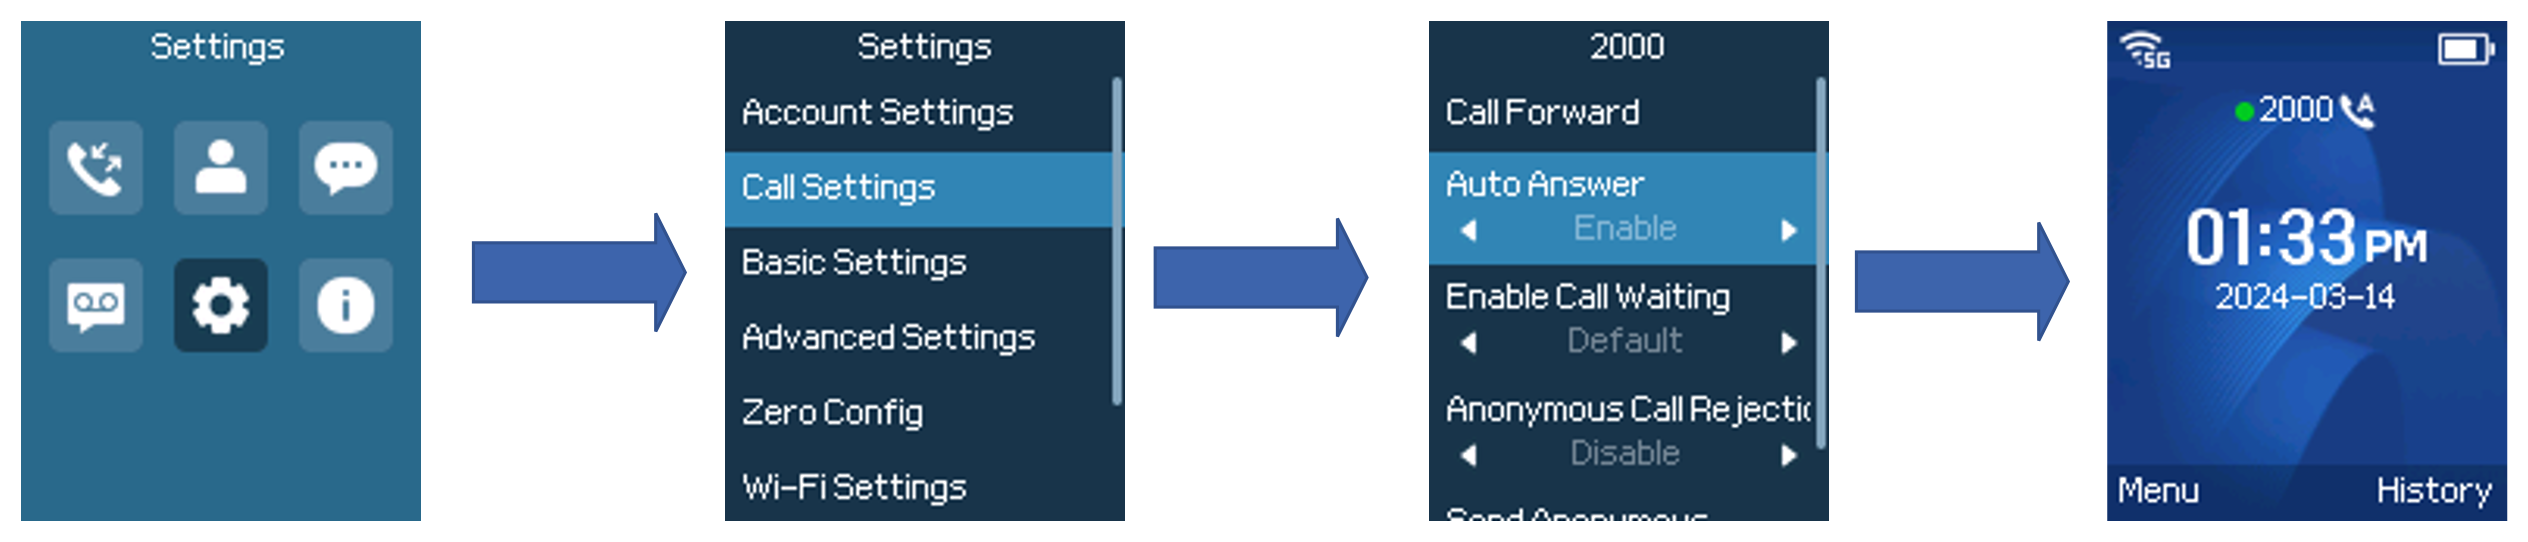
To activate/deactivate the auto answer feature:
- Using LCD Menu
- Press Menu to bring up the operation menu.
- Use arrow keys to reach Settings → Call Settings → Account x.
- Select which account will be enabling the Auto answer feature.
- Set “Auto-Answer” to “Enabled” to configure the auto-answer mode and press the “On-hook ” button to save the changes
- Using Web Interface
- Access Web GUI Interface.
- Navigate to Accounts → Call Settings.
- Set “Auto Answer” to “Yes”. (By default, set to “No”).
Ending Calls
To terminate the calls, press the Hang-Up key .
.
Rejecting Calls
To reject an incoming call, press the Hang-Up key.
Call Hold/Resume
- During an active call, press the right softkey “Hold” to put the established call on hold.
- To resume the call, press the right softkey “Resume” while the established call is being on hold.
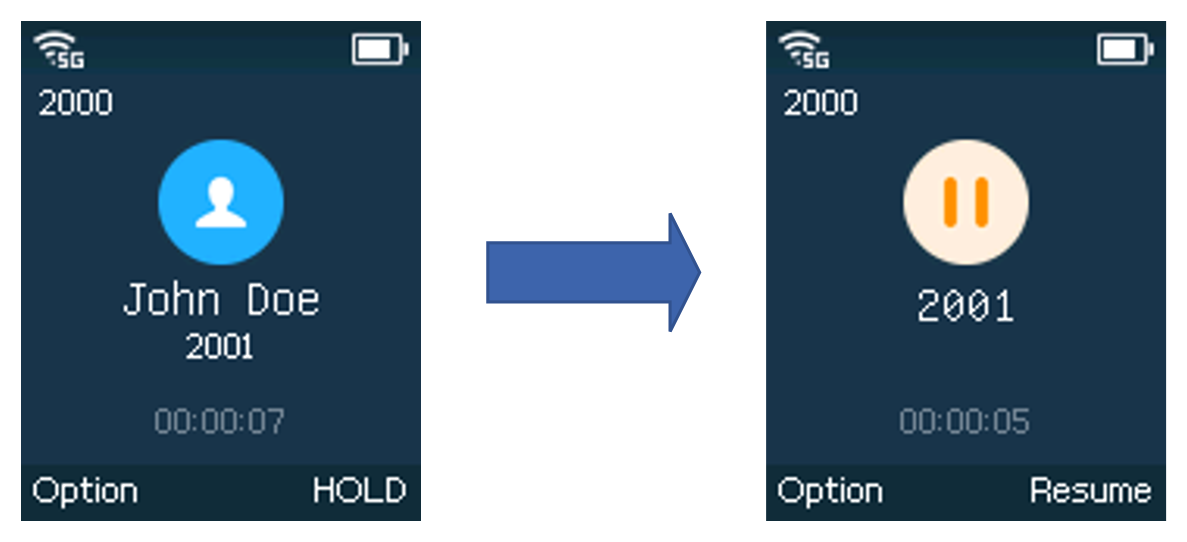
Call Waiting
This feature will notify you of a new incoming call during an established call and display the incoming call information visually on the LCD screen and a call waiting tone will be heard. If this feature is disabled, the new incoming call will be automatically rejected.
This feature is enabled from the Web GUI:
- Access Web Interface.
- Go to Accounts → Call Settings
- Set “Enable Call Waiting ” to “Yes”.
- Press the Save and Apply buttons to confirm the new settings.
Users now will be able to hear the call waiting tone and it will be visible as well on the LCD screen as displayed in the following screenshot.
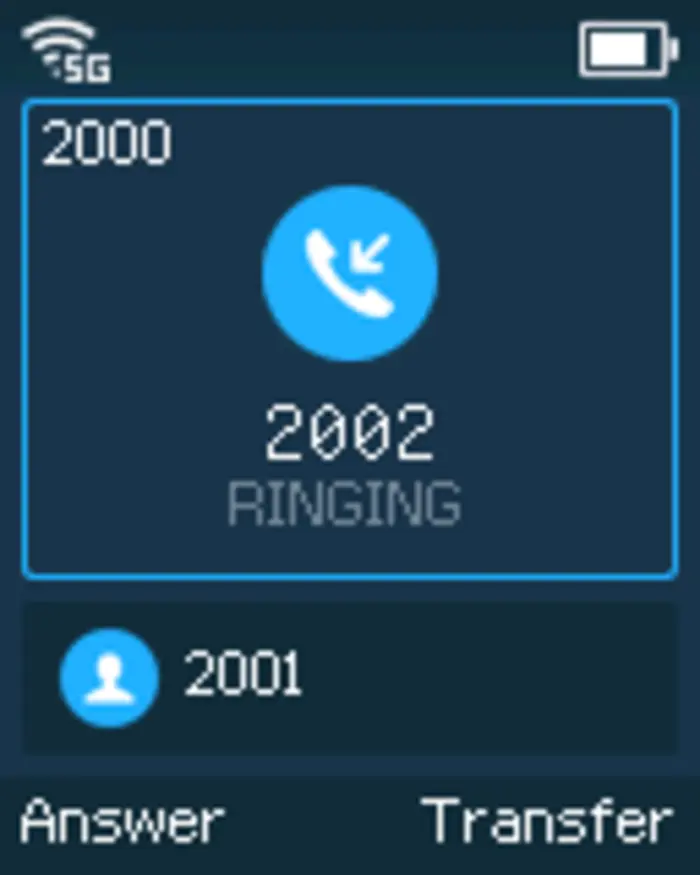
Do Not Disturb
You can activate or deactivate the DND mode for your accounts registered on the handset from its LCD menu, by following two methods, If DND mode is activated, all incoming calls will receive busy treatment depending on your configuration (forward to voice mail, busy tone…).
To enable or disable the DND mode :
- Click on the key and DND mode will be enabled.
- Go to Settings → Call Settings, from there, you can enable/disable Do Not Disturb
 and DND mode will be enabled.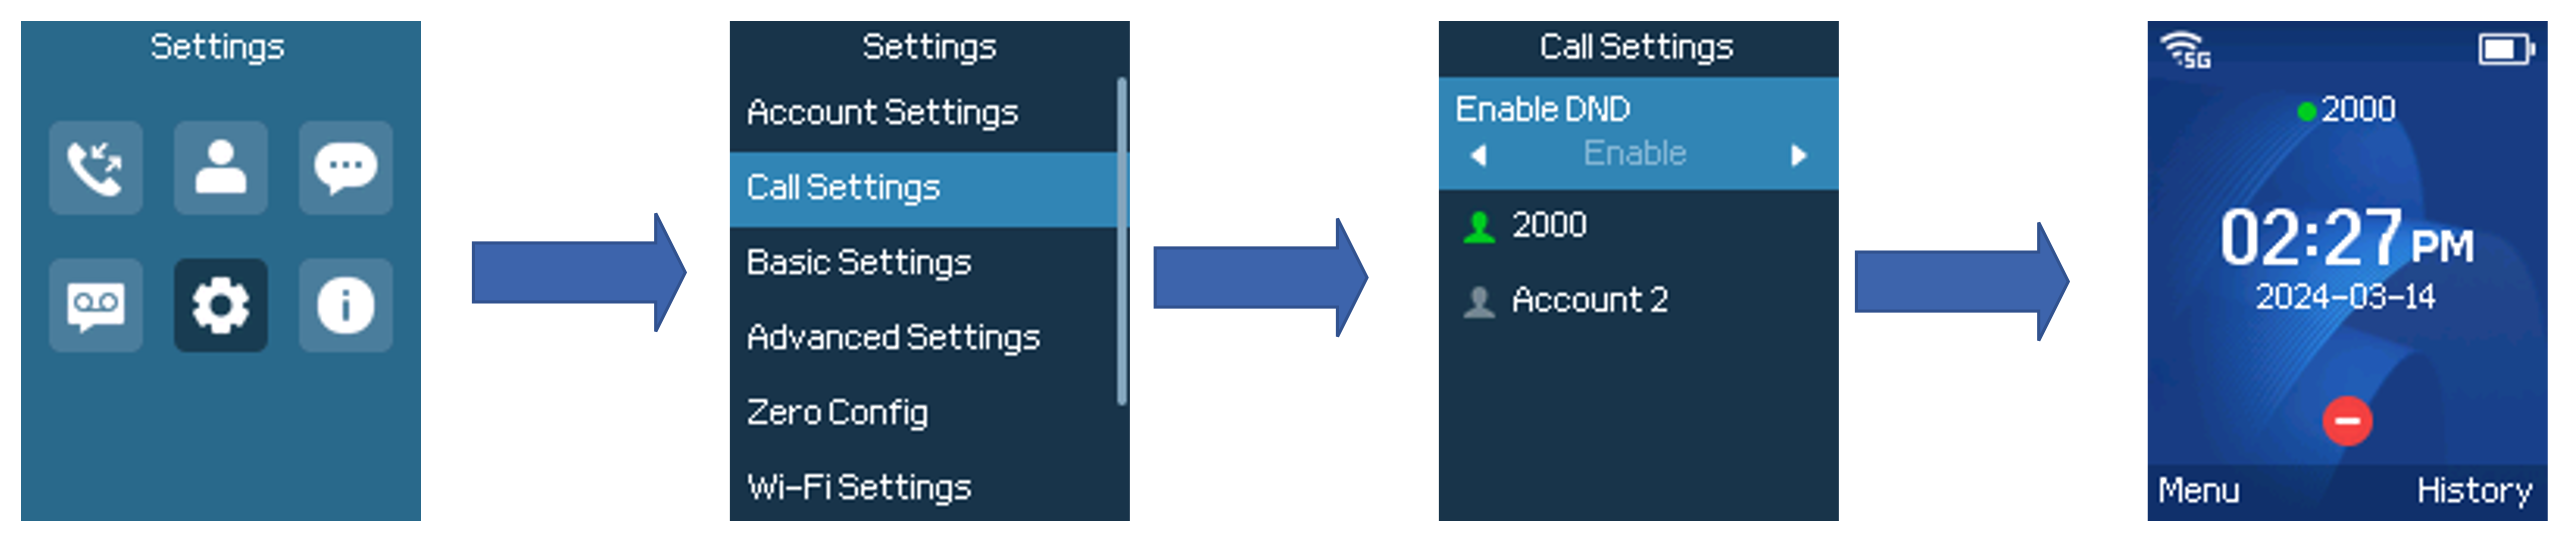
Call Forward
The call-forward feature will allow you to forward all incoming calls to the desired number. Three possible call-forward types are available.
- Forward Always: All incoming calls are forwarded to a specific number whether the phone is available or not.
- Forward Busy: All incoming calls are forwarded to a specific number when the phone is on a call.
- Forward No Answer: All incoming calls are forwarded to a specific number when the caller receives no answer.
To enable the call forward, please refer to the following steps:
- Press Menu to bring up the operation menu.
- Use arrow keys to reach Settings → Call Settings → Account x → Call Forward.
- Select which account will be enabling the call forwarding feature and navigate to “Call forwarding”.
- Set “Call Forward” to “On” and select the call forward
- Configure the parameters of the call forward mode and press the “Save” button.
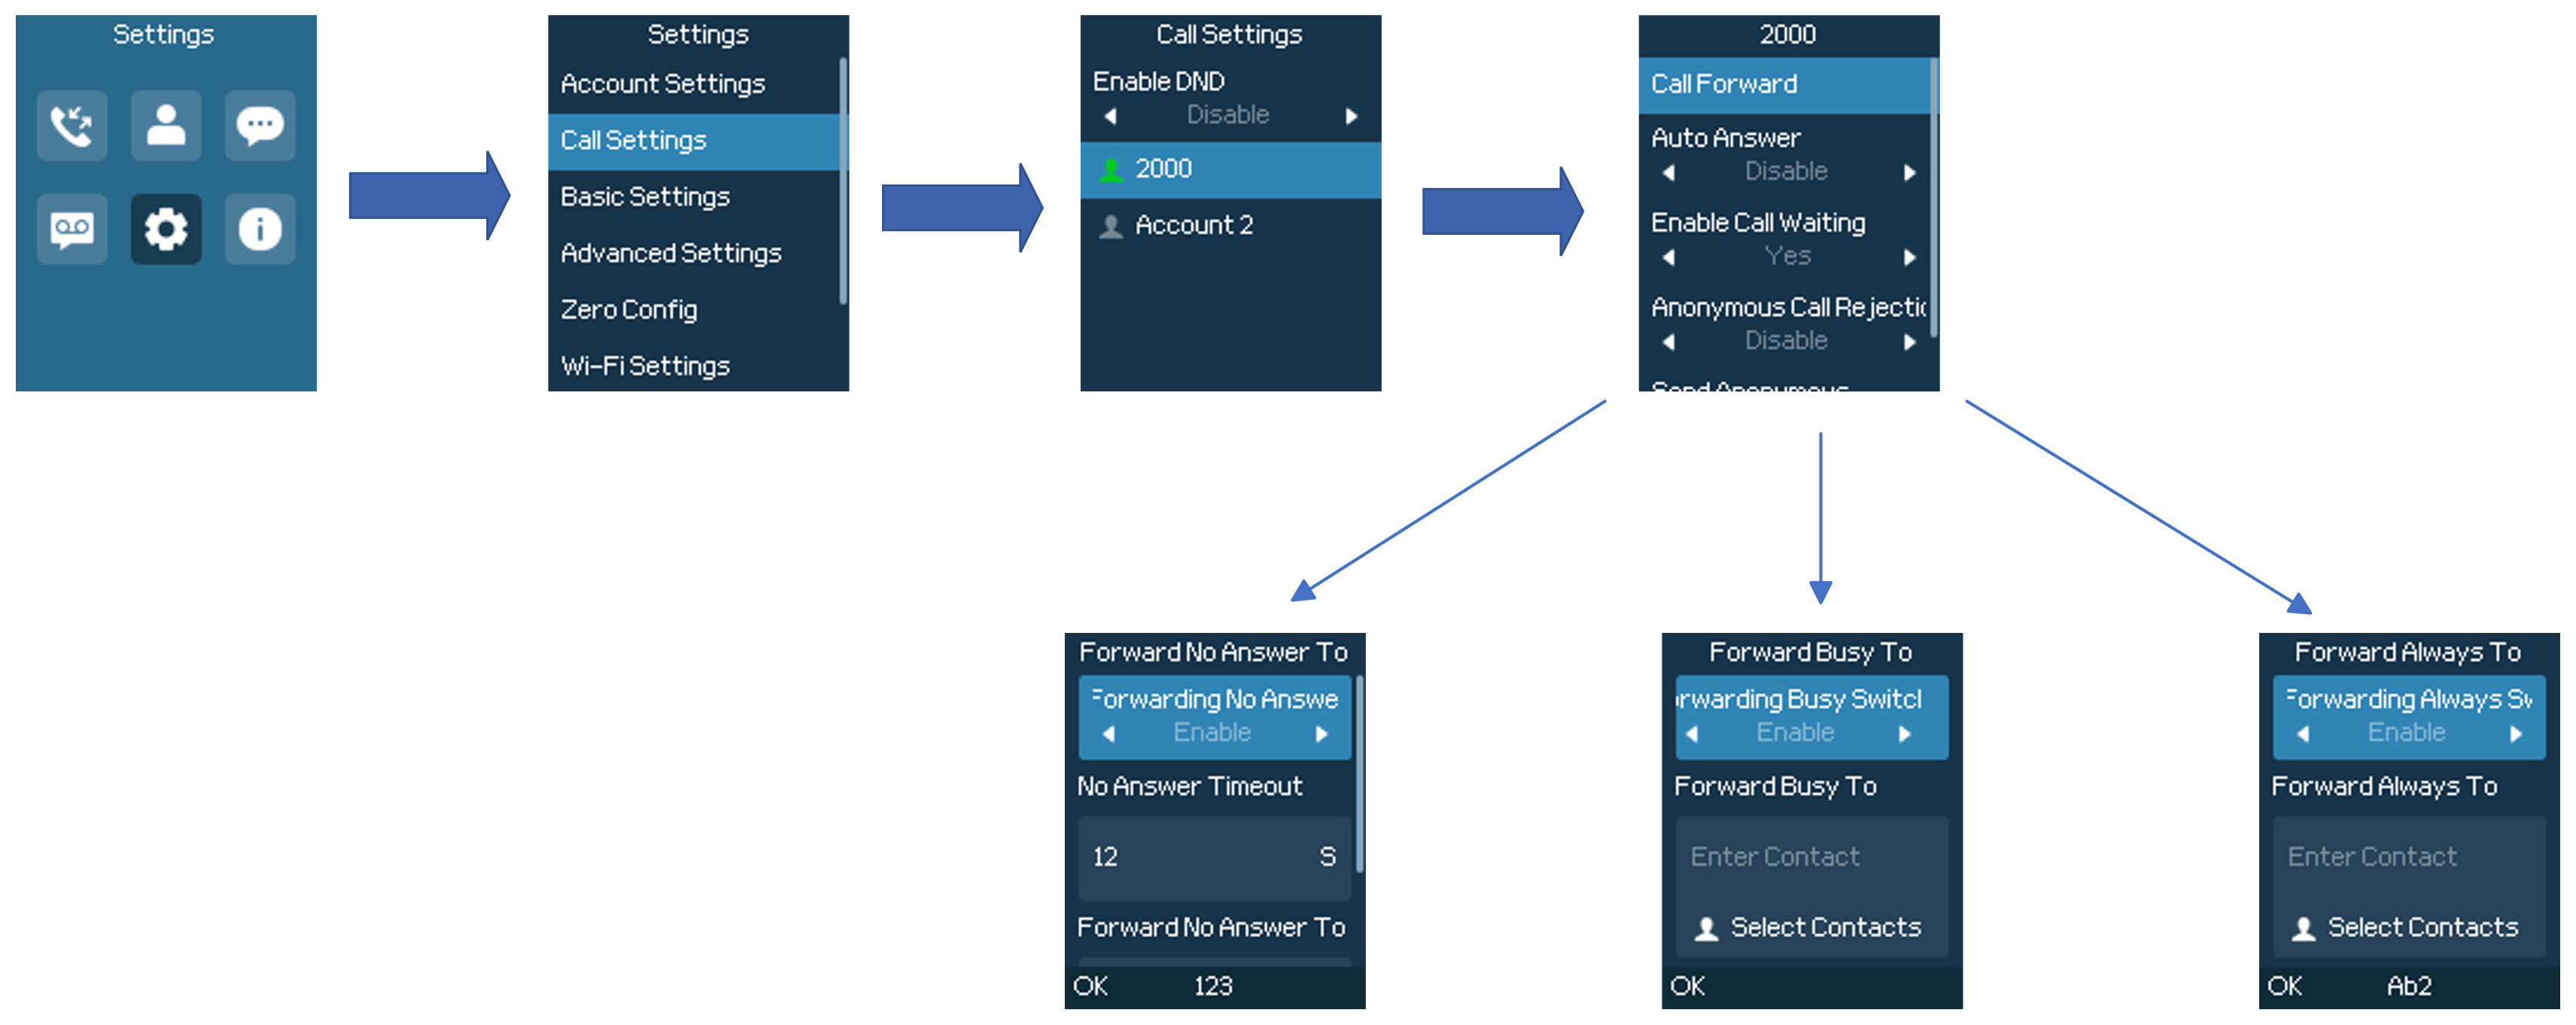
Call Transfer
The WP8x6 supports the call transfer feature, you can transfer a call to another party using one of the following ways:
- Blind transfer: Transfer a call directly to another party without consulting
- Attended transfer: Transfer a call with prior consulting.
- Quick Transfer: Use the Quick Access key to transfer a call via a contact in Favorite Contacts.
Blind Transfer
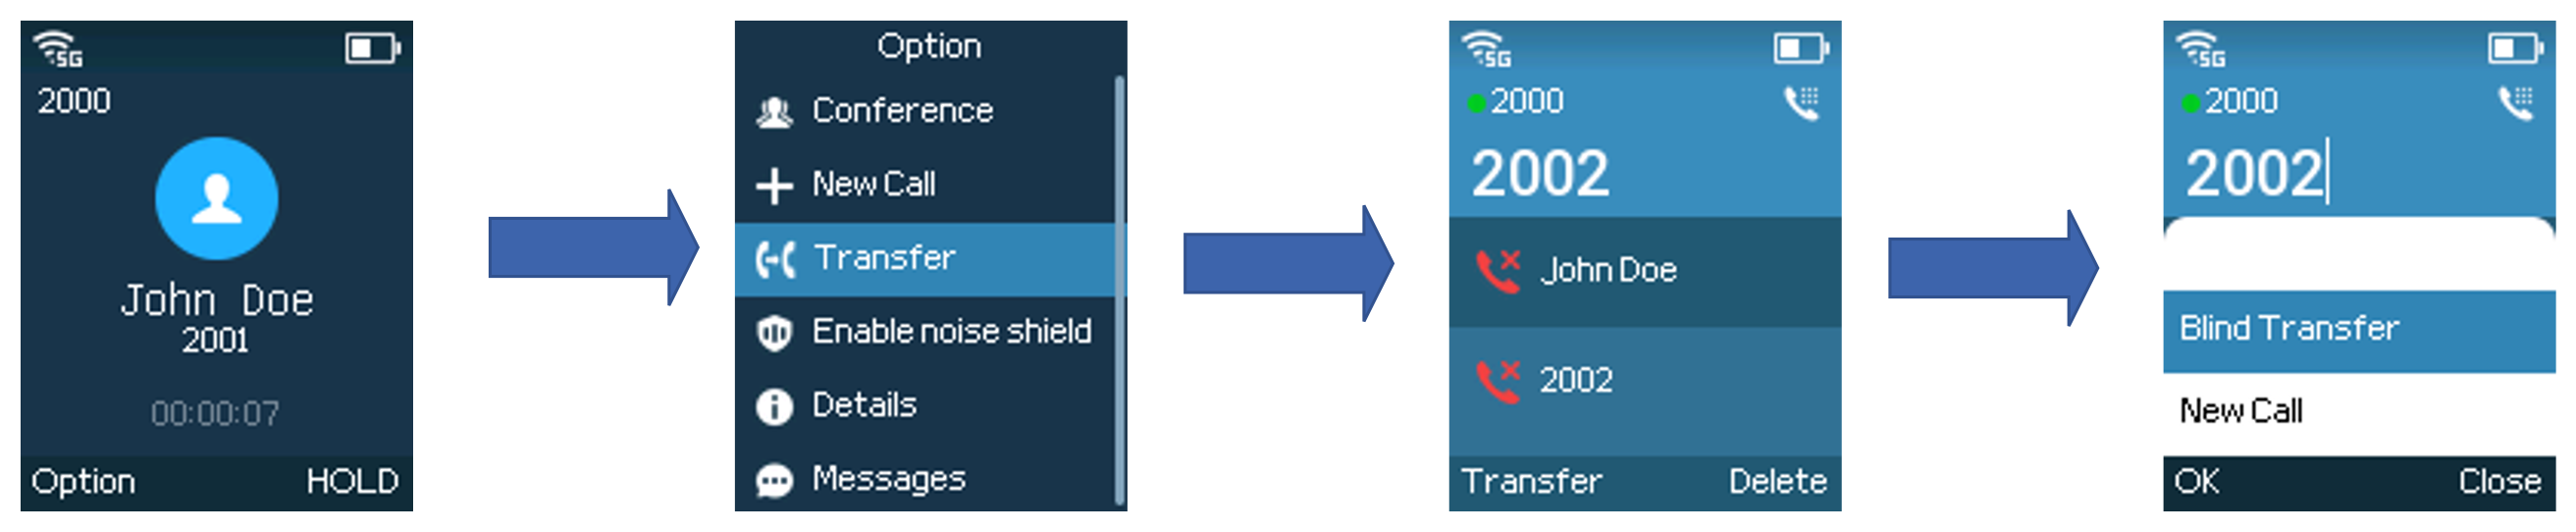
- Press the “Transfer” soft key during a call, and then enter the number you want to transfer the call to.
- Press Options then choose Transfer option
- Select Transfer then press on Blind Transfer key.
- The call is connected to the number you specified, and the LCD screen prompts Call Transferred.
Attended Transfer
Using New Call Softkey
- During an established call, press Options → New call.
- Choose the line and enter the number you want to transfer the call to, then press the dial key. The initial call will be put on hold
- Once the second call is established, press Options → Transfer
- Select the initial call on hold, and press Transfer to complete the transfer.
Using Attended Transfer Softkey
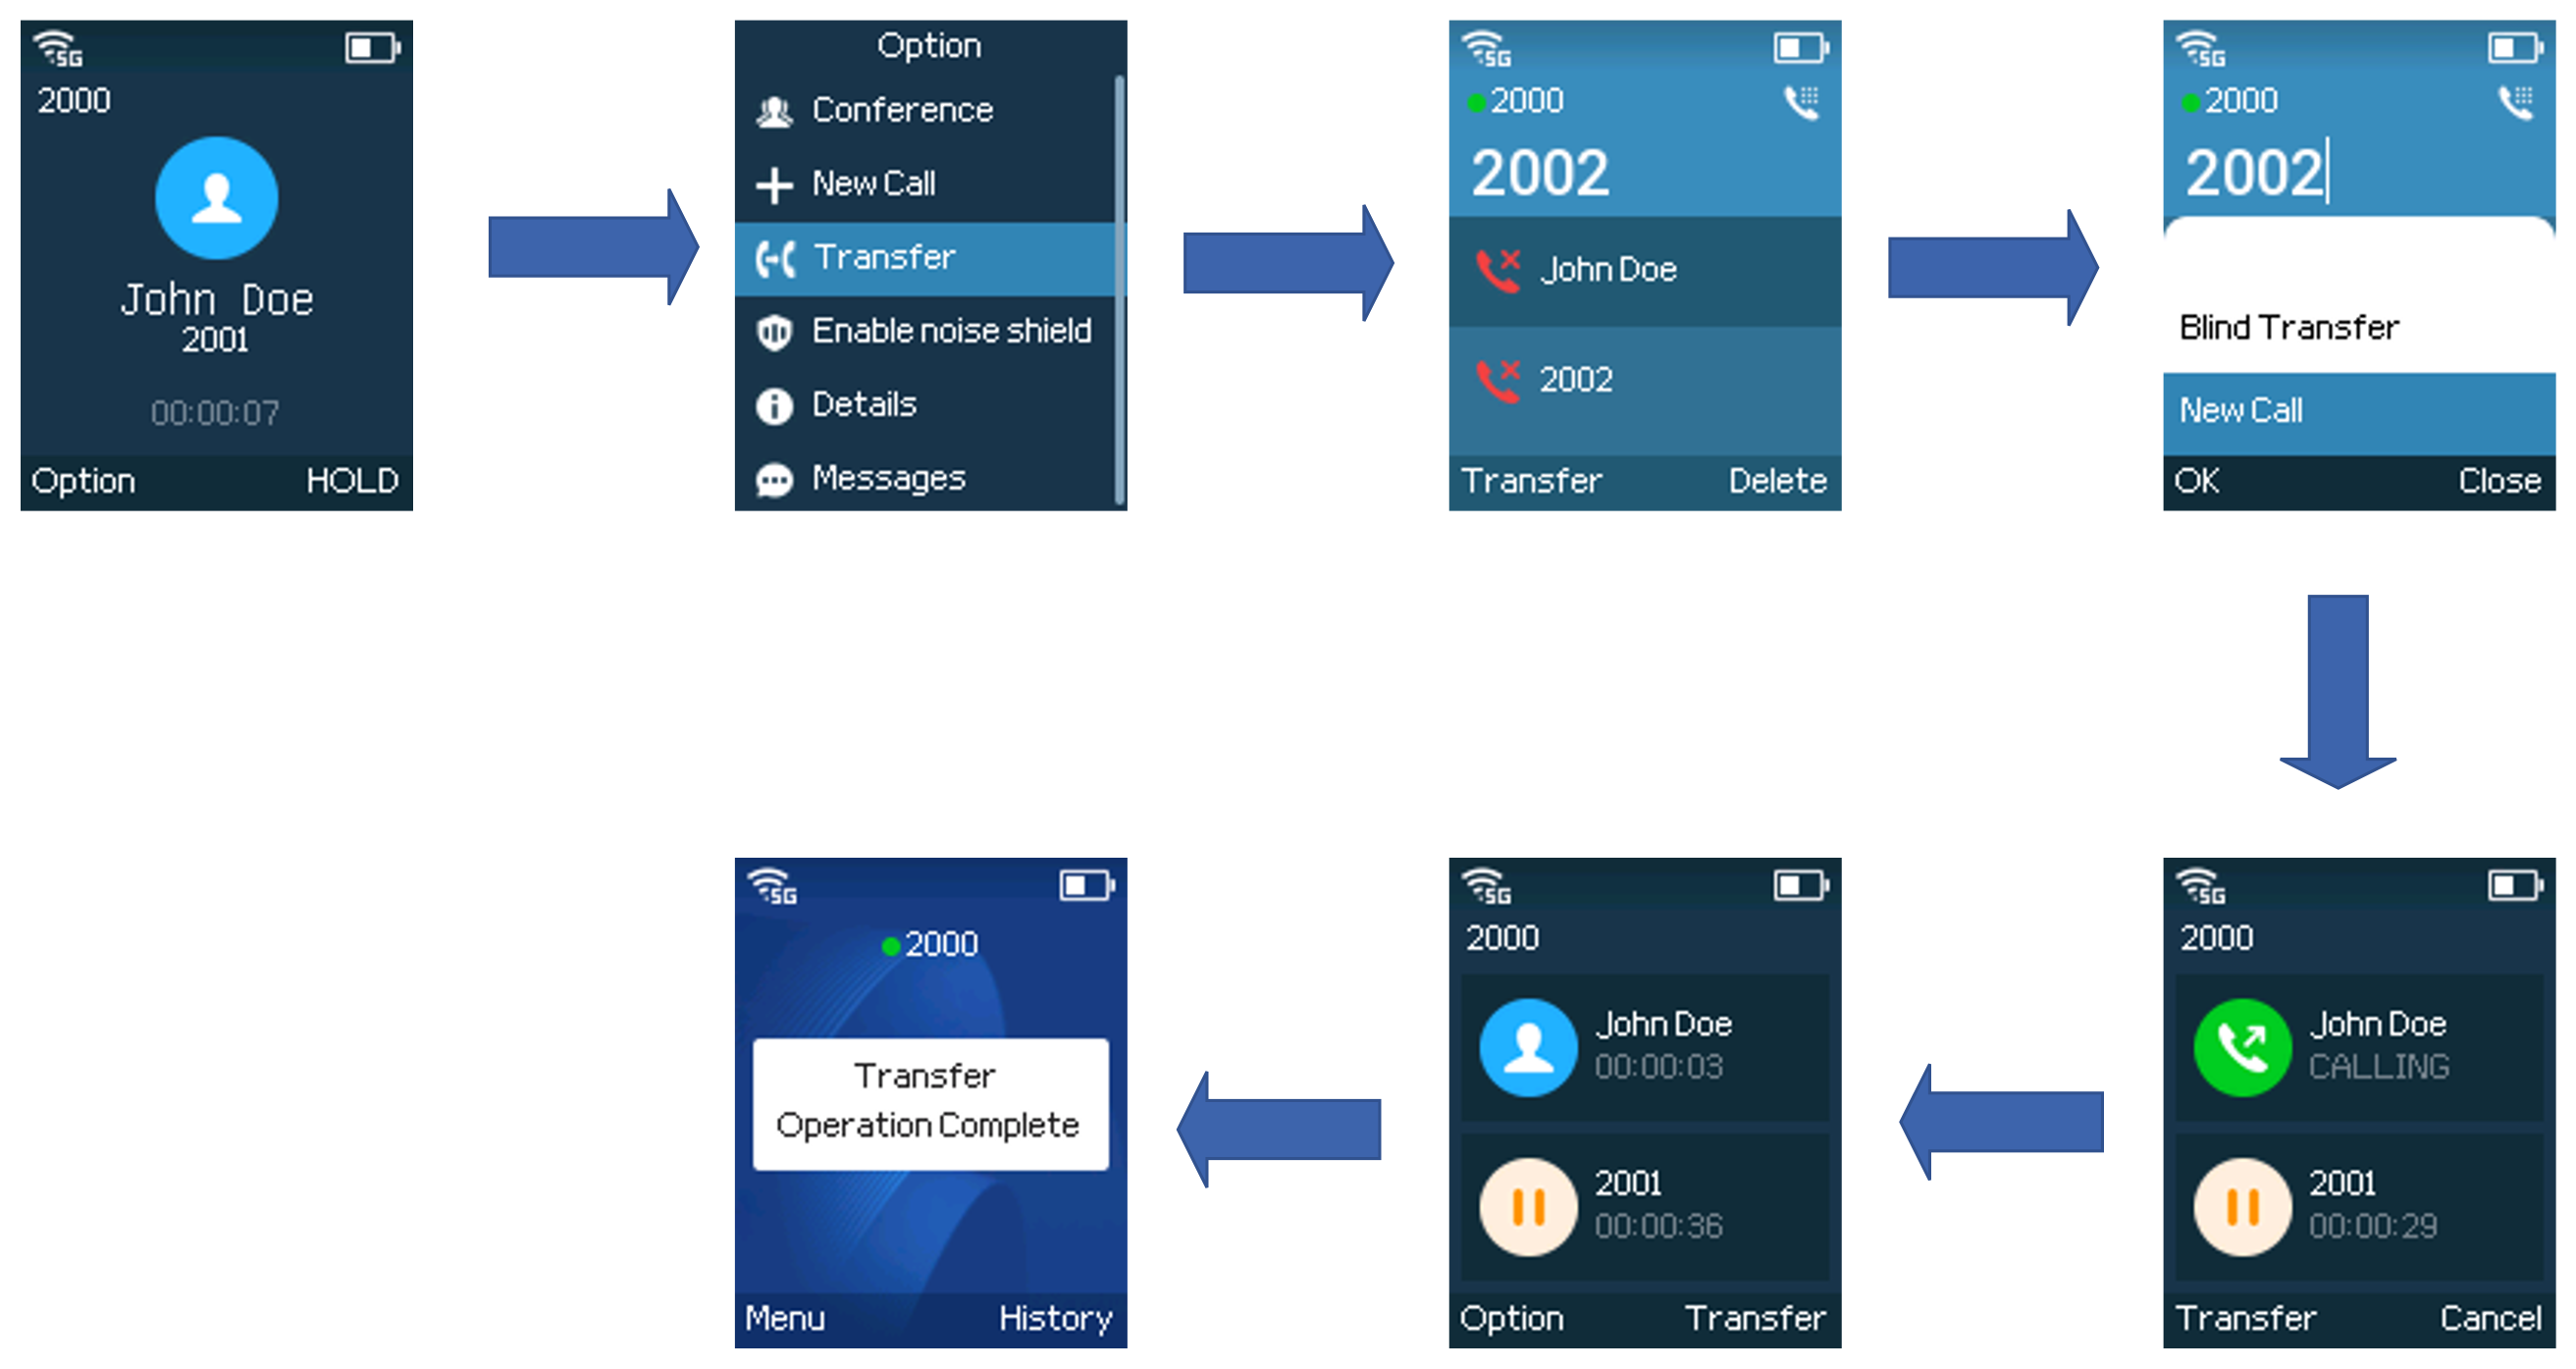
- During an established call, press Options → Attended Transfer.
- Choose the line and enter the number you want to transfer the call to, then press the “New Call”, the initial call will be put on hold
- Once the second call is established, Press the “Transfer” key to complete the transfer.
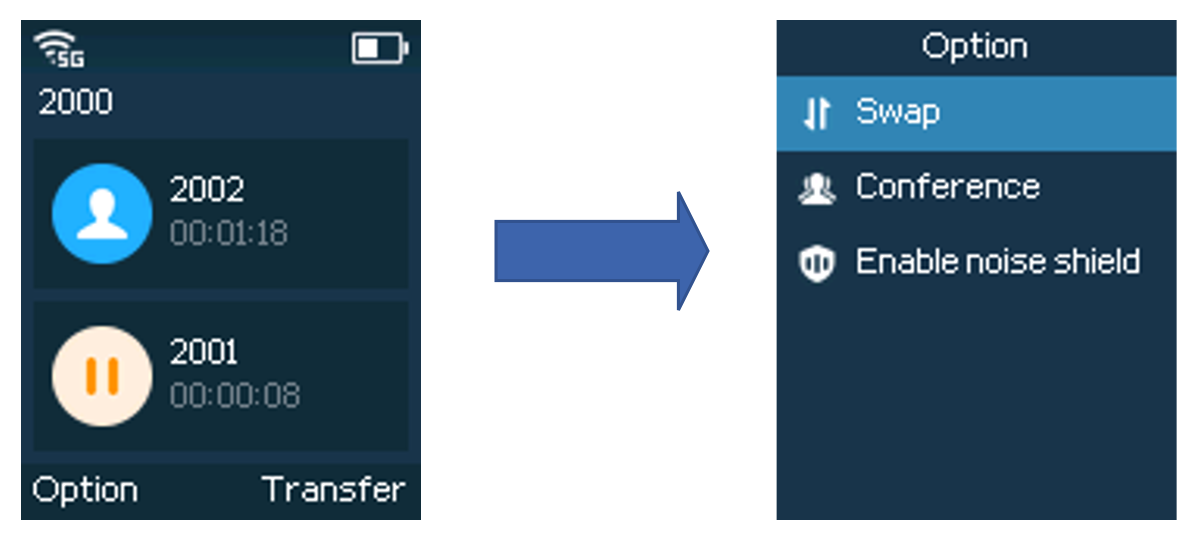
- The user can “swap” between the calls, to swap between the current call and the call put on hold Click on Options → Swap
Quick Transfer
The Quick Access key can be used during a call to perform a blind transfer or an attended transfer. This is achieved by adding the transfer destination to the Favorite contacts list and long-pressing the Quick Access key during the call to initiate the transfer.
Below are the steps to transfer a call using this feature:
On the WP8x6 Phone
- Press Menu to open the operation menu.
- In Contacts, navigate to the contact number to be added to Favorites.
- Press the Options softkey.
- Select Add to Favorite, then confirm by selecting Yes.
On the Web UI
- Navigate to Application → Quick Access.
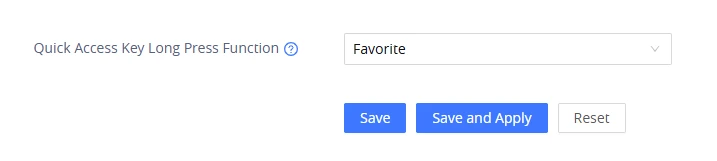
- Under Quick Access Key Long Press, select Favorite.
- Click Save and Apply.
Transferring a Call Using Quick Transfer
- During the call, long-press the Quick Access key.
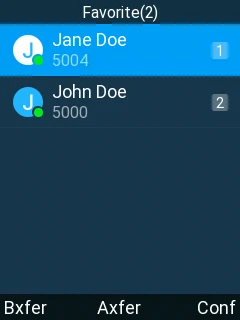
- On the Favorite contacts list, select the contact to transfer the call to. The list can be browsed using the navigation keys or the corresponding number for the contact can be entered on the keypad to select it.
- Press Bxfer softkey to perform a blind transfer, or Axfer softkey to perform an attended transfer.
- If Axfer is selected, press the Transfer softkey to finalize the transfer.
Speed Dial
Speed dial allows users to perform single-digit dialing to predefined numbers. This feature is particularly useful to speed up dialing frequently used or hard-to-remember numbers. A maximum of 10 speed dial numbers is allowed. For example, the digit key 2 is configured as a speed dial key and assigned the number 2001, the phone will dial out the number 2001 directly when you long press digit key 2.
To configure the speed dial (create, edit, or delete) numbers, proceed as the following steps:
- Press Menu to bring up the operation menu and use arrow keys to reach Settings → Basic Settings → Key Customization
- You have then the option to choose under which category of programmable keys you want to define the Speed Dial key, in our case we will choose the Multi-purpose key
- Select the mode to Speed Dial
- Select the associated account and the number to be dialed.
- Press the “Save” softkey to save the configured speed dial numbers.
- Once the Multi-purpose key is pressed, the speed dial will be initiated.
 , the speed dial will be initiated.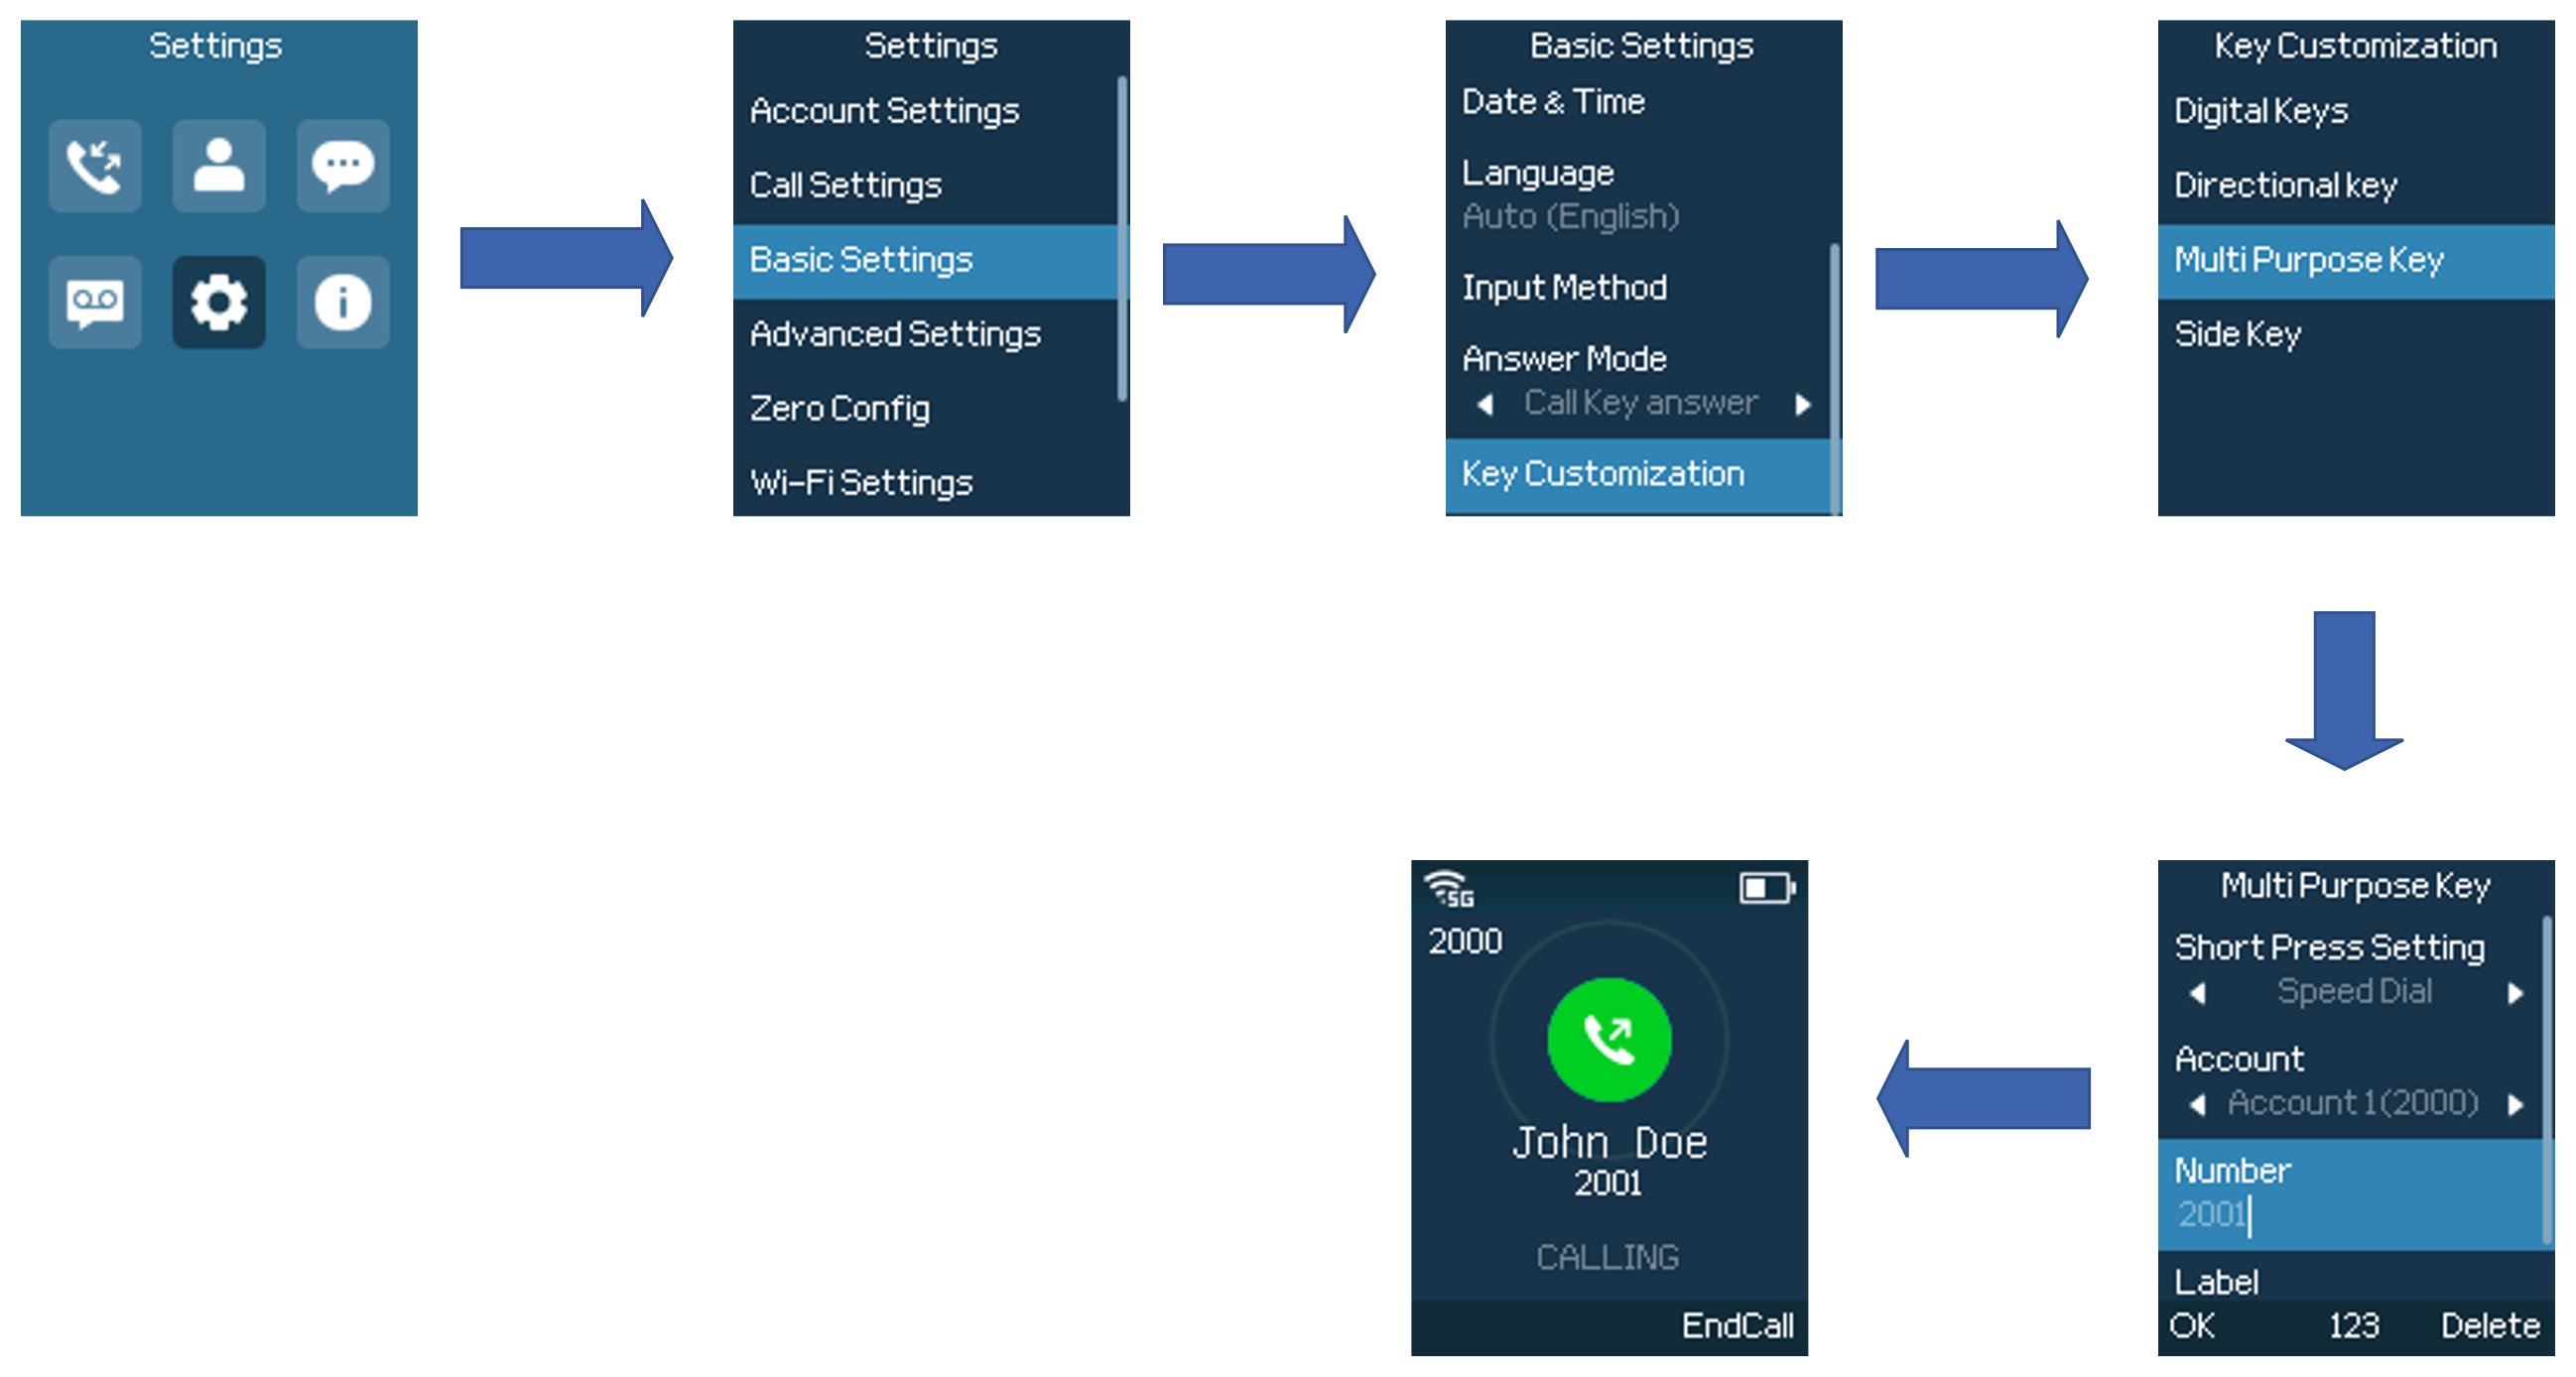
N-Way Conference
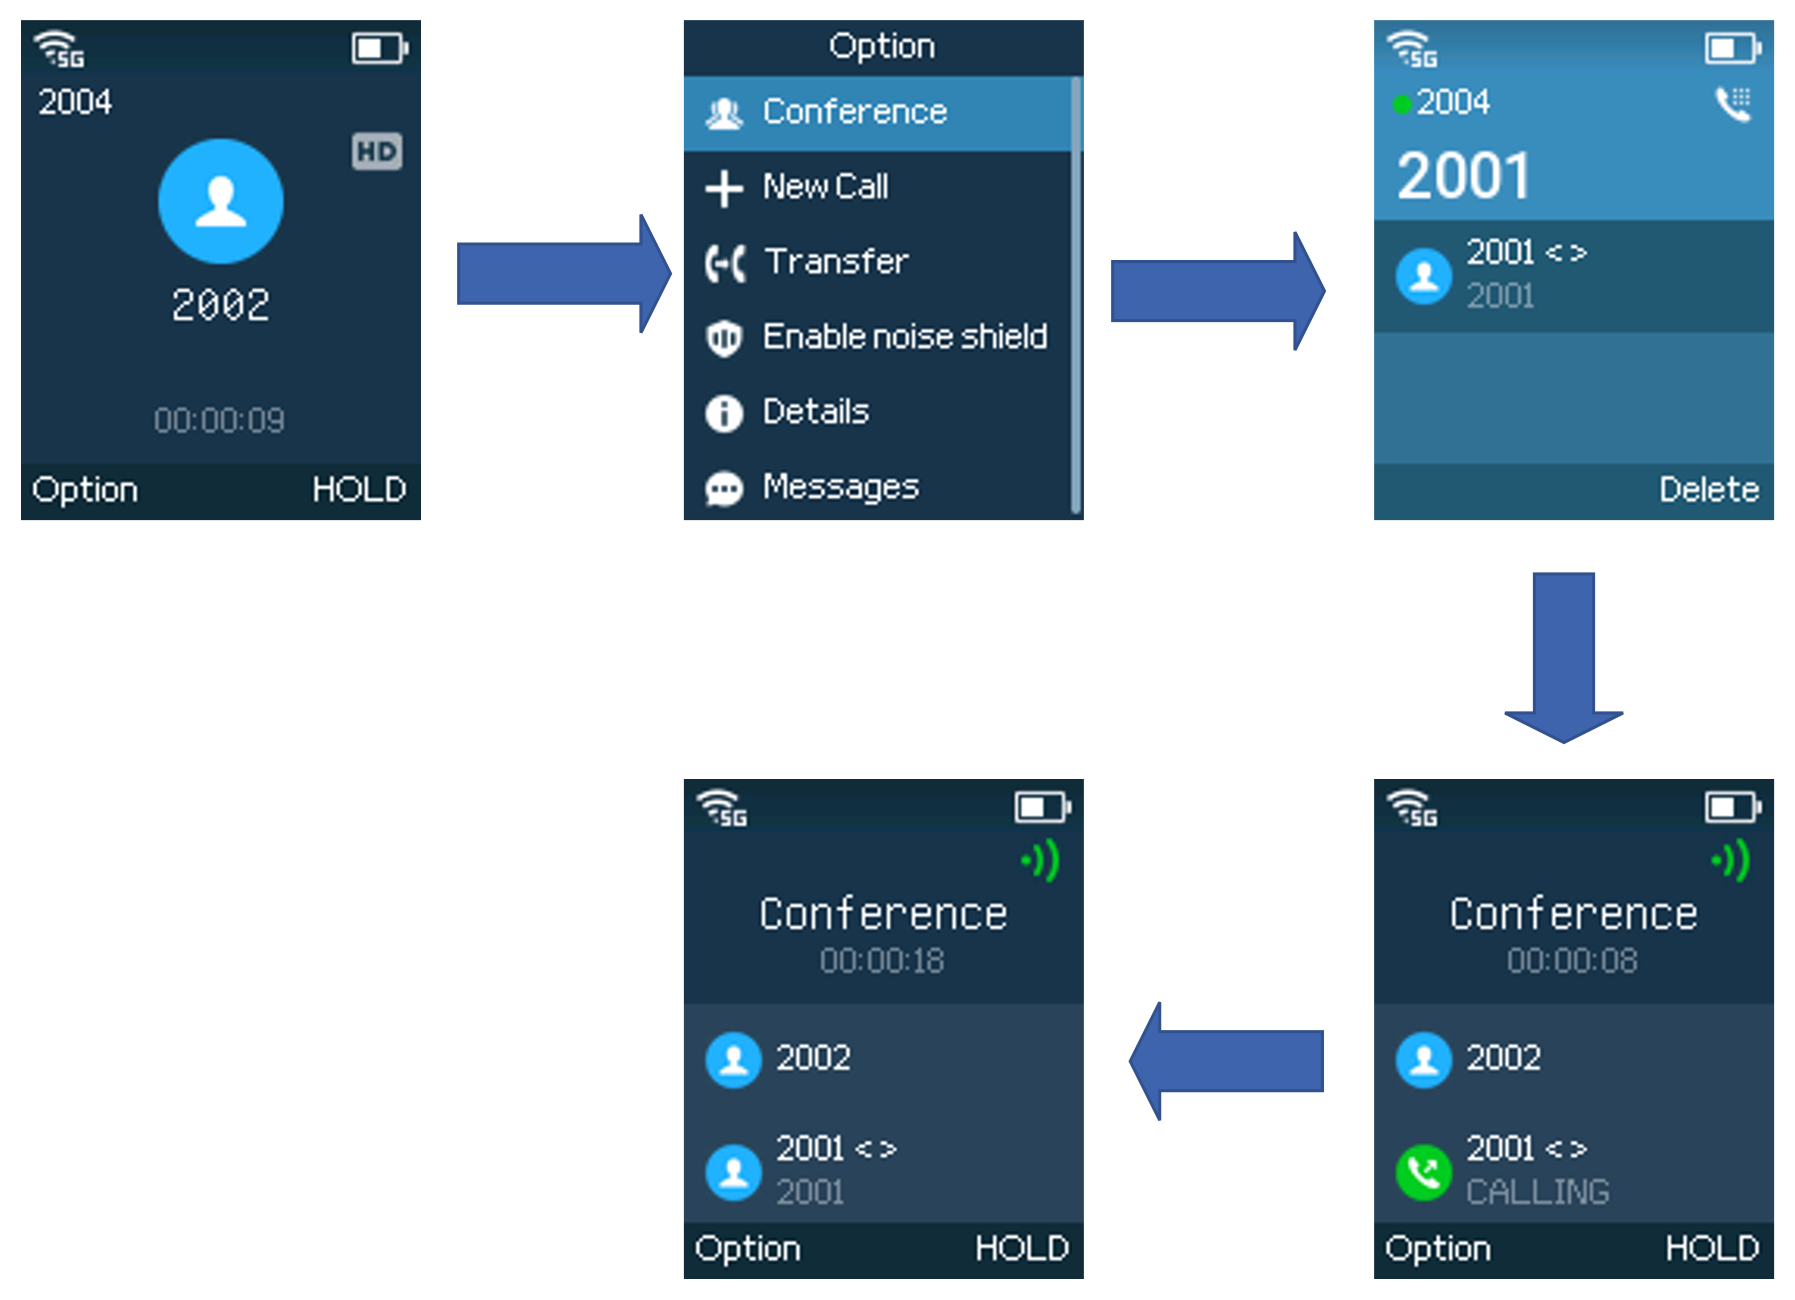
The WP8x6 supports creating a local conference with other parties (including the handset starting the conference). To start a 3-Way conference for WP816, or a 4-Way Conference for WP826/WP836, follow the below steps:
- Place a call to the first party and press the left softkey “Options”, then select “Conference”.
- Enter the number of the second party you want to add to the conference and pressto initiate the call.
- Once the Third-party picks up the call, the conference will be automatically initiated
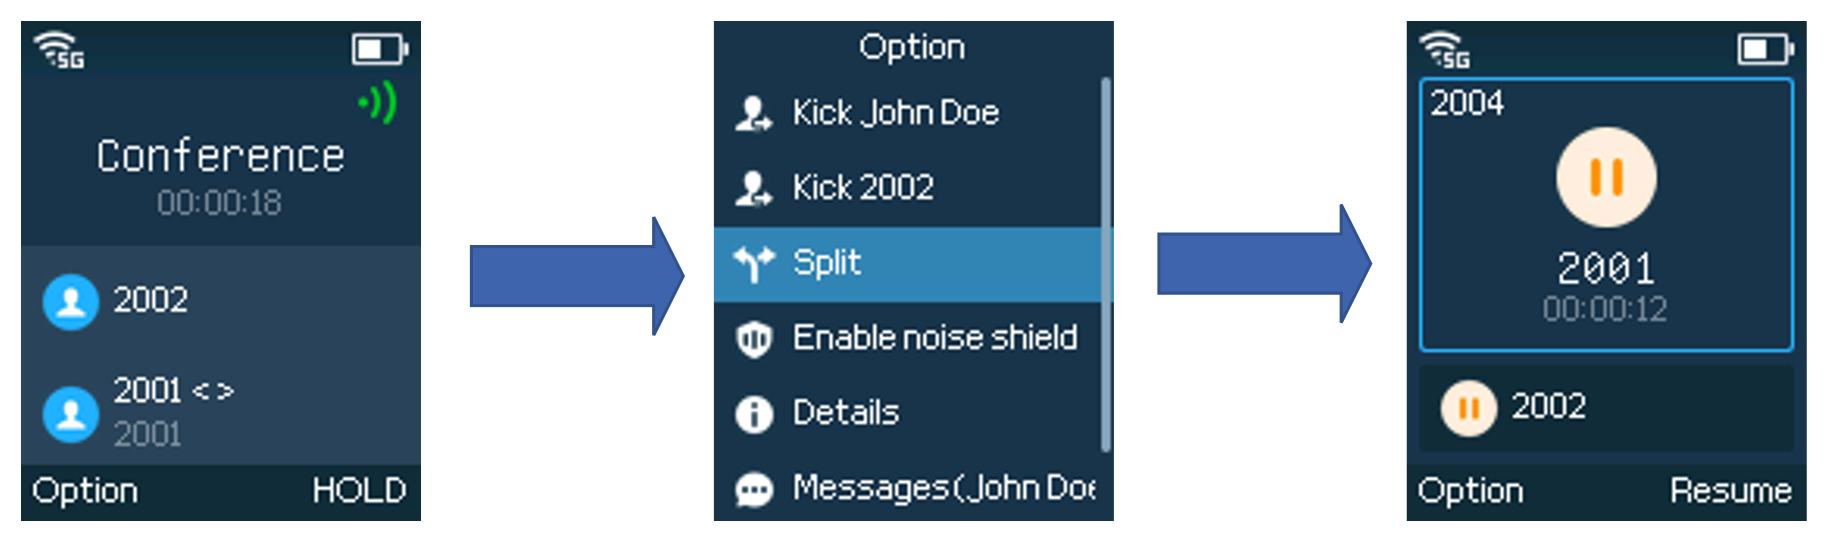
Please refer to the following screenshots for more details.
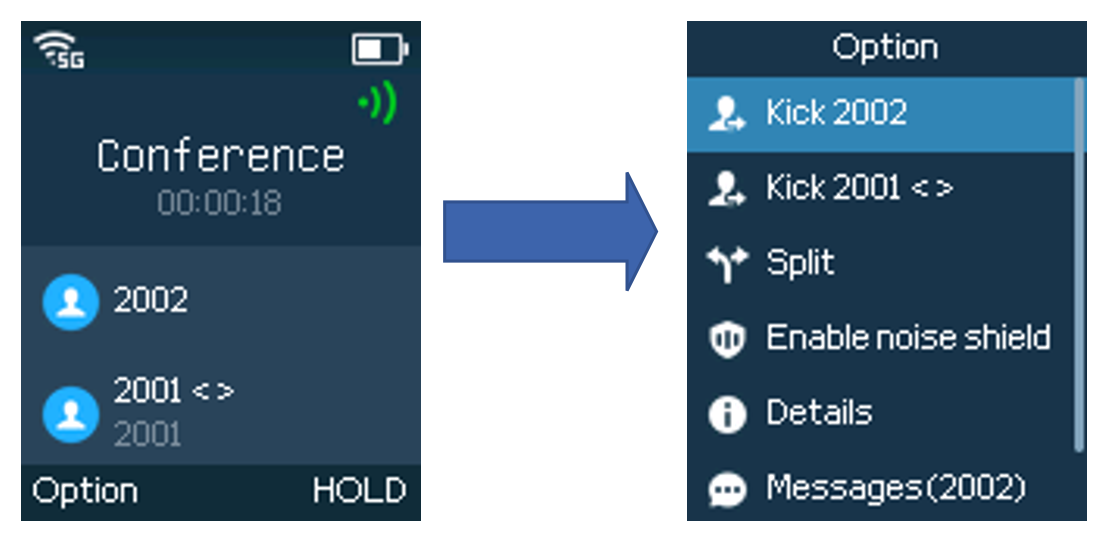
4. You can split the conference between the members or kick a specific member out of the conference, please refer to the screenshots below for more details
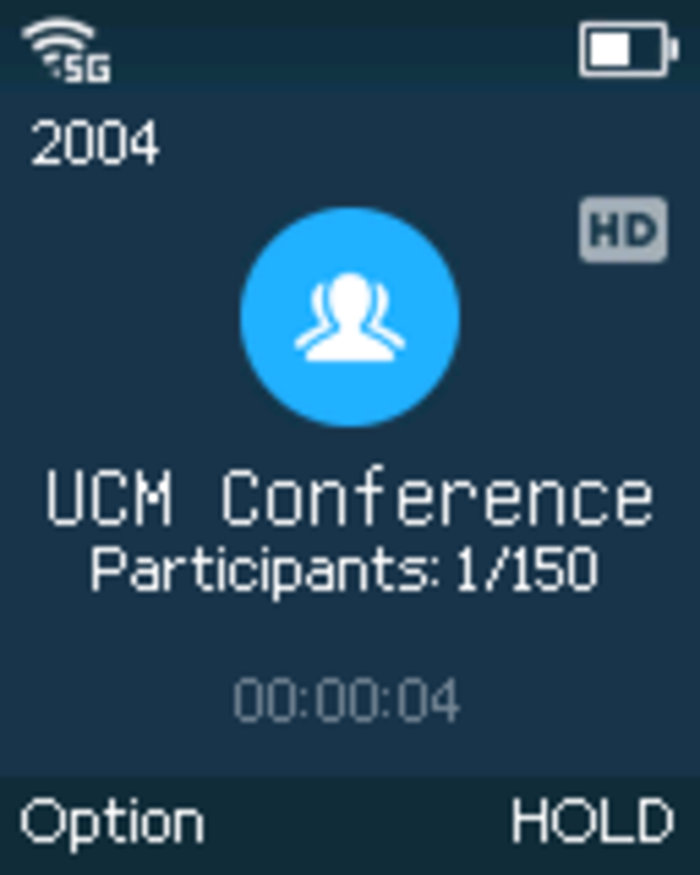
UCM Conference
Participate in an UCM Conference Room
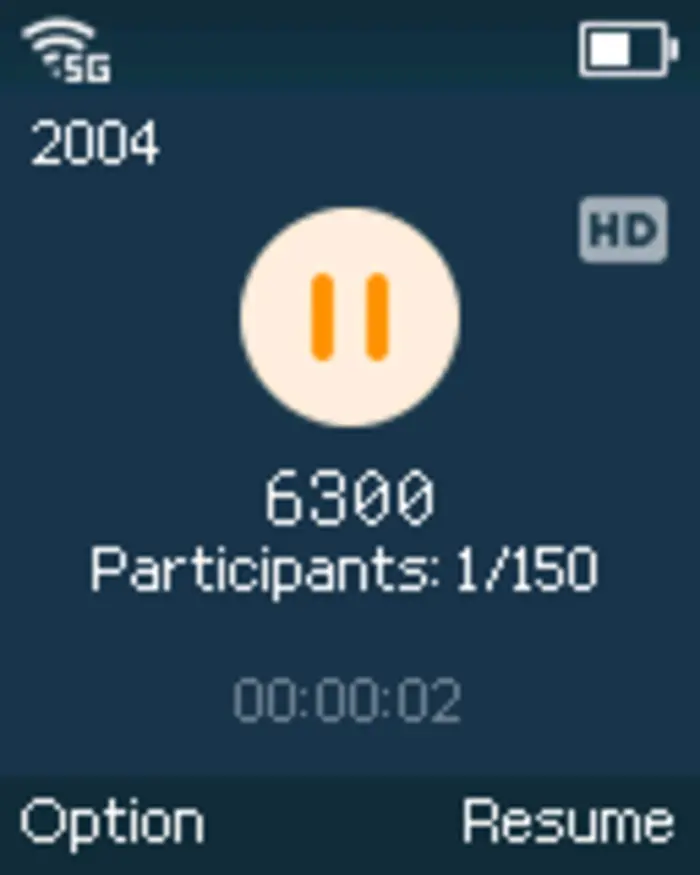
Users could dial the UCM conference room extension to join the conference. If a password is required, enter the password to join the conference as a normal user, or enter the admin password to join the conference as an administrator.
Voice Mail
The voice mail feature ensures that you will never miss any important messages. It permits either to leave voice mails to someone else or receive and listen to voice mails via the handset
Set Voice Mail ID
There are 2 ways to set Voice Mail Feature Code, either using the Handset Menu or Web Interface.
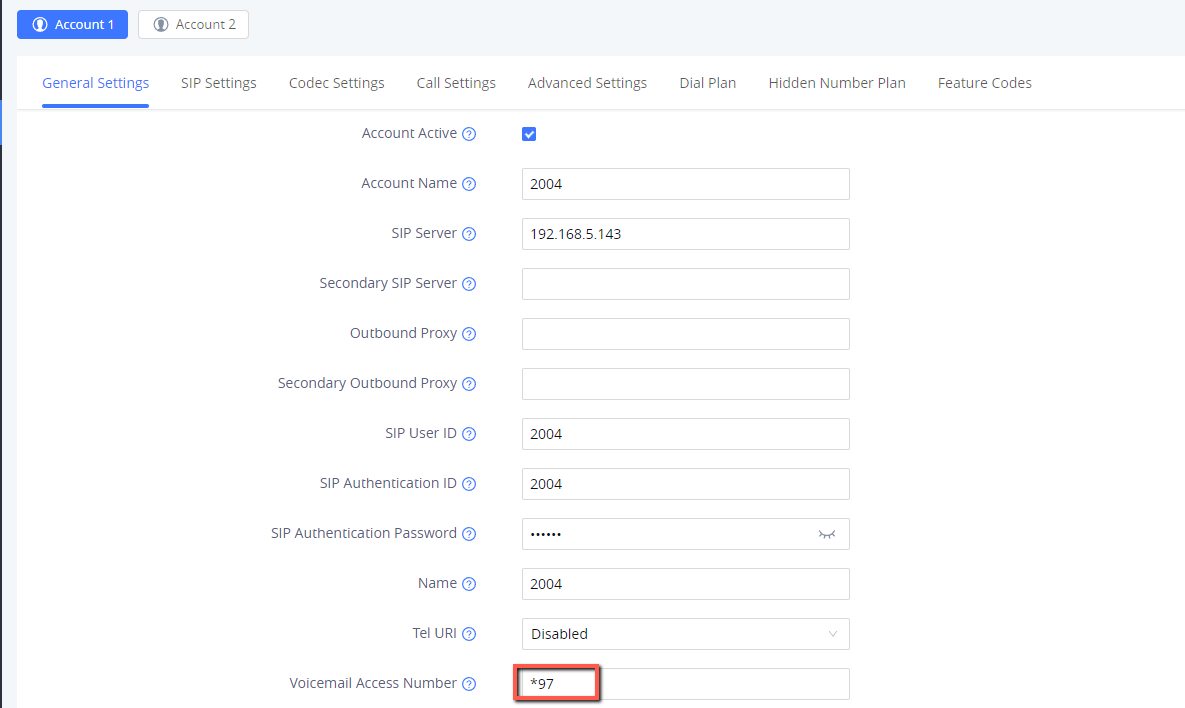
Note: The Voice Mail Feature Code depends on the service provider or IP-PBX used. For example, if UCM6xxx is the SIP server, the Voice Mail Feature Code is *97.
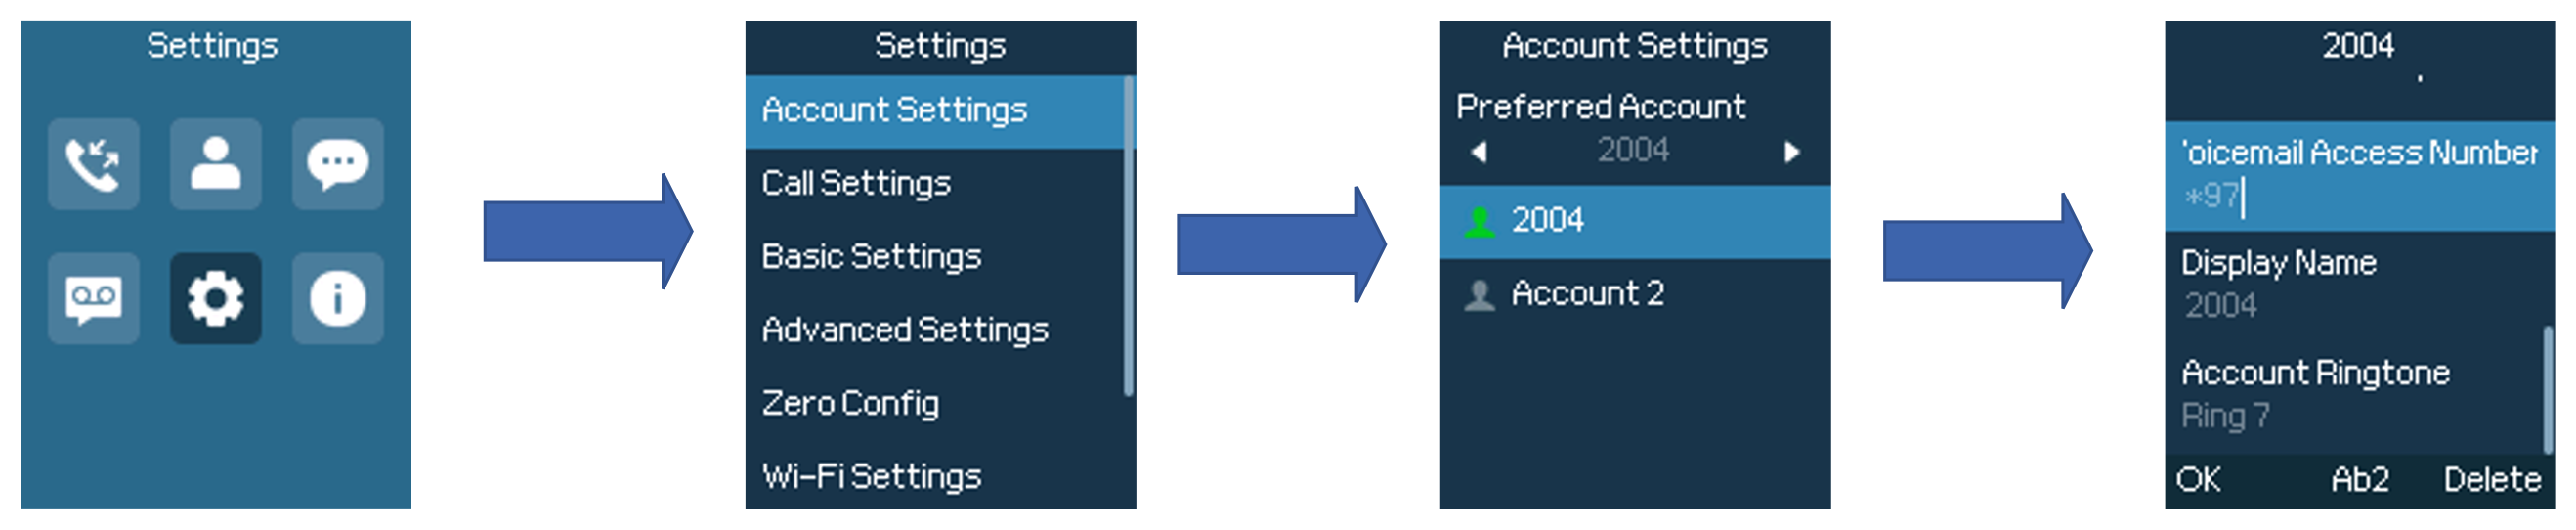
- Using LCD Menu
- Press Menu to bring up the operation menu.
- Use arrow keys to reach the Settings tab, then Go to Account settings
- Select the desired account and configure the Voicemail ID number, then press “Save” softkey.
- Using Web Interface
- Access Web GUI Interface.
- Go to Accounts → Account x → General Settings
- Configure Voice Mail Access Number.
Play Voice Mail Messages
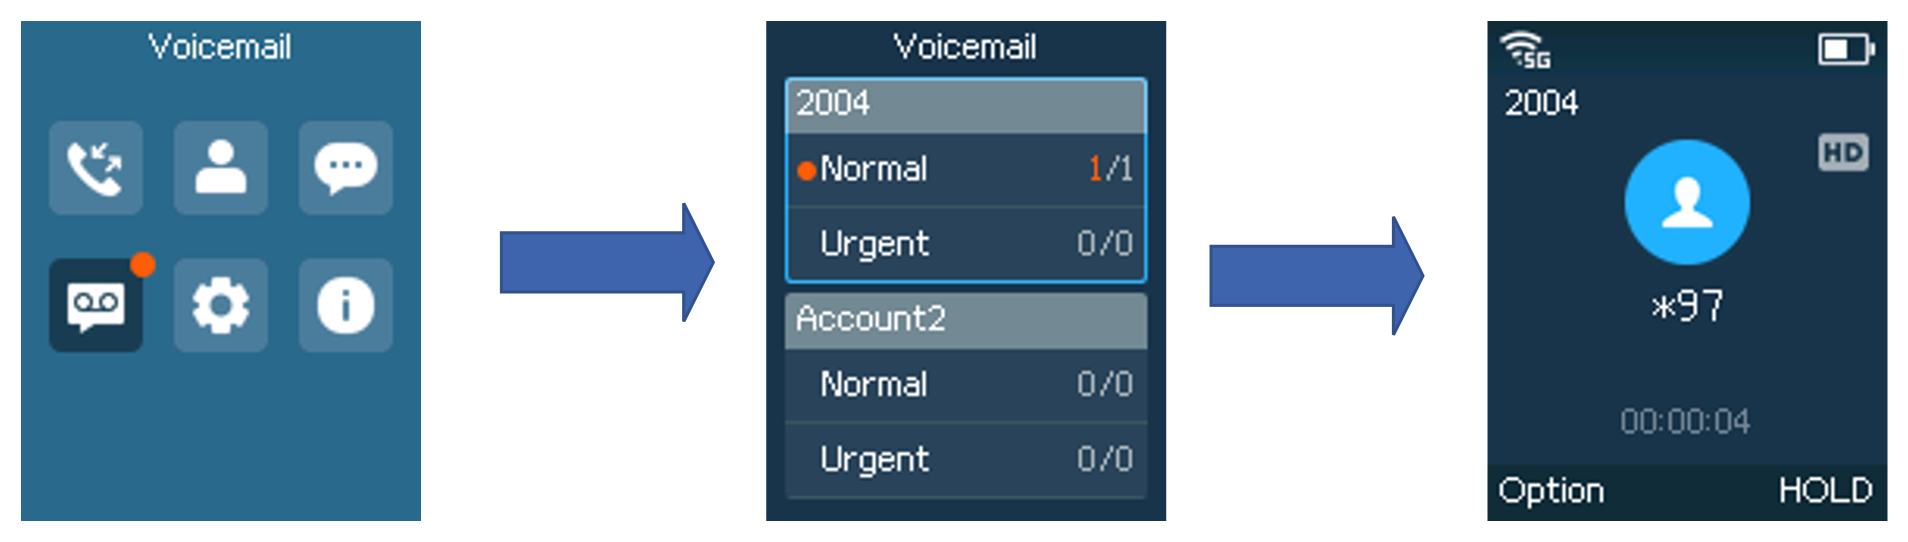
- Press Menu to bring up the operation menu.
- Use arrow keys to reach the Voicemail tab.
- Choose the account, press the “Select” button, and enter your Voicemail password then you can select visually and retrieve your voice messages saved on your voicemail and listen to each voicemail.
Note: this feature is compatible with UCM6xxx on v.1.0.20.6 or higher.
CONTACTS
Users can manage local contacts by adding, deleting, and modifying every single contact. Users could access contacts under the handset Menu. Please, refer to the following screenshots:
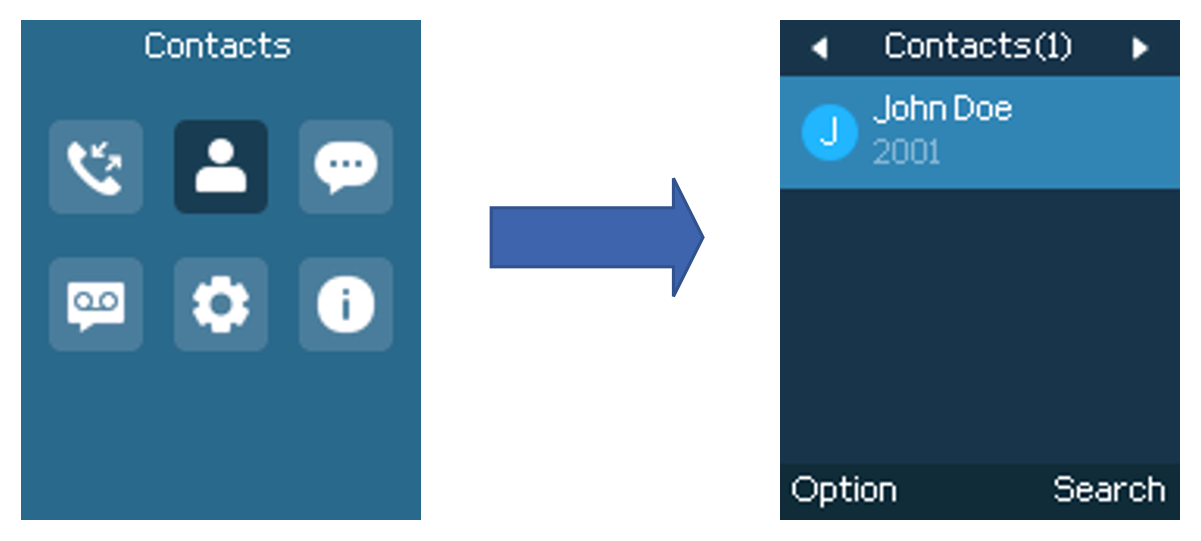
There are three different types of phonebooks under the contacts page:
- Local Phonebook:
This list contains all the contacts stored directly on the WP8x6 device. These are the contacts that have been manually added or imported to the phone.
Contacts can have up to 10 numbers, categorized as Work, Home, Mobile, or Conference, with multiple entries allowed per category.
- LDAP Phonebook:
This list includes contacts synchronized from an LDAP server. These contacts are retrieved based on the LDAP configuration set up on the WP8x6 device.
- Groups:
This list shows the groups stored on the WP8x6 device. Groups can be created manually on the phone by pressing the Add softkey, entering the group name and ringtone, and adding members from the phonebooks by pressing the Member softkey, then pressing the OK softkey to save. Up to 50 contact groups can be added.
- Block List:
The Block List displays contacts that have been blocked. Please note that at least one contact must be blocked for this list to be visible.
Local Phonebook
The following operations can be done under the local phonebook screen:
- New contact: Under “Option”, users can select “New Contact” to manually add the contact information and details. Please, see the following screenshots and table:

Last Name | Enter the contact’s last name. |
First Name | Enter the contact’s first name. |
Number | Enter the contact’s: • Home Number • Mobile Number Note: Contacts can have up to 10 numbers by pressing the “+” button. The above categories can be used multiple times for the same contact. |
Prefer Number | Select the preferred number. By default, the Work Number is set as the Prefer Number. |
Accounts | Choose the default account you want to dial with this contact. |
Ringtone | Choose a specific ringtone for the account’s received calls. |
Groups | Choose the group you want to include your contact in it. (The WP8x6 phone supports up to 50 contact groups) |
Job Title | Enter the contact’s job title. |
Company | Enter the contact’s company. |
Department | Enter the contact’s department. |

- Search: Enter and search using the contact’s name or number to quickly locate it.
- Messages: Compose and send a message to the selected contact’s phone number.
- EditDial: Tap to dial the phone number directly from the LDAP phonebook.
- Block List Add: Add the selected contact to the Block List.
- Download: Phone will download the latest phonebook XML file. (XML Phonebook needs to be enabled from the Web UI)
- Delete: Users can delete a specific contact by tapping on “Delete contact”.
- Delete All: Users can delete the whole list of local contacts by tapping on “Clear all contacts”.
vCard Phonebook
The WP8x6 supports importing and exporting contacts using the standard vCard .vcf format. This feature simplifies contact management by enabling bulk uploads, backups, and seamless transfer of phonebook entries between devices.
For detailed instructions on how to import or export a vCard file, please refer to the WP8x6 – vCard Phonebook Guide.
LDAP Phonebook
Users can perform the following actions on the LDAP phonebook page:

- Search: Enter and search using the contact’s name or number to quickly locate it.
- Save as Contact: Save the selected LDAP contact to your local phonebook.
- EditDial: Tap to dial the phone number directly from the LDAP phonebook.
- Messages: Compose and send a message to the selected contact’s phone number.
- History: View the call history associated with the selected contact.
Block List
By default, the Block List doesn’t appear on the contacts page. In order for it to be visible, users need to add a contact by selecting Block List Add from the options menu in Local Phonebook or History.


Once the Block List appears on the Contacts page, users can also add entries to the blacklist as such:

Users can perform the following actions from the Block List options menu:

- Remove: Delete the selected entry from the Block List.
- Intercept Records: Shows the records of blocked calls for this contact.
- Remove all: Clear all entries from the Block List.
CALL HISTORY
Call history provides users access to phone call logs in different categories and helps users to make some operations directly. Call history can be accessed under the menu as shown in the following figure:
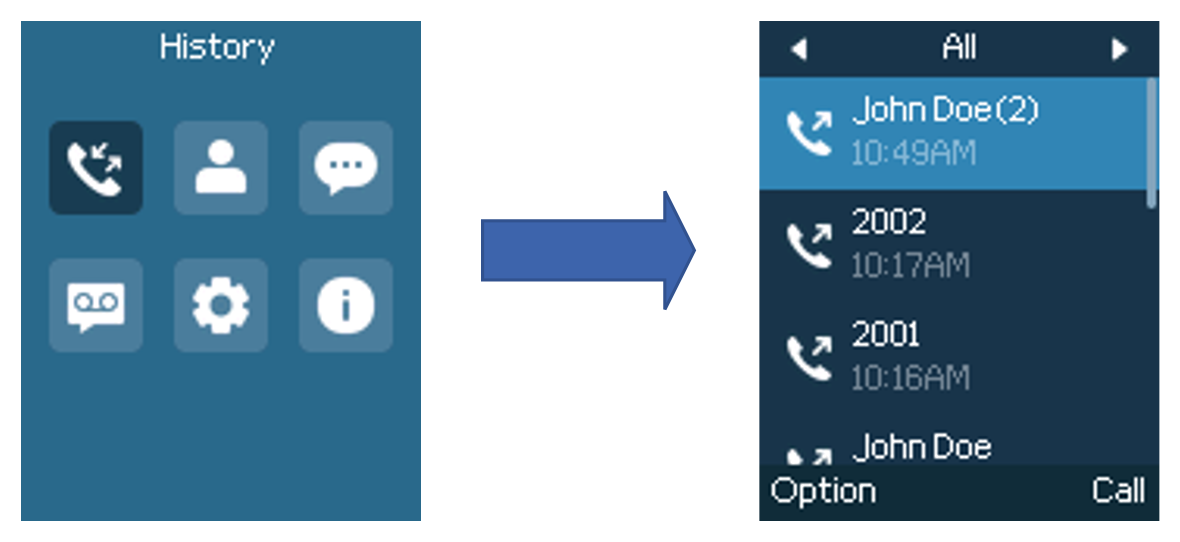
There are four different categories in the call history. Users could use the phone’s right and left arrows to view the following categories: All Calls, Missed Calls, Dialed Calls, and Answered Calls.
Dial Out from Call History
Select one of the call history logs and tap on the dial key  to call this number directly. The phone will use the same account as the call log to dial out.
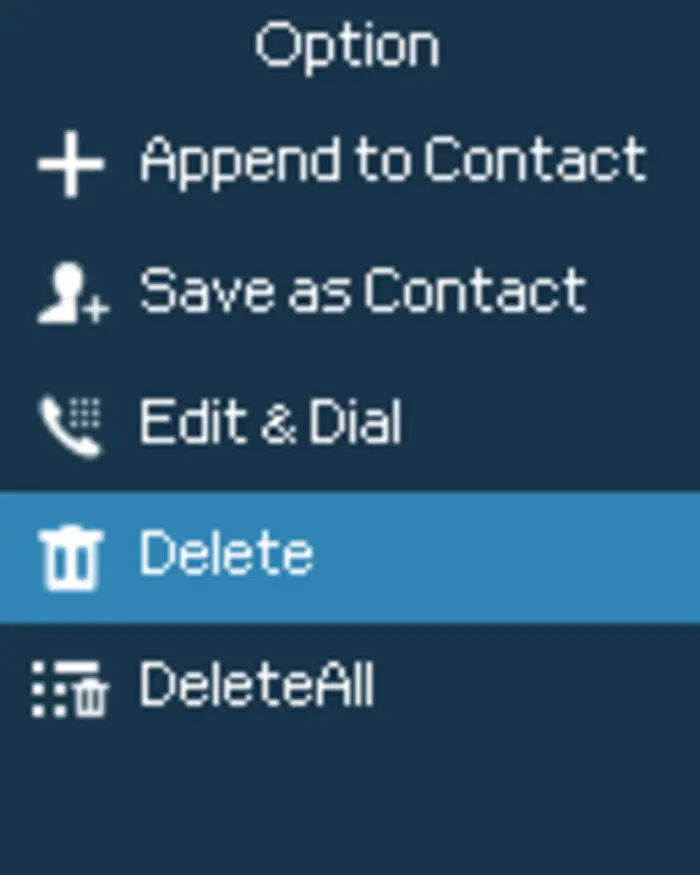
Call History Options

- Append to contacts: Users can tap on this option to add the number listed on the selected call history entry to local contacts, this only applies to phone numbers that have not been saved yet.
- Save as Contact: Saves the phone number on call history to the contact list.
- Edit&Dial: Users could copy the number to the dial screen to edit it before dialing.
- Block List Add: Adds the selected number to the Blocklist, which will stop the phone from receiving calls from that number.
- Delete: Users can delete the selected call history log by tapping on “Delete”.
- Delete all: This option helps users to clear all their call history.
- Details: In case the contact is already saved, the detail option will give you the possibility to view the contact’s details.
MESSAGES
The WP8x6 has a built-in Instant messaging application to send/receive messages, if the SIP server supports Instant messaging. Users can create, edit draft, and delete one or all the messages. Tap  on phone’s menu to launch Instant Messages application.
View Messages
On the Messages list screen, under Inbox tap on one of the messages using the OK button to view the Messages details.
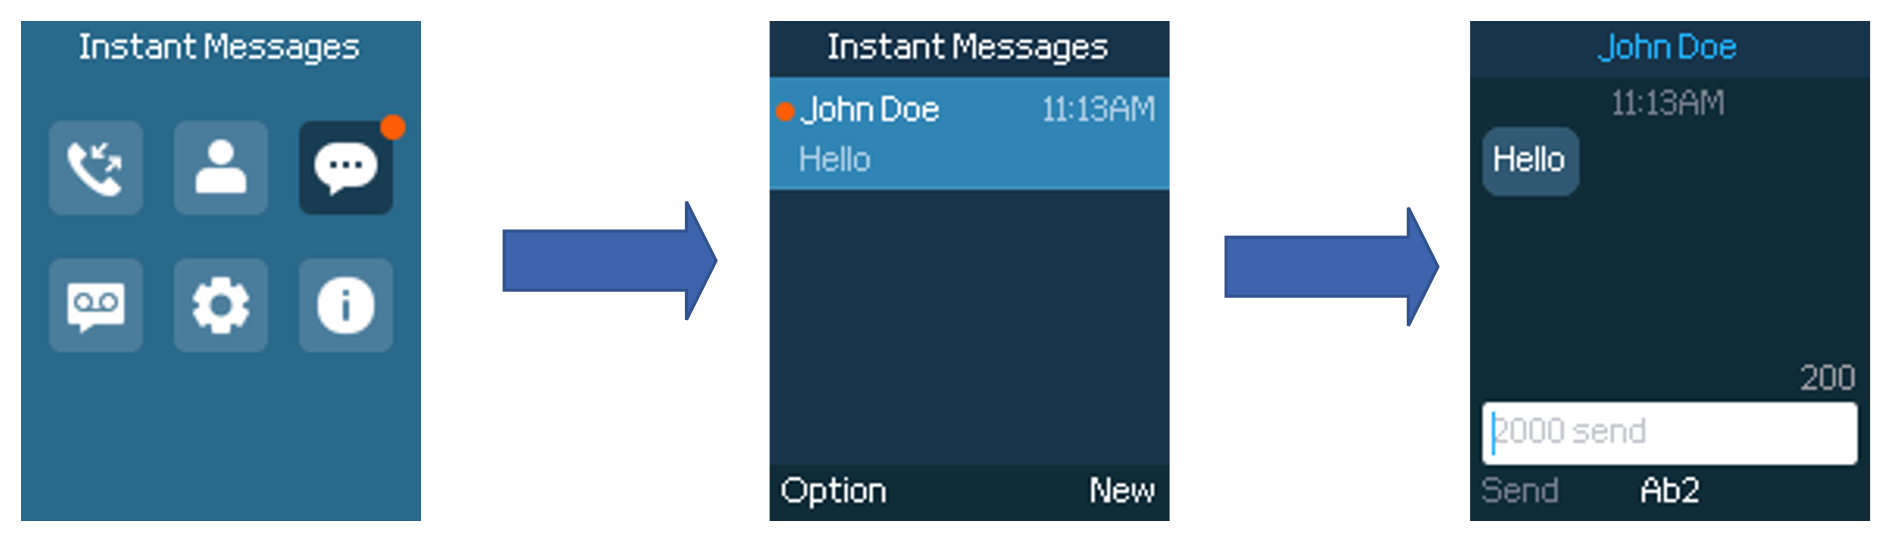
Reply to Message
On the same message received, the user can reply by composing the message and clicking Send
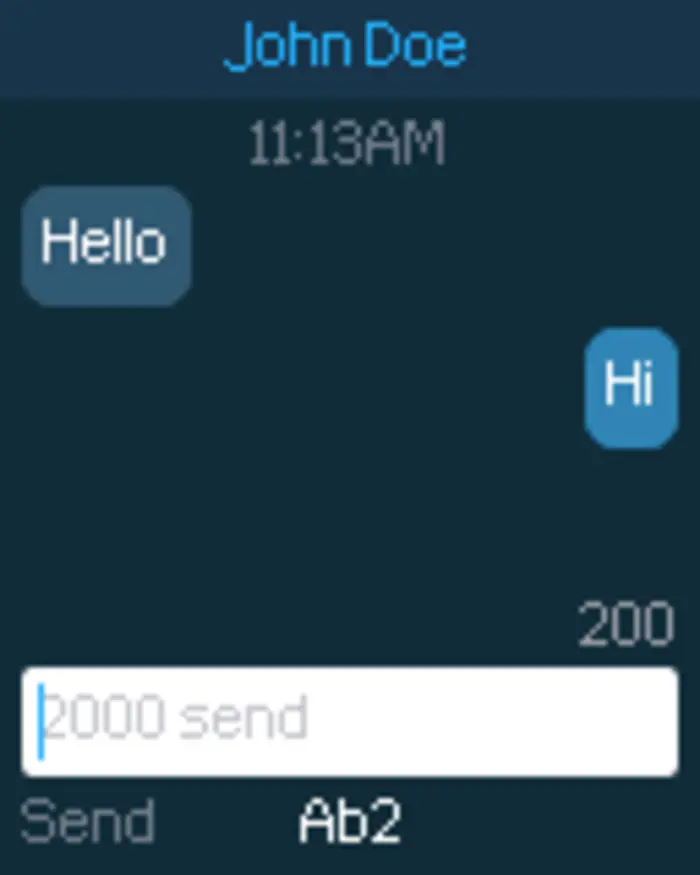
Create Messages
Tap on “New” in the Messages application to start composing a new message.
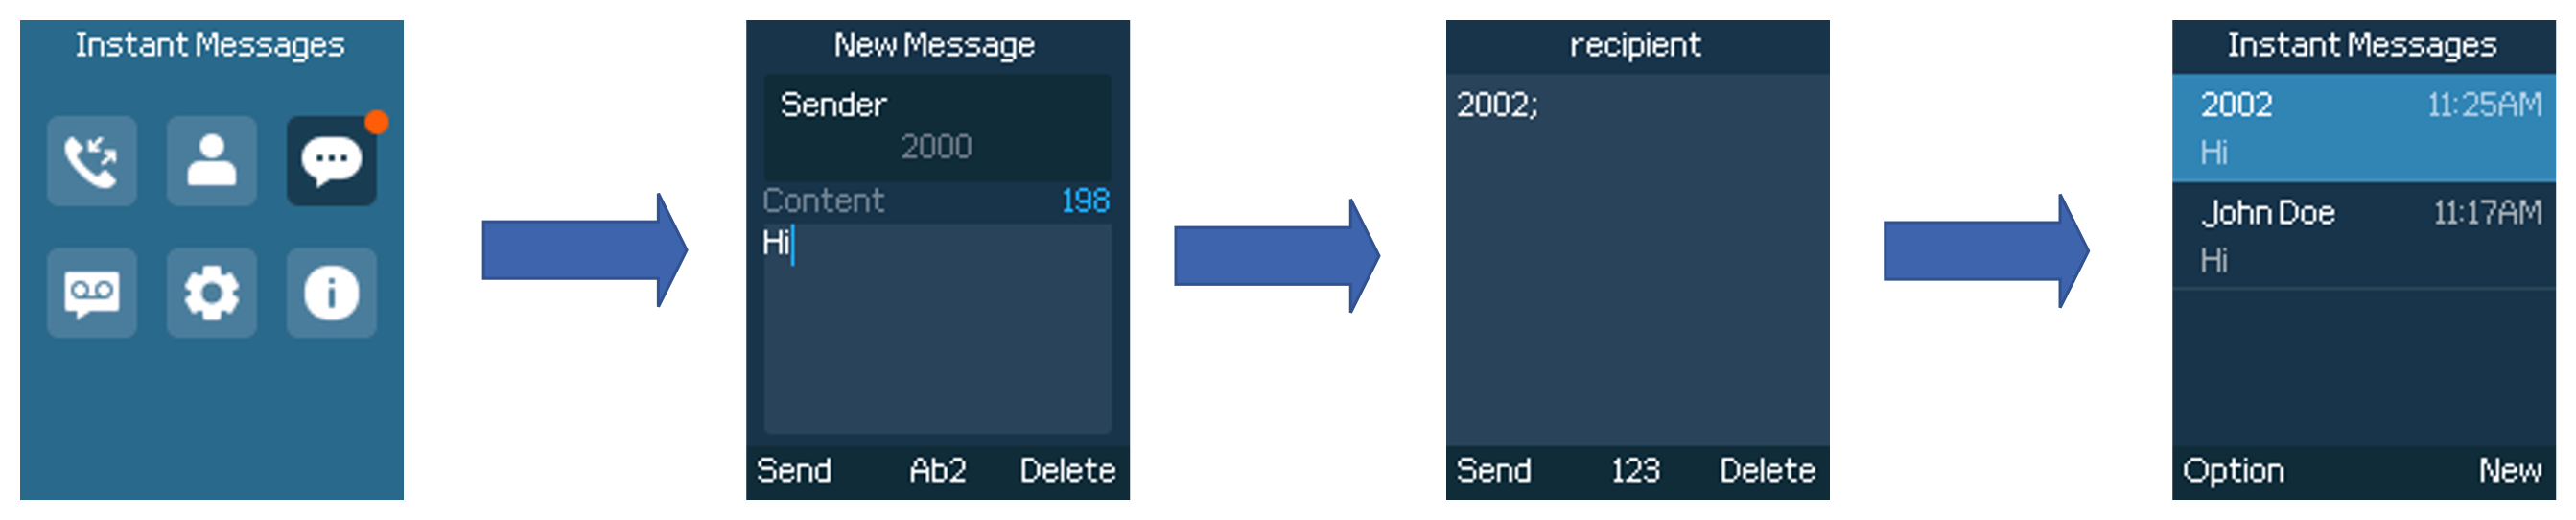
- Select Account: Before composing, you can choose which local account to send the message from. By default, the message will be sent using your designated IM account (configured under Settings→Account Settings). If the IM Designated Account is set to “Auto” the device will automatically use your preferred calling account.
- Input content: Enter the message content on the next field of the screen. Tap on “Send” once finished, a “Sending” message will prompt and the message is confirmed as sent once the “Sending” message prompt disappears.
- Add the number to send the message to in the Recipient section. (Note: Users could click on “Add” to add existing contacts to the Recipient list.
Send a Voice Message
Tap on “New” in the Messages application to send a new voice message.
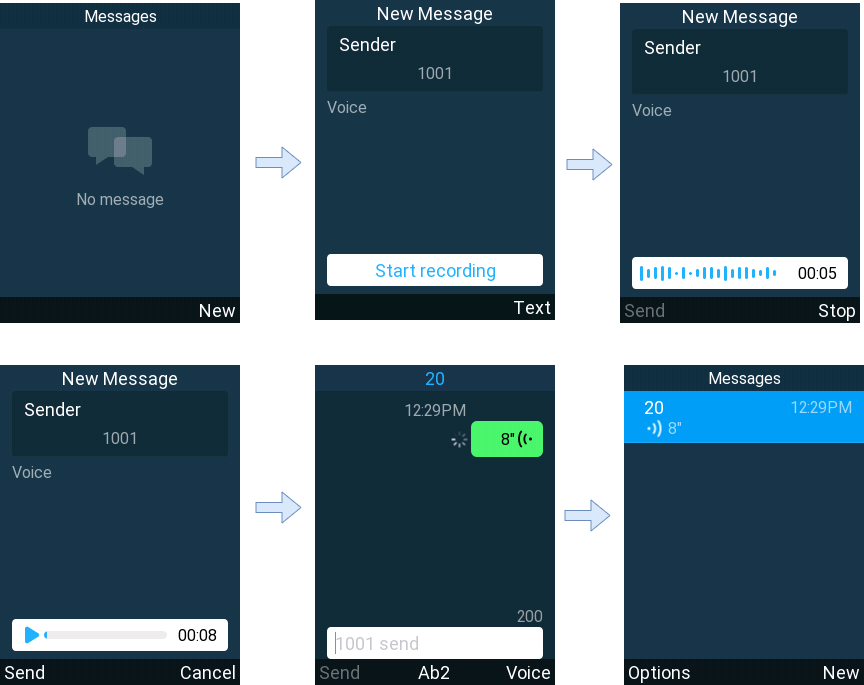
- Open Messages from the device menu.
- Press New to create a new message.
- Enter or confirm the Sender / Recipient information.
- Select Voice as the message type.
- Tap Start recording to begin recording the voice message.
- Speak into the microphone while recording.
- Press Stop to finish the recording.
- (Optional) Tap Play to review the recorded message. users can play the audio when recorded, by pressing the Menu/OK button.
- Press Send to deliver the voice message, or Cancel to discard it.
Delete Messages
- On the messages list, tap on “Options” to show more options.
- Tap on “Delete message” to delete the selected message, or on “Delete all” to delete all the messages/drafts.
CALL FEATURES
The WP8x6 supports traditional and advanced telephony features including call forward, call waiting, etc.
*30 | Disable Caller ID. To disable caller ID: Dial *30. Press Call softkey or Dial key. |
*31 | Enable Caller ID. To enable caller ID: Dial *31. Press Call softkey or Dial key. |
*50 | Disable All Call Waiting. To disable all call waiting: Dial *50. Press Call softkey or Dial key. |
*51 | Enable All Call Waiting. To enable all call waiting: Dial *51. Press Call softkey or Dial key. |
*67 | Call Anonymously. To start an anonymous call: Dial *67 and then enter the number call anonymously. Press Call softkey or Dial key. |
*68 | Hide Dialed Number. To hide the dialed number: Dial *68 and then enter the number to hide. Press Call softkey or Dial key. |
*70 | Call With Call Waiting Disabled. To call a number while call waiting is disabled: Dial *70 and then enter the number to call. Press Call softkey or Dial key. |
*71 | Call With Call Waiting Enabled. To call a number while call waiting is enabled: Dial *71 and then enter the number to call. Press Call softkey or Dial key. |
*72 | Enable Call Forward Always. To enable unconditional call forward: Dial *72 and then enter the number to call. Press Call softkey or Dial key. |
*73 | Cancel Call Forward Always. To cancel the unconditional call forward: Dial *73. Press Call softkey or Dial key. |
*82 | Call with Caller ID Enabled. To perform a call with caller ID enabled: Dial *82 then enter the number to call. Press Call softkey or Dial key. |
*90 | Busy Call Forward. To set up busy call forward: Off hook the phone. Dial *90 and then enter the number to forward the call. Press Call softkey or Dial key. |
*91 | Cancel Busy Call Forward. To cancel the busy call forward:
Off hook the phone. Dial *91. Press Call softkey or Dial key. |
*92 | No Answer Call Forward. To set up delayed call forward: Dial *92 and then enter the number to forward the call. Press Call softkey or Dial key. |
*93 | Cancel No Answer Call Forward. To cancel the delayed call forward: Dial *93. Press Call softkey or Dial key.
|
WP8x6 Call Features
BATCH DEPLOYMENT
The Batch Deployment feature allows a hotspot phone to deploy selected settings and configurations to multiple devices connected to its hotspot network. This feature can be enabled on WP8x6 devices under Settings → Advanced Settings → Batch Deployment.
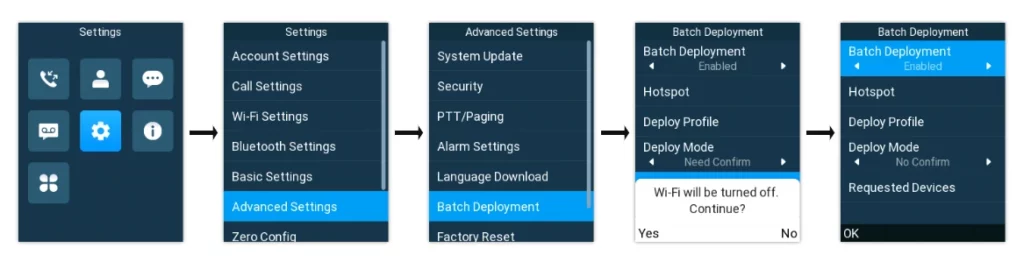
Once enabled, Batch Deployment provides options for configuring the hotspot, selecting the deployment profile and deployment mode, and choosing the target devices for deployment. The sections below demonstrate the process and the available options.
Configuring the Hotspot Device
To configure the hotspot phone, follow the steps below:
- On the chosen WP8x6 hotspot device, navigate to Settings → Advanced Settings → Batch Deployment.
- Enable Batch Deployment and select Yes when prompted to turn off Wi-Fi.
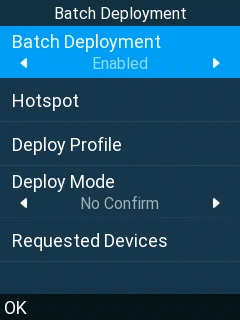
- Under Hotspot, configure the following:
- Hotspot SSID: Configures the SSID of the hotspot phone. This field cannot be empty. The default SSID is wp_master.
- Hotspot Password: Configures the password required to connect to the hotspot. The password must contain at least 8 characters. The default password is wp!987@dmin.
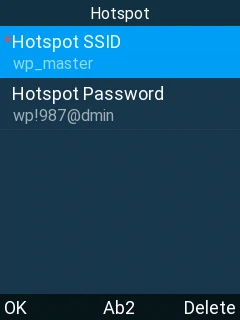
- Under Deploy Profile, specify the deployment profile source. Available options are Custom and PNP Local. If Custom is selected, configure the following:
- Saved Wi-Fi: Select saved Wi-Fi networks from the hotspot phone to deploy to other devices. Multiple Wi-Fi networks can be selected, and an option to Select All or None is also available.
- Firmware Server: Enables or disables deployment of the firmware server settings.
- Config Server: Enables or disables deployment of the configuration server settings.
- TR069: Enables or disables deployment of TR-069 settings.
- Contact: Select contact sources from the hotspot phone to deploy to other devices. Available options: Phonebook XML Download, LDAP, Remote Phonebook, Online Contacts.
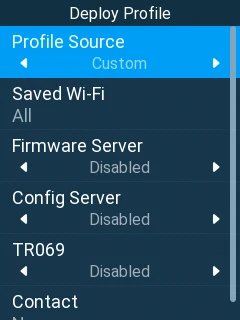
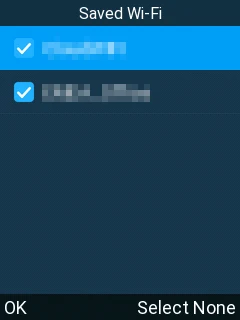
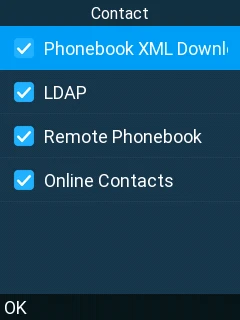
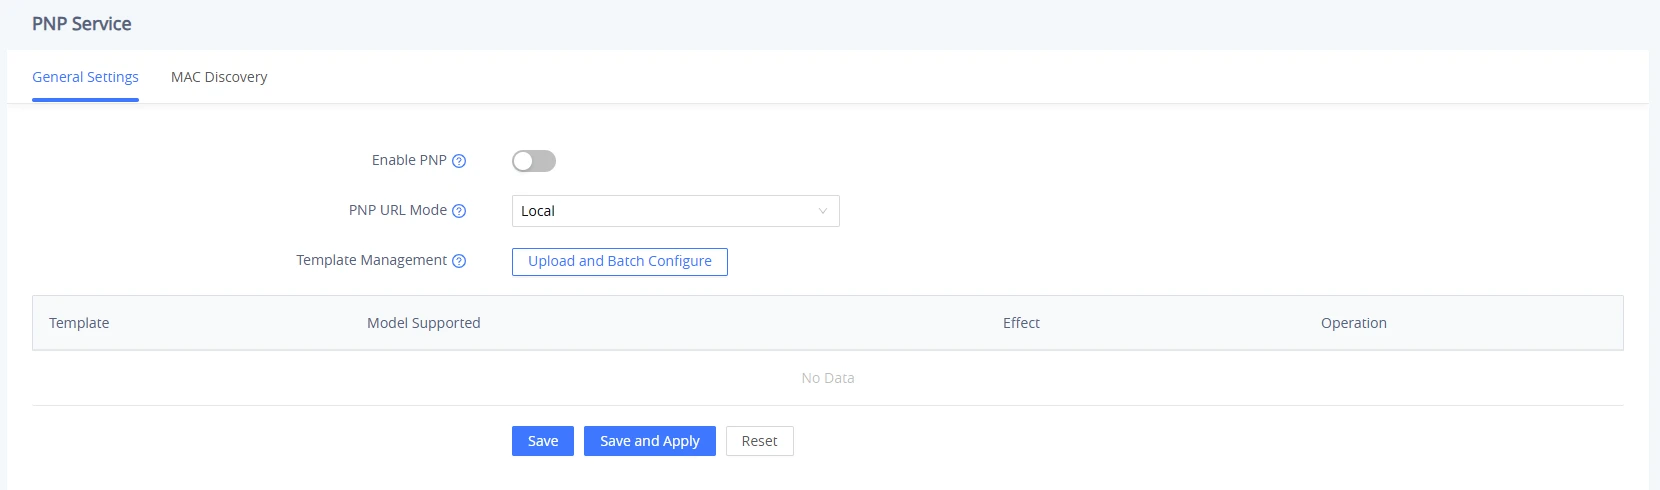
- Under Deploy Mode, specify whether confirmation is required before deployment. The available options are:
- No Confirm: Deployment starts automatically and the Deploy softkey is hidden.
- Need Confirm: When selected, the Deploy softkey is displayed and the deployment is applied after it is pressed.
- Under Requested Devices, select the devices to be deployed from those connected to the hotspot. This section displays the device model, MAC address, and total number of connected devices. Multiple devices can be selected, and up to 10 devices can be connected to the hotspot.
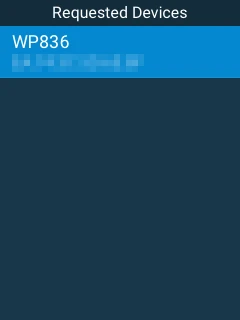
Connecting the Requested Devices to the Hotspot Device
To connect the requested devices to the hotspot, follow the steps below:
- Navigate to Settings → Wi-Fi Settings → Wi-Fi Network, select the hotspot SSID, and press Connect.
- Enter the configured Hotspot Password.
Initiating Deployment
To begin deployment, follow the steps below:
- After connecting the Requested Devices as described above, deployment is applied automatically when the Deploy Mode is set to No Confirm. If Need Confirm is selected, press the Deploy softkey on the hotspot phone to start the deployment.
- When deployment completes successfully, the Requested Devices display a “Configuration obtained successfully” prompt and play a notification tone.
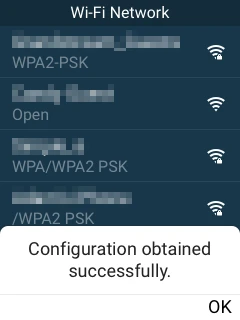
QUICK ACCESS SETTINGS
Quick access is a shortcut feature that allows WP8x6 users to launch phone applications, perform call actions, or display device information, with one click.
The quick access modes supported are : “Quick Start” and “Quick Open” , Depending on the quick access mode,
Quick Start: Allows users to configure call feature shortcuts such as : Speed Dial, Dial DTMF, DND….
Quick Open: Allows users to open specific phone application, such as: Broadsoft Call Log, Contacts, Local Phonebook, LDAP
To add a quick access key, Please follow the below steps on your WP8x6 phone:
- Click on the mute/shortcut key

- Click on “Config” to set up the quick access key
- Choose the quick access mode, function, and its corresponding parameters
- The Quick access key will be saved, and can be triggered by clicking the number corresponding to the key, in our case, we will press key number1

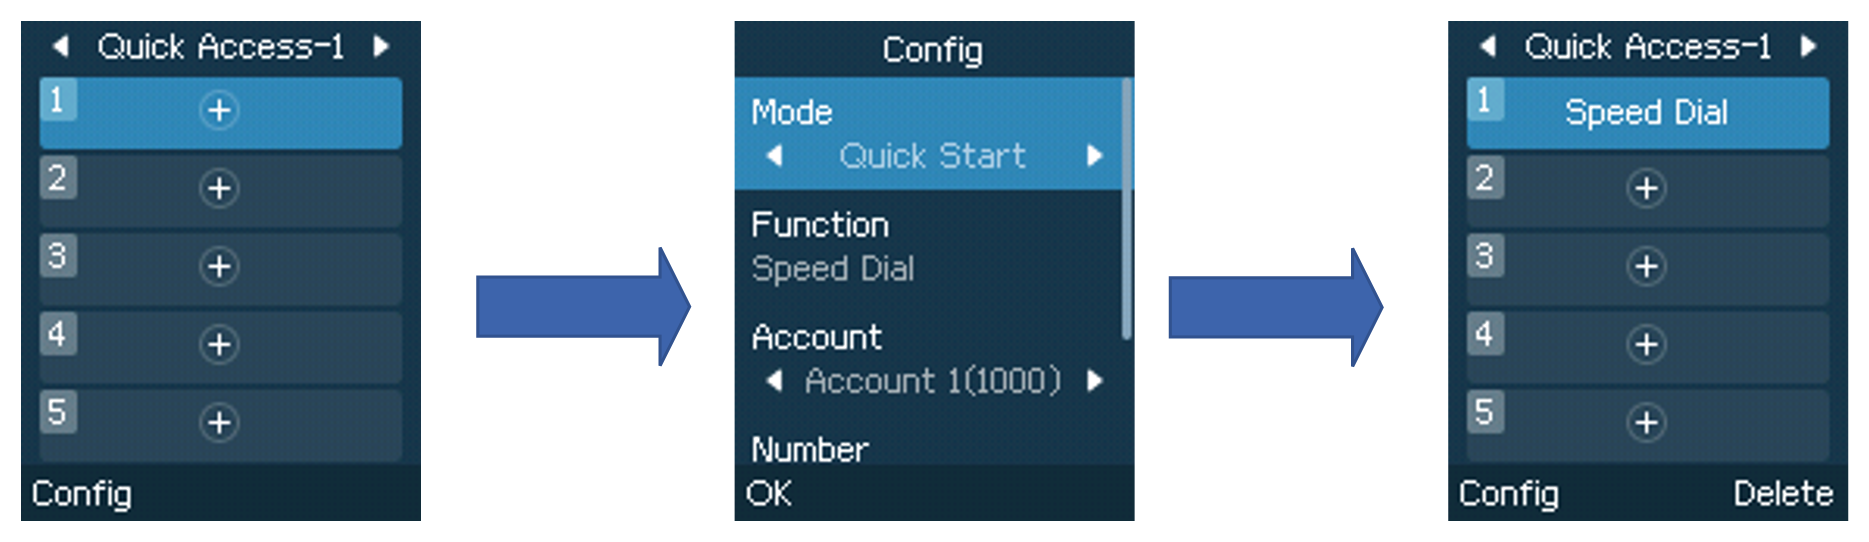
PTT (PUSH-TO-TALK) FUNCTIONALITY
The WP8x6 supports the push-to-talk (PTT) features which is a technology based on the instantaneous communication commonly employed in wireless cellular phone services using a button to switch the device from voice transmission mode to voice reception mode. This feature is similar to “walkie-talkie” use and the PTT mode switches a phone from full duplex mode, where both parties can hear each other simultaneously, to half duplex mode, where only one party can speak at one time. Multiple parties to the conversation may also be included.
Enabling PTT mode
You can enable and configure the PTT settings using the handset LCD menu:
- Press Menu to bring up the operation menu.
- Use arrow keys to reach Settings → Advanced settings → PTT and paging.
- Choose PTT settings and enable the PTT function.
- Press the Save button to enable PTT mode.
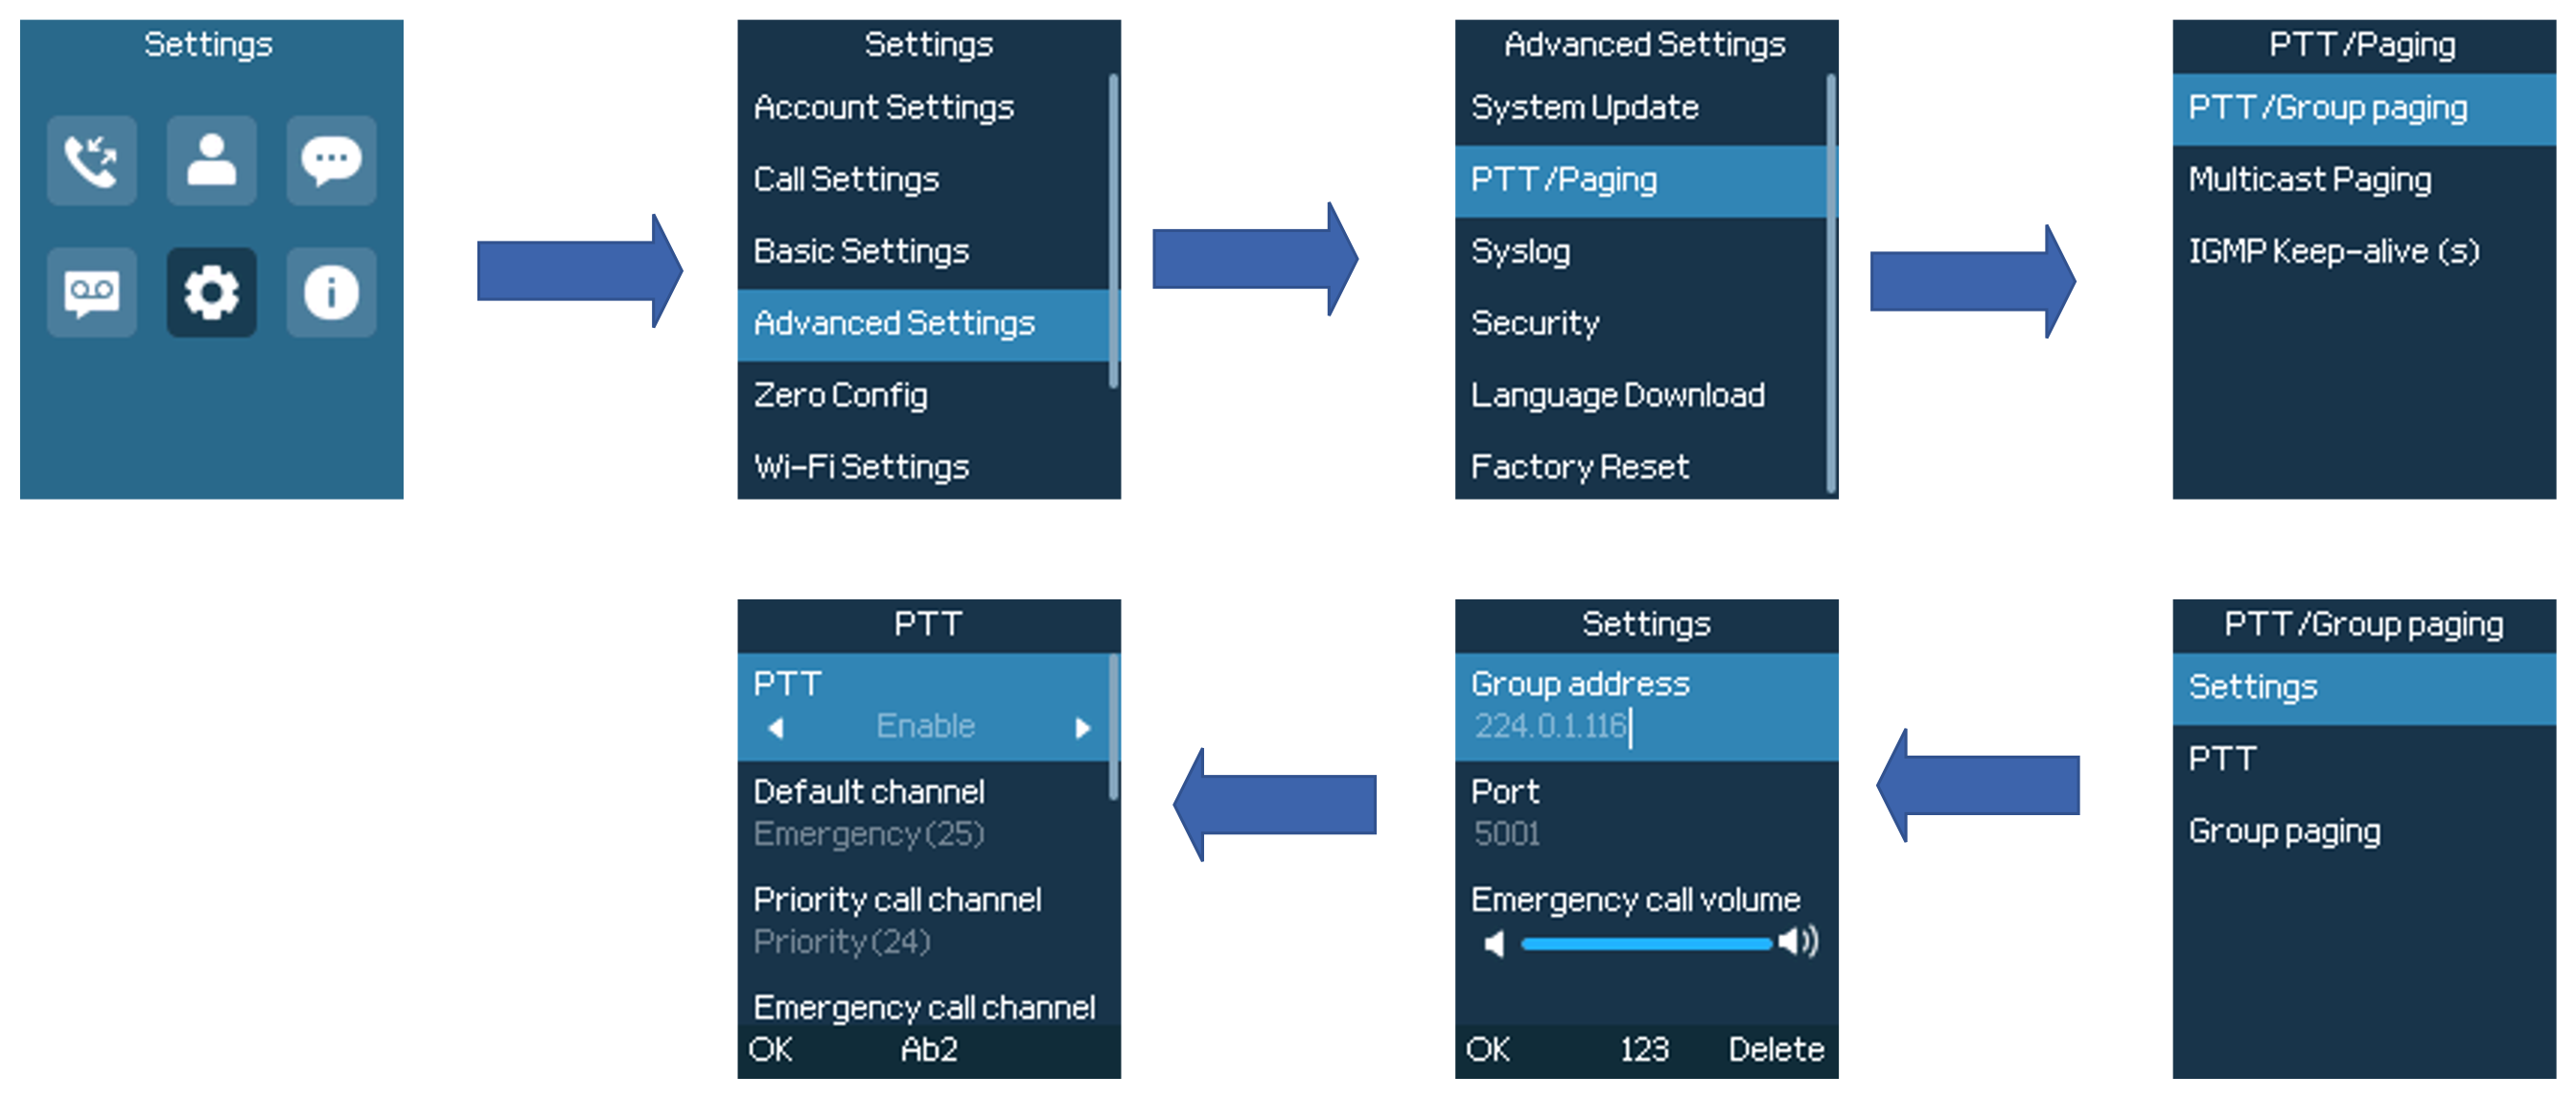
Using the PTT Functionality
To send a PTT broadcast:
- Unlock your handset.
- Make sure the multi-function side key is configured to be a Push-To-Talk button.
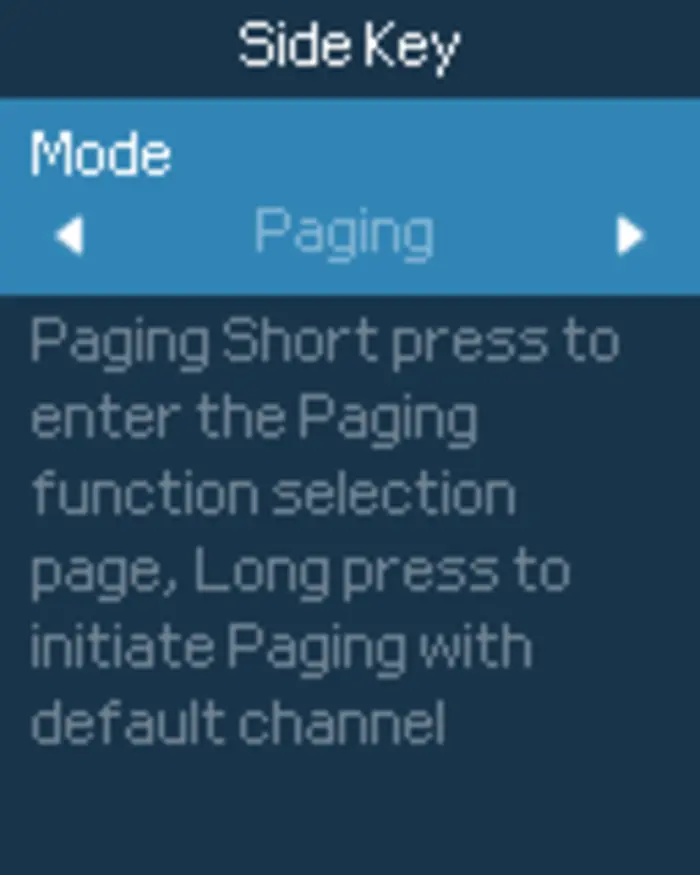
- Press the Push-to-Talk key (one time) to access PTT/Paging Page settings.
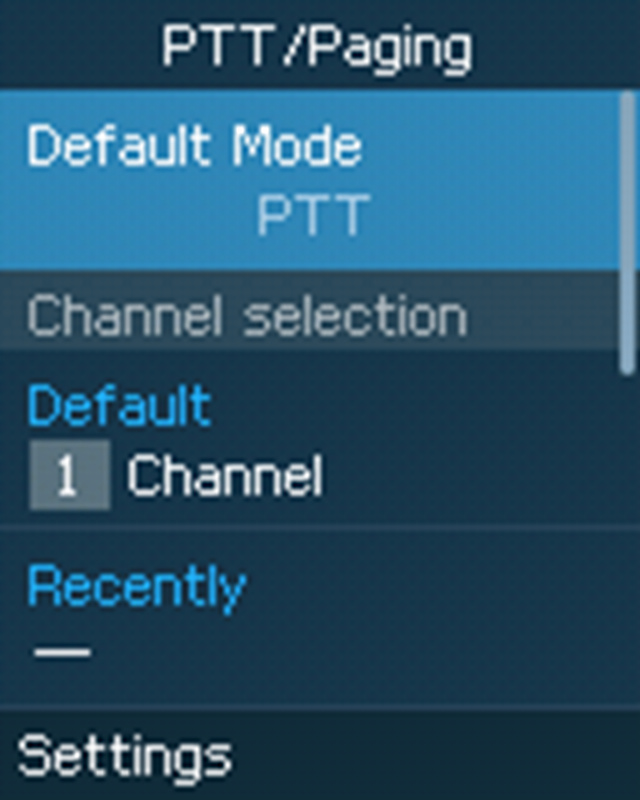
- Press and hold the Push-to-Talk key to initiate the PTT/Paging call (and to speak).
- The devices which are in the same channel will receive the PTT call.
- Release the Push to Talk soft key when you have finished speaking. The channel will wait 10 seconds before release.
- You should press the Push to Talk soft key only when the channel status indicates Waiting. Otherwise, you may interrupt another person’s message.
PTT Configuration Settings
Please refer to the following Settings for more details about the configuration of the PTT functionality:
Settings
- Multicast address: The multicast IP address to send page audio to and receive page audio from. The default value is 224.0.1.116.
- Port: The port to send audio to and receive audio from. The default value is 5001
- Emergency volume: The Volume of the emergency channel. The default value is 8
PTT Parameters
- PTT function: Enable or disable the PTT function.
- Default channel: The PTT channel is used to transmit an outgoing page if the user does not explicitly specify a channel.
- Priority channel: The channel assigned for priority pages.
- Emergency channel: The channel assigned for emergency pages.
- Accept while busy: If no, incoming PTT sessions do not produce standard call waiting. If yes, incoming PTT sessions produce standard call-waiting behavior on the active audio channel.
- CallerID(*): Caller ID number for identification.
- PTime: The audio payload size in milliseconds.
- Audio codec: The audio codec to use for outgoing PTT broadcasts. Incoming PTT audio will be decoded according to the codec specified in the incoming message.
- Channel: Set the channel to be usable, transported, acceptable, and joined, and the channel display name.
Group Paging
Enabling Group Paging Feature
You can enable and specify settings for the Group Paging feature through the phone’s user interface.
To specify the Group Paging feature settings:
- Using your phone’s interface, navigate to the Group Paging Configuration menu by pressing Settings → Advanced setting → PTT and paging → PTT and group paging.
- Choose Group Paging Configuration.
- Set the Group Paging function to Enabled.
Please, refer to the following screenshots:
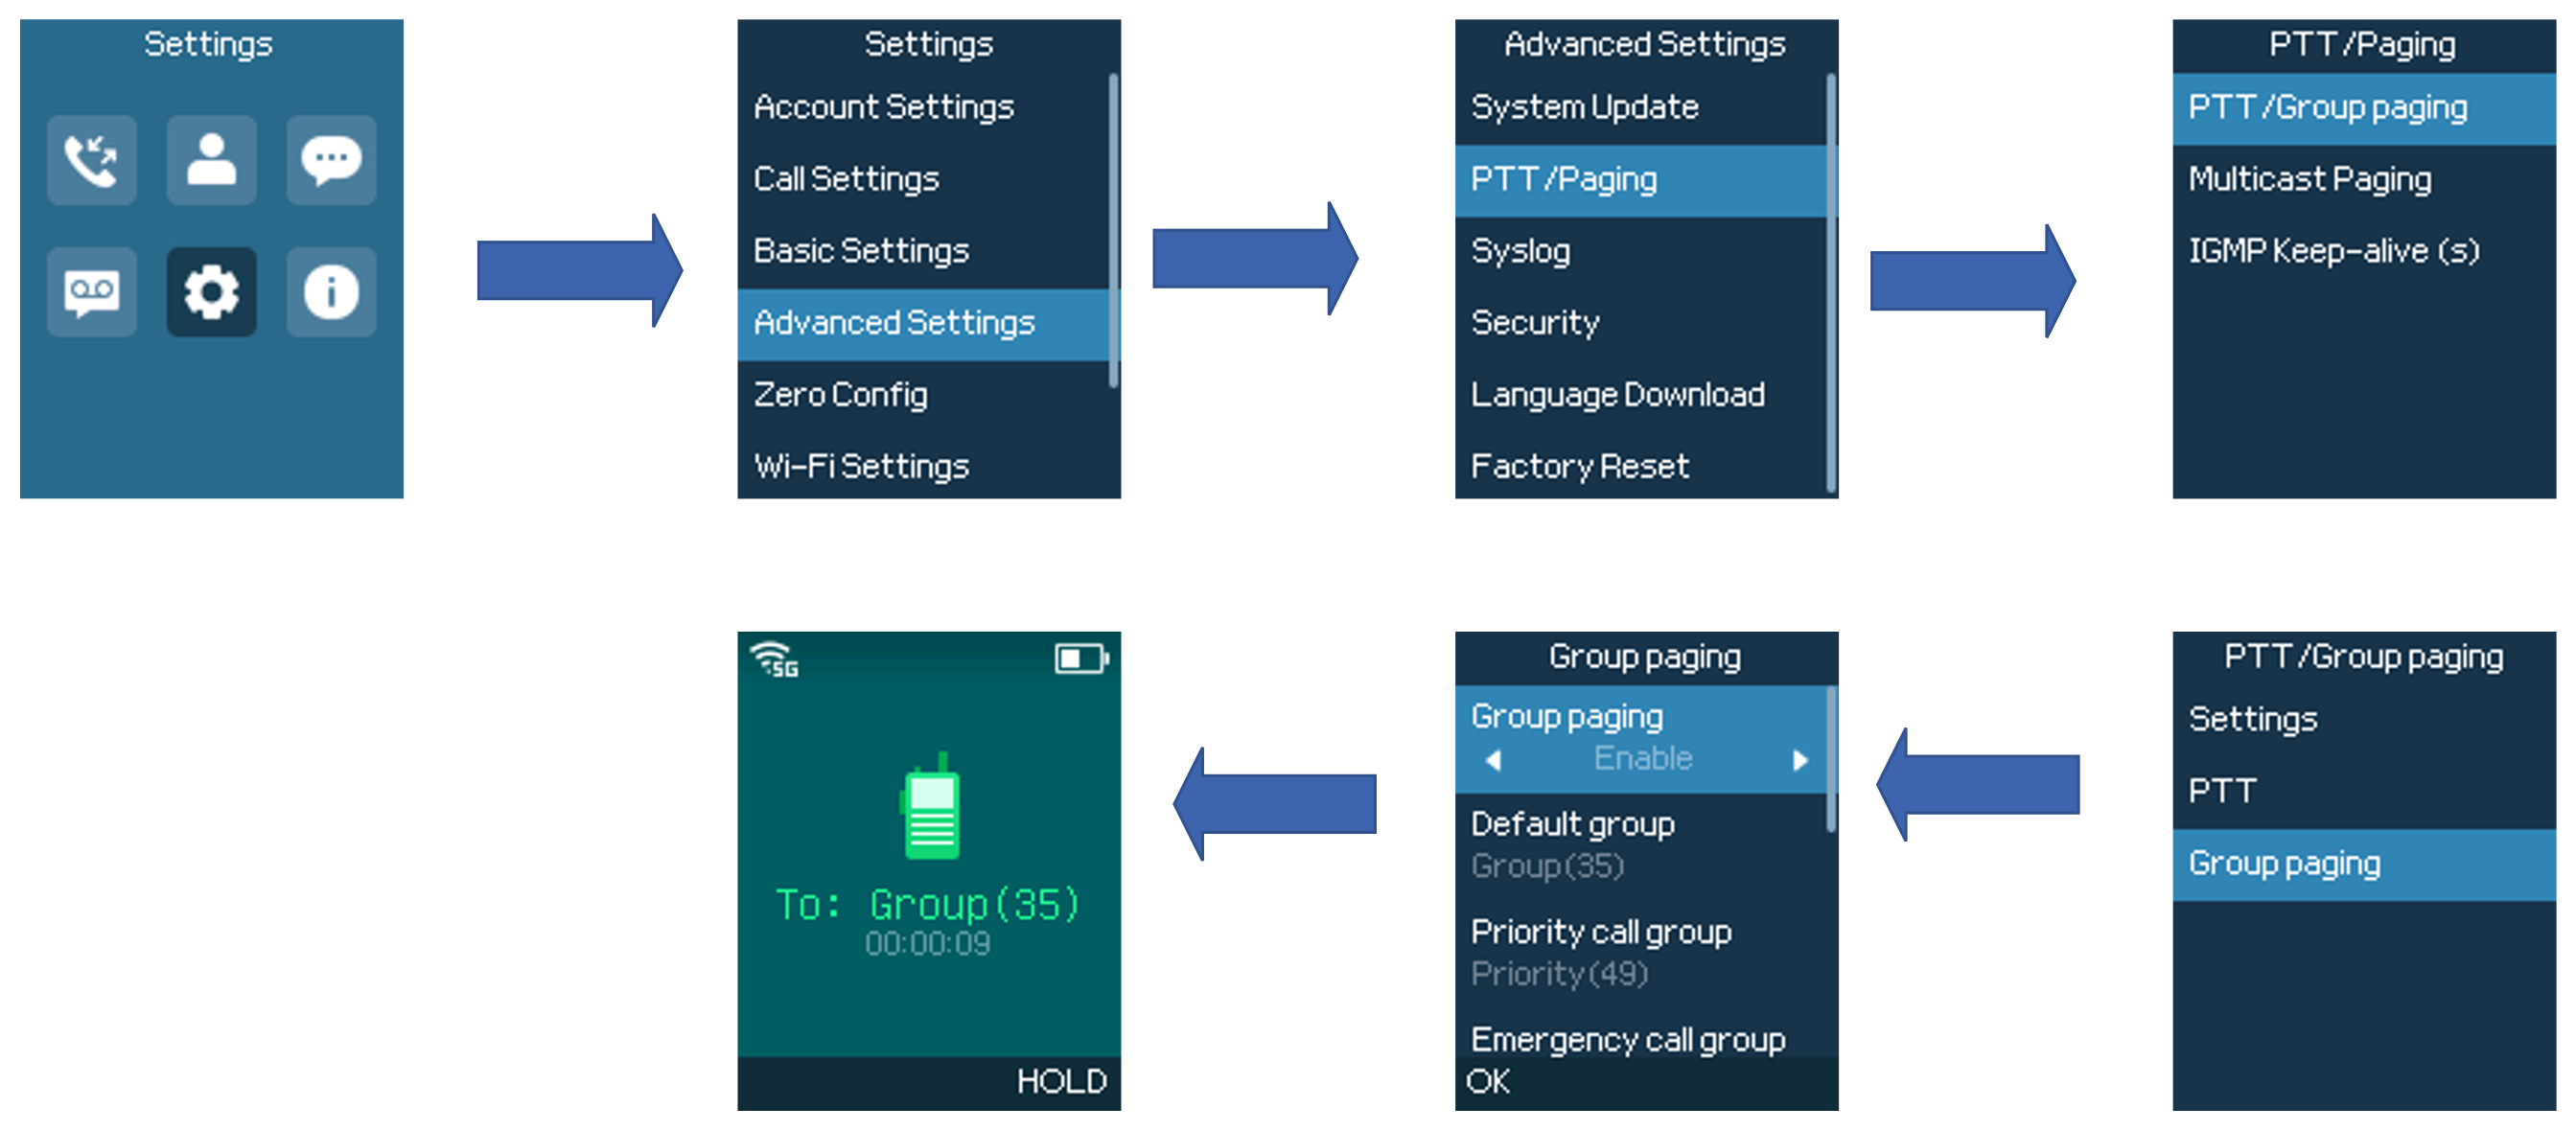
To send a Group Paging broadcast:
- Unlock your handset.
- Press the Talk soft key.
- Set the Default mode to Group paging.
- Scroll to the group you wish to send a broadcast to.
- Press and hold the Talk soft key before speaking.
The group status will change to Sending group paging to indicate you are transmitting.
The devices which are in the group will receive the paging.
- Release the Talk soft key, and press the on-hook/power key when you have finished speaking.
Group Paging Parameters
- Paging function: Enable or disable the Group paging function.
- Default group: The group is used to transmit an outgoing page if the user does not explicitly specify a group.
- Priority group: The group assigned for priority pages.
- Emergency group: The group assigned for emergency pages.
- Accept while busy: If no, incoming Group paging sessions do not produce standard call waiting. If yes, incoming PTT sessions produce standard call-waiting behavior on the active audio group.
- Caller ID(*): Caller ID number for identification.
- P-Time: The audio payload size in milliseconds.
- Audio codec: The audio codec to use for outgoing Group paging broadcasts. Incoming Group paging audio will be decoded according to the codec specified in the incoming message.
- Group: Set the group whether to be available, transmit, subscribe, join a group, and the group name.
IGMP Settings
Users could specify how often the phone will report IGMP when the PTT/ Paging function is turned on. IGMP reporter help to keep PTT/ Paging receivable in a dormant state. The interval may have some effect on standby time. The valid range is 20-120 seconds
You can find these settings on the LCD Menu under Settings → Advanced Settings → PTT/Paging → IGMP Keep Alive (s)
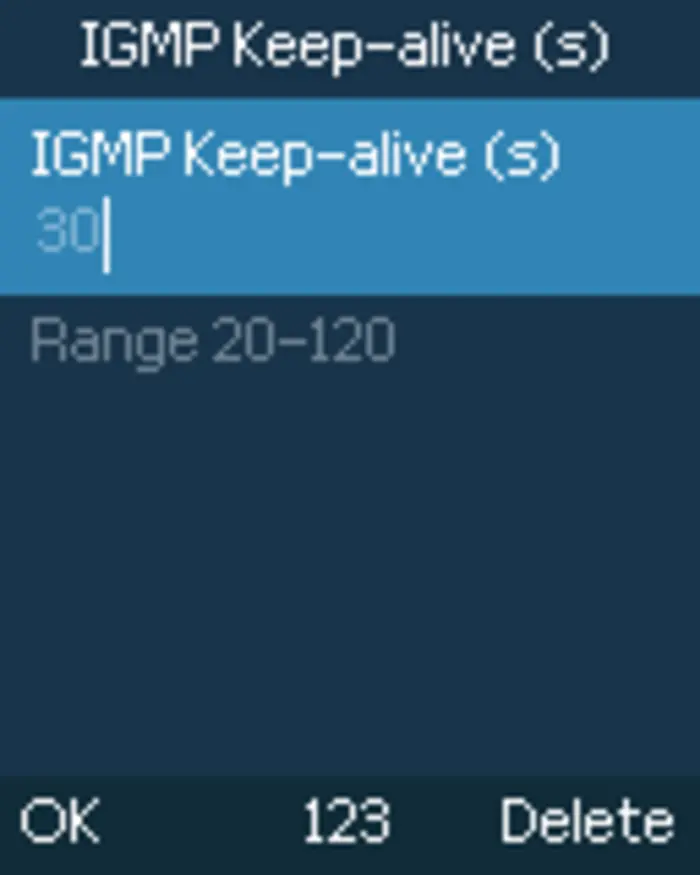
ALARM SETTINGS
The WP8x6 series is equipped with multiple alarm settings designed to ensure safety in various scenarios. These alarms include:
- Push-button alarm.
- Ambient sound alarm.
- No movement alarm.
- Man down alarm.
- Running alarm.
This section describes in detail each of the alarm functions as well as the necessary configuration steps.
Push-button Alarm
The push-button alarm allows the user to manually trigger an emergency alert in case of a situation that requires immediate attention.
The previous section explained how to set up the side key as a PTT button. The process for configuring it as an alarm button is similar:
- On the WP8x6 menu, select Settings.
- Go to Basic Settings, and click on Key Customization.
- Select Side Key, and set function as “Alarm“.

Once the side key is set as an alarm button, users can quickly press it to access the alarm settings or long press it to trigger an alarm.

There are some additional settings (under Settings→Advanced Settings→Alarm Settings→While Push Button Alarm) that can be configured with the push-button alarm and they include:

- Mute: If set to “Enabled”, the alarm triggered by pressing side key will be a silent alarm.
- LCD Backlight: Configures the behavior of the LCD backlight during the push-button alarm.
- Behavior Override: Chooses whether the push-button alarm can be overridden by other alarm events. (Example in the image below)

Alarm Monitoring
Ambient Sound Detection
Ambient Sound Detection is used to identify sound levels and can trigger an alarm if a configured threshold is exceeded.
There are two methods of ambient-sound detection:
- Instantaneous Detection: the alarm is triggered immediately when the sound level exceeds the detection threshold. This method is typically used when quick action is needed.
- Continuous Detection (3s): The alarm is triggered only if the ambient sound exceeds the threshold continuously for 3 seconds. This method is useful for avoiding false alarms.
The three levels of ambient sound are:

To configure ambient-sound detection, please follow the steps below:
- Quickly press the side key to access the alarm settings (if the side key is configured as “alarm”), or go to Settings→Advanced Settings→Alarm Settings.
- Select Alarm Monitoring and choose the Ambient Sound Detection method.
- Set the Ambient Sound Level and click on the left Softkey (OK) to confirm the changes.
- Once the sound threshold is reached, the warning will be triggered as shown the following figure.

No Movement Alarm
No Movement Alarm allows to monitor the user’s motion. If no movement is detected within a configured time frame, the handset will send an alert.
To configure the alarm, users must select a detection sensitivity level from 1 to 7, where Level 1 is the lowest and Level 7 is the highest. Additionally, users should set a No Movement Timeout in seconds, which defines the duration without movement before the warning is triggered.
Please refer to the following steps to configure this alarm:
- Quickly press the side key to access the alarm settings (if the side key is configured as “alarm”), or go to Settings→Advanced Settings→Alarm Settings.
- Select Alarm Monitoring and set the No Movement Alarm level.
- Configure the No Movement Timeout, the allowed range is 5 to 300 seconds.
- Click on the left Softkey (OK) to confirm the changes.
- The warning will be triggered as soon as no movement is detected for the specified duration. (as shown in the figure)

Man Down Alarm
The Man Down Alarm is triggered when the user has fallen or is unresponsive, in order to ensure that prompt action is taken in emergency situations.
To configure the alarm, users must set a detection sensitivity level from 1 to 7, where Level 1 is the lowest and Level 7 is the highest. Additionally, users should set the Man Down Timeout (in seconds), which defines the duration the user remains in the man down position before the warning is triggered.
In order to configure the Man Down Alarm, please follow the instructions below:
- Quickly press the side key to access the alarm settings (if the side key is configured as “alarm”), or go to Settings→Advanced Settings→Alarm Settings.
- Select Alarm Monitoring and set the Man Down Alarm level.
- Configure the Man Down Timeout. (Valid range is 5 to 300 seconds)
- Click on the left Softkey (OK) to confirm the changes.
- The warning will be triggered if the man down position is maintained for the specified duration. (as show in the figure)

Running Alarm
Running Alarm triggers an alert when the user is moving at a speed that indicates running. This feature can be particularly useful in situations where running may signal an emergency.
Users must set a detection sensitivity level from 1 to 7, where Level 1 is the lowest and Level 7 is the highest, and configure the Running Timeout (in seconds).
The steps below illustrate how to configure this alarm:
- Quickly press the side key to access the alarm settings (if the side key is configured as “alarm”), or go to Settings→Advanced Settings→Alarm Settings.
- Select Alarm Monitoring and set the Running Alarm level.
- Choose the Man Down Timeout from 5 to 300 seconds.
- To trigger the warning, running motion must be detected for the timeout duration.
Warning and Snoozing
Warning Timeout
In the event of an alarming situation, the handset first sends a warning to alert users of the detected event. If the warning persists for a specified duration without being canceled, the alarm is triggered. This duration is called Warning Timeout, and it can be set to a value between 0 and 60 seconds.
The figure below explains the configuration of the warning timeout:

The warning and alarm each have a distinct tone which can be configured under Settings→Advanced Settings→Alarm Settings.

Snooze Timeout
When an alarm or warning is triggered, users can snooze the alert, preventing alarm monitoring for the Snooze Timeout duration (0 to 300 seconds). Users can also pause the snooze window to temporarily enable alarm detection.
The snooze flow is explained using the following image:

Emergency Call
Users can configure the WP8x6 to dial a specific number when an alarm is triggered. By setting this number, users can ensure that the contacted party is quickly notified, improving response times during emergencies.
- Quickly press the side key to access the alarm settings (if the side key is configured as “alarm”), or go to Settings→Advanced Settings→Alarm Settings.
- Enable the Emergency Call feature and choose the account to be used for making the call.
- Enter the emergency number under Emergency Dial Number.
- Once the alarm/warning is triggered, the phone will automatically call the emergency number.

TOOLS
The WP8x6 provides a set of built-in utility tools designed to assist users with everyday tasks directly from the phone. These tools include a Calculator, Alarm Clock, Stopwatch, Timer, and Calendar.
Each tool serves a specific purpose and can be accessed easily from the phone’s LCD menu. The following sections describe the functionality of each tool and how it can be used.
Calculator
The Calculator allows users to perform basic arithmetic operations directly on the phone.
It supports standard calculations such as addition, subtraction, multiplication, and division, making it useful for quick computations without requiring an external device.
The calculator can be accessed from the Tools menu on the LCD screen and is operated using the touchscreen interface.
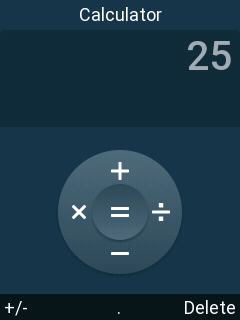
Alarm Clock
The Alarm Clock enables users to set alarms as reminders or wake-up alerts.
Users can configure the alarm time and activate or deactivate alarms as needed. When the alarm is triggered, the phone will generate an audible alert to notify the user.
This feature is accessible from the Tools menu and is especially useful for scheduling important events or daily reminders.
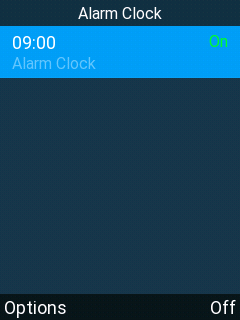
Stopwatch
The Stopwatch function allows users to measure elapsed time with precision.
It can be used to start, stop, and reset timing sessions, making it suitable for tracking durations of activities or tasks.
The stopwatch is accessed through the Tools menu and operates in real time on the LCD screen.
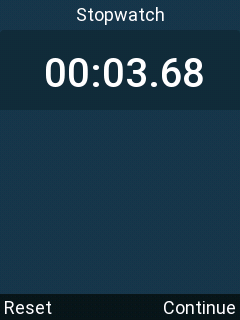
Timer
The Timer allows users to set a countdown for a specified duration.
Once the timer reaches zero, the phone will notify the user with an alert. Users can add new timers and manage existing ones as needed.
This feature is useful for time-limited tasks and can be accessed from the Tools menu.
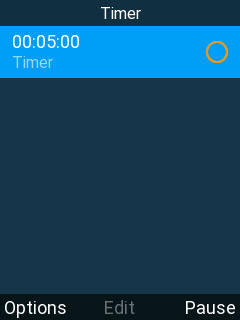
Calendar
The Calendar tool helps users organize and manage schedules directly on the phone.
Users can:
- Add new schedules or events
- View and display all created schedules
- Configure calendar settings, such as defining the week start day
The calendar provides a simple way to keep track of appointments and planned activities and is available through the Tools menu on the LCD interface.
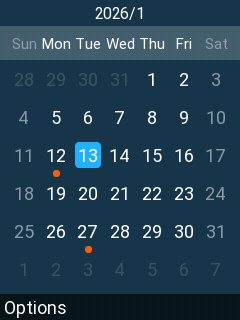
The Calendar feature allows the device to display dates, manage local calendar events, handle event reminders, and import or export calendar data using .ics files. Calendar information can be viewed and managed from both the LCD interface and the WEB interface of the WP8x6, with visual indicators highlighting dates that contain events.
The calendar supports local events, subscribed events, reminder notifications, configurable start days of the week, and file-based calendar customization using standard and vendor-specific .ics components.
For more information on how to set up the features, please visit the following guide: WP8x6 Calendar Setup Configuration
UPGRADING AND PROVISIONING/
The WP8x6 can be upgraded via TFTP/HTTP/HTTPS/FTP/FTPS by configuring the URL/IP Address for the TFTP/HTTP/HTTPS/FTP/FTPS server and selecting a download method. Configure a valid URL for TFTP, HTTP, HTTPS, FTP, or FTPS; the server name can be FQDN or IP address.
Examples of valid URLs:
fw.mycompany.com
Upgrade and Provisioning Configuration
There are two ways to set up upgrades and provisioning on WP8x6. They are the Keypad Menu and Web GUI.
Configure via keypad Menu
- In handset Settings, select Advanced Settings → System Update.
- From here, you will have two options, either to detect if a new firmware is available by choosing the “detection upgrade” option or roll back to the previous firmware version by clicking “Switching version”
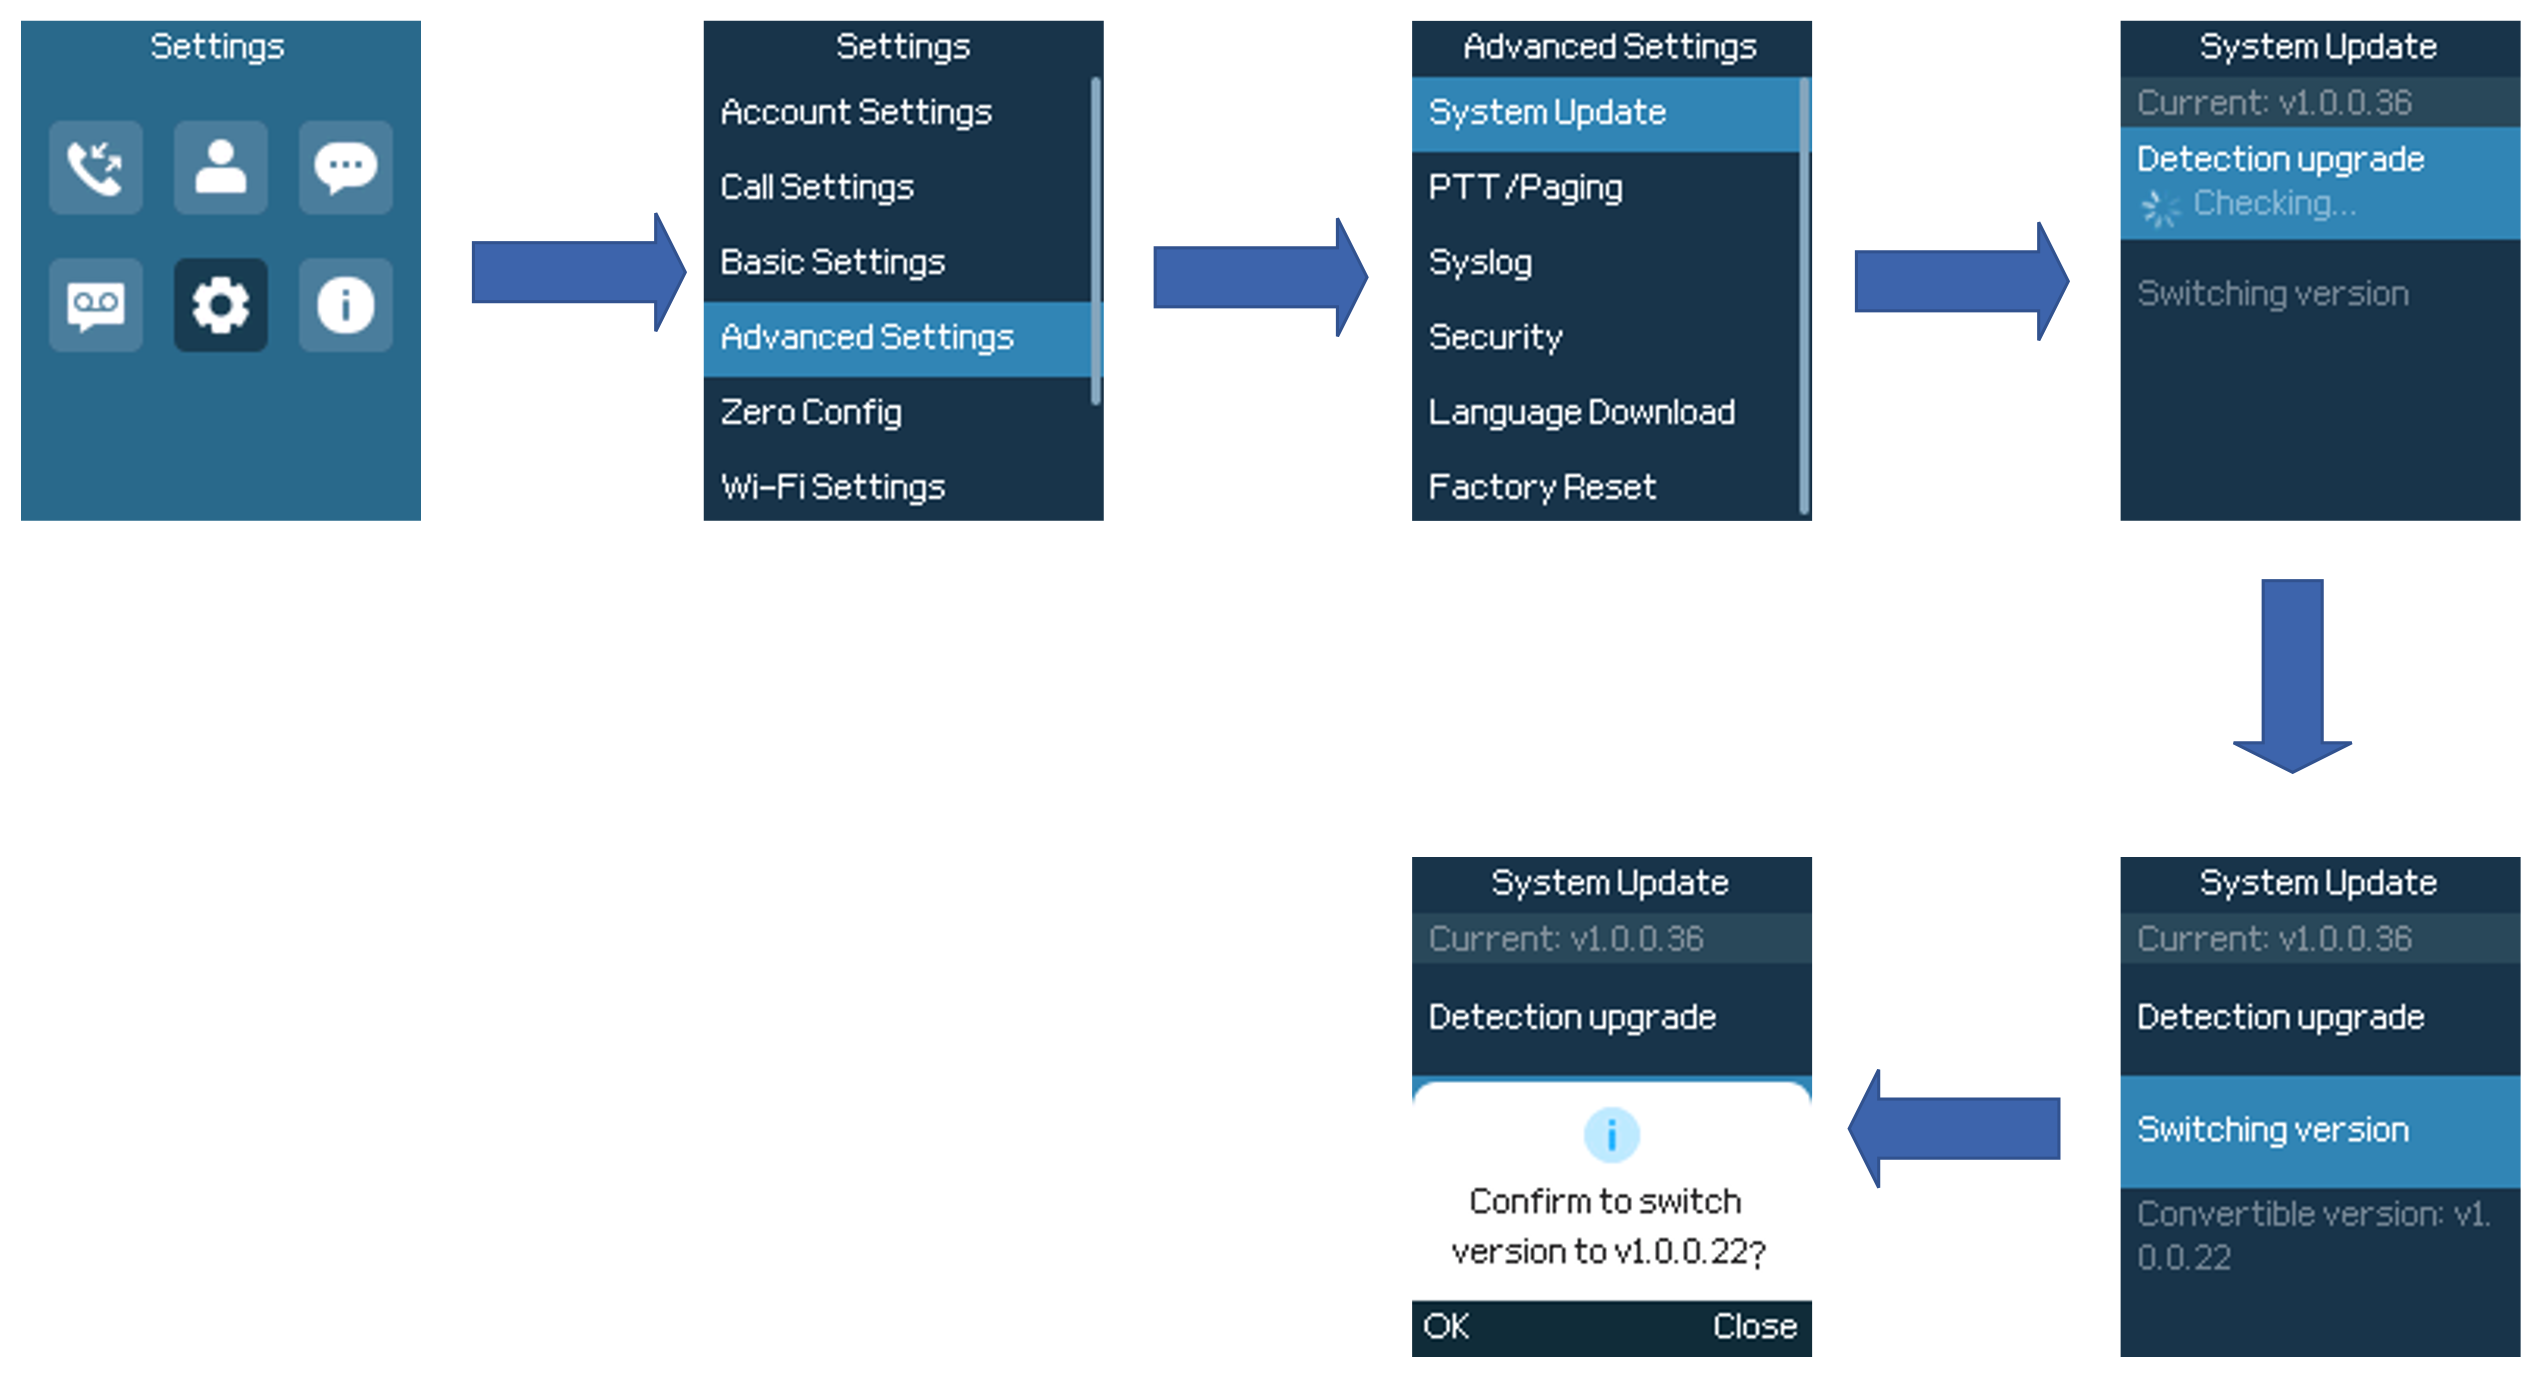
Configure via Web GUI
Open a web browser on a PC and enter the IP address for the handset. Then login with the administrator username and password. Go to Maintenance → Upgrade and Provisioning → Firmware.
On the Upgrade web page, enter the IP address or the FQDN for the upgrade server and choose to upgrade via TFTP, HTTP, HTTPS, FTP, or FTPS (The default setting is HTTP). Save and apply the changes, press the Save and apply button then reboot the phone to initiate the firmware upgrade process.
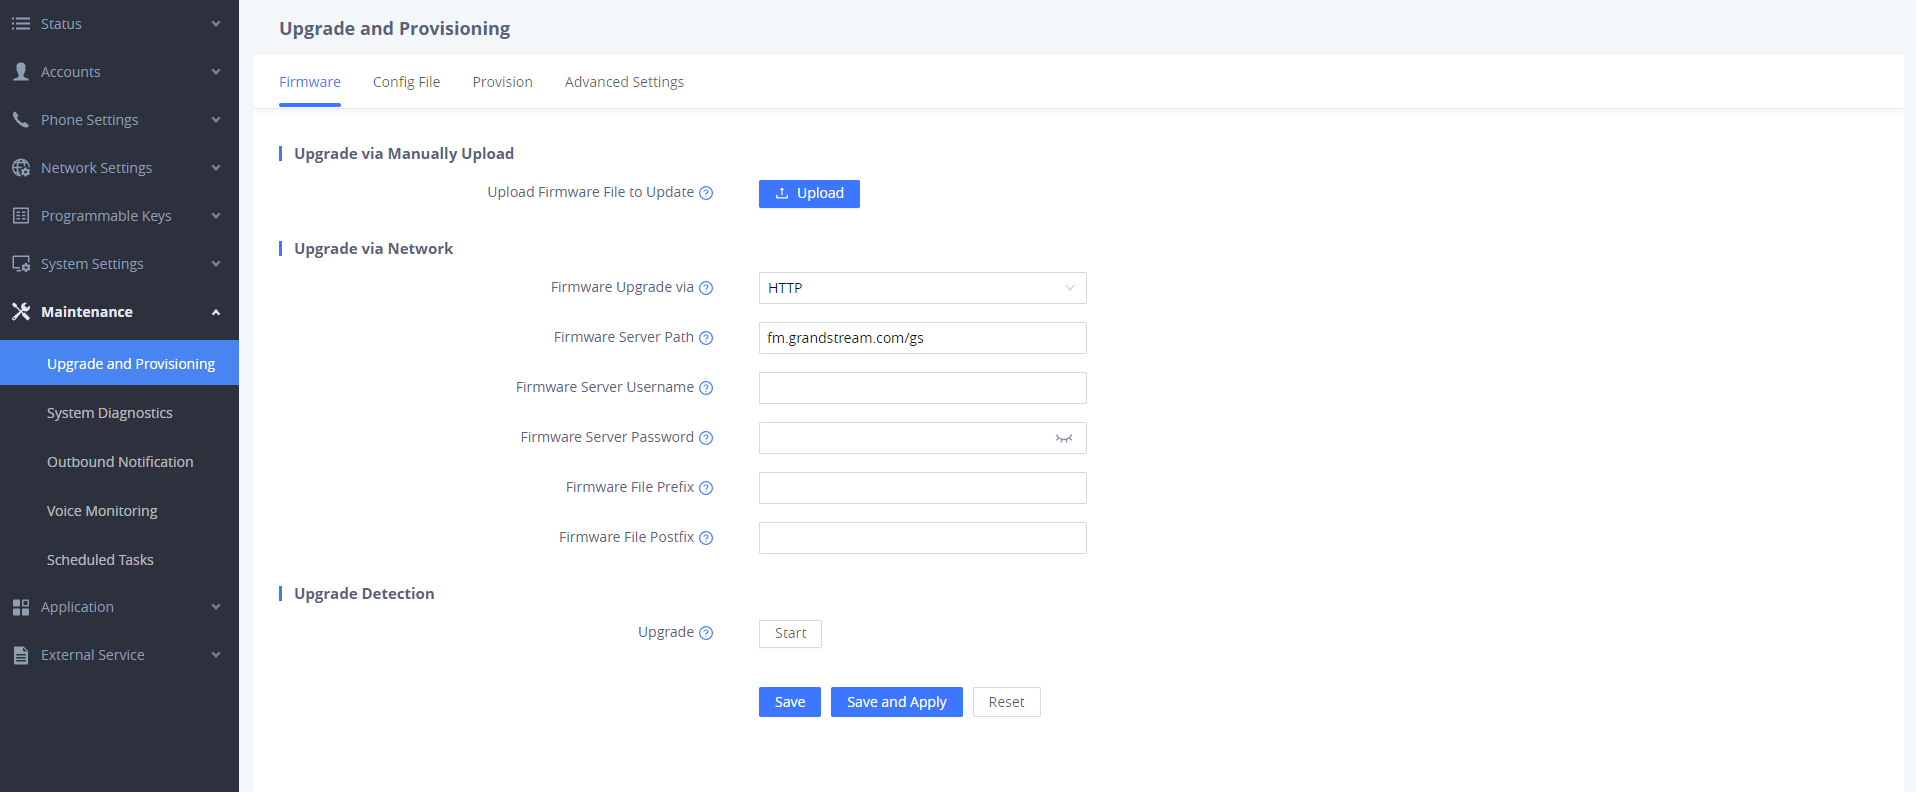
Upload Firmware Locally
If there is no HTTP(S)/TFTP/FTP(S) server, users could also upload the firmware to the device directly via Web GUI. Please follow the steps below to upload the firmware locally.
- Download the latest firmware file from the following link and save it on your PC.
https://www.grandstream.com/support/firmware
- Log in to the Web GUI as an administrator on the PC.
- Go to Web GUI Maintenance → Upgrade and Provisioning → Firmware.
- Click the “Start” button under “Upgrade Firmware”, and a window will be prompted to select the firmware file to upload.
- Select the firmware file from your PC. Then uploading progress will show on the window.
- When uploading is done, users can see the upgrading process starts on the device LCD.
- The phone will reboot again with the new firmware version upgraded.
No Local Firmware Servers
Service providers should maintain their firmware upgrade servers. For users who do not have a TFTP/HTTP/HTTPS/FTP/FTPS server, some free Windows version TFTP servers are available for download from:
https://www.solarwinds.com/free-tools/free-tftp-server and https://www.tftpd64.com/.
Please check our website at https://www.grandstream.com/support/firmware for the latest firmware.
Instructions for local firmware upgrade via TFTP:
- Unzip the firmware files and put all of them in the root directory of the TFTP server.
- Connect the PC running the TFTP server and the device to the same LAN segment.
- Launch the TFTP server and go to the File Menu → Configure →Security to change the TFTP server’s default setting from “Receive Only” to “Transmit Only” for the firmware upgrade.
- Start the TFTP server and configure the TFTP server in the phone’s web configuration interface.
- Configure the Firmware Server Path on your device to the IP address of the PC.
- Update the changes and reboot the device.
End users can also choose to download a free HTTP server from https://httpd.apache.org/ or use a Microsoft IIS web server.
Provisioning and Configuration File Download
Grandstream SIP Devices can be configured via the Web Interface as well as via a Configuration File (binary or XML) through TFTP or HTTP/HTTPS FTP/FTPS. The “Config Server Path” is the TFTP, HTTP or HTTPS, FTP, or FTPS server path for the configuration file. It needs to be set to a valid URL, either in FQDN or IP address format. The “Config Server Path” can be the same or different from the “Firmware Server Path”.
A configuration parameter is associated with each particular field in the web configuration page. A parameter consists of a Capital letter P and 1 to 5 (could be extended to more in the future) digit numeric numbers. i.e., P2 is associated with the “Admin Password” in the Web GUI Maintenance → Web Access page. For a detailed parameter list, please refer to the corresponding firmware release configuration template in the following link:
https://www.grandstream.com/support/tools
When the handset boots up, it will issue a TFTP, HTTP(S), or FTP(S) request to download a configuration XML file named “cfgxxxxxxxxxxxx” followed by “cfgxxxxxxxxxxxx.xml”, where “xxxxxxxxxxxx” is the MAC address of the phone, i.e., “cfg000b820102ab” and “cfg000b820102ab.xml”. If downloading “cfgxxxxxxxxxxxx.xml” file is not successful, the provision program will download a generic cfg.xml file. The configuration file name should be in lowercase letters.
For more details on XML provisioning, please refer to the following document:
https://documentation.grandstream.com/knowledge-base/sip-device-provisioning-guide/
REBOOT
Reboot through Device keys
To reboot the WP8x6 using the device’s touch keys, on idle mode, long press the “offhook” key, until the below menu is displayed, then select the reboot option
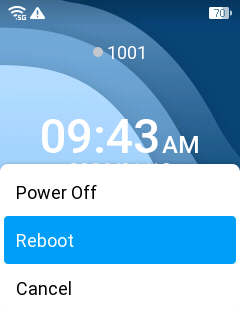
Reboot via SIP NOTIFY
The device supports controlled reboot behavior upon receiving a SIP NOTIFY message with the header:
Event: Check-SyncThis mechanism allows service providers or SIP servers to remotely trigger a reboot for each individual SIP account, enabling account-level management and provisioning synchronization without manual intervention.
When this feature is enabled, the device listens for valid Check-Sync NOTIFY events associated with the configured SIP account and performs a reboot accordingly.
FACTORY RESET
Restore to Factory Default via LCD Menu
There are two methods to restore the device to the factory default settings.
- On the handset idle screen, go to Settings → Advanced Settings → Factory reset.
- In the new window, confirm the reset using the left softkey.
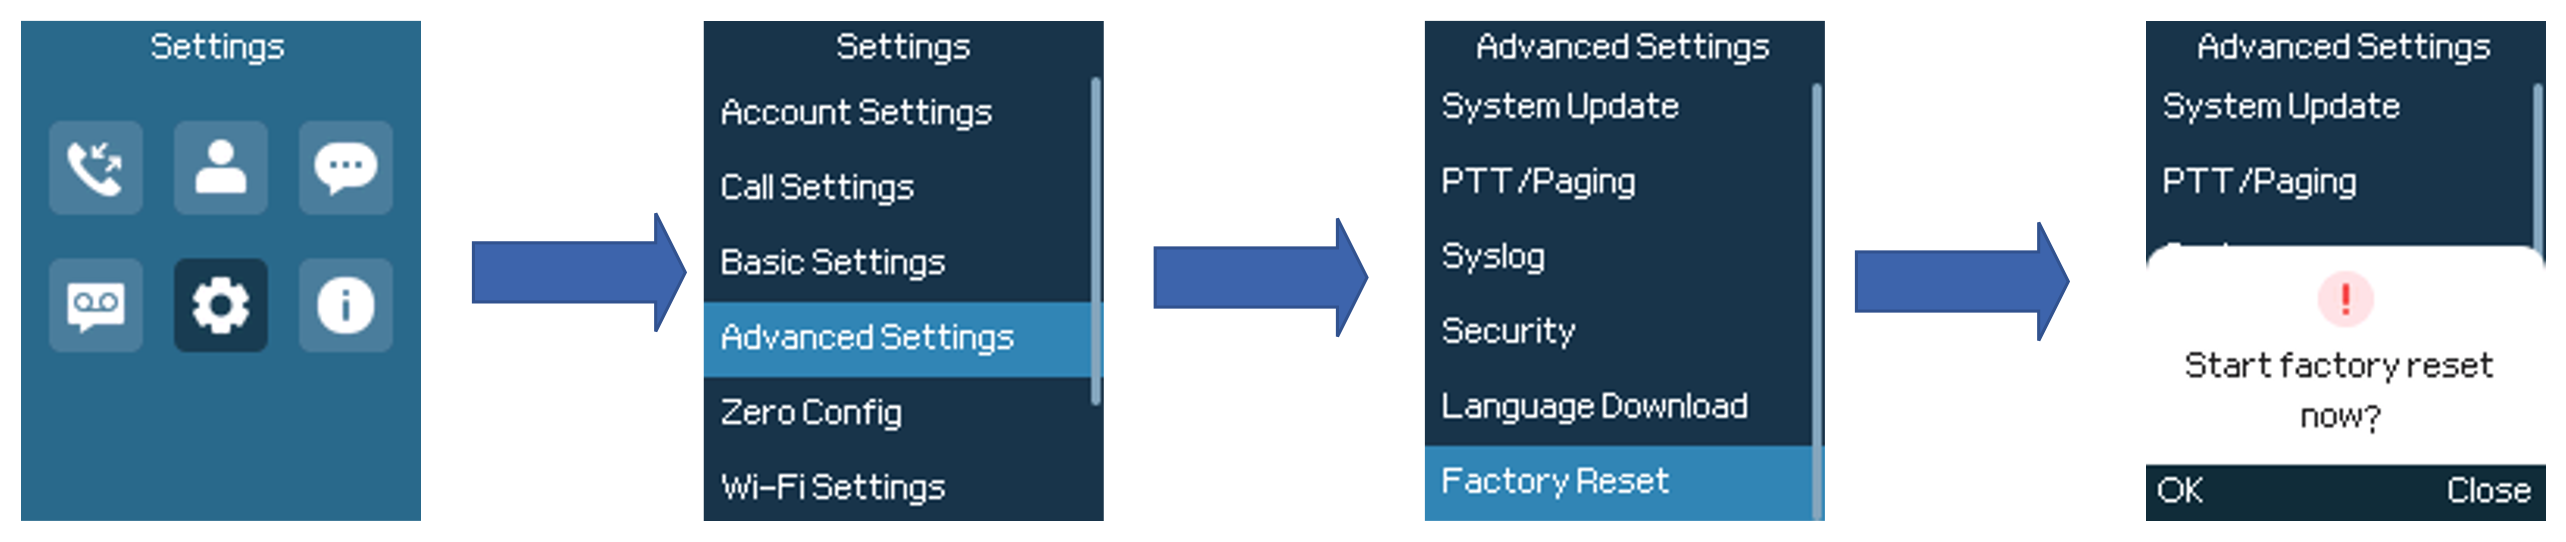
3. Once confirming the factory reset, the device will reboot with the default factory settings.
Restore to Factory Default via the Web GUI
- Log in to Web GUI and go to Maintenance → Upgrade and Provisioning → Advanced Settings.
- Click on the Start button in front of the field “Factory Reset” to perform a Factory reset.
3. A dialog box will pop up to confirm the factory reset.
4. Click OK to restore the phone to factory settings.
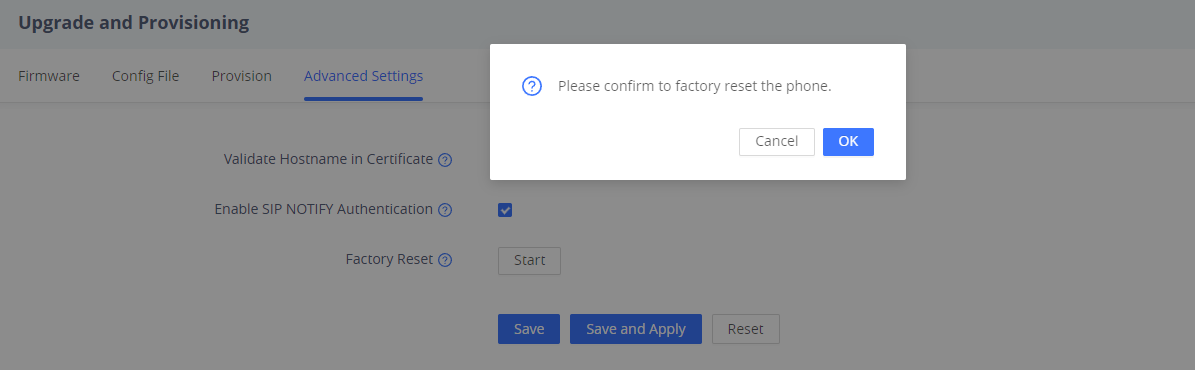
CHANGE LOG
This section documents significant changes from previous firmware versions. Only major new features or major document updates are listed here. Minor updates for corrections or editing are not documented here.
Firmware Version 1.0.3.35
- No major changes.
Firmware Version 1.0.3.31
- Added Support to enable or disable trusting CA certificates. [ENABLE TRUST CA CERTIFICATE]
Firmware Version 1.0.3.29
- No major changes.
Firmware Version 1.0.3.25
- Added Support for CA Certificate Type. [CA CERTIFICATE TYPE]
Firmware Version 1.0.3.24
- Added Support of Phone Ready Indicator [ENABLE PHONE READY INDICATOR]
- Added support for up to 10 phone numbers per contact, with multiple entries allowed per category. [Contacts]
- Added Support of vCard Phonebook. [VCARD PHONEBOOK]
Firmware Version 1.0.3.20
- Added support for Calendar app. [Calendar]
- Added support to control reboot when receiving SIP NOTIFY with “Event: Check-Sync” header for each SIP account. [Reboot via SIP NOTIFY]
- Added support to set the alarm clock and timer in the device LCD menu. [Alarm Clock] [Timer]
- Added support to configure WP8x6 phone as a WireGuard Client. [WireGuard Client Configuration]
- Added support for ICE Configuration. [ICE Configuration]
- Added support to analyze Wi-Fi Status from device LCD menu. [Wi-Fi Analyze]
- Added support to send voice messages from device LCD menu. [Send a Voice Message]
Firmware Version 1.0.1.88
- No major changes.
Firmware Version 1.0.1.87
- Added Support of Silent Charging. [Silent Charging]
- Added Support to lock the screen during a call. [Lock Screen]
- Added Support to configure IM Designated Account. [IM Designated Account]
Firmware Version 1.0.1.85
- Added Support to display more information to the INFO navigation key shortcut. [General Info]
Firmware Version 1.0.1.80
- No major changes
Firmware Version 1.0.1.79
- Increased the contacts group max limit to 50 groups. [Group]
- Added support to configure Wi-Fi Roaming Mode. [Roaming Mode]
- Added support for Roaming Prompt. [Roaming Prompt]
- Added support to have LCD backlight always on under certain situations. [LCD Backlight Always On Scene]
Firmware Version 1.0.1.71
- No major changes.
Firmware Version 1.0.1.63
- No major changes.
Firmware Version 1.0.1.61
- Added support to display call forward destination number on the LCD home screen. [Call Forward][Icons Description]
- Added Support of case sensitive search in Contacts. [Contacts]
- Added Support to display time during active call. [Call Duration]
- Added Support to display battery percentage on the LCD. [Battery Percentage]
- Added Support to remain LCD backlight at a very low brightness when charging. [Dim Always]
Firmware Version 1.0.1.52
- No major changes.
Firmware Version 1.0.1.44
(This is the initial version for WP836).
- Added Support to dial numbers when a missed call notification is displayed on the LCD screen. [Missed Call Notification]
- Updated the terms “Blacklist/Whitelist” to “Blocklist/Allowlist” on LCD Menu. [Block List]
- Added Support to change ringtone for Direct IP call. [Direct IP Call]
- Added support for Alarm Settings. [Alarm Settings]
- Added support for AI Noise Reduction. [Smart Noise Cancellation][Icons Description]
Firmware Version 1.0.1.30
- Added Support to disable voicemail pop-up. [Enable Voicemail Popup]
Firmware Version 1.0.1.18
- No major changes.
Firmware Version 1.0.1.14
- No major changes.
Firmware Version 1.0.1.9
- This is the initial version for WP816/WP826.